What's the Difference: Snatch vs Hang Snatch vs Power Snatch | FAST & EASY
/Snatch, hang snatch, power snatch, hang power snatch . . . all in less than 3 minutes! What are the differences between these lifts, and how can we easily remember each one?
At Testify, we offer small group training, private coaching (in-person or remotely via Zoom), online coaching, and form checks. Click the button below to get quality coaching from a Starting Strength Coach and start getting stronger TODAY.
Easy Setup for Deadlift, Snatch, & Clean
/
Whether you’re deadlifting, cleaning, or snatching, we’d like a setup process that is as simple, efficient, and consistent as possible. With that in mind, we’re going to take the 5-step deadlift setup process and quickly learn how to apply it - with very minor modifications - to the clean and the snatch.
DEADLIFT SETUP
Let’s briefly recap the 5-step deadlift process, and for a more detailed treatment, you can watch the included video.
Step 1: Stance
The stance is narrow (heels about hip width apart), your shins are one inch from the bar, which places the bar over the middle of your foot, and your toes are pointed out slightly (roughly 10-15 degrees).
Step 2: Grip
Bend over and take your grip on the bar. Your grip is relatively narrow - just outside the legs. Don’t let your shins touch the bar during this step, and DO NOT move the bar (i.e., don’t let the bar roll forward or backward at all).

tyler demonstrates the deadlift start position and is ready to pull.
Step 3: Shins
Bend your knees slightly until your shins touch the bar (this means your hips should drop, but only a bit). Also, shove your knees out slightly - your knees should touch the insides of your arms. Again, do not move the bar.
Step 4: Chest
Squeeze your chest up to set your back in rigid, flat extension. Your hips DO NOT drop during this step, and you still DO NOT move the bar.
Step 5: Pull
Pushing the floor away from you with your legs, drag the bar up your legs until you’ve locked out the bar at the top of the lift.
CLEAN SETUP
Moving on to the clean, there are two small changes. Step 1 (stance) is the same, and we then encounter the first change in Step 2 (grip): your grip for the clean is one hand-width wider than it was for the deadlift.

maddie demonstrates the start position for the clean.
Step 3 (shins) brings about the other small change. You still bring your shins to the bar by bending your knees slightly, but since your grip is a bit wider, you also shove your knees out a little more than you did in the deadlift so that the knees still touch the insides of your arms.
After this, you then move on to Step 4 (chest) and Step 5 (pull).
SNATCH SETUP
Moving on to the snatch, we have three changes. The first change shows up right away in Step 1 (stance): point your toes out wider than they were in the deadlift and clean - roughly 30 degrees (you’ll see the reason for this shortly).
The second change arrives in Step 2 (grip): your grip is significantly wider than it was in the deadlift or the clean. It should be wide enough that the bar hangs at the crease of your hips when you are holding the bar with straight arms in a completely upright (i.e., standing) position.

becky demonstrates the start position for the snatch.
The third and final change shows up in Step 3 (shins): once again, you still bend your knees to bring your shins to the bar, but since your grip is significantly wider than that of the deadlift or clean, you also shove your knees out significantly wider than you did with the other two lifts. This very noticeable “knees out” position is why you point your toes out quite a bit in Step 1 of the snatch setup.
After Step 3, you then move on to Step 4 (chest) and Step 5 (pull).
SUMMARY
To recap, the 5 steps are always as follows: stance, grip, shins, chest, and pull. However, the execution of certain steps changes due to the grip width of the clean and the snatch.
As always, we hope this helps you get stronger and live better.
If you found this helpful, you’ll love our weekly email. It’s got useful videos, articles, and training tips just like the one in this article. Sign up below, and of course, if you don’t love it, you can unsubscribe at any time.
At Testify, we offer small group training, private coaching (in-person or remotely via Zoom), online coaching, and form checks. Would you like to get quality coaching from a Starting Strength Coach?
The Snatch: Landing Positions
/
Joy performs a power snatch.
(This article is a Blast from the Past article originally posted on 05/21/21.)
There are three landing positions for the snatch, and each has its own advantages. Let’s briefly cover them here:
POWER SNATCH
Landing Position: Partial squat (i.e., partial-depth overhead squat)
Advantage: The power snatch is the simplest to learn as your feet do not travel far from their original pulling position. It also doesn’t require learning how to perform the overhead squat as in the . . .

Joy performs a snatch.
SNATCH (AKA full snatch or squat snatch)
Landing Position: Overhead squat (i.e., full-depth overhead squat)
Advantage: Of the three landing positions, the full snatch allows lifters to lift the heaviest weights as this lower receiving position means the bar doesn’t have to be lifted as high before catching it.

Joy performs a split snatch.
SPLIT SNATCH
Landing Position: Split stance - nearly identical to the split jerk stance, but the split is usually even longer and deeper.
Advantage: The split snatch allows the lifter to drop further under the bar than the power snatch without requiring the ability to drop into an overhead squat position as in the full snatch. For this reason, the split snatch - although potentially useful at all ages - is especially well-suited to older lifters.
You’ll notice that the word “hang” - as in hang snatch or hang power snatch or hang split snatch - is conspicuously absent in this discussion. This is because “hang” refers to a starting position, not a landing position. If “hang” is added as a prefix, then the lift simply starts with the bar hanging in the hands (usually at about mid-thigh height) as opposed to starting with the bar resting on the floor.
If you found this helpful, you’ll love our weekly email. It’s got useful videos, articles, and training tips just like the one in this article. Sign up below, and of course, if you don’t love it, you can unsubscribe at any time.
At Testify, we offer small group training, private coaching (in-person or remotely via Zoom), online coaching, and form checks. Click the button below to get quality coaching from a Starting Strength Coach and start getting stronger TODAY.
This Mistake Will RUIN All Your Lifts!
/Want to improve every one of your lifts with one fix? Make sure you're doing this.
At Testify, we offer small group training, private coaching (in-person or remotely via Zoom), online coaching, and form checks. Click the button below to get quality coaching from a Starting Strength Coach and start getting stronger TODAY.
The Snatch & Clean: Stay Over the Bar!
/
DON’T CLEAN LIKE THIS DOOFUS.
When learning to snatch and clean (sometimes even after we’ve learned!), a common error is that of pulling the barbell around the knees or - equivalently - making the back angle become more vertical too soon.
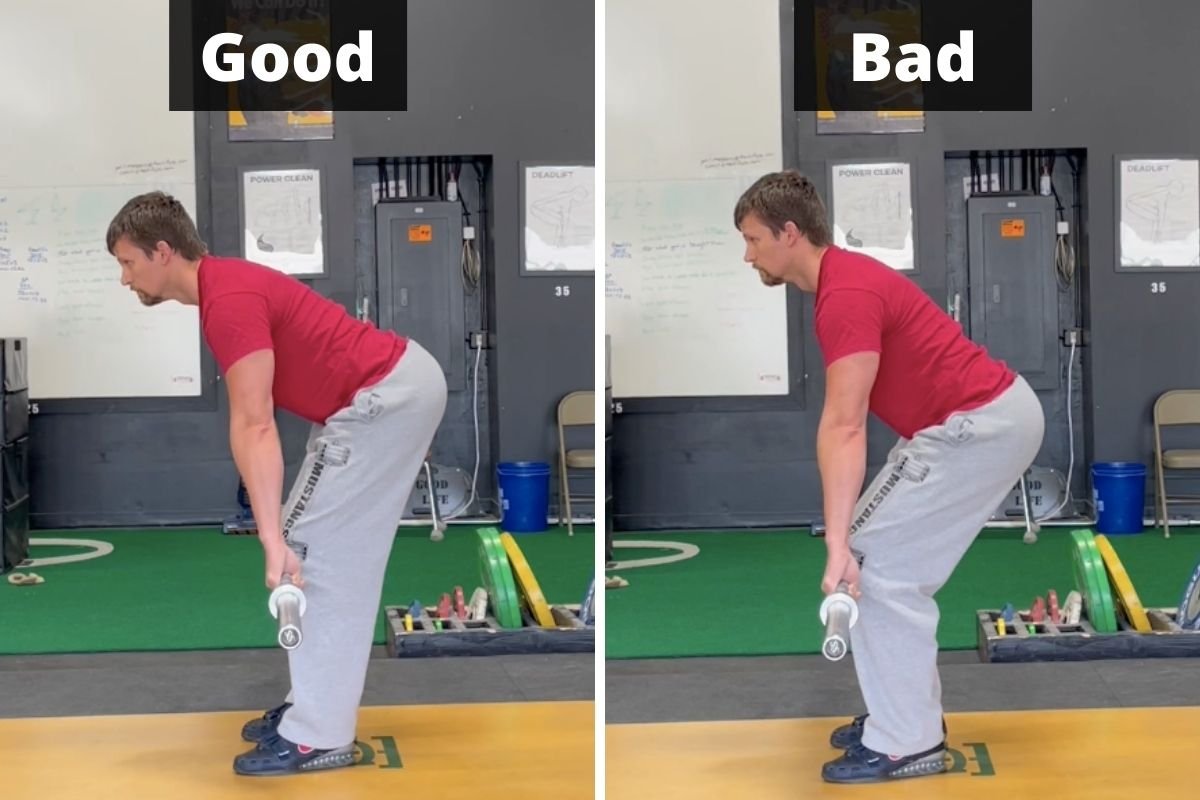
To fix this - cue yourself to “stay over the bar.” In other words, you need to keep your back relatively horizontal for longer than you think - in fact, roughly until after it passes your knees. Of course, the bar travels upward before this point, but it does so because of knee extension, i.e., you should be pushing the floor away from you like a leg press.

Here’s a mental picture: It’s raining, and you’ve decided to lift outside (not a good decision, mind you, but it’s too late now). Staying over the bar means that, from the start of the pull (i.e., your setup position) until just after it passes your knees, you want to stay leaned over so that your shoulders and upper back are keeping the middle of the bar from getting rained on (your shoulders will actually be slightly in front of the bar). If you raise your torso too soon, the bar gets wet, and that’s no good.
Eventually, your back angle will become more vertical as you reach what we call in the teaching progression the “jumping position,” but during the first part of the lift, stay over the bar. You’ll have a more vertical bar path (which means the bar doesn’t have to travel as far), and you’ll be able to accelerate the bar better as well.
We hope this helps you get stronger and live better!
(Some links may be affiliate links. As an Amazon Associate, Testify earns from qualifying purchases.)