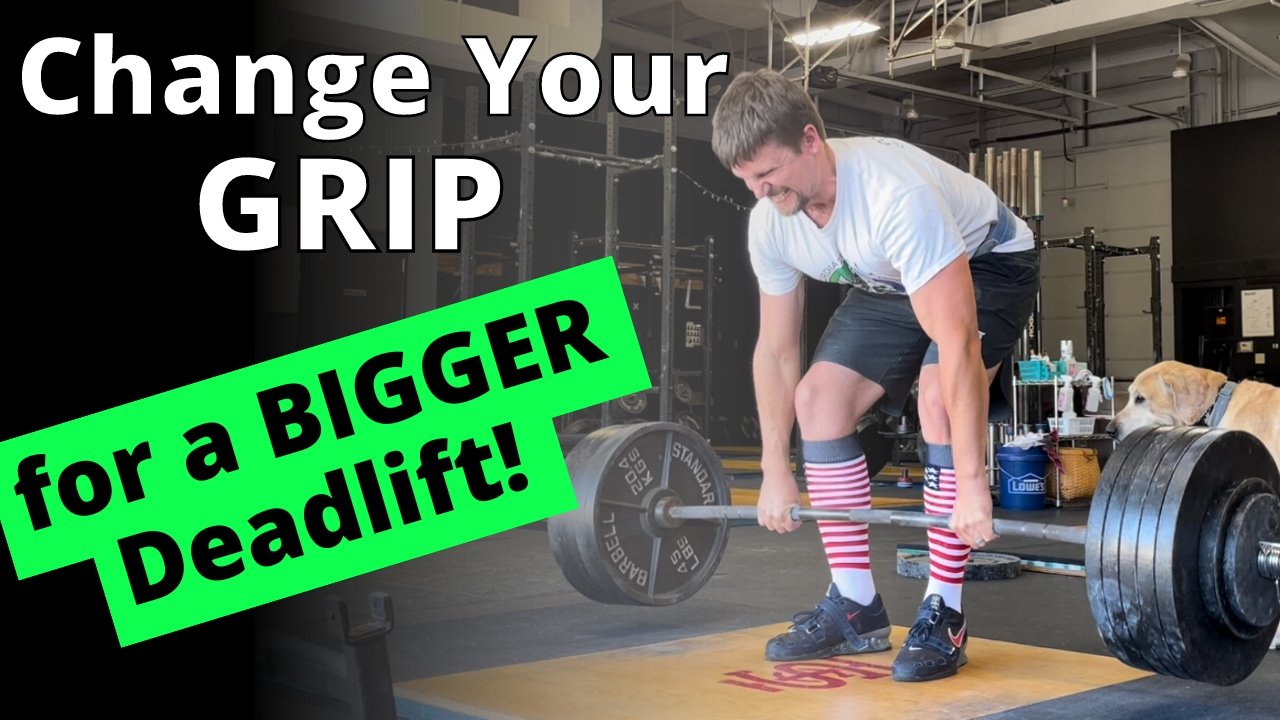
Easy Setup for Deadlift, Snatch, & Clean

(A Blast from the Past article originally posted on 07/28/23)

Whether you’re deadlifting, cleaning, or snatching, we’d like a setup process that is as simple, efficient, and consistent as possible. With that in mind, we’re going to take the 5-step deadlift setup process and quickly learn how to apply it - with very minor modifications - to the clean and the snatch.

DEADLIFT SETUP
Let’s briefly recap the 5-step deadlift process, and for a more detailed treatment, you can watch the included video.

Step 1: Stance
The stance is narrow (heels about hip width apart), your shins are one inch from the barbell, which places the bar over the middle of your foot, and your toes are pointed out slightly (roughly 10-15 degrees).

Step 2: Grip
Bend over and take your grip on the barbell. Your grip is relatively narrow - just outside the legs. Don’t let your shins touch the bar during this step, and DO NOT move the bar (i.e., don’t let the bar roll forward or backward at all).

tyler demonstrates the deadlift start position and is ready to pull.

Step 3: Shins
Bend your knees slightly until your shins touch the bar (this means your hips should drop, but only a bit). Also, shove your knees out slightly - your knees should touch the insides of your arms. Again, do not move the bar.

Step 4: Chest
Squeeze your chest up to set your back in rigid, flat extension. Your hips DO NOT drop during this step, and you still DO NOT move the bar.

Step 5: Pull
Pushing the floor away from you with your legs, drag the bar up your legs until you’ve locked out the bar at the top of the lift.

CLEAN SETUP
Moving on to the clean, there are two small changes. Step 1 (stance) is the same, and we then encounter the first change in Step 2 (grip): your grip for the clean is one hand-width wider than it was for the deadlift.

maddie demonstrates the start position for the clean.

Step 3 (shins) brings about the other small change. You still bring your shins to the bar by bending your knees slightly, but since your grip is a bit wider, you also shove your knees out a little more than you did in the deadlift so that the knees still touch the insides of your arms.

After this, you then move on to Step 4 (chest) and Step 5 (pull).

SNATCH SETUP
Moving on to the snatch, we have three changes. The first change shows up right away in Step 1 (stance): point your toes out wider than they were in the deadlift and clean - roughly 30 degrees (you’ll see the reason for this shortly).

The second change arrives in Step 2 (grip): your grip is significantly wider than it was in the deadlift or the clean. It should be wide enough that the barbell hangs at the crease of your hips when you are holding the bar with straight arms in a completely upright (i.e., standing) position.

becky demonstrates the start position for the snatch.

The third and final change shows up in Step 3 (shins): once again, you still bend your knees to bring your shins to the bar, but since your grip is significantly wider than that of the deadlift or clean, you also shove your knees out significantly wider than you did with the other two lifts. This very noticeable “knees out” position is why you point your toes out quite a bit in Step 1 of the snatch setup.

After Step 3, you then move on to Step 4 (chest) and Step 5 (pull).

SUMMARY
To recap, the 5 steps are always as follows: stance, grip, shins, chest, and pull. However, the execution of certain steps changes due to the grip width of the clean and the snatch.

As always, we hope this helps you get stronger and live better.

-Phil

PS: Whenever you want even more Testify in your life, here are some free resources:

  • Book a free intro and strategy session with us HERE.

  • Pick up a free copy of Testify’s Squat Guide: 12 Tips to Improve Your Squat Now HERE.

  • Get our free weekly email - containing useful videos, articles, and training tips - HERE.

  • Follow Testify on Instagram HERE.

  • Subscribe to Testify’s YouTube channel HERE.

(Some links may be affiliate links. As an Amazon Associate, Testify earns from qualifying purchases.)


At Testify, we offer small group training, private coaching (in-person or remotely via Zoom), online coaching, and form checks. Interested in getting stronger, looking better, and having more energy?

book a free intro

Power Clean vs Split Clean vs Squat Clean: Which One is Best?

(A Blast from the Past article originally posted on 06/04/21)

A couple of weeks ago, we covered the three landing positions for the snatch. There are also three landing positions for the clean, and as with the snatch landing positions, each has its own advantages. Let’s briefly cover them here:

POWER CLEAN

Landing Position: Partial squat (i.e., partial-depth front squat)

Maddie performs a power clean.

Maddie performs a power clean.

Advantage: The power clean is the simplest to learn as your feet do not travel far from their original pulling position. It also doesn’t require learning how to perform a front squat as in the . . .

CLEAN (AKA full clean or squat clean)

Landing Position: Front squat (i.e., full-depth front squat)

Advantage: Of the three landing positions, the full clean allows lifters to lift the heaviest weights as this lower receiving position means the barbell doesn’t have to be lifted as high before racking it on the shoulders.

Maddie performs a clean.

Maddie performs a clean.

SPLIT CLEAN

Landing Position: Split stance - nearly identical to the split jerk stance, but the split is often even longer and deeper.

Advantage: The split clean allows the lifter to drop further under the bar than the power clean without requiring the ability to drop into an front squat position as in the full clean. For this reason, the split clean  - although potentially useful at all ages - is especially well-suited to older lifters.

Maddie performs a split clean.

Maddie performs a split clean.

You’ll notice that the word “hang” - as in hang clean or hang power clean or hang split clean - is conspicuously absent in this discussion. This is because “hang” refers to a starting position, not a landing position.

If “hang” is added as a prefix, then the lift simply starts with the bar hanging in the hands (usually at about mid-thigh height) as opposed to starting with the bar resting on the floor.

As always, we hope this helps you get stronger and live better.

-Phil

PS: Whenever you want even more Testify in your life, here are some free resources:

  • Book a free intro and strategy session with us HERE.

  • Pick up a free copy of Testify’s Squat Guide: 12 Tips to Improve Your Squat Now HERE.

  • Get our free weekly email - containing useful videos, articles, and training tips - HERE.

  • Follow Testify on Instagram HERE.

  • Subscribe to Testify’s YouTube channel HERE.

(Some links may be affiliate links. As an Amazon Associate, Testify earns from qualifying purchases.)


At Testify, we offer small group training, private coaching (in-person or remotely via Zoom), online coaching, and form checks. Interested in getting stronger, looking better, and having more energy?

book a free intro

What is a Clean (AKA Squat Clean or Full Clean)? | Olympic Weightlifting Technique

What is a clean? How is it different from a power clean or hang clean? What is a squat clean? What is a full clean? Starting Strength Coach Phil Meggers covers it all here in about a minute.

(A Blast from the Past video originally published on 02/04/23)

Whenever you want even more Testify in your life, here are some free resources:

  • Book a free intro and strategy session with us HERE.

  • Pick up a free copy of Testify’s Squat Guide: 12 Tips to Improve Your Squat Now HERE.

  • Get our free weekly email - containing useful videos, articles, and training tips - HERE.

  • Follow Testify on Instagram HERE.

  • Subscribe to Testify’s YouTube channel HERE.


At Testify, we offer small group training, private coaching (in-person or remotely via Zoom), online coaching, and form checks. Interested in getting stronger, looking better, and having more energy?

book a free intro

Slippery Lifting Platform?! Use THIS for Olympic Weightlifting & Strength Training

Do you have a slippery lifting surface? A slick platform can cause a lot of problems, whether you're snatching, clean-and-jerking, squatting, etc., so Starting Strength Coach Phil Meggers lets you in on a very simple (and rarely discussed!) method to make sure you've got good grip between your shoes and the platform.

(A Blast from the Past video originally published on 12/12/22)

Whenever you want even more Testify in your life, here are some free resources:

  • Book a free intro and strategy session with us HERE.

  • Pick up a free copy of Testify’s Squat Guide: 12 Tips to Improve Your Squat Now HERE.

  • Get our free weekly email - containing useful videos, articles, and training tips - HERE.

  • Follow Testify on Instagram HERE.

  • Subscribe to Testify’s YouTube channel HERE.


At Testify, we offer small group training, private coaching (in-person or remotely via Zoom), online coaching, and form checks. Interested in getting stronger, looking better, and having more energy?

book a free intro

You've Been Unloading Your Barbell Wrong This Whole Time (plus bonus tip)

You’re done lifting - you’ve finished your deadlifts, snatches, cleans, rows, whatever was on the docket for the day - you’ve got a bunch of bumper plates on the barbell, and you’ve got to unload them.

It’s a bit of a pain, of course, and you don’t want to work any harder than you have to, so let’s cover how to make your life easier when unloading your bar (and read to the end for a bonus tip).

You can also watch the video below to see these steps in action.

Step 1: Get all the metal plates or “change plates” off the bar.
Take care of the smaller plates first. If it’s not a full-sized plate (i.e., a bumper plate or a metal 45 lb plate), it’s easy to slide off since it’s not sitting on the floor, so get these plates off first.

Step 2: Outer Plates Off
Move to one side of the bar and roll the innermost plate up onto a small, change plate (a 2.5 lb plate works well). Doing this raises that entire side of the barbell up just enough that you can easily slide off any other plates on that side of the bar (Figure 1).

Figure 1

Step 3: Inner Plate Off
On the same side of the bar, you now have one remaining plate (i.e., the plate that you rolled up onto the 2.5 lb plate in Step 2). This is the only plate that requires a little work to remove. You can pick up the bar with one hand and slide the plate off with the other hand (Figure 2), or your can move to the outside of the barbell and use both hands to pull that last plate toward you.

figure 2

Note: Don’t let that end of the barbell simply drop jarringly to the floor when that last plate comes off. Be kind to your barbell.

Step 4: The Best Part
Grab the empty end of the barbell, walk it up (Figure 3) until the barbell is completely vertical, and then simply pick up the barbell as it slides up and out of the stack of plates now resting on the floor. At this point, you can store your barbell and then easily put away that stack of plates.

figure 3

Bonus Tip:
When getting your barbell out (or when putting it away), if you’d like to conserve some energy, don’t carry it in your hands. Pick it up, place it on one shoulder (one end will counterweight the other end, so this is a pretty easy process), and then carry it over to your squat rack.

figure 4

Since the bar is already on your shoulder, it’s at roughly the same height as your j-hooks (if you’re set up to squat or press), which means you can lean against the squat rack to make sure the barbell is against the uprights (Figure 4) and then just dip slightly until the bar is resting in the hooks.

Note: If there are other people around, make sure you don’t clock someone in the face when carrying it at this height.

As always, we hope this helps you get stronger and live better.

-Phil

PS: Whenever you want even more Testify in your life, here are some free resources:

  • Book a free intro and strategy session with us HERE.

  • Pick up a free copy of Testify’s Squat Guide: 12 Tips to Improve Your Squat Now HERE.

  • Get our free weekly email - containing useful videos, articles, and training tips - HERE.

  • Follow Testify on Instagram HERE.

  • Subscribe to Testify’s YouTube channel HERE.

(Some links may be affiliate links. As an Amazon Associate, Testify earns from qualifying purchases.)


At Testify, we offer small group training, private coaching (in-person or remotely via Zoom), online coaching, and form checks. Interested in getting stronger, looking better, and having more energy?

book a free intro

"Go Home, Get Weak, and Die" | Why Your Doctor is Wrong about Lifting Weights

“Sally” is one of our members and has been training with us for a number of years. Sally is 70 years old, she’s a grandmother several times over, and to be frank, Sally is fairly awesome. (Please don’t tell her that - she’ll be unbearable.) Over the years, she’s gotten quite strong - she regularly squats 200 lb, she’s deadlifted 300 lb, and she continues to train hard in the weight room.

Sally also goes to her primary physician every year for her checkup, and the topic of her strength training inevitably comes up. Sally knows the conversation is coming, she tells her doc about what she does - squatting, pressing, deadlifting, benching, etc. - and her doc always has the same response, which is something along the lines of “Why are you doing this? What are you trying to prove?”

This type of response drives me fairly nuts because what this doctor is really telling Sally - in no uncertain terms - is “Sally, just go home, get weaker, and die.” Of course, he’s not saying this out loud, and he doesn’t mean to tell Sally this, but it’s the message he’s preaching nonetheless.

Go home, get weaker, and die.

Fortunately, Sally is rather stubborn and doesn’t listen to her doc when he says such things. She returns to the gym, she continues to train, and she keeps striving to get stronger because she understands that strength is independence.

Strength is important at all ages of life, of course, but the older we get, the more important strength becomes. Strength is independence, it’s the ability to play with your kids, it’s the ability to pick up your grandkids, it’s the ability to get up off the toilet by yourself.

If you’re in your 50s, 60s, 70s, 80s, or older (and if you’re not, you know someone dear to you who is) and you strength train, you too may have been told something like what Sally’s been told. It might not be your doc; instead, it might be one of your family members - one of the people that love and care for you. Yet, unfortunately, they say things like, “Why are you doing that? You don’t need to be lifting those heavy weights. Just lift some lighter weights, or maybe don’t lift at all - you don’t need to be doing that kind of thing. What are you trying to prove? Who are you trying to impress?”

Again, and although they don’t mean it, they’re simply saying, “Just go home, get weaker, and die.”

I challenge you - do not listen to them.

You know more about getting stronger than they do. Strength is not their specialty - it’s not their field of expertise, nor have they tried to learn about it like you have.

There are only two options - stronger and weaker. I exhort you to choose the former - get stronger. It’s good for your muscles, it’s good for your bones, it’s good for your tendons and ligaments.

We’re not talking about the sports of powerlifting, weightlifting, strengthlifting, or anything like that. Sure, many of our members have participated in those because they are fun ways to motivate one’s training, but most of our members didn’t start training with that in mind. Sally has done many lifting competitions, but she will be the first to tell you that she never thought she would do something like that when she started training with a light, empty barbell years ago. To this day, competitions are still not the reason she trains (although they do provide some fun and motivation!).

Sally and her friends at Testify train to get stronger. They know that stronger and weaker are the only options. Endeavor to get stronger so you can live better.

-Phil

PS: Whenever you want even more Testify in your life, here are some free resources:

  • Book a free intro and strategy session with us HERE.

  • Pick up a free copy of Testify’s Squat Guide: 12 Tips to Improve Your Squat Now HERE.

  • Get our free weekly email - containing useful videos, articles, and training tips - HERE.

  • Follow Testify on Instagram HERE.

  • Subscribe to Testify’s YouTube channel HERE.

(Some links may be affiliate links. As an Amazon Associate, Testify earns from qualifying purchases.)


At Testify, we offer small group training, private coaching (in-person or remotely via Zoom), online coaching, and form checks. Interested in getting stronger, looking better, and having more energy?

book a free intro