Are You Finishing Your Deadlift Wrong?
/(A Blast from the Past article originally posted on 11/11/22)
A common problem in the deadlift is a misunderstanding of what finishing the lift should look and feel like. This typically results in one of two situations - a lifter who doesn’t completely open the hips and therefore doesn’t actually complete the rep or a lifter who overdoes it and ends up finishing the lift with the back in overextension.
One of these results is insufficient, and the other is unnecessary. Both of them look ridiculous, so we’re going to try and fix this.
To see these errors demonstrated as well as how to correct them, watch the video below.
A finished deadlift (Figure 1) will have the knees fully extended, the hips fully extended, the chest up, and the shoulders back. In other words, the knees will be straight, the hips will be straight, and the shoulders will be behind the barbell. In even simpler terms, the lifter simply stands all the way up.
If you find that you’re not finishing your deadlift, i.e., if your hips don’t open all the way and you look like you’re leaning over the bar like the fool in Figure 2, simply cue yourself to “Stand up” or “Stand up tall.”
If, on the other hand, you find that you’re overdoing the top of the deadlift, i.e., if you’re finishing the lift with your lumber spine in overextension (Figure 3), you can still use the cue “Stand up” (or “stand tall”) or you can also simply tell yourself, “Don’t lean back.”
Fixing either of these problems is not complicated, but you’ve got to be aware that you have the problem in order to fix it, so we recommend that you either have a coach, or if that’s not possible, make sure that you record your lifts so that you can watch them.
As always, we hope this helps you get stronger and live better.
(Some links may be affiliate links. As an Amazon Associate, Testify earns from qualifying purchases.)
If you found this helpful, you’ll love our weekly email. It’s got useful videos, articles, and training tips just like the one in this article. Sign up below, and of course, if you don’t love it, you can unsubscribe at any time.
At Testify, we offer small group training, private coaching (in-person or remotely via Zoom), online coaching, and form checks. Interested in getting stronger, looking better, and having more energy?
What You Should NEVER Do When Deadlifting!
/If you train with barbells, you’ve got to stop making this mistake.
What mistake are we talking about? That of using a compromised grip.
When you train - specifically when you train pulling movements such as the deadlift, row, snatch, clean, chin-up, etc. - your hands are the interface between you and the barbell (this applies to an equal or lesser extent to other lifts such as the squat, bench, etc.). With this in mind, your grip needs to be secure.
The Problem: Grip and the Deadlift
Using the deadlift for the purposes of our discussion, at some point, the deadlift gets heavy enough that your grip becomes the limiting factor unless you choose to do something about it, and you should absolutely do something about it because grip is a silly reason not to strengthen your deadlift.
The Solution: Part 1
First of all, use chalk. Start using chalk on day one of your training journey. If you train at a gym that doesn’t allow chalk, sneak it in anyway, use something like Liquid Chalk, or better yet, find a different gym at which to train. I kid you not - chalk is that important.
Use chalk right from the start. Get some on your hands at the start of your training session (yes, even for the squat), chalk up again when you start warming up the deadlift, and then chalk up one more time when you get to your work set(s) on the deadlift.
However, pretty quickly, the deadlift will get heavy enough that chalk alone won’t be enough. What do you do then?
The Solution: Part 2
The second part of the solution is to modify your grip. You’ll either need to use a hook grip or a mixed grip (also known as an “alternate grip” or “switch grip”). If you’re not sure how to do this, watch the included videos for a demonstration as well as explanation.
The thumb is the weak link in your grip since you only have one thumb around one side of the bar while you have four fingers wrapping around the other side, so when your grip fails, it’s the thumb that’s losing the battle. Both a hook grip and a mixed grip solve this problem, so pick one and use it.
If you don’t like either of those options, then you need to use straps, and you can watch the video below to see the difference between hook grip, mixed grip, and straps.
New Lifters vs Those Who Refuse to Learn
All this advice is intended to help the new lifter who might not know about chalk, hook grip, mixed grip, etc. If you’re an experienced lifter - if you already know about all of these things - and you’re still not using chalk or a modified grip, this article is not for you. You’ve decided to make a Silly Choice, and wasting your time and energy on the deadlift with a compromised grip is certainly your prerogative.
Where to Go From Here
Start using chalk right away, and before your grip becomes the limiting factor, start modifying the grip. There are a couple of telltale signs that the grip is starting to fail - it will become difficult to lock out the deadlift at the top of the lift, it will feel like the bar is starting to slip out of your hands (because it is), and it will be tougher than usual to keep your back set in rigid extension when you’re pulling off the floor. Before any of these start to become a serious issue, simply use a hook grip or a mixed grip, and you’ll be amazed at the difference it will make.
As always, we hope this helps you get stronger and live better.
(Some links may be affiliate links. As an Amazon Associate, Testify earns from qualifying purchases.)
If you found this helpful, you’ll love our weekly email. It’s got useful videos, articles, and training tips just like the one in this article. Sign up below, and of course, if you don’t love it, you can unsubscribe at any time.
At Testify, we offer small group training, private coaching (in-person or remotely via Zoom), online coaching, and form checks. Interested in getting stronger, looking better, and having more energy?
1 HUGE Mistake Self-Taught Deadlifters Make
/If you're committing this deadlift error, then you're making your deadlifts horribly inefficient, and you're significantly limiting the amount of weight on the bar. Starting Strength Coach Phil Meggers explains.
At Testify, we offer small group training, private coaching (in-person or remotely via Zoom), online coaching, and form checks. Interested in getting stronger, looking better, and having more energy?
Do CrossFitters Make the BEST Deadlifters?!
/Do CrossFitters make the best deadlifters? The short answer is “No.”
However, there is one thing that efficient CrossFitters tend to do well when deadlifting, and we might be able to learn something about the deadlift from observing this phenomenon.
The Problem You Want to Solve
A common problem that we see with new lifters (and yes, even experienced lifters) is that of lowering the barbell in an extremely inefficient manner. While lowering the deadlift should be the easiest part of the lift, it very often is not.
When setting the bar down, the goal is to lower it rather quickly in a straight, vertical line so that it lands right over the middle of the foot - in other words, in the same place from which you started the previous rep. However, in a misguided attempt (whether consciously or subconsciously) to keep the back vertical, a lifter often makes this process difficult, inefficient, and almost painful to watch.
If this is you, then you’re making the mistake of starting to lower the bar primarily by bending the knees. As the knees bend, they go forward and become an obstacle for the bar (Figure 1), so you have to lower the bar around your knees.
This curved path is much harder to create and manage than the simple vertical line we’d like to see. You’ll feel the increased difficulty immediately in your back since you’ve made the job harder for your back than it should be.
Why Do Many CrossFitters Do This Efficiently?
It has everything to do with deadlifting during a metcon, i.e., deadlifting a high number of reps at speed when racing against a clock.
Don’t get me wrong - performing high rep deadlifts at speed is certainly not ideal for learning and encouraging solid deadlift technique. However, and for example, if you’re doing fifty deadlift reps for time, you may tend to become rather efficient (again, consciously or subconsciously) at lowering the bar simply because you’re trying to conserve energy.
In other words, you’re letting gravity do all the work of lowering the bar, and herein lies the key.
The Solution
Gravity likes to pull things down in a straight, vertical line, which is exactly the bar path you want when setting the deadlift down. You’re not going to drop the bar, of course, but one of your main tasks when setting it down is to simply stay out of the barbell’s way.
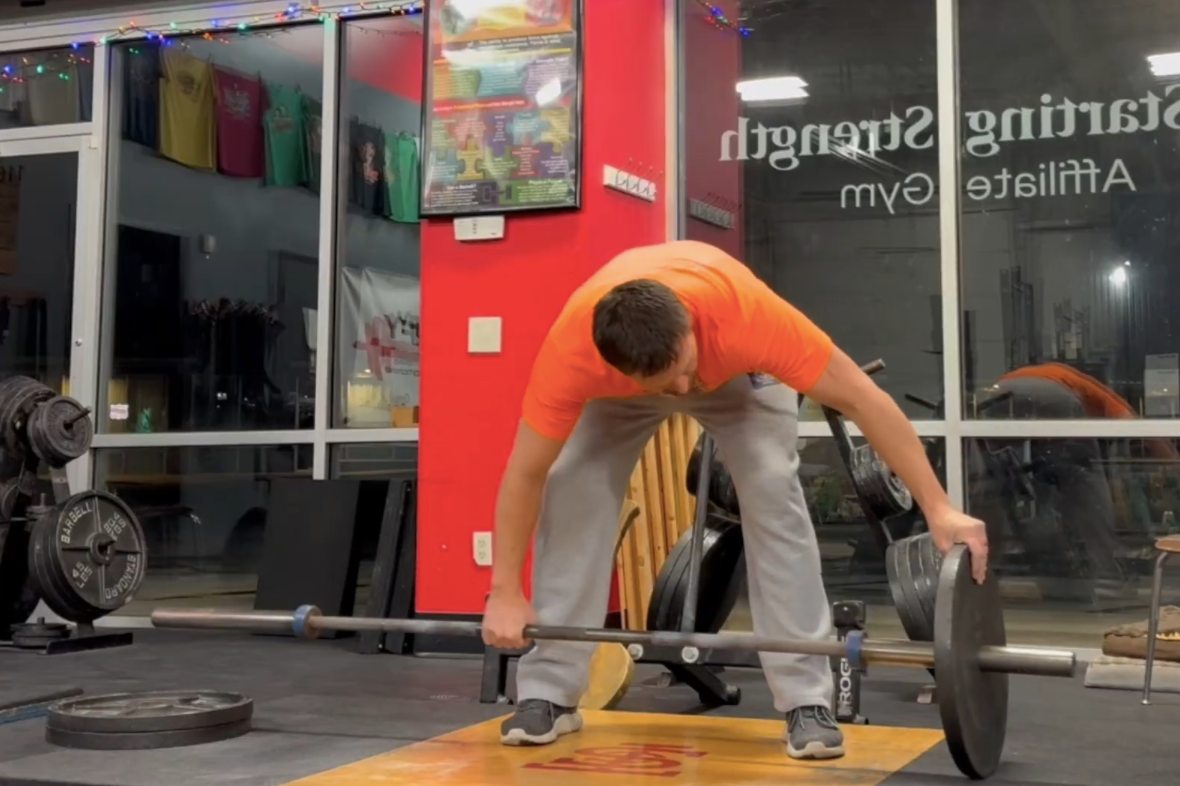
You do this by keeping your knees out of the way (i.e., you keep your knees back) and bending mostly at the hips rather than the knees (Figure 2). You want the bar to travel straight down over the middle of the foot, so your job is to stay the heck out of the barbell’s way so that gravity can pull it there for you.
Bow to the Floor . . . Fast
To do this, reach back with your hips, bend over, and slide the barbell down your thighs, and this is how we teach lowering the deadlift in the first place. However, if that concept isn’t working for you, simply cue yourself to “bow to the floor . . . fast.”
To see this solution in action, watch one of the videos included in this article.
Don’t drop the bar, and don’t destroy your platform, but you can and indeed should lower your deadlifts pretty quickly. While your knees shouldn’t be locked straight, they should stay back out of the way, and the concept of bowing to the floor often helps with this.
Bow to the floor, keep your knees out of the way, let gravity do the work for you, and you’ll do a great job setting the bar down right over the middle of your foot. It’s simple, it’s efficient, and you won’t have to roll the bar back to the correct position before starting the next rep (because it will already be there).
As always, we hope this helps you get stronger and live better.
(Some links may be affiliate links. As an Amazon Associate, Testify earns from qualifying purchases.)