Correct Grip for Snatch, Clean, and Jerk

(A Blast from the Past article originally posted on 12/22/23)

When gripping the bar for the Olympic lifts (i.e., the snatch and the clean-and-jerk), there are a few special considerations to bear in mind, so let’s address these.

This is the third and final article in our series on the correct grip for each lift. In the first article, we discussed the compression grip, which is useful for pressing movements such as the press and bench press, and in the second article, we covered the tension grip, which is useful for pulling movements such as deadlifts, cleans, and rows.

#1: Chalk
Use it.

Hopefully, all of this goes without saying, but sadly, that is often not the case. Chalk is useful for all of the lifts (both pushing movements and pulling movements), but it is especially useful for pulling movements like the deadlift and - in this case - the snatch and the clean. Specifically, chalk is useful for friction, so it contributes mightily to your ability to securely grip the bar.

If you’re training efficiently, you go through more chalk in a weightlifting (AKA Olympic lifting) session than you do in a strength training session (deadlifts, squats, presses, etc.). When training the Olympic lifts, you perform a lot of singles, doubles, and triples, so there is quite a bit of gripping and re-gripping of the barbell, and as a result, you go through a healthy dose of chalk. It doesn’t need to be caked on your hands, but chalk up on a regular basis.

#2: Hook Grip
For every single snatch and clean you perform for the rest of your life, use the hook grip (this doesn’t apply to the jerk).

Figure 1: The hook grip

Don’t use a double overhand grip, don’t use an alternate grip (AKA mixed grip or switch grip). Use the hook grip, i.e., the grip wherein your thumbs go on the bar first, and your fingers go over your thumbs (Figure 1).

The hook grip video included below goes more in-depth on how and why we hook grip, but suffice to say we use it because, although the Olympic lifts are not as heavy as a deadlift (which certainly requires a modified grip such as a hook or alternate grip), they must be pulled quickly. Because they have to be accelerated, your grip will be compromised if you don’t modify your grip.

With this in mind, get used to the hook grip right away. Start hook gripping your snatches and your cleans immediately at the outset of your training.

#3: Hook Grip and the Snatch
As discussed, you hook grip when you snatch, but when you rack the bar overhead, you may or may not keep the hook grip.

Some lifters may need to let the thumb slip out of the hook grip, and to determine whether or not this applies to you, keep the hook grip (when racking the bar) at first, and you’ll know pretty quickly if you need to make a change. If you experience discomfort when racking the bar overhead, or if keeping the hook grip is slowing down your turnover, then you’ll need to let the thumb slip out of the hook grip on the turnover (i.e., transition).

Note that when letting the thumb slip out from the hook, you don’t actually release the grip. Admittedly, this process is often referred to as “releasing the hook grip,” but all you simply do is allow the thumb to slip out of the hook grip while maintaining a solid purchase on the bar (refer to the video below to see how this is done).

To recap, try keeping the hook grip at first, and if that doesn’t work, let the thumb slip out of the hook as you rack the bar.

#4: Hook Grip and the Clean
Unlike the situation with the snatch, you always “release the hook grip” when performing the clean. Specifically, let the thumb slide out of the hook during the turnover (AKA transition), i.e., as your elbows rotate forward and up and as you rack the bar on your shoulders (Figure 2).

Figure 2: Maddie has released the hook grip (incidentally, she has also let her pinky slip off the bar, which is unimportant).

Attempting to keep the hook grip when racking the bar results in a slower turnover that is very often uncomfortable or even painful on the elbows and wrists. Because of these issues, keeping the hook results in a greater likelihood of missed lifts, so with this in mind, be sure to release the hook on your cleans.

#5: Hook Grip and the Jerk
It doesn’t make any sense to use the hook grip on the jerk, so don’t do it (Figure 3).

When you prepare for the jerk, the bar is sitting on your shoulders since you just cleaned it, and since you read tip #4 above, you’ve already released your hook grip. Additionally, the hook grip is useful for pulling movements (e.g., deadlifts, snatches, and cleans) and completely useless for pushing movements like the jerk, so attempting to regain the hook grip before performing the jerk is pointless and - even worse - a waste of time and energy.

figure 3: brianne wisely avoids the hook grip when jerking.

No hook grip on jerks.

As always, we hope these tips helps you get stronger and live better.

-Phil

PS: Whenever you want even more Testify in your life, here are some free resources:

  • Book a free intro and strategy session with us HERE.

  • Pick up a free copy of Testify’s Squat Guide: 12 Tips to Improve Your Squat Now HERE.

  • Get our free weekly email - containing useful videos, articles, and training tips - HERE.

  • Follow Testify on Instagram HERE.

  • Subscribe to Testify’s YouTube channel HERE.

(Some links may be affiliate links. As an Amazon Associate, Testify earns from qualifying purchases.)


At Testify, we offer small group training, private coaching (in-person or remotely via Zoom), online coaching, and form checks. Interested in getting stronger, looking better, and having more energy?

Understanding barbells is easy, actually (but what are the rings for?)

Ever wondered why barbells have rings etched into them? Starting Strength Coach Phil Meggers breaks down the key parts of a barbell and explains what those markings mean – and why they matter.

Whenever you want even more Testify in your life, here are some free resources:

  • Book a free intro and strategy session with us HERE.

  • Pick up a free copy of Testify’s Squat Guide: 12 Tips to Improve Your Squat Now HERE.

  • Get our free weekly email - containing useful videos, articles, and training tips - HERE.

  • Follow Testify on Instagram HERE.

  • Subscribe to Testify’s YouTube channel HERE.


At Testify, we offer small group training, private coaching (in-person or remotely via Zoom), online coaching, and form checks. Interested in getting stronger, looking better, and having more energy?

Weightlifting vs Powerlifting vs Strengthlifting - What's the Difference?!

(A Blast from the Past article originally posted on 11/20/18)

“What’s the deal with all of these lifting sports? I can’t keep them straight!”

No worries - let’s take a quick look at the three major sports of the barbell world (you can also watch the included video).

Powerlifting
This is the sport of the squat (i.e., back squat), bench press, and the deadlift. Each lifter gets 3 attempts on the squat, 3 attempts on the bench press, and 3 attempts on the deadlift.

Take your best attempt from each lift, add them together, and you have what is known as your total.

Stephanie locks out the press at a strengthlifting meet.

Strengthlifting
This is the sport of the squat, the press, and the deadlift. It is similar to powerlifting, but there are several notable differences:

  • The press (i.e., overhead press) is contested, not the bench press.

  • The deadlift is conventional, which means your hands go outside of your legs. This is how we teach the deadlift anyway, so it’s not unusual to you, but at powerlifting meets, a beast known as the sumo deadlift often makes an appearance (wherein the stance is very wide and the grip is fairly narrow - inside the stance).

  • The judges simply tell you whether or not the lift counted, whereas in powerlifting, the judges are a bit more involved.

Chris snatches 133 kg at a weightlifting meet.

Weightlifting
This is the sport of the snatch and the clean-and-jerk. Like the other two sports, each lifter gets 3 attempts on each of the lifts, and once again, we add the best successful lifts together to get a total.

  • Weightlifting is also known as “olympic weightlifting” or simply “olympic lifting.”

  • If you’ve ever watched lifting during the Summer Olympics, this is the sport you witnessed.

As always, we hope this helps you get stronger and live better.

-Phil

PS: Whenever you want even more Testify in your life, here are some free resources:

  • Follow Testify on Instagram HERE.

  • Subscribe to Testify’s YouTube channel HERE.

  • Book a free intro and strategy session with us HERE.

  • Pick up a free copy of Testify’s Squat Guide: 12 Tips to Improve Your Squat Now HERE.

  • Get our free weekly email - containing useful videos, articles, and training tips - HERE.

(Some links may be affiliate links. As an Amazon Associate, Testify earns from qualifying purchases.)

At Testify, we offer small group training, private coaching (in-person or remotely via Zoom), online coaching, and form checks. Interested in getting stronger, looking better, and having more energy?

Power Snatch vs Split Snatch vs Squat Snatch: Which One is Best?

(A Blast from the Past article originally posted on 05/21/21)

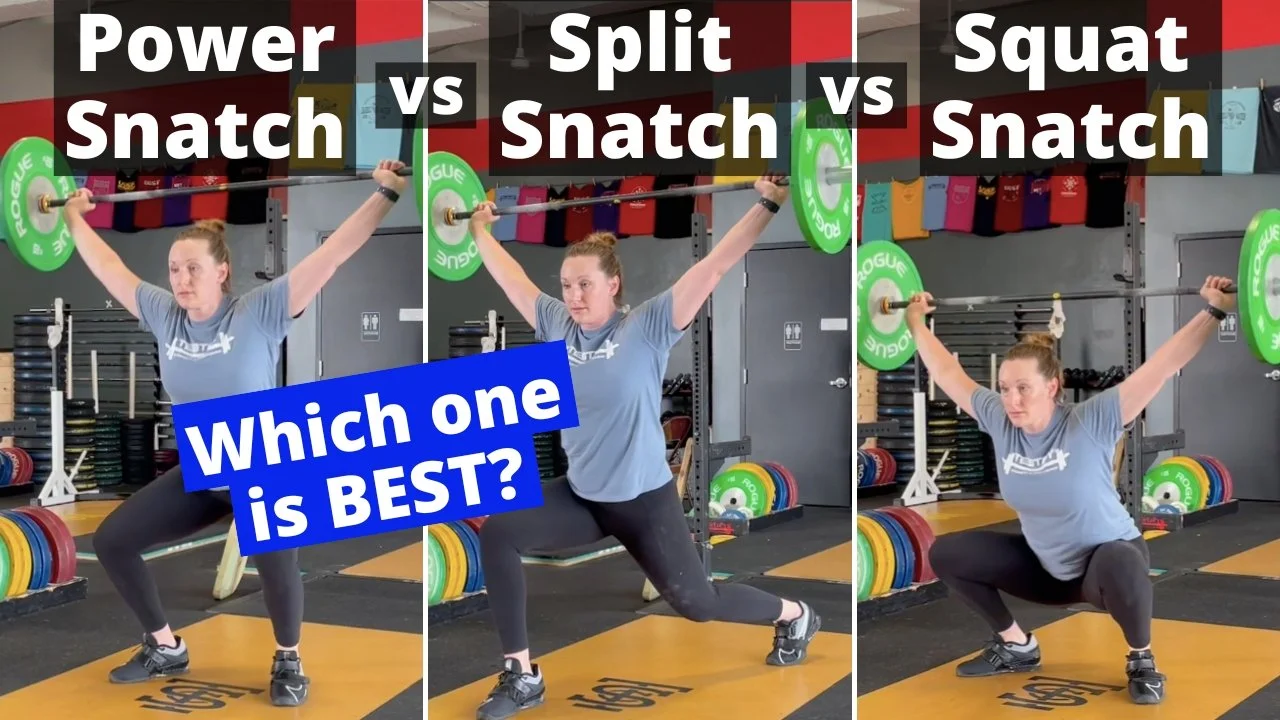
There are three landing positions for the snatch, and each has its own advantages. Let’s briefly cover them here:

POWER SNATCH

Landing Position: Partial squat (i.e., partial-depth overhead squat)

Joy performs a power snatch.

Advantage: The power snatch is the simplest to learn as your feet do not travel far from their original pulling position. It also doesn’t require learning how to perform the overhead squat as in the . . .

SNATCH (AKA full snatch or squat snatch)

Landing Position: Overhead squat (i.e., full-depth overhead squat)

Advantage: Of the three landing positions, the full snatch allows lifters to lift the heaviest weights as this lower receiving position means the barbell doesn’t have to be lifted as high before catching it.

Joy performs a snatch.

SPLIT SNATCH

Landing Position: Split stance - nearly identical to the split jerk stance, but the split is usually even longer and deeper.

Advantage: The split snatch allows the lifter to drop further under the bar than the power snatch without requiring the ability to drop into an overhead squat position as in the full snatch. For this reason, the split snatch - although potentially useful at all ages - is especially well-suited to older lifters.

Joy performs a split snatch.

You’ll notice that the word “hang” - as in hang snatch or hang power snatch or hang split snatch - is conspicuously absent in this discussion. This is because “hang” refers to a starting position, not a landing position.

If “hang” is added as a prefix, then the lift simply starts with the bar hanging in the hands (usually at about mid-thigh height) as opposed to starting with the bar resting on the floor.

As always, we hope this helps you get stronger and live better.

-Phil

PS: Whenever you want even more Testify in your life, here are some free resources:

  • Book a free intro and strategy session with us HERE.

  • Pick up a free copy of Testify’s Squat Guide: 12 Tips to Improve Your Squat Now HERE.

  • Get our free weekly email - containing useful videos, articles, and training tips - HERE.

  • Follow Testify on Instagram HERE.

  • Subscribe to Testify’s YouTube channel HERE.

(Some links may be affiliate links. As an Amazon Associate, Testify earns from qualifying purchases.)


At Testify, we offer small group training, private coaching (in-person or remotely via Zoom), online coaching, and form checks. Interested in getting stronger, looking better, and having more energy?

Correct Grip for Snatch, Clean, and Jerk | Olympic Weightlifting Technique

Gripping the bar for the Olympic lifts shouldn't be complicated, but there are a few simple things you must do to ensure you're getting the most out of your lifts. Starting Strength Coach Phil Meggers explains.

(A Blast from the Past video originally published on 10/10/22)

Whenever you want even more Testify in your life, here are some free resources:

  • Book a free intro and strategy session with us HERE.

  • Pick up a free copy of Testify’s Squat Guide: 12 Tips to Improve Your Squat Now HERE.

  • Get our free weekly email - containing useful videos, articles, and training tips - HERE.

  • Follow Testify on Instagram HERE.

  • Subscribe to Testify’s YouTube channel HERE.


At Testify, we offer small group training, private coaching (in-person or remotely via Zoom), online coaching, and form checks. Interested in getting stronger, looking better, and having more energy?

First Weightlifting or Powerlifting Meet? MOST Important Advice Ever!

What is the most important tip ever for your first weightlifting, powerlifting, or strengthlifting meet? Check it out.

(A Blast from the Past video originally published on 05/07/22)


At Testify, we offer small group training, private coaching (in-person or remotely via Zoom), online coaching, and form checks. Click the button below to get quality coaching from a Starting Strength Coach and start getting stronger TODAY.