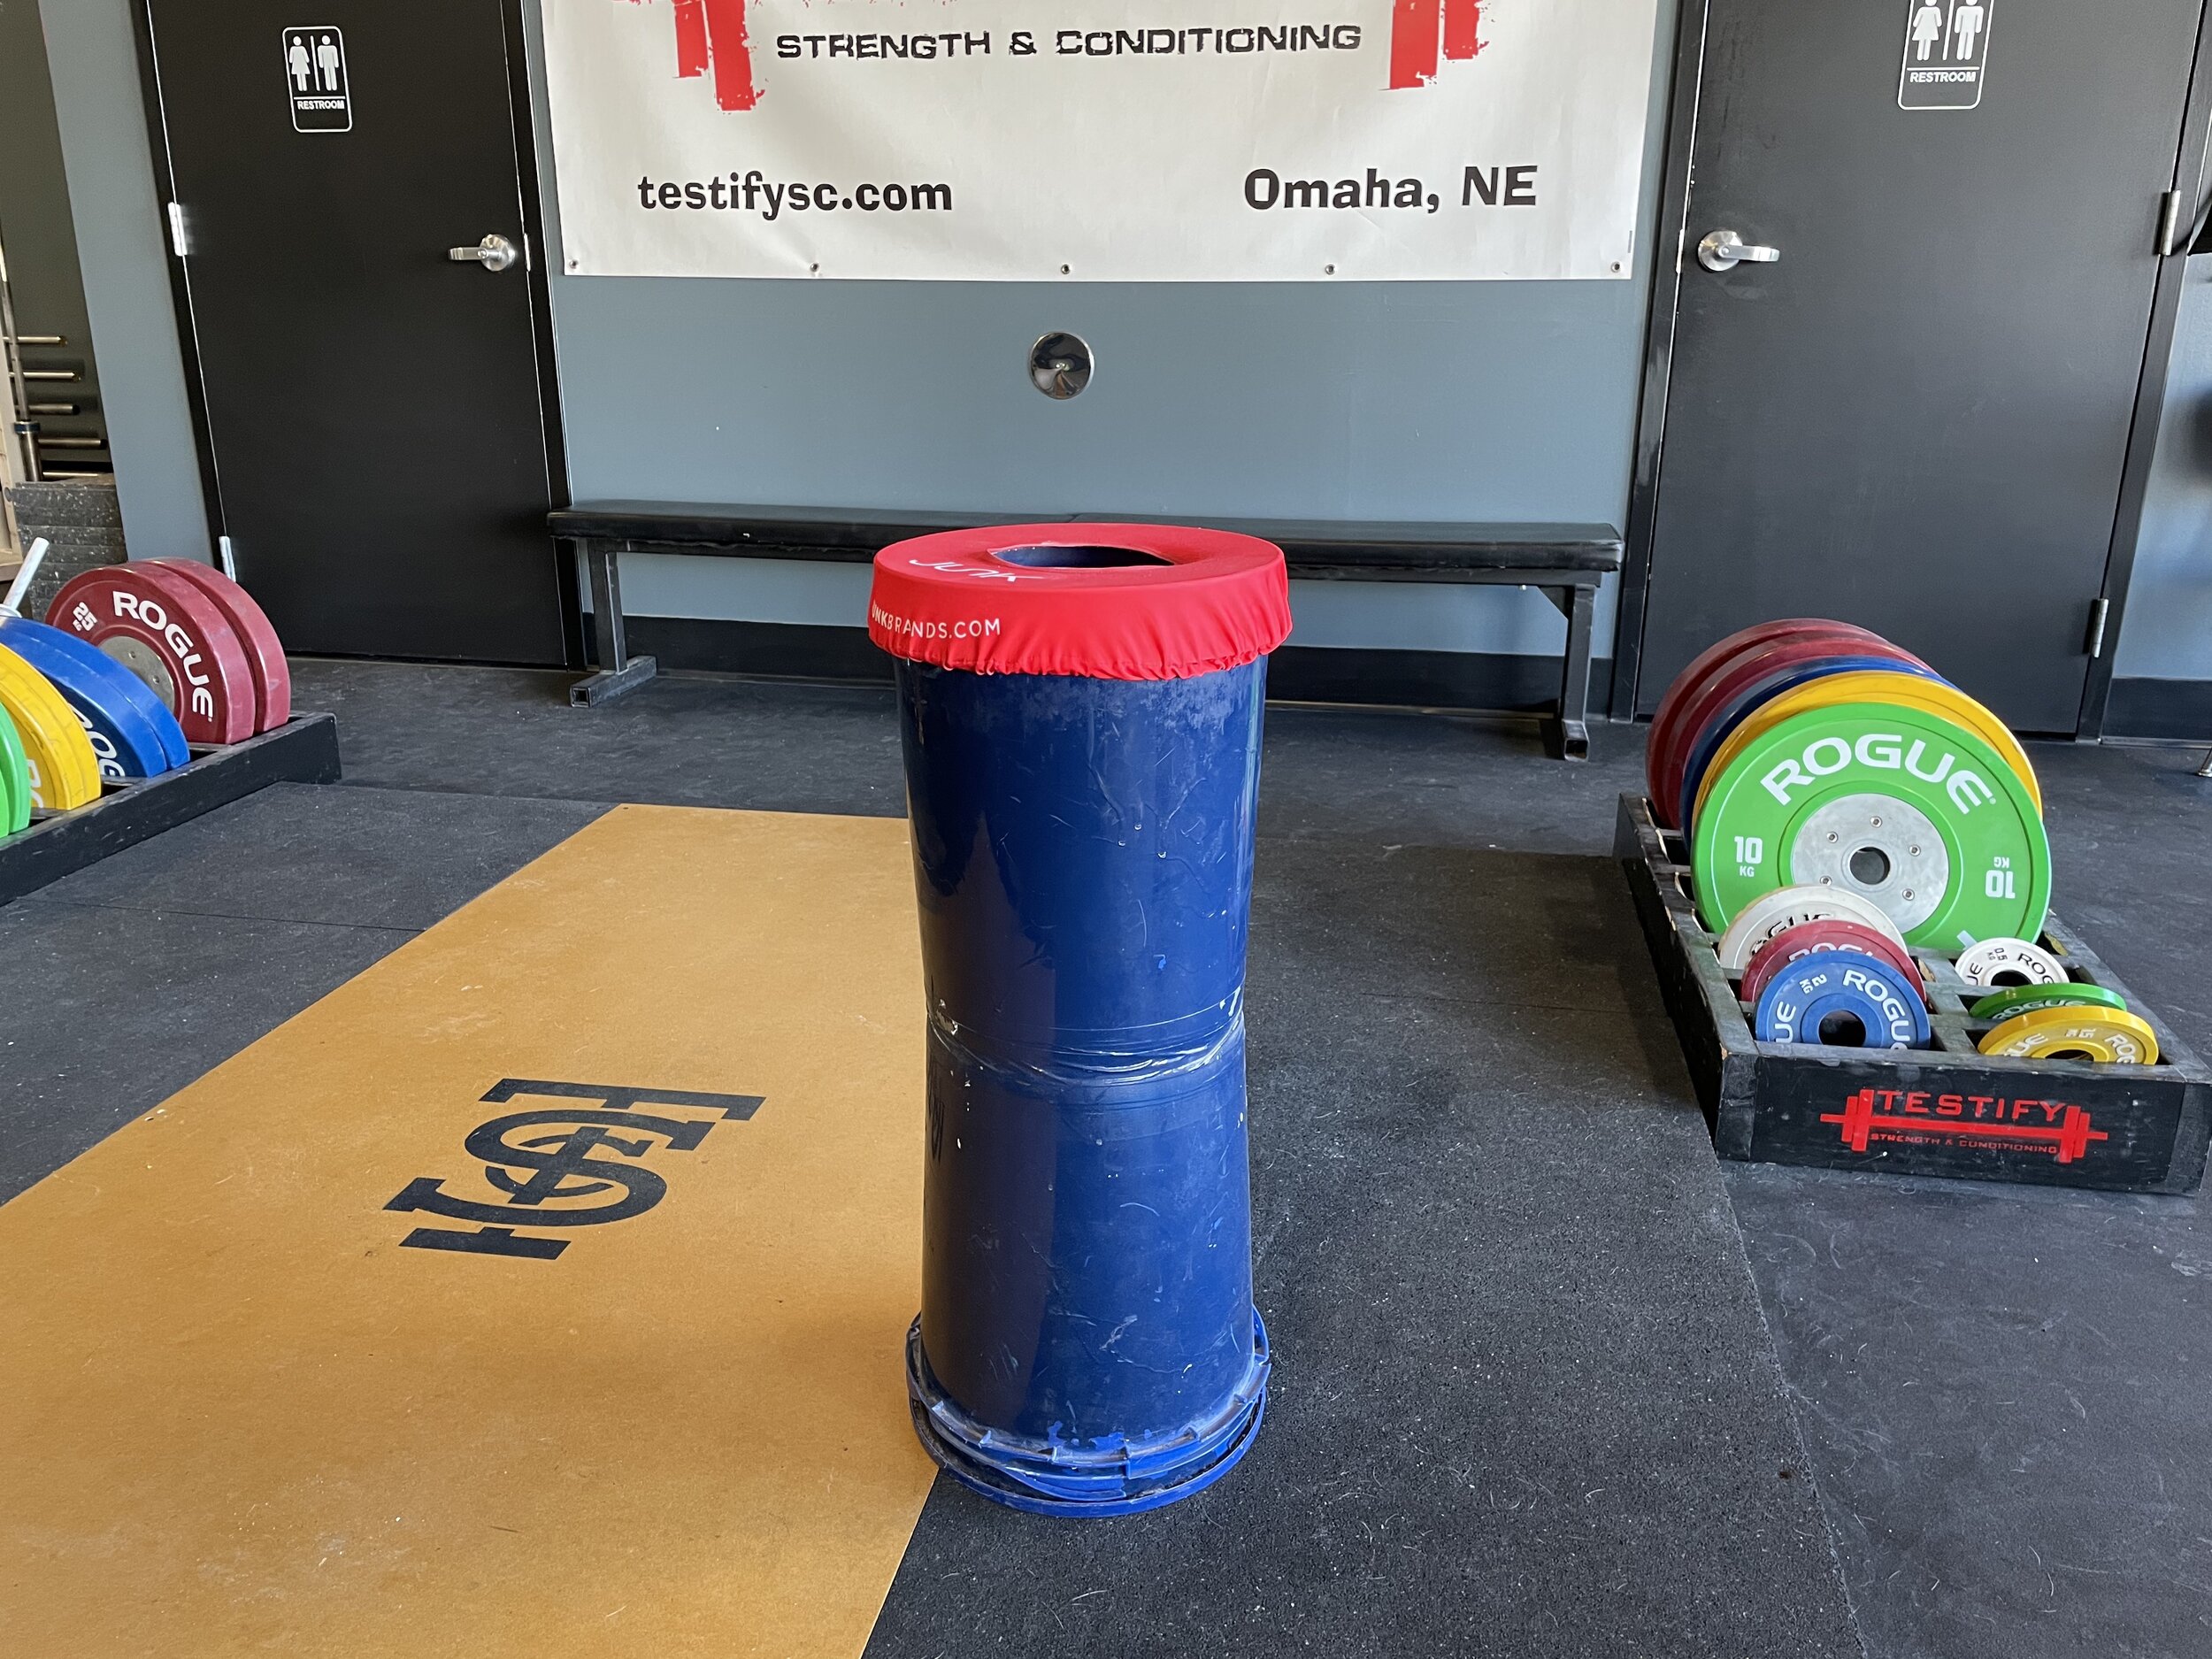
Simple and Cheap DIY Chalk Stand

(A Blast from the Past article originally posted on 02/26/21)

When you chalk up for your next set, it’s nice to have a chalk stand. It’s not absolutely necessary, of course, as you can just use a bag of chalk or - better yet - a chalk bucket sitting on the ground. Although those options work, a chalk stand makes much less of a mess than a bag of chalk, and as the stand is raised, you don’t have to reach all the way down to the floor level as you do with a bucket of chalk, which can be a bit of pain if you already have your belt tightened.

With all this in mind, here’s how you can make a simple and cheap chalk stand (feel free to watch the video above if you’d rather not read the steps below):

Step 1
Go to your nearest hardware store and purchase the following items (you may already have some of these items at home). If you’d rather not make the trip, you can click the items below and order from Amazon.

Step 2
Set one bucket on the ground - upside down.

Step 3
Set the other bucket on top of the first bucket - right side up. The closed ends of the two buckets should now be touching.

IMG_6317.jpg

Step 4
Tape the two buckets together by wrapping duct tape around the buckets several times. Tape the “seam” between the buckets as well as above and below the seam. Five or six times around the buckets should do nicely.

Step 5
Spray paint the buckets. This step is optional and is for aesthetic purposes only - it covers up any logos or printing on the buckets. It’s nice to have the paint match the buckets (or as closely as possible) for two reasons:

  • This is supposed to be a quick process, so don’t worry too much about whether you’ve painted the entire apparatus or not. If the logos are covered and the paint closely matches the bucket, it will look just fine.

  • Eventually, the paint will chip or wear in places, and if the bucket is close to the same color as the paint, this won’t be a big deal.

Step 6
Place the lid on the ground - upside down - with a brick, 10 lb plate, or some other relatively heavy object on top of the lid, and then set your new chalk stand on top of the lid and press down so that the lid is attached to the stand. You’ve now weighted the base of your chalk stand and made it much less likely to tip over and spill.

IMG_6318.JPG

Step 7
Put a chalk-topper over the top of the stand. This is optional, but if other people use your chalk stand, you’ll find this greatly helps keep the chalk dust inside the stand. Our chalk toppers are from www.junkbrands.com.

IMG_6316.JPG

Step 8
Place some chalk in the top bucket, and you’re good to go!

As always, we hope this helps you get stronger and live better.

-Phil

PS: Whenever you want even more Testify in your life, here are some free resources:

  • Book a free intro and strategy session with us HERE.

  • Pick up a free copy of Testify’s Squat Guide: 12 Tips to Improve Your Squat Now HERE.

  • Get our free weekly email - containing useful videos, articles, and training tips - HERE.

  • Follow Testify on Instagram HERE.

  • Subscribe to Testify’s YouTube channel HERE.

(Some links may be affiliate links. As an Amazon Associate, Testify earns from qualifying purchases.)


At Testify, we offer small group training, private coaching (in-person or remotely via Zoom), online coaching, and form checks. Interested in getting stronger, looking better, and having more energy?

Simple DIY Wall Mounted Weight Plate Storage | Home Gym Storage

Need a better system for plate storage in your home gym? We did too, so in this video, we walk you through how to easily and relatively quickly construct a wall-mounted plate storage system.

(A Blast from the Past video originally published on 11/14/22)

Whenever you want even more Testify in your life, here are some free resources:

  • Book a free intro and strategy session with us HERE.

  • Pick up a free copy of Testify’s Squat Guide: 12 Tips to Improve Your Squat Now HERE.

  • Get our free weekly email - containing useful videos, articles, and training tips - HERE.

  • Follow Testify on Instagram HERE.

  • Subscribe to Testify’s YouTube channel HERE.


At Testify, we offer small group training, private coaching (in-person or remotely via Zoom), online coaching, and form checks. Interested in getting stronger, looking better, and having more energy?

6 Tips to Load a Barbell for Deadlifts EASILY!

When people are new to lifting, one of the comments we often hear is that it’s a pain to put full size plates (i.e., 45-lb metal plates or any bumper plate) on the bar when deadlifting. We hear this primarily regarding the deadlift, but the problem shows up in the snatch, clean, row, or any other lift wherein the barbell starts on the floor.

Whether it’s putting the first 45-lb plate on the bar or subsequent 45-lb plates on the bar (this applies with any bumper plate as well), below are a few tips that will help. Also, there are several videos throughout this article that cover these tips and include demonstrations, so I’d recommend checking them out.

For clarification, from here on, “plate” refers to a metal, 45-lb plate unless otherwise specified.

Tip #1: Lift as Few Plates as Possible
If it’s a short distance, save yourself some energy and simply roll the plate across the floor.

Tip #2: Putting the First Plate on the Bar
Don’t put the first plate on the bar. Instead, do the following (as shown in Figure 1):

  1. Set the plate on the floor (numbers facing up).

  2. Put one end of the barbell through the plate.

  3. Set the other end of the bar on the floor.

  4. Slide the bar through the plate until the plate is up against the collar of the bar.

figure 1

In short, they key here is to not put the first plate on the end of the bar, but rather put the end of the bar through the first plate.

Tip #3: Putting the Next Plate on the Bar
The second plate (i.e., the first plate on the opposite end of the bar) should be the only one that even potentially poses a problem, and we’re going to solve that right now.

With the plate standing vertically (after rolling it over, of course), raise the end of the bar to the height of the plate’s hole. Then, you have two options:

figure 2

Option 1
Get the plate onto the bar, pick up the bar slightly with one hand, and slide the plate on with the other hand.

Option 2
Get the plate onto the bar, straddle the bar, and slide the plate toward you using both hands (Figure 2). It’s useful to note that this option requires less strength than Option 1.

figure 3

Tip #4: Commercial Deadlift Jack (but . . .)
Now it’s time to get the rest of the plates on the bar, but it’s annoying to slide additional plates on the bar since they are the same size as the plates already on the bar. As a result, you’ll experience a lot of friction between the plate and the ground. Also, as you add more plates, picking the bar up off the floor to create some space between the plates and the floor (so there’s no friction between those two surfaces) becomes more difficult.

The solution is a deadlift jack, but perhaps not the kind you’re imagining.

Of course, if you can afford and want to buy a full-size deadlift jack, go for it (Figure 3). They’re amazingly convenient, we have one at Testify, and our members greatly appreciate using it. That said, they’re a bit pricey, and there are other options, such as . . .

Tip #5: Fishhook (DIY Deadlift Jack)
The fishhook is an easy-to-make, DIY deadlift jack, and it’s incredibly useful. My wife and I have one in our garage gym, and we have several of these at Testify as well. We have a video on how to make and use the fishhook, so be sure to check that video out if you’re interested.

However, if you don’t feel like making a fishhook jack, the next solution is . . .

Tip #6: Plate Jack
The plate jack is simply any 2.5-lb plate that you are going to use as a deadlift jack. It doesn’t have to be a 2.5-lb plate - you could use a 1.25-lb plate, a 5-lb plate, or even the thickness of your belt (sometimes referred to as the “belt jack”).

figure 4

To use the plate jack (Figure 4), set the 2.5 on the floor, roll the first 45 up onto the 2.5 (make sure it stays there!), and then slide any other 45s onto the bar since the 2.5 will have jacked the bar up slightly, and now the additional plates slide on and off very easily.

As always, we hope these tips help you get stronger and live better.

-Phil

PS: Whenever you want even more Testify in your life, here are some free resources:

  • Book a free intro and strategy session with us HERE.

  • Pick up a free copy of Testify’s Squat Guide: 12 Tips to Improve Your Squat Now HERE.

  • Get our free weekly email - containing useful videos, articles, and training tips - HERE.

  • Follow Testify on Instagram HERE.

  • Subscribe to Testify’s YouTube channel HERE.

(Some links may be affiliate links. As an Amazon Associate, Testify earns from qualifying purchases.)


At Testify, we offer small group training, private coaching (in-person or remotely via Zoom), online coaching, and form checks. Interested in getting stronger, looking better, and having more energy?

"Go Home, Get Weak, and Die" | Why Your Doctor is Wrong about Lifting Weights

“Sally” is one of our members and has been training with us for a number of years. Sally is 70 years old, she’s a grandmother several times over, and to be frank, Sally is fairly awesome. (Please don’t tell her that - she’ll be unbearable.) Over the years, she’s gotten quite strong - she regularly squats 200 lb, she’s deadlifted 300 lb, and she continues to train hard in the weight room.

Sally also goes to her primary physician every year for her checkup, and the topic of her strength training inevitably comes up. Sally knows the conversation is coming, she tells her doc about what she does - squatting, pressing, deadlifting, benching, etc. - and her doc always has the same response, which is something along the lines of “Why are you doing this? What are you trying to prove?”

This type of response drives me fairly nuts because what this doctor is really telling Sally - in no uncertain terms - is “Sally, just go home, get weaker, and die.” Of course, he’s not saying this out loud, and he doesn’t mean to tell Sally this, but it’s the message he’s preaching nonetheless.

Go home, get weaker, and die.

Fortunately, Sally is rather stubborn and doesn’t listen to her doc when he says such things. She returns to the gym, she continues to train, and she keeps striving to get stronger because she understands that strength is independence.

Strength is important at all ages of life, of course, but the older we get, the more important strength becomes. Strength is independence, it’s the ability to play with your kids, it’s the ability to pick up your grandkids, it’s the ability to get up off the toilet by yourself.

If you’re in your 50s, 60s, 70s, 80s, or older (and if you’re not, you know someone dear to you who is) and you strength train, you too may have been told something like what Sally’s been told. It might not be your doc; instead, it might be one of your family members - one of the people that love and care for you. Yet, unfortunately, they say things like, “Why are you doing that? You don’t need to be lifting those heavy weights. Just lift some lighter weights, or maybe don’t lift at all - you don’t need to be doing that kind of thing. What are you trying to prove? Who are you trying to impress?”

Again, and although they don’t mean it, they’re simply saying, “Just go home, get weaker, and die.”

I challenge you - do not listen to them.

You know more about getting stronger than they do. Strength is not their specialty - it’s not their field of expertise, nor have they tried to learn about it like you have.

There are only two options - stronger and weaker. I exhort you to choose the former - get stronger. It’s good for your muscles, it’s good for your bones, it’s good for your tendons and ligaments.

We’re not talking about the sports of powerlifting, weightlifting, strengthlifting, or anything like that. Sure, many of our members have participated in those because they are fun ways to motivate one’s training, but most of our members didn’t start training with that in mind. Sally has done many lifting competitions, but she will be the first to tell you that she never thought she would do something like that when she started training with a light, empty barbell years ago. To this day, competitions are still not the reason she trains (although they do provide some fun and motivation!).

Sally and her friends at Testify train to get stronger. They know that stronger and weaker are the only options. Endeavor to get stronger so you can live better.

-Phil

PS: Whenever you want even more Testify in your life, here are some free resources:

  • Book a free intro and strategy session with us HERE.

  • Pick up a free copy of Testify’s Squat Guide: 12 Tips to Improve Your Squat Now HERE.

  • Get our free weekly email - containing useful videos, articles, and training tips - HERE.

  • Follow Testify on Instagram HERE.

  • Subscribe to Testify’s YouTube channel HERE.

(Some links may be affiliate links. As an Amazon Associate, Testify earns from qualifying purchases.)


At Testify, we offer small group training, private coaching (in-person or remotely via Zoom), online coaching, and form checks. Interested in getting stronger, looking better, and having more energy?

Easy Fix for a Slanted Lifting Platform (cheap & fast)

If you’ve got a slightly sloped platform, and if it causes the barbell to roll a bit when setting up for pulls from the floor (e.g., deadlifts, rows, snatches, cleans, etc.), this problem needs to be addressed. There are a few ways to fix the issue, so let’s cover them quickly.

Solution #1: Shim the Platform
If the slope is significant, the best solution is to shim your platform. My wife and I often train in our garage gym, and the garage floor has a pretty decent slope to it (as most garage floors do for drainage reasons). We shimmed our platform when we built it, and as a result, the platform is level and works wonderfully for training.

Although very effective, shimming a platform is a pretty involved project and a topic for another article or video as we’re talking about a relatively small slope today. With this in mind, let’s move on to . . .

figure 1: got a bar that rolls away from you? just stand on the other side of the bar.

Solution #2: Lift From the Other Side of the Barbell
If the barbell wants to roll away from you when you set up to deadlift, simply step over the barbell, turn around, and set up facing the opposite direction (Figure 1). The bar will still want to roll, but now it will roll toward you, and your shins will serve as a good barrier for the bar’s unruly behavior.

The drawback here is small but worth noting - we want to set up with the bar over the middle of the foot, and since the bar will roll toward your shins, you’ll need to actually roll the bar forward just a bit when setting up. In summary, it’s not ideal, but it works. Better yet, go with . . .

Solution #3: Use Your Wrist Wraps
The easiest way to solve the problem is to take your wrist wraps, lay one of them flat on the ground immediately in front of the plate(s) on the right side of the barbell, and lay the other wrap flat on the ground immediately in front of the plate(s) on the left side of the barbell (Figure 2). Of course, you can use socks, sponges, lifting straps, etc. - the key is to use something soft and relatively thin (i.e., just thick enough to keep the bar from rolling)

figure 2: Phil & Loren have put wrist wraps on the ground in front of the plates, and this solution stops the bar from rolling.

This solution will arrest the bar’s roll, so you can set up according to a stationary barbell, which is what you’d have if you were lifting on a level platform.

I do not recommend using a small metal weight plate (e.g., a 2.5 lb plate) for two reasons. The first reason is that if you set the bar down slightly forward of where you picked it up - thus landing on the edge of the plate - the bar may come careening back toward your shins, and shins and rolling barbells do not get along well (hint: the barbell wins every time). The wrist wrap solution is much better in this regard since you can set the bar down directly on the wrist wrap with no adverse effects - it has enough “squish” not to pose a problem.

The second reason to avoid using a small plate is that - again - if you set the bar down slightly forward of its original position, you may chip either the small plate or the larger plates on the barbell. Since you obviously don’t want to damage your equipment, just grab your wrist wraps, and you’ll be good to go.

Finally, if a wrist wrap won’t stop the barbell from rolling, your platform probably has enough of a slope that you need to shim it. More on that another day.

As always, we hope this helps you get stronger and live better.

-Phil

PS: Whenever you want even more Testify in your life, here are some free resources:

  • Book a free intro and strategy session with us HERE.

  • Pick up a free copy of Testify’s Squat Guide: 12 Tips to Improve Your Squat Now HERE.

  • Get our free weekly email - containing useful videos, articles, and training tips - HERE.

  • Follow Testify on Instagram HERE.

  • Subscribe to Testify’s YouTube channel HERE.

(Some links may be affiliate links. As an Amazon Associate, Testify earns from qualifying purchases.)


At Testify, we offer small group training, private coaching (in-person or remotely via Zoom), online coaching, and form checks. Interested in getting stronger, looking better, and having more energy?

Pulling Blocks: What, Why, and DIY vs. Commercial (Which Should YOU Use?)

Today, we’re covering everything related to blocks - pulling blocks, jerk blocks, what they are, why you might use them, as well as what kind you might want to use.

DC Blocks
In short, DC Blocks are made of a very durable plastic, they’re very useful, and they’re also quite expensive. 

Figure 1: setting up to perform a block pull from DC blocks

DC blocks (Figure 1) are most commonly used as pulling blocks, i.e., blocks upon which you perform a pulling motion such as a block pull or a block clean. For example, suppose you want to perform a rack pull, which requires a bent bar or, at the very least, a bar that you’re willing to allow to bend, since rack pulls will do this to barbells over time. If you don’t have such a bar, you can simply perform a block pull instead with your regular barbell (with no worry about what will happen to that bar).

Note: Although DC blocks are quite durable, I’d recommend using bumper plates with them as opposed to metal plates. To be fair, I’ve seen metal plates used with DC Blocks on rare occasions, but I wouldn’t be surprised to see a lifter damage the blocks this way, and that would be an expensive mistake.

Figure 2: power snatch from DC blocks

You can also perform snatches and cleans from DC Blocks (Figure 2). If you’re working to eliminate a pesky early arm pull on your clean, you can start with a block height at which you pull correctly and then slowly lower the height of the blocks over time until you’re pulling from the floor.

As another example, if you struggle to set your back in the deadlift setup, you can practice this from a higher position (using blocks) where it’s easier to achieve. Then you can slowly work your way down by lowering the block height until you’re pulling from the floor with a correctly set back.

Since these blocks are stackable, they are very useful because of how versatile they are as well as how easy it is to achieve differing heights of blocks. However, they are a bit on the small side, which doesn’t give you a lot of room to err forward or backward when setting the bar down. This should not be a problem for a block pull, but it can potentially be an issue when lowering cleans and snatches.

We have a full set of DC Blocks, and they’re great, but we bought them used, and we never would have bought them new as there are other solid options at significantly lower price points. This corresponds to my recommendation for most people - if you can get them used at a great price, go for it, but otherwise, I’d recommend other options.

figure 3: one stack of jerk blocks (also pulling blocks if not stacked this high)

Wood Jerk Blocks/Pulling Blocks
Blocks such as those seen in Figure 3 are commonly known as jerk blocks if stacked this high since lifters can perform split jerks and power jerks from them. As they’re stackable, they are also referred to as pulling blocks since you can create a stack that’s much lower to the ground and suitable for block pulls, cleans, and snatches.

You can build these on your own or buy a set, and if constructed well, they are very durable and incredibly useful. Purchasing a set is comparable in cost to DC Blocks, but you have a much larger area onto which you can lower the barbell, which is a huge advantage when dropping snatches, cleans, and jerks (Figure 4). Constructing your own set does represent a significant investment in terms of building time, but it will also save you a lot of money.

We built our set, the total price was around one-third that of what it would have been if we had purchased a set, and the savings was even more when compared to a similar stack height of DC Blocks. Above, you can find one of our DIY videos we created for these blocks (the first of a three-part series), or you can simply click the links below:

figure 4: wood pulling and jerk blocks provide a large, durable platform for cleans, snatches, jerks, and block pulls.

Horse Stall Mats
You can also make pulling blocks from horse stall mats. Simply take the typical 4’ x 6’ stall mat (¾” thick), and use a jig saw to cut it to the appropriate size. You can create stacks of multiple mats to create blocks of different heights.

These blocks are useful, easy to make, and we’ve got a video covering how to do exactly that (check out the video below). You can purchase horse stall mats by clicking here, but they are generally significantly cheaper if purchased locally, e.g., at a Tractor Supply or something similar.

This sort of block is easily stackable, but the stacks do get heavy rather quickly, and they don’t connect together in the secure fashion that DC Blocks or wood blocks do, so these are limited in height and thus will serve only as pulling blocks (and not as jerk blocks). However, if you only need blocks up to about 6-8” in height, this is the easiest and cheapest way to go.

As always, we hope this helps you get stronger and live better.

-Phil

PS: Whenever you want even more Testify in your life, here are some free resources:

  • Book a free intro and strategy session with us HERE.

  • Pick up a free copy of Testify’s Squat Guide: 12 Tips to Improve Your Squat Now HERE.

  • Get our free weekly email - containing useful videos, articles, and training tips - HERE.

  • Follow Testify on Instagram HERE.

  • Subscribe to Testify’s YouTube channel HERE.

(Some links may be affiliate links. As an Amazon Associate, Testify earns from qualifying purchases.)


At Testify, we offer small group training, private coaching (in-person or remotely via Zoom), online coaching, and form checks. Interested in getting stronger, looking better, and having more energy?