Timing and Bounce on the Jerk

(A Blast from the Past article originally posted on 11/18/22)

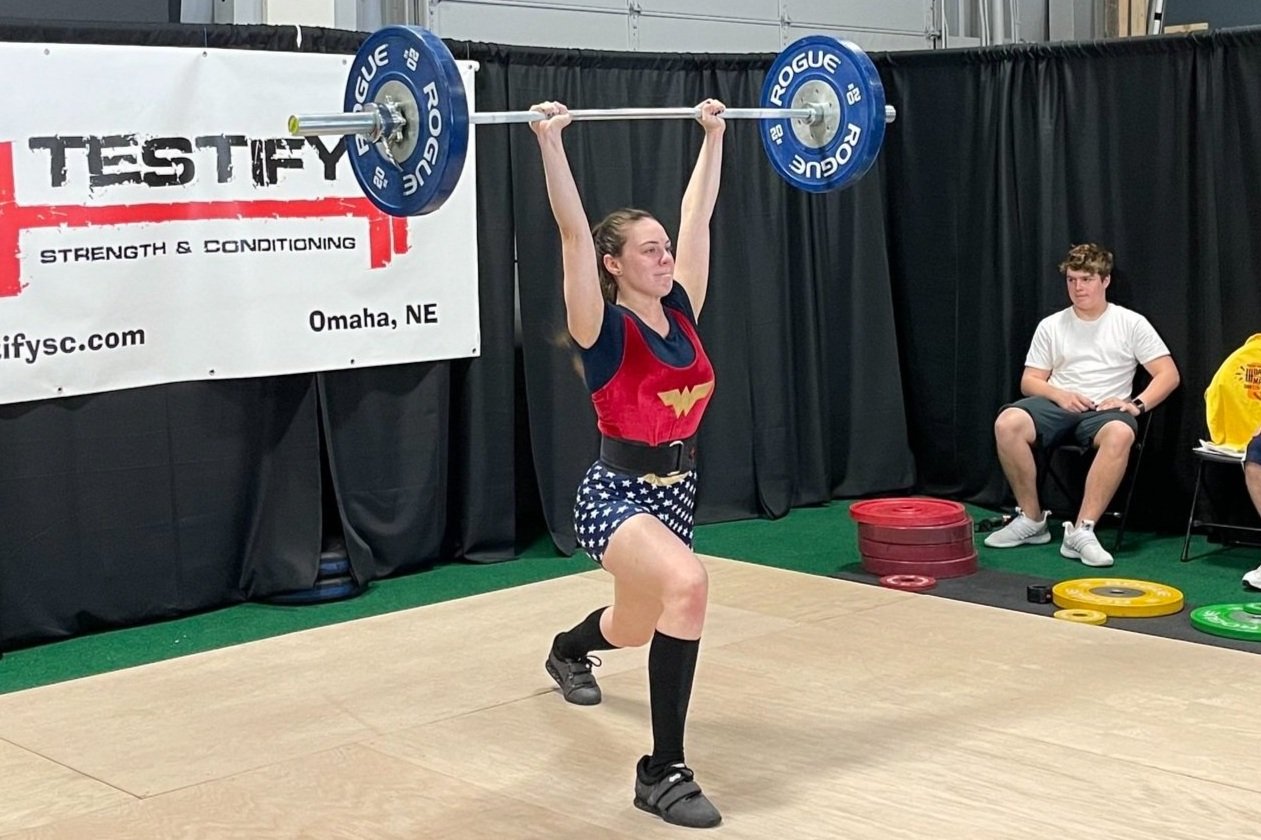
Let’s briefly address the “bounce and drive” aspect of the jerk. This applies to the split jerk, the power jerk, and the squat jerk. Note that we’re not referring to this motion as a “dip and drive” because we want the bounce of the jerk - i.e., the turnaround at the bottom of the movement - to be sharp and quick.

(Today’s topic is far more easily understood when watching it in action, so I’d strongly recommend watching the included video.)

By aiming for a short, quick, sharp bounce out of the bottom of the movement, we’re not only trying to impart as much upward momentum to the barbell as possible - we’re also endeavoring to take advantage of the flex (or whip) of the bar, and a sharp bounce does exactly this.

To achieve the proper “bounce and drive” that we’re aiming for, cue yourself “hard bounce” the next time you’re practicing your jerks. After the clean, immediately before starting the downward motion of the jerk, mentally remind yourself “hard bounce” and then try to get exactly that motion out of the bottom of the jerk.

As mentioned earlier, watching this motion in action is very helpful, so I’d recommend watching the video included earlier in this article. In the meantime, we hope this helps you get stronger and live better.

(Some links may be affiliate links. As an Amazon Associate, Testify earns from qualifying purchases.)

If you found this helpful, you’ll love our weekly email. It’s got useful videos, articles, and training tips just like the one in this article. Sign up below, and of course, if you don’t love it, you can unsubscribe at any time.


At Testify, we offer small group training, private coaching (in-person or remotely via Zoom), online coaching, and form checks. Interested in getting stronger, looking better, and having more energy?

Knee Position in the Split Jerk

(A Blast from the Past article originally posted on 10/21/22)

A common problem with new lifters and the split jerk - and it can be a problem with experience lifters, too - is that of knee position. The back knee often requires a bit more attention than the front knee, but we'll cover the front knee position briefly before moving on to the back knee.

Figure 1

For a demonstration of these problems and their solutions, check out the short video included near the end of this article.

Problem #1: Front Shin Angled Forward
When you lock the barbell out overhead in the split jerk, you want the front shin to be roughly vertical as Becky demonstrates in Figure 1, so if you find that your shin tends to be angled forward when you land as Becky demonstrates in Figure 2, you probably need to reach further with your front foot.

Figure 2: front shin angled forward

How to Fix This Problem
To help with this, try cueing yourself to reach further - specifically, reach forward with your front heel. Thus, the cue is “front heel forward” or “reach with your heel.”

If necessary, you can picture yourself landing with your front shin actually angled backward. In other words, envision your landing position with your front heel ahead of your front knee. While this mental picture is an exaggerated one and not the actual position we want (and thus represents an overcue), it can occasionally be useful in achieving the correct position.

Problem #2: Back Knee Completely Straight
As for the back leg, we want the knee to be bent or unlocked with the back heel off the ground as you see Becky demonstrate in Figure 1.

Figure 3: don’t do this.

While the knee bend is not going to be 90 degrees - so don't do what Becky’s doing in Figure 3 - we certainly don't want the back knee to be completely straight either, and that's a common problem that needs to be addressed.

A straight back leg tends to jam the lifter forward onto the front foot. Note the difference between the correct position in Figure 4a versus the straight leg position in Figure 4b.

If you find that you're landing forward with an excessive amount of weight on your front foot, it's very possible that you need to bend your back knee.

Another problem with a straight back leg is that the depth or amount of drop you can achieve in the split should come from the hip joint and the knee joints of both legs. You can clearly see this with the front leg - the hip is flexed (i.e., bent), and the knee is bent, and those two factors together allow the lifter to drop down into position.

Figure 4a (left) vs Figure 4b (right)

The hip and knee of the back leg should also contribute to the drop, but if the back knee is completely straight, it can't contribute to the dropping motion. This will typically mean that the only way to drop lower is to bend the front knee even more, which then pushes the front knee forward into a weaker position.

On a lesser note, allowing the back knee to bend means the hip of the back leg doesn't have to occupy as severe an angle as it otherwise would. Again, note the difference between the two positions shown in Figure 4a and 4b - if you try this yourself, you'll note the difference in sensation at the hip as well as in the low back. The bent knee position will feel stronger and more stable.

How to Fix This Problem
To help fix a straight back leg, try one of the following cues immediately before performing the jerk:

  • The most straightforward approach is simply “bend the back knee” or “bend the knee.”

  • If the above cue doesn’t work, try “drop the back knee” or simply “back knee down.”

  • Finally, you can also cue yourself to land with more weight on your back leg or foot.

As always, we hope this helps you get stronger and live better.

(Some links may be affiliate links. As an Amazon Associate, Testify earns from qualifying purchases.)

If you found this helpful, you’ll love our weekly email. It’s got useful videos, articles, and training tips just like the one in this article. Sign up below, and of course, if you don’t love it, you can unsubscribe at any time.


At Testify, we offer small group training, private coaching (in-person or remotely via Zoom), online coaching, and form checks. Interested in getting stronger, looking better, and having more energy?

Power Jerk vs Squat Jerk vs Split Jerk: Which One is BEST?

There are 3 different types of jerk, and each has its own advantages and disadvantages. Phil and Becky explain and demonstrate the power jerk, squat jerk, and split jerk.

(A Blast from the Past video originally published on 08/01/22)


At Testify, we offer small group training, private coaching (in-person or remotely via Zoom), online coaching, and form checks. Click the button below to get quality coaching from a Starting Strength Coach and start getting stronger TODAY.

Beginner's Guide to Olympic Weightlifting: Power Jerk vs Squat Jerk vs Split Jerk

In weightlifting (AKA Olympic weightlifting), there are 3 different types of jerk, and each has its unique advantages. We cover each version as well as why you might want to perform it.


At Testify, we offer small group training, private coaching (in-person or remotely via Zoom), online coaching, and form checks. Click the button below to get quality coaching from a Starting Strength Coach and start getting stronger TODAY.

The Jerk: Landing Positions

Jonny performs a power jerk..

Jonny performs a power jerk.

(This is a Blast from the Past article originally posted on 07/02/21.)

We’ve covered the three landing positions for both the snatch and the clean in past articles, and not surprisingly, there are also three landing positions for the jerk. Again, each has its own advantages, so let’s briefly cover them:

POWER JERK

Landing Position: Partial squat

Advantage: The power jerk is the simplest to learn as your feet do not travel far from their original position. Your feet don’t move very much as they barely leave the ground and then immediately land in a squat-width stance. You receive the bar overhead with your hips and legs in a partial-depth squat position. Due to its simplicity, the power jerk often serves as an intermediate step on the way to learning either the squat jerk or the split jerk.

Note: If your feet never leave the ground during this movement, many coaches will call this a push jerk to distinguish it from a power jerk (but some coaches use the terms interchangeably).

Jonny performs a squat jerk.

Jonny performs a squat jerk.

SQUAT JERK

Landing Position: Squat (i.e., full-depth squat)

Advantage: Of the three landing positions, the squat jerk allows lifters to drop the farthest under the bar, which means the bar doesn’t have to be lifted as high before locking it out overhead. With this in mind, there is great potential with the squat jerk, but this potential is tempered by two drawbacks - first, the lifter needs excellent flexibility to achieve what is essentially a narrow-grip overhead squat position in the receiving position for this jerk, and second, the lifter has relatively little stability from front-to-back due to the lack of a split (see the split jerk below), so the squat jerk is extremely unforgiving of jerks that are slightly forward or backward.

Jonny performs a split jerk.

Jonny performs a split jerk.

SPLIT JERK

Landing Position: Split stance

Advantage: The split jerk allows the lifter to drop further under the bar than the power jerk without requiring the ability to drop into the squat jerk position, and due to the front-to-back split, the split jerk is more stable. For this reason, the split jerk is - by far - the most commonly executed jerk in training and competition.

If you found this helpful, you’ll love our weekly email. It’s got useful videos, articles, and training tips just like the one in this article. Sign up below, and of course, if you don’t love it, you can unsubscribe at any time.


At Testify, we offer small group training, private coaching (in-person or remotely via Zoom), online coaching, and form checks. Click the button below to get quality coaching from a Starting Strength Coach and start getting stronger TODAY.

Timing and Bounce on the Jerk

Let’s briefly address the “bounce and drive” aspect of the jerk. This applies to the split jerk, the power jerk, and the squat jerk. Note that we’re not referring to this motion as a “dip and drive” because we want the bounce of the jerk - i.e., the turnaround at the bottom of the movement - to be sharp and quick.

(Today’s topic is far more easily understood when watching it in action, so I’d strongly recommend watching the included video.)

By aiming for a short, quick, sharp bounce out of the bottom of the movement, we’re not only trying to impart as much upward momentum to the barbell as possible - we’re also endeavoring to take advantage of the flex (or whip) of the bar, and a sharp bounce does exactly this.

To achieve the proper “bounce and drive” that we’re aiming for, cue yourself “hard bounce” the next time you’re practicing your jerks. After the clean, immediately before starting the downward motion of the jerk, mentally remind yourself “hard bounce” and then try to get exactly that motion out of the bottom of the jerk.

As mentioned earlier, watching this motion in action is very helpful, so I’d recommend watching the video included earlier in this article. In the meantime, we hope this helps you get stronger and live better.

(Some links may be affiliate links. As an Amazon Associate, Testify earns from qualifying purchases.)

If you found this helpful, you’ll love our weekly email. It’s got useful videos, articles, and training tips just like the one in this article. Sign up below, and of course, if you don’t love it, you can unsubscribe at any time.


At Testify, we offer small group training, private coaching (in-person or remotely via Zoom), online coaching, and form checks. Interested in getting stronger, looking better, and having more energy?