Bench Press with Short Legs or Back Pain?
/
(A Blast from the Past article originally posted on 11/26/21)
If you have shorter legs you may find it difficult or simply uncomfortable to keep your feet planted firmly (and flat) on the ground. Let’s fix this.
Having your feet planted flat and firmly to the floor is important because your feet provide lateral stability, i.e., your stance provides side-to-side stability during the bench press because the bench itself is rather narrow. Additionally, having your feet planted firmly on the ground allows you to use your legs to drive up the bench during the movement as well (which provides rigidity in your upper body and also reinforces your arch).
With all this in mind, if you have shorter legs - specifically shorter lower legs (i.e., your shins or shanks) - and if you find that your heels are coming up off the ground, then simply stack a bumper plate or two underneath each foot.

You can use wooden blocks or rubber mats instead of bumper plates, but whatever you use, your new “foot platform” needs to provide a non-slip surface that is high enough that you can keep your feet flat and firmly on that surface. A reasonable benchmark (get it?) is to create a platform high enough that your thighs are roughly parallel to the ground.
The use of such a platform can also be a good tactic if you experience some low back discomfort or pain when you lie down on the bench. This can occur with people with shorter legs due to the excessive arch needed to reach their feet down to the floor, and it can also occur with older people or with people who carry some extra weight.

Jen demonstrates the use of bumper plates to provide an elevated platform for her feet.
If lying down on the bench causes you some discomfort, try raising your feet up a bit by using a platform. If your use of the platform is due to discomfort (and not due to having short legs), you may find that you can reduce the height of your platform over time (e.g., remove a bumper plate from your stack), and you might even get to the point where your feet are flat on the ground again.
We hope this helps you get stronger and live better!
-Phil
PS: Whenever you want even more Testify in your life, here are some free resources:
Follow Testify on Instagram HERE.
Subscribe to Testify’s YouTube channel HERE.
Book a free intro and strategy session with us HERE.
Pick up a free copy of Testify’s Squat Guide: 12 Tips to Improve Your Squat Now HERE.
Get our free weekly email - containing useful videos, articles, and training tips - HERE.
(Some links may be affiliate links. As an Amazon Associate, Testify earns from qualifying purchases.)
At Testify, we offer small group training, private coaching (in-person or remotely via Zoom), online coaching, and form checks. Interested in getting stronger, looking better, and having more energy?
Best Christmas Present for a Lifter? I'll Start...
/Not sure what to get for the lifter in your life? Perhaps you're getting yourself a Christmas present. Either way, we recommend this option.
At Testify, we offer small group training, private coaching (in-person or remotely via Zoom), online coaching, and form checks. Click the button below to get quality coaching from a Starting Strength Coach and start getting stronger TODAY.
Testify Commentator - December 11, 2023
/THIS WEEK'S SUBMISSION
From our video Pin Squats: How and Why (click the title to watch):
Rick Flairs Hair
Really liked the content and simple explanation. I do have a question. What percentage of 1 RM would you recommend for this? And, how many sets/reps would you generally prescribe for a lifter? Thank you
Phil
Thanks for the kind words, Kyle, and sorry for the belated response. Don't worry about a percentage (a set of 5 pin squats will use less weight than a set of 5 regular squats, however), and, on your first day of utilizing pin squats, simply work up to a challenging, yet manageable weight where your bar speed starts to slow by the end of the set. We usually use 3-5 reps per set with pin squats. A good approach would be to start with 3 x 5 (i.e., 3 sets x 5 reps).
ARTICLES & VIDEOS

How to Unrack a Heavy Bench Press By Yourself
Struggling with unracking your bench press when training alone? Take the strain off your shoulders (and avoid getting a barbell to the face) with this method. Click here to watch.
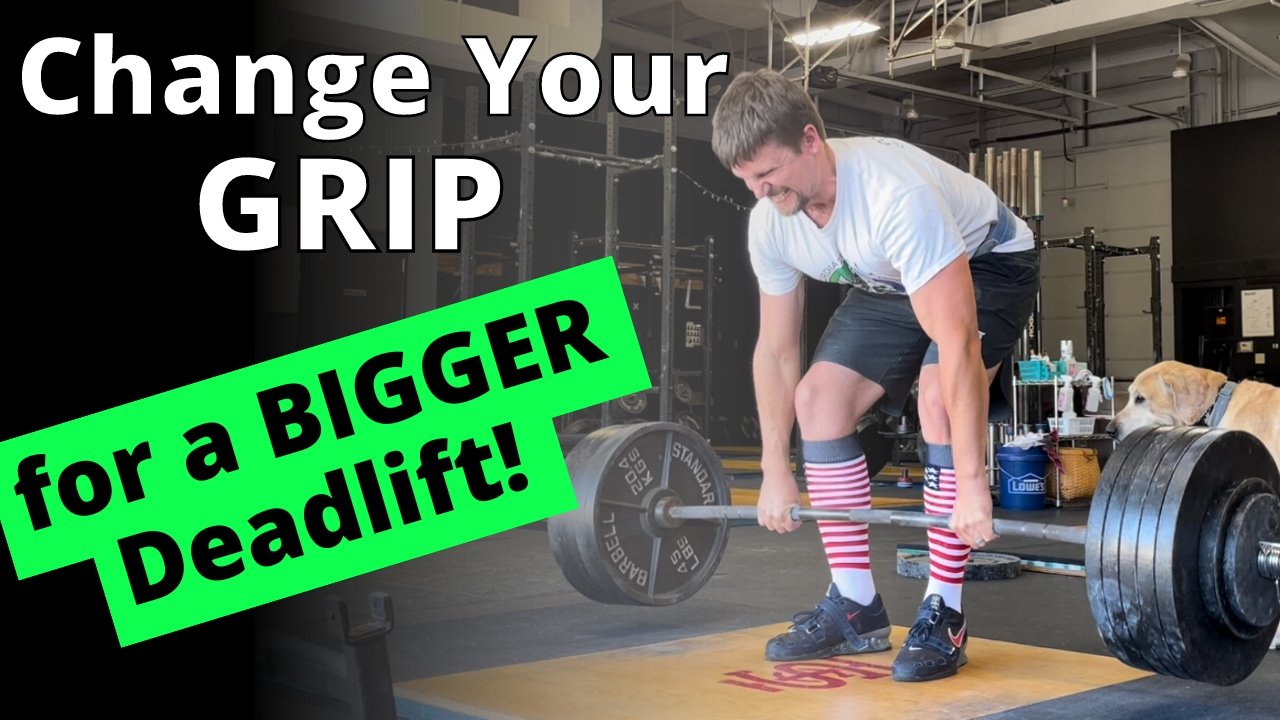
Use This Grip for a BIGGER Deadlift! (Tension Grip)
What is a tension grip, and why should you use it for pulling movements like the deadlift, row, and clean? Phil explains in the second article in our series on the correct grip for each lift. Click here to read.

Blast from the Past: Pull-up vs Chin-up | The Difference & Which One You Should Do!
What is the difference between a pull-up and a chin-up? Which one should you do? Phil breaks it down in just a few minutes. Click here to watch.

Blast from the Past: Enter the TUBOW
We cover how to use the TUBOW (the Terribly Useful Block Of Wood) in the squat to help fix your knees' forward position, your knees' lateral position, and even your hip position. Click here to read.

NEW TESTIFY HOODIES ARE AVAILABLE!
Looking to train in style and comfort this winter? Get yourself a Testify hoodie - in practically any color! Get yours today and represent your favorite gym.
Click here to head to the Testify Store.
WHAT'S COMING UP
Below are a few of our upcoming events, and you can find out what else is on the calendar by heading to our events page at www.testifysc.com/events.
Testify Leprechaun Lift-off
March 16, 2024
Want to join us for the annual Testify Leprechaun Lift-off? Of course you do! This is a weightlifting meet, so the contested lifts are the snatch and clean-and-jerk.
Click here to register or for more information.
Testify Strengthlifting Challenge
April 6, 2024
The annual Testify Strengthlifting Challenge is back, and we invite you to be a part of it! This is a strengthlifting meet, which means the contested lifts will be the squat, press, and deadlift.
Click here to register or for more information.
Testify Barbell MAYhem
May 11, 2024
Come on out and join us for the annual Testify Barbell MAYhem! This is a weightlifting meet, so the contested lifts are the snatch and clean-and-jerk.
Click here for more information.
THIS WEEK’S CONDITIONING
Option 1
“Prowler Base”
1. Load up a manageable weight.
2. Sprint 40m at 85% intensity.
3. Rest until breathing and heart rate slow down. (45 sec – 2 min)
4. Repeat 5-15 times.
Courtesy of “Death by Prowler” (on Starting Strength).
Compare to 2023.10.09.
Option 2
Bike/row:
5 min on
4 min off
4 min on
3 min off
3 min on
2 min off
2 min on
1 min off
1 min on
Record distance for each interval and add for total distance.
Compare to 2023.09.18.
Option 3
5-10 rounds of:
30 sec ME tire flips
30 sec rest
Compare to 2023.08.21.
Option 4
For time:
500m row
5 x 80m sled push (200 ft if indoors)
500m row
Rest 1 minute after the first row and after each sled push.
Compare to 2023.08.21.
Use This Grip for a BIGGER Deadlift! (Tension Grip)
/What is a tension grip, and why should you use it for pulling movements like the deadlift, row, and clean? This is the second article in our short series on the correct grip for each lift. In the first article, we discussed the compression grip, which is useful for pressing movements such as the bench press, press, close grip bench press, etc., and you can read that article by clicking here.
Today’s Topic: Pulling Movements
The grip we are covering today is the type of grip you would take for pulling movements such as the deadlift, the row, the clean, etc. This grip is commonly referred to as a tension grip (watch the included video for a demonstration).
Whether you execute a pulling lift (e.g., deadlift) or a pressing movement (e.g., bench press), the same principle is true - gravity wants the bar to go down, so your grip should put the bar in the lowest stable position possible. In this way, the bar cannot accidentally reach a lower position than that which it’s already occupying.
What NOT To Do
In a pressing movement - as discussed in the compression grip article - you place the bar at the base of the palm. However, since the hand will be pointing downward in a pulling movement, putting the base of the palm against the bar puts the bar in an unstable position. The compression grip is very strong for pushing and pretty terrible for pulling.

Figure 1: compression grip (shown in reverse for viewing purposes): good for pushing - terrible for pulling
Placing the base of the palm against the bar - this will look like you’re pushing down on the bar (Figure 1) - compromises the grip, and this will show up in several ways. First, if you can even break the bar off the floor, it may result in a soft lockout at the top of the lift (e.g., knees that are still bent) or the complete inability to finish the lift at all. Second, when your grip is compromised, everything else starts to compensate - your back starts to round, the weight feels heavier, and it will actually be harder to pull the bar off the floor.

Figure 2: tension grip (shown in reverse for viewing purposes): good for pulling
The Answer
Take a grip that permits the bar to sit a little lower in the hand - down by the fingers a bit more (Figure 2).
(As a side note, don’t take a monkey grip - you shouldn’t have a visible air gap between your hands and the bar.)
Put simply, it should look like you’re pulling up on the bar and not pushing down on the bar. Note the differences between a compression grip (bad for pulling) and a tension grip (good for pulling) in the photos below.


Whether you use a double overhand grip, a hook grip, or an alternate grip, make sure the bar is carried down by the fingers and not positioned up by the base of the palm. When in doubt, put some upward tension on the bar, and voilà - your wrists will straighten out, and the bar will be positioned correctly.
As always, we hope these tips help you get stronger and live better.
-Phil
PS: Whenever you want even more Testify in your life, here are some free resources:
Follow Testify on Instagram HERE.
Subscribe to Testify’s YouTube channel HERE.
Book a free intro and strategy session with us HERE.
Pick up a free copy of Testify’s Squat Guide: 12 Tips to Improve Your Squat Now HERE.
Get our free weekly email - containing useful videos, articles, and training tips - HERE.
(Some links may be affiliate links. As an Amazon Associate, Testify earns from qualifying purchases.)