Simple and Cheap DIY Chalk Stand
/
(A Blast from the Past article originally posted on 02/26/21)
When you chalk up for your next set, it’s nice to have a chalk stand. It’s not absolutely necessary, of course, as you can just use a bag of chalk or - better yet - a chalk bucket sitting on the ground. Although those options work, a chalk stand makes much less of a mess than a bag of chalk, and as the stand is raised, you don’t have to reach all the way down to the floor level as you do with a bucket of chalk, which can be a bit of pain if you already have your belt tightened.
With all this in mind, here’s how you can make a simple and cheap chalk stand (feel free to watch the video above if you’d rather not read the steps below):
Step 1
Go to your nearest hardware store and purchase the following items (you may already have some of these items at home). If you’d rather not make the trip, you can click the items below and order from Amazon.
Two 5-gallon buckets. Choose a color option that allows you to find matching spray paint.
A lid for one of the buckets (preferably the same color as the buckets). You only need one lid.
One can of spray paint - ideally the same color as the buckets
One roll of duct tape
Step 2
Set one bucket on the ground - upside down.
Step 3
Set the other bucket on top of the first bucket - right side up. The closed ends of the two buckets should now be touching.

Step 4
Tape the two buckets together by wrapping duct tape around the buckets several times. Tape the “seam” between the buckets as well as above and below the seam. Five or six times around the buckets should do nicely.
Step 5
Spray paint the buckets. This step is optional and is for aesthetic purposes only - it covers up any logos or printing on the buckets. It’s nice to have the paint match the buckets (or as closely as possible) for two reasons:
This is supposed to be a quick process, so don’t worry too much about whether you’ve painted the entire apparatus or not. If the logos are covered and the paint closely matches the bucket, it will look just fine.
Eventually, the paint will chip or wear in places, and if the bucket is close to the same color as the paint, this won’t be a big deal.
Step 6
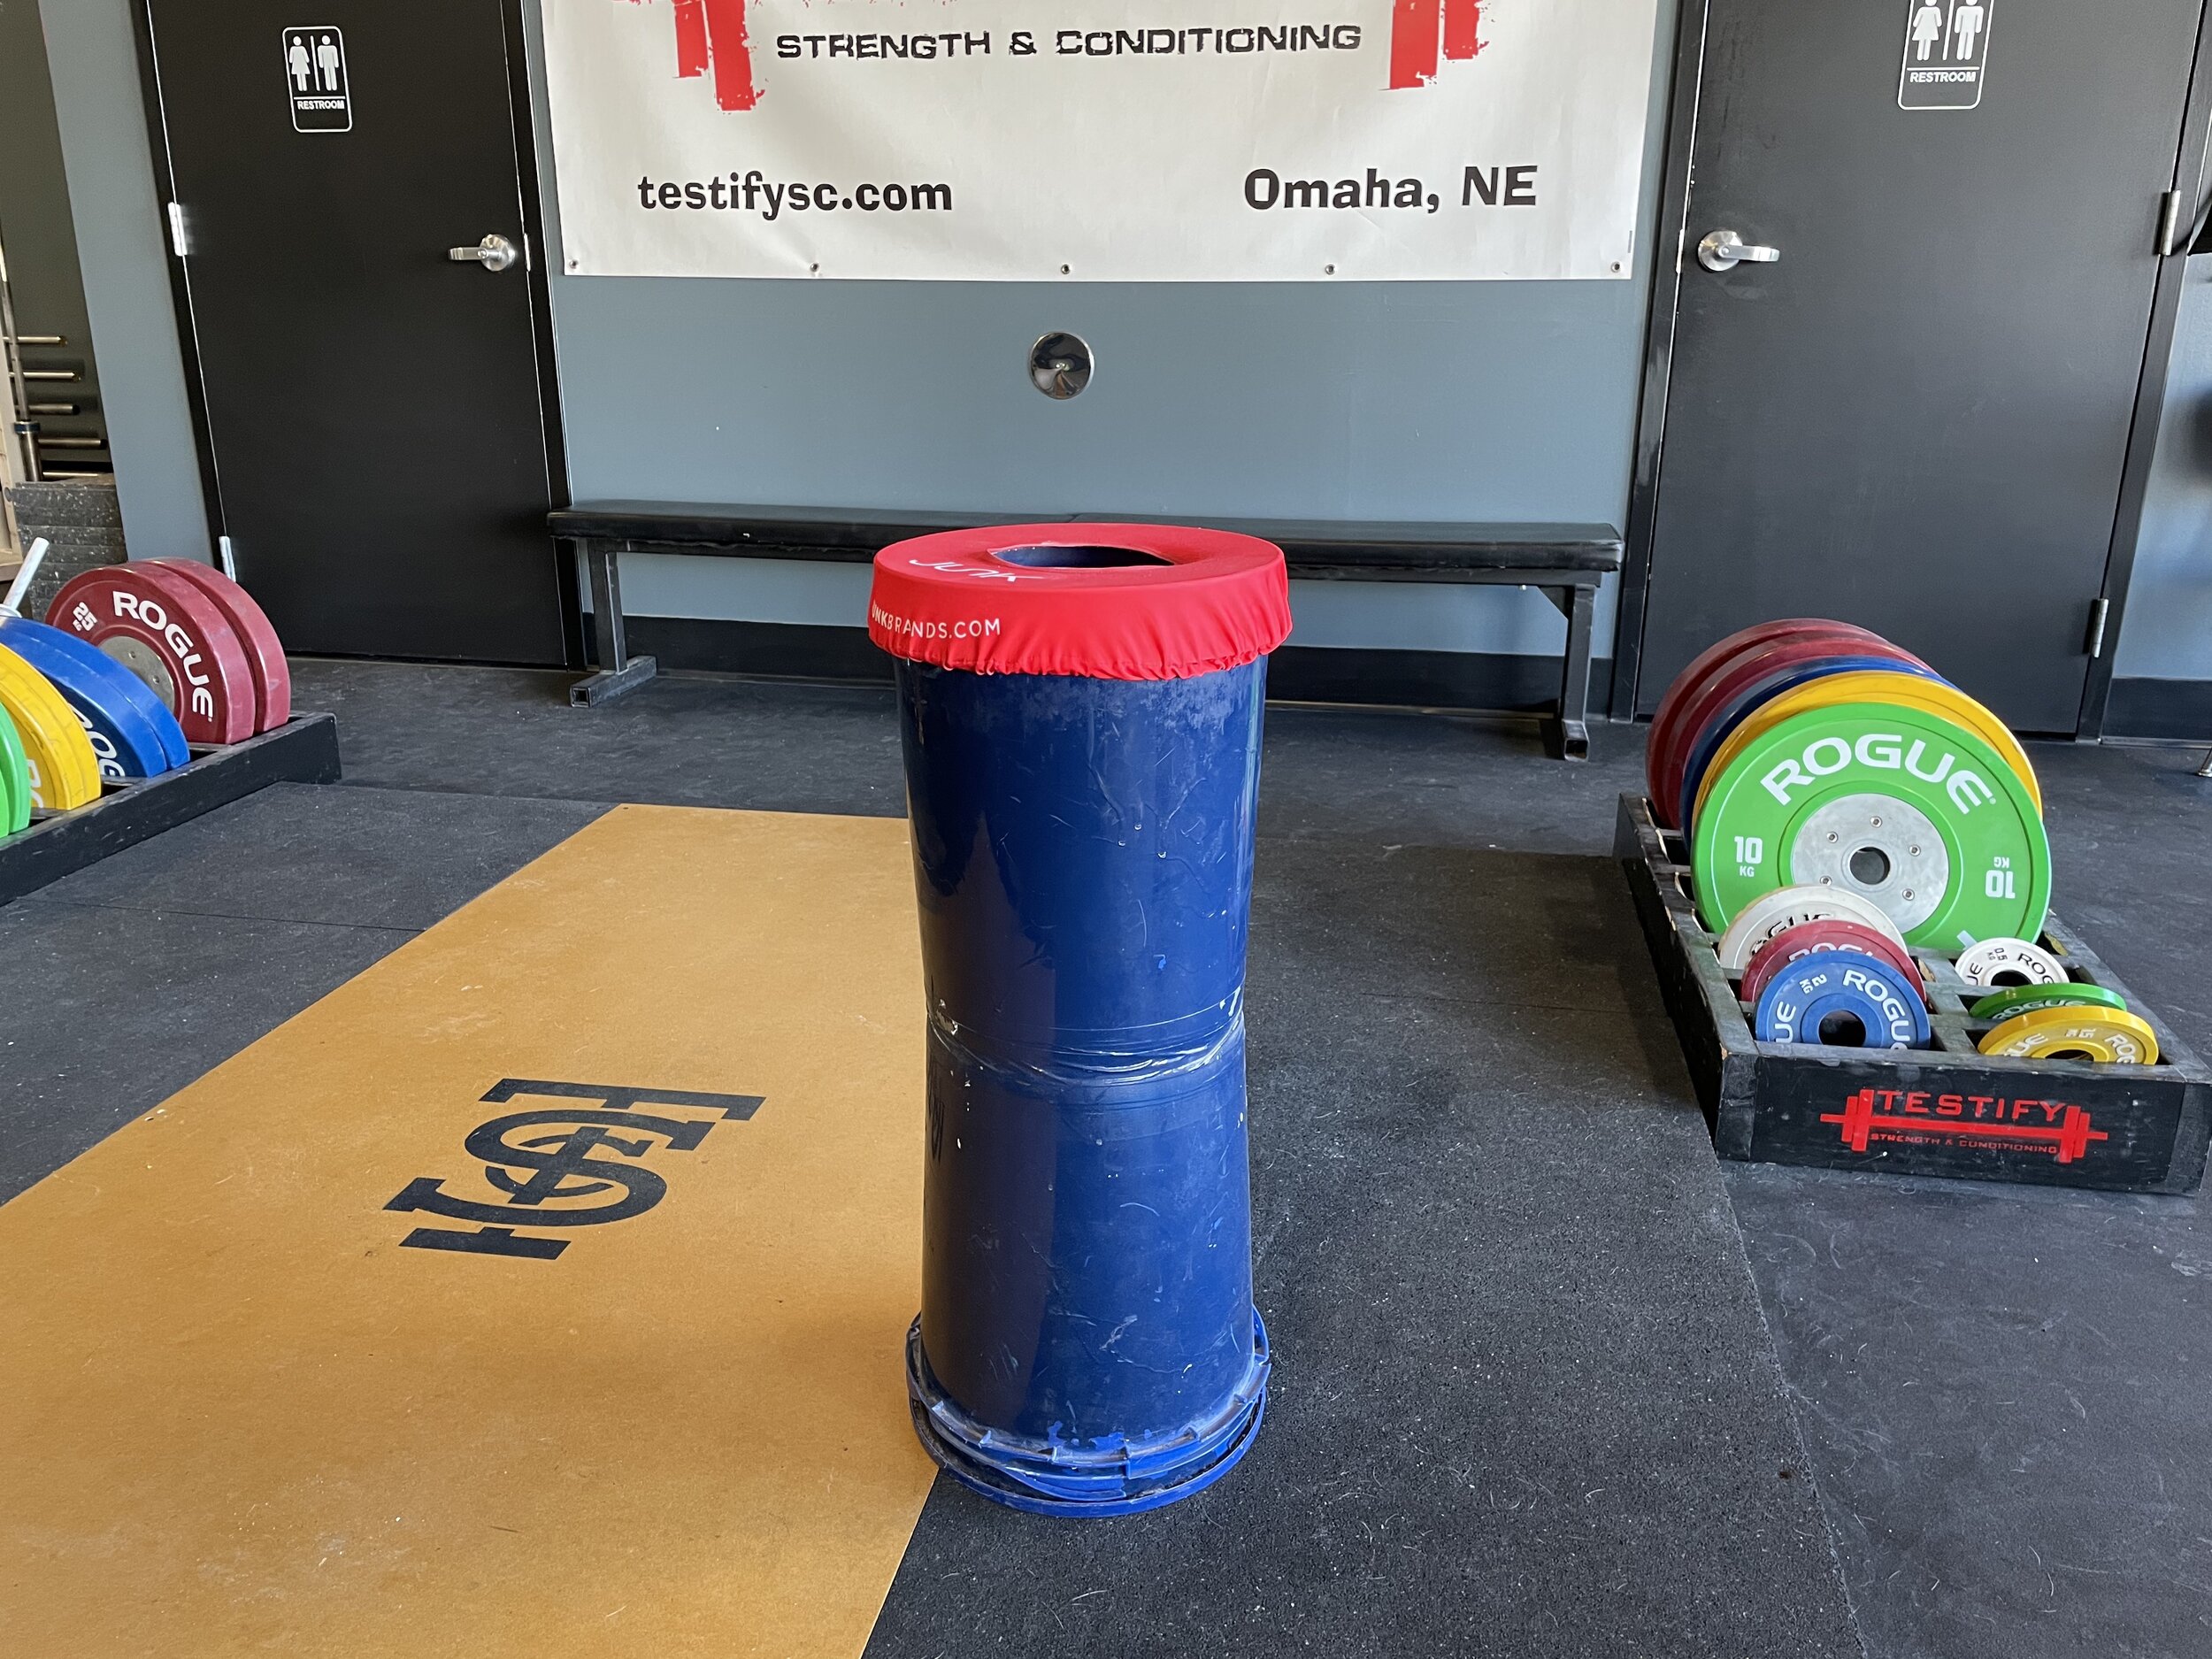
Place the lid on the ground - upside down - with a brick, 10 lb plate, or some other relatively heavy object on top of the lid, and then set your new chalk stand on top of the lid and press down so that the lid is attached to the stand. You’ve now weighted the base of your chalk stand and made it much less likely to tip over and spill.

Step 7
Put a chalk-topper over the top of the stand. This is optional, but if other people use your chalk stand, you’ll find this greatly helps keep the chalk dust inside the stand. Our chalk toppers are from www.junkbrands.com.
Step 8
Place some chalk in the top bucket, and you’re good to go!
As always, we hope this helps you get stronger and live better.
-Phil
PS: Whenever you want even more Testify in your life, here are some free resources:
Book a free intro and strategy session with us HERE.
Pick up a free copy of Testify’s Squat Guide: 12 Tips to Improve Your Squat Now HERE.
Get our free weekly email - containing useful videos, articles, and training tips - HERE.
Follow Testify on Instagram HERE.
Subscribe to Testify’s YouTube channel HERE.
(Some links may be affiliate links. As an Amazon Associate, Testify earns from qualifying purchases.)
At Testify, we offer small group training, private coaching (in-person or remotely via Zoom), online coaching, and form checks. Interested in getting stronger, looking better, and having more energy?
Cheap & Easy DIY Sled Drag Harness Options
/
The sled or prowler is an extremely effective conditioning tool (albeit a rather evil one). You can get in some great conditioning pushing the sled, but you can also get in some great conditioning pulling it, so let’s cover a couple of options to construct a simple and cheap sled drag harness so you don’t have to go out and buy an expensive one.
First, a few notes . . .
Sled vs Prowler
A sled has 2 skids while a prowler has 3 skids. They accomplish the same purpose as they both can be pushed or pulled, and for our purposes, I’m going to use the word “sled” for both implements.
Don’t Have a Sled?
If you don’t have a sled for pulling, you don’t need to go out and put down a bunch of cash for a new one. You can construct a “tire sled” from an old tire and an eyebolt - it’s cheap, pretty quick, and it works very well for pulls.
Watch the included video - Free (or cheap!) Strongman and Conditioning Equipment - to see what I’m talking about.
And now, let’s get to the harness options . . .
Sled Drag Harness - Waist Option
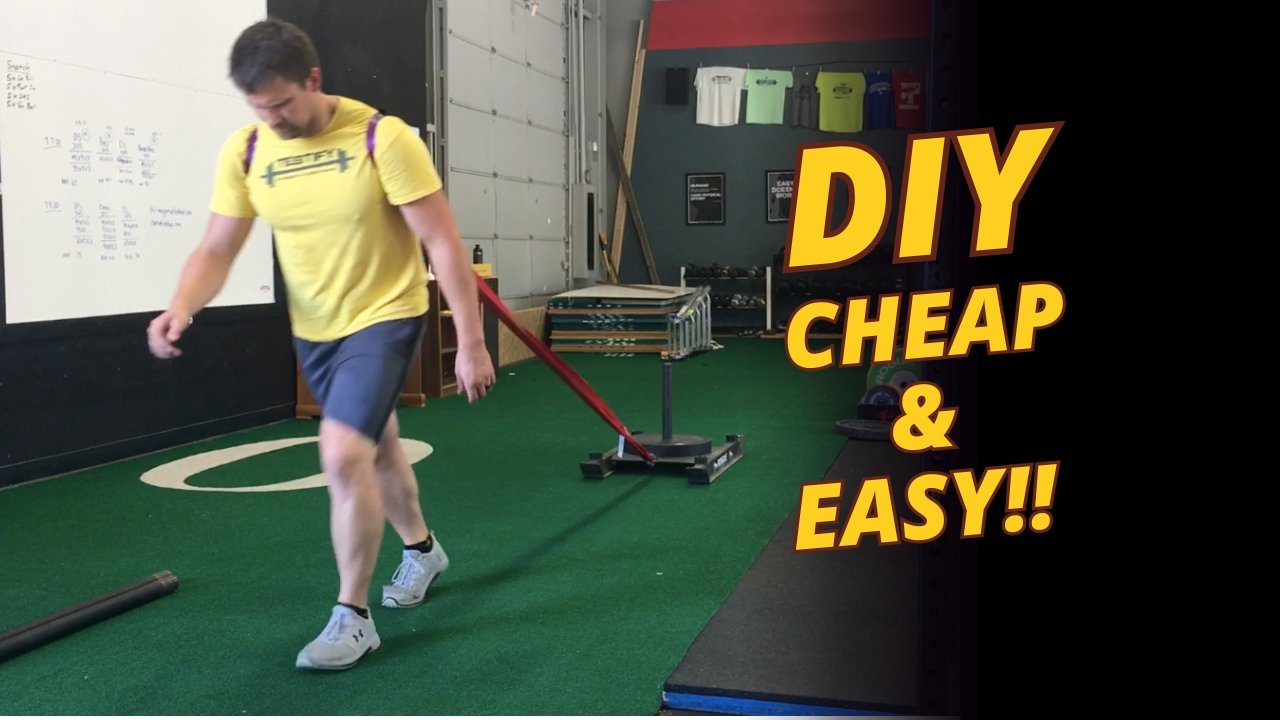
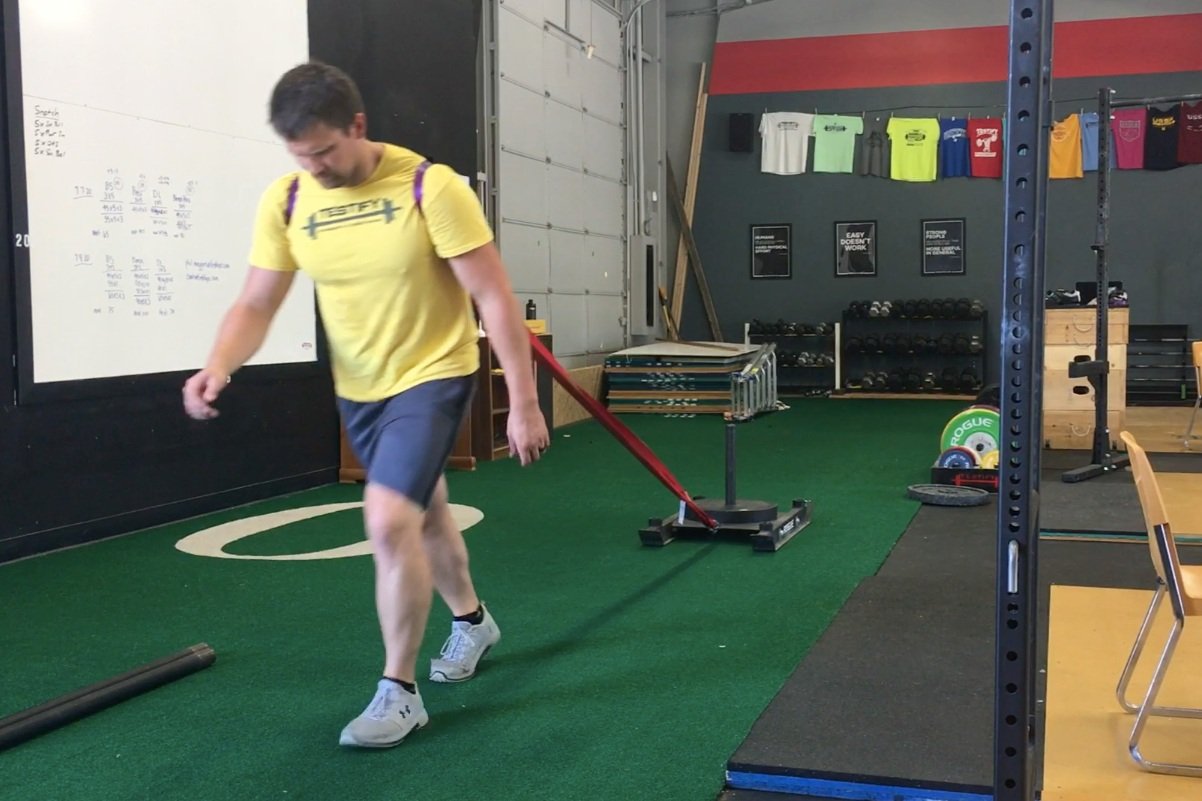
You’ll need a fairly large carabiner, and you’ll also need to get an automotive recovery strap, which you can obtain at pretty much any hardware store or by clicking here. Each end of the strap has a loop, and we’ll simply connect each loop to the carabiner, and then we’ll hook the carabiner to the sled. Simply place the middle of the recovery strap around your waist, and you’ve now got a cheap and easy-to-make harness for walking either forward or backward while dragging the sled.
Shoulder Harness option
Sled Drag Harness - Shoulder Option
For this version, you’ll need to get some 1-inch climbing webbing. This is the same tubular webbing that we use for making lifting straps (see the video below) - you can find this type of webbing at an R.E.I. or a something store, or you can get some on Amazon by clicking here. You could probably use wider material if you want to make it more comfortable, but conditioning is not terribly comfortable anyway, and this is what we had on hand, and it works well.
Take 7-8 feet of webbing and tie a water knot with the ends to create one long, continuous loop. To tie a water knot (other knots won’t work as well with webbing), check out the DIY Sled Drag Harness Options video above. Feeding that loop through the loop created by your recovery strap, you have now created “backpack straps,” so simply put one arm through each end of the backpack straps, and you’re all set to go.
Seeing this on video helps quite a bit, so as mentioned earlier, I’d recommend watching the short DIY Sled Drag Harness Options video above (this video was the basis for this article).
As always, we hope this helps you get stronger (or at least more conditioned!) and live better.
-Phil
PS: Whenever you want even more Testify in your life, here are some free resources:
Follow Testify on Instagram HERE.
Subscribe to Testify’s YouTube channel HERE.
Book a free intro and strategy session with us HERE.
Pick up a free copy of Testify’s Squat Guide: 12 Tips to Improve Your Squat Now HERE.
Get our free weekly email - containing useful videos, articles, and training tips - HERE.
(Some links may be affiliate links. As an Amazon Associate, Testify earns from qualifying purchases.)
At Testify, we offer small group training, private coaching (in-person or remotely via Zoom), online coaching, and form checks. Interested in getting stronger, looking better, and having more energy?
How to Easily Build a Lifting Platform (and the EASIEST way to cut stall mats)
/
A lifting platform is a very important part of your gym - it protects your equipment as well as your floor, it dampens the noise and vibrations of deadlifts, cleans, snatches, etc., and it clearly delineates the lifting space. This last factor - the abundantly clear “stay out of my lifting space” effect of the platform - is very useful when you have a training partner or little kids with you in the gym.
Fortunately, building a lifting platform is quite easy. In fact, “building” is a rather generous term for the process - we’re pretty much just assembling a platform. We’ll lay out the steps below, but I’d strongly recommend watching one of the videos linked throughout this article for a better understanding of the process.
First, lay two 4’ x 8’ sheets of OSB next to one another. I’d recommend what is commonly referred to as 3/4"-thick OSB, but the actual dimension will be listed as 23/32”.

Laying down the base layer of OSB sheets
These two sheets will run lengthwise, i.e., they’re run front-to-back. The sheets will probably have a slight bow to them (i.e., a curvature), and you’ll want to make sure that the crown of the board is up (so the board should make a mountain, not a valley).
Next, lay two more sheets of the same OSB on top of the base layer. These sheets will be perpendicular to the base layer sheets, so they’ll run side-to-side. Again, the crown should be up. Then you’ll use 1-1/4” screws to attach the second layer to the base layer. We use three screws on the short end of each board and four screws along the long end.

Laying down the 2nd layer of OSB sheets
Then, for the top layer, you’ll use a sheet of 3/4”-thick MDF to run down the middle. You could use something nicer like oak, but we like MDF as it’s nice and heavy and causes everything to lie nice and flat. You’ll need to do some cutting on the MDF as they are sized at 49” x 97”. You’ll cut the length to 96” (8 feet), and we recommend cutting the width to 42” (3.5 feet) as this gives you ample room between the plates and the MDF when you set down your deadlifts, cleans, etc (you can go with 4 feet wide, but 3.5 feet makes it much less likely that you’ll chip the MDF over time). You can do this yourself, or your lumber store may be willing to rip it for you.
Finally, you’ll use 3/4”-thick horse stall mats for the rest of the top layer. Stall mats are typically 4’ x 6’, so you’ll have some cutting to do here. The bigger piece on each side will be 72” x 27” (i.e., 6’ x 2’3”), and the smaller piece on each side will be 24” x 27” (i.e., 2’ x 2’3”).
To attach the top layer to the second layer, use 1-5/8” screws. We put six screws into the MDF - three in front and three in back. For the stall mats, we simply put screws around the outside, front, and back of the platform - we don’t put any screws down the rubber edge near the MDF so that we can’t accidentally set our metal plates or bumper plates down on a screw that might be a bit proud.
Last note - when cutting stall mats, use a jig saw. It is - by far - the best way to do it. Check out the video above to see this process.
We hope this helps you quickly and easily build a lifting platform, and as always, we hope this helps you get stronger and live better.

Finished platform - complete with Addy, Milo, & Parker
(Some links may be affiliate links. As an Amazon Associate, Testify earns from qualifying purchases.)
If you found this helpful, you’ll love our weekly email. It’s got useful videos, articles, and training tips just like the one in this article. Sign up below, and of course, if you don’t love it, you can unsubscribe at any time.
At Testify, we offer small group training, private coaching (in-person or remotely via Zoom), online coaching, and form checks. Interested in getting stronger, looking better, and having more energy?
Your Training Log - Part 3: The PR Sheet
/
(If you like, you can scroll down to the end of this article and watch a video on this topic. This article is a Blast from the Past article originally posted on 01/15/21.)
A few months ago, we covered the importance of keeping a training log in Your Training Log - Part 1: Just Do It, and we also covered how to keep one in the cleverly titled article, Your Training Log - Part 2: How to Keep One. Today, we’re going to add to this series and discuss adding a PR sheet to your log.
The concept is very straightforward - simply designate one sheet of paper in your training log for keeping track of PRs (Personal Records). I would recommend using the first page of your book, the last page of your book, or you can keep a separate piece of paper in your book that is only used for PRs (but don’t let it fall out).
On this sheet, record your 1-5 rep PRs for the Big Four Lifts - the squat, press, bench press, and deadlift. If you snatch and clean-and-jerk, do the same for those lifts. Pull-ups? Absolutely. Curls? Sure. What about a 7-rep PR? Knock yourself out. If you compete, have two PR lists - one for training and one for competition (the competition list will only have 1-rep PRs). We’re not talking hard-and-fast rules here, but at the very least, having your 1-5 rep PRs written down for the Big Four is a good place to start.
Here’s a sample for the squat:
Weight Reps Date
310 1 03/25/20
285 2 05/18/19
275 3 02/20/20
4
265 5 10/18/19
250 3 x 5 10/06/19
It’s fine if your sheet has some blanks - as you can see, our imaginary lifter doesn’t have a 4-rep PR yet. You’ll also notice that this lifter recorded his “3 x 5” PR as well (i.e., the best he’s done for 3 sets of 5 reps), and that’s another solid idea.
When you start out, you’re setting PRs every single session, so this might not seem all that useful at first. However, the longer you train and the stronger you get, the harder it is and the longer it takes to get stronger and set new PRs, so having multiple opportunities to set new personal bests can be very helpful in the motivation department. Plus, it’s a lot of fun to discover that you just pulled your old 3-rep deadlift max for a set of five, and how will you ever know unless you track these things? Give it a shot.
At Testify, we offer small group training, private coaching (in-person or remotely via Zoom), online coaching, and form checks. Would you like to get quality coaching from a Starting Strength Coach?
Wraps and Straps and Gloves, Oh My!
/
You’re a lifter, so of course, you’ve got to accessorize. But with all the options for lifting gear and accessories out there, what’s useful and what’s garbage? This article is the first in a short series covering exactly that, and today’s topic is gear associated with your grip.
Lifting Straps
Also known simply as “straps” or sometimes “wrist straps” (which is inaccurate), straps are useful for pulling movements, such as deadlifts, rows, and even snatches. Do NOT use them for cleans, and it’s worth pointing out they are actually worn on the hand and not the wrist itself.
They save some wear and tear on the hands, and if you’ve got multiple sets on the deadlift, then a reasonable approach is to use your usual grip for the first set (hook grip or alternate grip) and then use straps for the remaining sets.
You can buy straps or make them (quite cheaply!), and we’ve got a few videos covering how to make them as well as use them.
Wrist Wraps
These are useful for pressing movements such as the press, bench press, close grip bench press, etc. Wrist wraps provide stability for the wrist by acting as a sort of belt or cast for the wrist. When the weights get challenging, a good approach is to warm up (mostly) without wrist wraps and then put your wraps on (tightly!) for your last warm up as well as your work sets.
Not surprisingly, we have a few videos covering this topic as well.
Gloves
Nope. Don’t use ‘em. They add something squishy and deformable between your hand and the bar, which is never good for force transfer. Also, because they add a layer between your hand and the bar, they effectively make the bar diameter larger, which makes it harder to keep your grip when pulling the bar off the floor with deadlifts, rows, etc.
Lifting gloves are stupid. I know this firsthand because I have worn them in a previous life. Don’t use them.
Ahem, we do not have a video on this topic.
Chalk
We’ll save this discussion for another day, but suffice to say chalk is very important for your grip. Use chalk.
As always, we hope this helps you get stronger and live better.
(Some links may be affiliate links. As an Amazon Associate, Testify earns from qualifying purchases.)