The Clean: Landing Positions

(A Blast from the Past article originally posted on 06/04/21)

A couple of weeks ago, we covered the three landing positions for the snatch. There are also three landing positions for the clean, and as with the snatch landing positions, each has its own advantages. Let’s briefly cover them here:
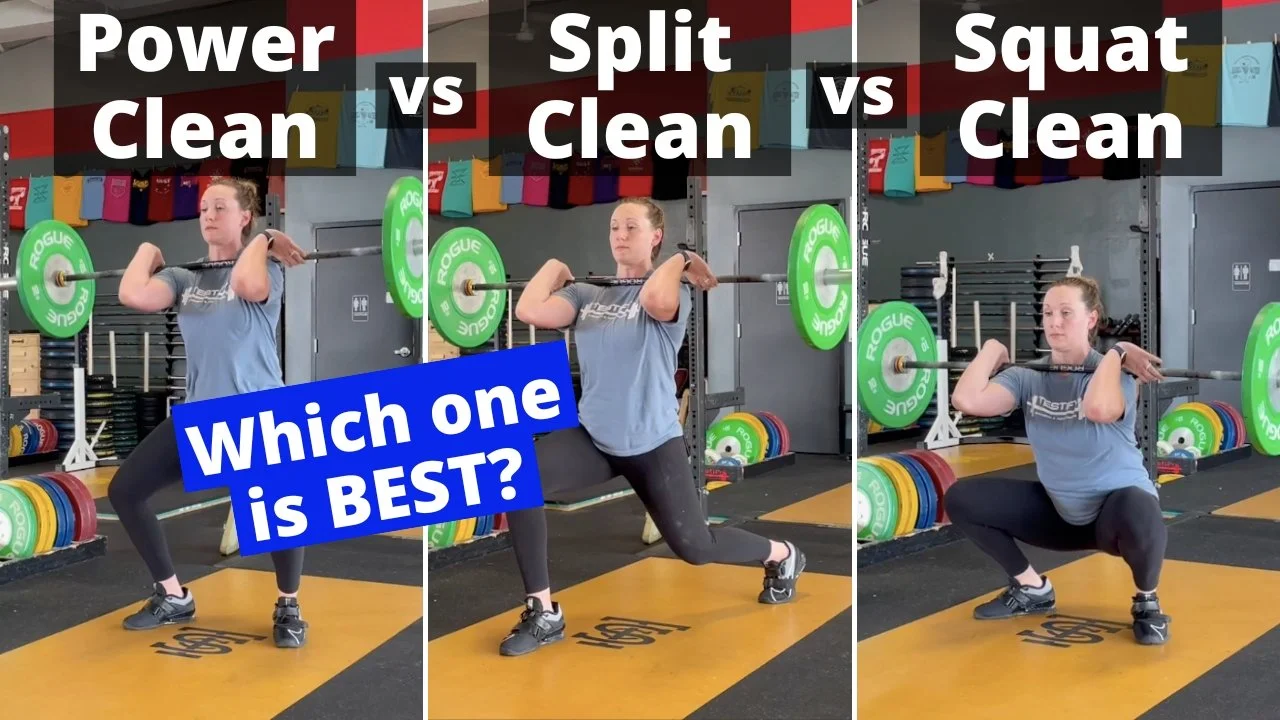
POWER CLEAN

Landing Position: Partial squat (i.e., partial-depth front squat)

Maddie performs a power clean.

Maddie performs a power clean.

Advantage: The power clean is the simplest to learn as your feet do not travel far from their original pulling position. It also doesn’t require learning how to perform a front squat as in the . . .

CLEAN (AKA full clean or squat clean)

Landing Position: Front squat (i.e., full-depth front squat)

Advantage: Of the three landing positions, the full clean allows lifters to lift the heaviest weights as this lower receiving position means the barbell doesn’t have to be lifted as high before racking it on the shoulders.

Maddie performs a clean.

Maddie performs a clean.

SPLIT CLEAN

Landing Position: Split stance - nearly identical to the split jerk stance, but the split is often even longer and deeper.

Advantage: The split clean allows the lifter to drop further under the bar than the power clean without requiring the ability to drop into an front squat position as in the full clean. For this reason, the split clean  - although potentially useful at all ages - is especially well-suited to older lifters.

Maddie performs a split clean.

Maddie performs a split clean.

You’ll notice that the word “hang” - as in hang clean or hang power clean or hang split clean - is conspicuously absent in this discussion. This is because “hang” refers to a starting position, not a landing position.

If “hang” is added as a prefix, then the lift simply starts with the bar hanging in the hands (usually at about mid-thigh height) as opposed to starting with the bar resting on the floor.

As always, we hope this helps you get stronger and live better.

-Phil

PS: Whenever you want even more Testify in your life, here are some free resources:

  • Book a free intro and strategy session with us HERE.

  • Pick up a free copy of Testify’s Squat Guide: 12 Tips to Improve Your Squat Now HERE.

  • Get our free weekly email - containing useful videos, articles, and training tips - HERE.

  • Follow Testify on Instagram HERE.

  • Subscribe to Testify’s YouTube channel HERE.

(Some links may be affiliate links. As an Amazon Associate, Testify earns from qualifying purchases.)


At Testify, we offer small group training, private coaching (in-person or remotely via Zoom), online coaching, and form checks. Interested in getting stronger, looking better, and having more energy?

How to Start Lifting: Learn to Power Clean

In this episode of the "How to Start Lifting" series, Phil, Maddie, and Carolyn help you learn how to power clean.

(This video is a Blast from the Past video originally published on 01/10/22.)


At Testify, we offer small group training, private coaching (in-person or remotely via Zoom), online coaching, and form checks. Click the button below to get quality coaching from a Starting Strength Coach and start getting stronger TODAY.

This Mistake Will RUIN All Your Lifts!

Want to improve every one of your lifts with one fix? Make sure you're doing this. Starting Strength Coach Phil Meggers explains.

Whenever you want even more Testify in your life, here are some free resources:

  • Book a free intro and strategy session with us HERE.

  • Pick up a free copy of Testify’s Squat Guide: 12 Tips to Improve Your Squat Now HERE.

  • Get our free weekly email - containing useful videos, articles, and training tips - HERE.

  • Follow Testify on Instagram HERE.

  • Subscribe to Testify’s YouTube channel HERE.


At Testify, we offer small group training, private coaching (in-person or remotely via Zoom), online coaching, and form checks. Interested in getting stronger, looking better, and having more energy?

Maximum Acceleration in the Clean! | Olympic Weightlifting

Learn how to put maximal acceleration into your clean. Phil and Becky Meggers discuss and demonstrate how to do this.

(This video is a Blast from the Past video originally published on 09/20/21.)


At Testify, we offer small group training, private coaching (in-person or remotely via Zoom), online coaching, and form checks. Click the button below to get quality coaching from a Starting Strength Coach and start getting stronger TODAY.

Stop Using Your Hands to Catch Your Cleans!

(A Blast from the Past article originally posted on 01/22/21)

The clean is racked (i.e., caught or received) on the shoulders. Not in the hands.

Figure 1: This is the correct way to rack a clean.

When you rack a clean, you do so by rapidly punching your elbows forward and up so that the barbell can sit on the shelf provided by your delts (Figure 1). This shelf is extremely strong, stable, and it can support a lot of weight - more than you can clean, in fact.

On the other hand - or rather, hands - if you receive your cleans by supporting the bar in your hands (Figure 2), your poor, tiny, bent wrists will hate you for it, and it’s possible that your collarbones will too.

Figure 2: Don’t rack your cleans like this. Your wrists will despise you.

To rack the bar properly, jam the elbows forward and up and receive the bar with a loose grip - be sure to let the thumb slip out of the hook grip as you punch the elbows forward.

Figure 3: Elbows forward and up and a loose grip on the bar

It’s possible that your pinky finger (maybe even your ring finger) will slip off the bar during the catch, and while this is not ideal (especially if you need to jerk the barbell overhead yet), it’s not the end of the world. Do whatever you need to do with your grip to permit the receiving of the bar on your shoulders.

Your wrists will not be straight when you catch a clean, and that’s perfectly fine. Whether a lifter receives the bar correctly on the shoulders or not, the wrists will be bent backwards in extension, but a bar caught on the shoulders (with elbows forward and up) is supported by the shoulders, so the wrists - although bent - do not take any of the load. A bar caught with low elbows, however, cannot be successfully supported by the shoulders and is instead supported on bent - and usually painful - wrists.

Tommy doesn’t even need hands to rack his cleans. (We do NOT recommend trying this at home, folks)

Be kind to your wrists and commit to catching your cleans on your shoulders. You’ll enjoy the lift far more when your wrists aren’t screaming at you.

As always, we hope this helps you get stronger and live better.

-Phil

PS: Whenever you want even more Testify in your life, here are some free resources:

  • Follow Testify on Instagram HERE.

  • Subscribe to Testify’s YouTube channel HERE.

  • Book a free intro and strategy session with us HERE.

  • Pick up a free copy of Testify’s Squat Guide: 12 Tips to Improve Your Squat Now HERE.

  • Get our free weekly email - containing useful videos, articles, and training tips - HERE.

(Some links may be affiliate links. As an Amazon Associate, Testify earns from qualifying purchases.)


At Testify, we offer small group training, private coaching (in-person or remotely via Zoom), online coaching, and form checks. Interested in getting stronger, looking better, and having more energy?

Timing and Bounce on the Jerk

Let’s briefly address the “bounce and drive” aspect of the jerk. This applies to the split jerk, the power jerk, and the squat jerk. Note that we’re not referring to this motion as a “dip and drive” because we want the bounce of the jerk - i.e., the turnaround at the bottom of the movement - to be sharp and quick.

(Today’s topic is far more easily understood when watching it in action, so I’d strongly recommend watching the included video.)

By aiming for a short, quick, sharp bounce out of the bottom of the movement, we’re not only trying to impart as much upward momentum to the barbell as possible - we’re also endeavoring to take advantage of the flex (or whip) of the bar, and a sharp bounce does exactly this.

To achieve the proper “bounce and drive” that we’re aiming for, cue yourself “hard bounce” the next time you’re practicing your jerks. After the clean, immediately before starting the downward motion of the jerk, mentally remind yourself “hard bounce” and then try to get exactly that motion out of the bottom of the jerk.

As mentioned earlier, watching this motion in action is very helpful, so I’d recommend watching the video included earlier in this article. In the meantime, we hope this helps you get stronger and live better.

(Some links may be affiliate links. As an Amazon Associate, Testify earns from qualifying purchases.)

If you found this helpful, you’ll love our weekly email. It’s got useful videos, articles, and training tips just like the one in this article. Sign up below, and of course, if you don’t love it, you can unsubscribe at any time.


At Testify, we offer small group training, private coaching (in-person or remotely via Zoom), online coaching, and form checks. Interested in getting stronger, looking better, and having more energy?