Basic Barbell Maintenance

(A Blast from the Past article originally posted on 01/13/23)

My wife, Becky, and I have two bare steel barbells in our garage gym, and while bare steel is unmatched in terms of grip and feel, it does require a bit of maintenance. Bars with a protective coating (e.g., zinc) will need some attention from time to time as well - simply less frequently.

With all of this in mind, let’s dive into how to perform some simple barbell maintenance.

Brush the Chalk Off the Barbell
The upside to chalk is that it absorbs the moisture of your hands and thus provides a secure grip on the bar. However, the downside is that chalk can hold some of that moisture and keep it on the bar even after you’re done training, and that can encourage rust formation on your bar.

To prevent this, simply brush the chalk off the bar every time you’re done training. A cheap nylon bristle brush will do the job just fine, and brushing off the chalk will take you about 20 seconds tops. Every member at Testify does this (whether the bar is bare steel or not) as well, and it helps tremendously.

APPLYING OIL TO THE BARBELL

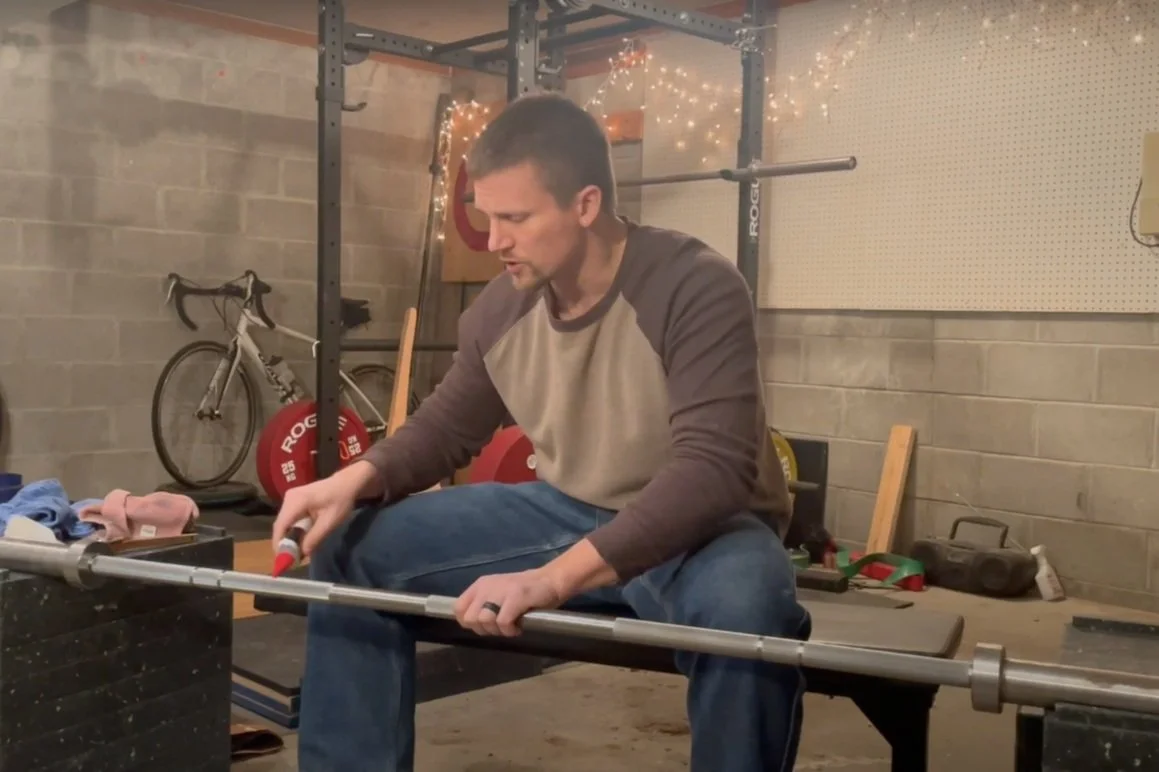
Oil the Barbell Shaft
About once a month (perhaps even more infrequently), you’ll need a few things: 3-IN-ONE Multi-Purpose Oil, a brass bristle brush, and a clean rage or two. The oil will help remove rust from the bar as well as apply a protective coating to help prevent future rust. Simply apply a bit of oil to the bar (watch the video above for an example) and then use the brass bristle brush to brush in the oil. After that, take a clean rag and then wipe down the bar to absorb any excess oil.

You can spend more time on any trouble spots, but if you’re doing this on a semi-regular basis, this will do an excellent job of protecting and caring for your bar. If you’ve got a bar that needs some serious rust removal, we also have a video that goes into depth on that process.

As always, we hope this helps you get stronger and live better.

-Phil

PS: Whenever you want even more Testify in your life, here are some free resources:

  • Book a free intro and strategy session with us HERE.

  • Pick up a free copy of Testify’s Squat Guide: 12 Tips to Improve Your Squat Now HERE.

  • Get our free weekly email - containing useful videos, articles, and training tips - HERE.

  • Follow Testify on Instagram HERE.

  • Subscribe to Testify’s YouTube channel HERE.

(Some links may be affiliate links. As an Amazon Associate, Testify earns from qualifying purchases.)


At Testify, we offer small group training, private coaching (in-person or remotely via Zoom), online coaching, and form checks. Interested in getting stronger, looking better, and having more energy?

The BEST Single Device to Prevent Frailty in Older Adults

What's the best device for seniors to get strong, prevent frailty, and stay independent? Starting Strength Coach Phil Meggers answers that question and provides 7 reasons why.

Whenever you want even more Testify in your life, here are some free resources:

  • Book a free intro and strategy session with us HERE.

  • Pick up a free copy of Testify’s Squat Guide: 12 Tips to Improve Your Squat Now HERE.

  • Get our free weekly email - containing useful videos, articles, and training tips - HERE.

  • Follow Testify on Instagram HERE.

  • Subscribe to Testify’s YouTube channel HERE.


At Testify, we offer small group training, private coaching (in-person or remotely via Zoom), online coaching, and form checks. Interested in getting stronger, looking better, and having more energy?

The Testify Star-Advertiser - January 13, 2025

THIS WEEK'S SUBMISSION

From our video Top 8 Squat Myths (click the title to watch):

Chad MacPherson
In your opinion is there a single shoe for squats, dead’s, presses, and cleans? Looking for any help from people with more experience than me. Thanks, and have a great rest of your day. Oh, you also have a new sub!!

Phil
Chad, I currently wear the Nike Romaleo 2, and I've worn these for years (since 2016 or 2017, I believe). They're great for all lifts - squat, deadlift, press, snatch, clean, etc., and the only thing I've had repaired on them was the velcro (it had simply worn out and wasn't closing as effectively last year).

However, the model 2 went out of production a while back, and Nike is currently on the 4th edition (which is generally considered a better shoe than the 3rd edition anyway). We have a number of lifters with the 4 (including my wife, who also trained in the 2 for many years), and it's a great shoe as well. If I had to buy a new pair of shoes tomorrow to replace mine, I'd go with the Nike Romaleo 4: https://amzn.to/3LAYn8d

With that said, here are a couple other solid options:

VS Athletics: https://amzn.to/3LGoYB6
(This is my back-up pair as we have an extra pair of these at the gym. They only come in black, but I liked training in them)

Inov-8 Fastlift 360: https://amzn.to/3xIoXGZ

Adidas Adipower 3: https://amzn.to/3WbFVJk
(Adidas are often considered to run a bit narrow, so we have lifters who like these, but they're not a good option for me.)

Do-Win: https://www.roguefitness.com/dowin-weightlifting-shoes-black-white
This is very similar to the VS Athletics shoe (I'm reasonably sure they contract with the same company to manufacture the sole).

Hope this is useful!

Chad MacPherson
@TestifySC
Thank you for taking time to answer my question. Appreciate you, and all of the options you gave me.

Phil
You’re very welcome!


TESTIFY ONLINE COACHING

Interested in getting stronger working one-on-one remotely with us? Click here to book your free strategy session.

Get Stronger. Live Better. Start today.


ARTICLES & VIDEOS

Top 8 Squat Myths
More people than ever are learning that the squat is important for getting stronger. However, as popularity increases, so do the number of myths surrounding this movement. Phil puts this nonsense to bed. Click here to watch.


Pulling Blocks: What, Why, and DIY vs. Commercial (Which Should YOU Use?)
What are pulling blocks, why are they useful, what are some options, and should you buy them or make them yourself? Click here to read.


Blast from the Past: Use This Grip for a BIGGER Bench Press and Press!
What is a compression grip, and why should you use it for the bench press and the press? Phil explains in the first video in our series on the correct grip for each lift. Click here to watch.


Blast from the Past: The 9th Circle of Deadlift Hell: The Drifting Barbell
“…a bar that swings away from you betrays that relationship and makes for a much harder deadlift, so if you’re struggling to escape this 9th circle of deadlift hell, try out one of…” Click here to read.


TESTIFY BEANIES ARE AVAILABLE!

Represent your favorite gym - even when it's cold outside!

And, it gets better - you can choose your beanie from EIGHT different colors!

Click here to head to the Testify Store.


WHAT'S COMING UP

Below is one of our upcoming events, and you can find out what else is on the calendar by heading to our events page at www.testifysc.com/events.

Testify Strengthlifting Challenge

  • April 12, 2025

  • The annual Testify Strengthlifting Challenge is back, and we invite you to be a part of it! This is a strengthlifting meet, which means the contested lifts will be the squat, press, and deadlift.

  • Click here to register or for more information.


THIS WEEK’S CONDITIONING

Option 1
Sled
Outdoors:
10 rounds of:
Push sled 100 ft
Pull sled 100 ft (hand over hand)

Indoors:
20 rounds of:
Push sled 50 ft
Pull sled 50 ft (hand over hand)

Compare to 2024.11.11.

Option 2
Bike/row:
4 x 3 minutes

Rest 3 minutes between each round. Score = lowest distance.

Compare to 2024.10.21.

Option 3
5-10 rounds of:
30 sec ME tire flips
30 sec rest

Compare to 2024.09.23.

Option 4
1. 5 yoke carries @ 30 yd (15 yd downback) – work up to heaviest carry
2. 5 rounds of 5 reps on the axle “clean and press away” – work up to heavy set of 5

Compare to 2024.09.23.


As always, we hope this helps you get stronger and live better!

Whenever you want even more Testify in your life, here are some free resources:

  • Book a free intro and strategy session with us HERE.

  • Pick up a free copy of Testify’s Squat Guide: 12 Tips to Improve Your Squat Now HERE.

  • Get our free weekly email - containing useful videos, articles, and training tips - HERE.

  • Follow Testify on Instagram HERE.

  • Subscribe to Testify’s YouTube channel HERE.

Pulling Blocks: What, Why, and DIY vs. Commercial (Which Should YOU Use?)

Today, we’re covering everything related to blocks - pulling blocks, jerk blocks, what they are, why you might use them, as well as what kind you might want to use.

DC Blocks
In short, DC Blocks are made of a very durable plastic, they’re very useful, and they’re also quite expensive. 

Figure 1: setting up to perform a block pull from DC blocks

DC blocks (Figure 1) are most commonly used as pulling blocks, i.e., blocks upon which you perform a pulling motion such as a block pull or a block clean. For example, suppose you want to perform a rack pull, which requires a bent bar or, at the very least, a bar that you’re willing to allow to bend, since rack pulls will do this to barbells over time. If you don’t have such a bar, you can simply perform a block pull instead with your regular barbell (with no worry about what will happen to that bar).

Note: Although DC blocks are quite durable, I’d recommend using bumper plates with them as opposed to metal plates. To be fair, I’ve seen metal plates used with DC Blocks on rare occasions, but I wouldn’t be surprised to see a lifter damage the blocks this way, and that would be an expensive mistake.

Figure 2: power snatch from DC blocks

You can also perform snatches and cleans from DC Blocks (Figure 2). If you’re working to eliminate a pesky early arm pull on your clean, you can start with a block height at which you pull correctly and then slowly lower the height of the blocks over time until you’re pulling from the floor.

As another example, if you struggle to set your back in the deadlift setup, you can practice this from a higher position (using blocks) where it’s easier to achieve. Then you can slowly work your way down by lowering the block height until you’re pulling from the floor with a correctly set back.

Since these blocks are stackable, they are very useful because of how versatile they are as well as how easy it is to achieve differing heights of blocks. However, they are a bit on the small side, which doesn’t give you a lot of room to err forward or backward when setting the bar down. This should not be a problem for a block pull, but it can potentially be an issue when lowering cleans and snatches.

We have a full set of DC Blocks, and they’re great, but we bought them used, and we never would have bought them new as there are other solid options at significantly lower price points. This corresponds to my recommendation for most people - if you can get them used at a great price, go for it, but otherwise, I’d recommend other options.

figure 3: one stack of jerk blocks (also pulling blocks if not stacked this high)

Wood Jerk Blocks/Pulling Blocks
Blocks such as those seen in Figure 3 are commonly known as jerk blocks if stacked this high since lifters can perform split jerks and power jerks from them. As they’re stackable, they are also referred to as pulling blocks since you can create a stack that’s much lower to the ground and suitable for block pulls, cleans, and snatches.

You can build these on your own or buy a set, and if constructed well, they are very durable and incredibly useful. Purchasing a set is comparable in cost to DC Blocks, but you have a much larger area onto which you can lower the barbell, which is a huge advantage when dropping snatches, cleans, and jerks (Figure 4). Constructing your own set does represent a significant investment in terms of building time, but it will also save you a lot of money.

We built our set, the total price was around one-third that of what it would have been if we had purchased a set, and the savings was even more when compared to a similar stack height of DC Blocks. Above, you can find one of our DIY videos we created for these blocks (the first of a three-part series), or you can simply click the links below:

figure 4: wood pulling and jerk blocks provide a large, durable platform for cleans, snatches, jerks, and block pulls.

Horse Stall Mats
You can also make pulling blocks from horse stall mats. Simply take the typical 4’ x 6’ stall mat (¾” thick), and use a jig saw to cut it to the appropriate size. You can create stacks of multiple mats to create blocks of different heights.

These blocks are useful, easy to make, and we’ve got a video covering how to do exactly that (check out the video below). You can purchase horse stall mats by clicking here, but they are generally significantly cheaper if purchased locally, e.g., at a Tractor Supply or something similar.

This sort of block is easily stackable, but the stacks do get heavy rather quickly, and they don’t connect together in the secure fashion that DC Blocks or wood blocks do, so these are limited in height and thus will serve only as pulling blocks (and not as jerk blocks). However, if you only need blocks up to about 6-8” in height, this is the easiest and cheapest way to go.

As always, we hope this helps you get stronger and live better.

-Phil

PS: Whenever you want even more Testify in your life, here are some free resources:

  • Book a free intro and strategy session with us HERE.

  • Pick up a free copy of Testify’s Squat Guide: 12 Tips to Improve Your Squat Now HERE.

  • Get our free weekly email - containing useful videos, articles, and training tips - HERE.

  • Follow Testify on Instagram HERE.

  • Subscribe to Testify’s YouTube channel HERE.

(Some links may be affiliate links. As an Amazon Associate, Testify earns from qualifying purchases.)


At Testify, we offer small group training, private coaching (in-person or remotely via Zoom), online coaching, and form checks. Interested in getting stronger, looking better, and having more energy?

Use This Grip for a BIGGER Bench Press and Press!

What is a compression grip, and why should you use it for the bench press and the press? Starting Strength Coach Phil Meggers explains in the first video in our series on the correct grip for each lift.

(A Blast from the Past video originally published on 09/26/22)

Whenever you want even more Testify in your life, here are some free resources:

  • Book a free intro and strategy session with us HERE.

  • Pick up a free copy of Testify’s Squat Guide: 12 Tips to Improve Your Squat Now HERE.

  • Get our free weekly email - containing useful videos, articles, and training tips - HERE.

  • Follow Testify on Instagram HERE.

  • Subscribe to Testify’s YouTube channel HERE.


At Testify, we offer small group training, private coaching (in-person or remotely via Zoom), online coaching, and form checks. Interested in getting stronger, looking better, and having more energy?

The 9th Circle of Deadlift Hell: The Drifting Barbell

(A Blast from the Past article originally posted on 01/29/21)

You’ve memorized the 5 step setup for the deadlift, you rehearse it in your head every night as you lie in bed, and yet, somehow, you still struggle with step 5 - “Drag the bar up your shins.” No matter how hard you try, that stupid bar seems to always swing away from your legs as you pull it off the floor.

In the deadlift, the barbell needs to be in a close, committed relationship with your shins as you pull it off the floor, and a bar that swings away from you betrays that relationship and makes for a much harder deadlift, so if you’re struggling to escape this 9th circle of deadlift hell, try out one of the following fixes:

Use Chalk
This is so obvious as to be painful, but please, for the love of all that is good in the world, use chalk when you’re lifting, and use chalk especially when deadlifting. Get some chalk on your hands before you start warming up the deadlift, and then apply some more chalk before you pull your work set(s).

If you won’t use chalk, summon up your inner Kelly Clarkson and just walk away. You’ve decided not to lift weights today, so leave the gym and come back when you’ve changed your mind.

As you can tell, the phenomenon of not using chalk aggravates me somewhat. Most people use chalk, and the phenomenon is - not surprisingly - restricted only to those who would lift more and be stronger if they also used chalk. I have other words on this topic, but they are not fit for print.

Chalk affects your ability to transmit force to the bar efficiently, and that, in turn, affects your ability to control the bar and keep it close. Use chalk.

Use the Appropriate Grip
You can’t use double overhand forever, so start using a hook grip, an alternate grip, or straps before your grip starts to become an issue. If you persist in using a grip that isn’t working for you, I have other words for you, too.

Grip affects your ability to transmit force to the bar efficiently, and that in turn affects your ability to control the bar and keep it close. Sounds familiar, doesn’t it? Get a grip.

Midfoot Balance
The combined center of mass of the lifter-barbell system should be balanced over the middle of the foot. In other words, you and the barbell together should be balanced - not on the balls of your feet and not on your heels - but rather right over the middle of your feet.

People often get onto the balls of their feet in steps two or three of the setup process - the “bend at the waist and take a grip” step or the “bend your knees to bring your shins to the bar” step, respectively - and this will cause the bar to swing away from you as you break it off the floor. The easiest fix is to simply make sure that you stay midfoot as you execute these steps, but if you find that you’ve rocked forward a bit onto the balls of your feet, simply rock back a bit until you are balanced over the middle of your feet again. Ideally, you want to do this before step four (i.e., before you squeeze your chest up to set your back).

“Pin It to Your Shins”
Your lats are responsible for keeping the bar close, i.e., keeping it on your shins, but you don’t need to think about your massive lats while deadlifting. Instead, just cue yourself to keep the bar pinned to your shins as you squeeze the bar off the floor. Pin it to your shins.

Step 4: Squeeze Your Chest Up . . . Then Pause
During step four of the setup process, you squeeze your chest up and set your back in rigid extension. Many people will squeeze their chest up and immediately try to break the bar off the floor. This often results in hips that drop and a bar that swings away from the lifter (if it actually comes off the floor at all).

Instead, try this: Squeeze your chest up hard like you always do (without dropping your hips), putting a lot of tension on the bar, and then . . . pause one second.

Do NOT relax that tension that you’ve placed on the bar - keep pulling. It should feel like the bar is bending upward in the middle, and indeed, if it’s heavy enough, it will be. THEN put even more tension on the bar, pulling harder until the bar comes off the floor.

This pause has helped a number of lifters for two reasons. First, it tends to discourage dropping the hips right before pulling the bar off the floor. Second, it also allows step four to function as a quick diagnostic step of sorts - when you’ve got a decent amount of tension on the bar, you can assess whether or not you and the barbell are still balanced on your midfoot and you can also assess whether or not you’re trying to keep the bar pinned to your shins. If you’re not doing one of these tasks, you can make a small correction and then pull the bar off the floor.

If your deadlift keeps swinging away, see if one of the tips above helps. Dante will be cheering for you.

As always, we hope this helps you get stronger and live better.

-Phil

PS: Whenever you want even more Testify in your life, here are some free resources:

  • Book a free intro and strategy session with us HERE.

  • Pick up a free copy of Testify’s Squat Guide: 12 Tips to Improve Your Squat Now HERE.

  • Get our free weekly email - containing useful videos, articles, and training tips - HERE.

  • Follow Testify on Instagram HERE.

  • Subscribe to Testify’s YouTube channel HERE.

(Some links may be affiliate links. As an Amazon Associate, Testify earns from qualifying purchases.)


At Testify, we offer small group training, private coaching (in-person or remotely via Zoom), online coaching, and form checks. Interested in getting stronger, looking better, and having more energy?


At Testify, we offer small group training, private coaching (in-person or remotely via Zoom), online coaching, and form checks. Would you like to get quality coaching from a Starting Strength Coach?