12 Days of a Lifter's Christmas
/Shopping for a Christmas gift for that lifter in your life? Maybe you're just shopping for yourself. In either case, we cover 12 gift ideas for productive training.
At Testify, we offer small group training, private coaching (in-person or remotely via Zoom), online coaching, and form checks. Click the button below to get quality coaching from a Starting Strength Coach and start getting stronger TODAY.
Best Christmas Present for a Lifter? I'll Start...
/Not sure what to get for the lifter in your life? Perhaps you're getting yourself a Christmas present. Either way, we recommend this option.
At Testify, we offer small group training, private coaching (in-person or remotely via Zoom), online coaching, and form checks. Click the button below to get quality coaching from a Starting Strength Coach and start getting stronger TODAY.
Enter the TUBOW
/
(A Blast from the Past article originally posted on 11/20/18)
What on earth is a TUBOW?
So glad you asked! A TUBOW is a Terribly Useful Block Of Wood. Many of you have seen us use 2-foot lengths of 4 x 4 lumber when people squat from time to time - these are TUBOWs.
Why would one use a TUBOW?
We use TUBOWs in the squat, and there are a couple reasons we might use a TUBOW. The most common use is to fix the knee's forward position on the way down.

becky’s knees are so far forward that parker refuses to watch.
Two common errors that we see when people squat is either (a) the lifter's knees travel forward all the way down, or (b) the knees travel forward at the bottom of the squat.
We would like to see the knee establish its final forward position about 1/3 to 1/2 of the way into the descent of the squat, and touching the TUBOW with the knee at this point provides excellent tactile feedback as to whether or not the lifter is doing that correctly. If the lifter accidentally knocks the TUBOW over, it provides excellent negative feedback that the knee has traveled too far forward.

becky touches her knees lightly to the tubow during the descent.
Another use of the TUBOW is to fix the knee's lateral position in the squat, i.e., is the lifter shoving the knees out (to the side) far enough, or perhaps even too far? The TUBOW gives the lifter something concrete (well, lumber, actually) to aim for, and very often, this will help solve the issue.

One of the great side effects of fixing the knee position is that it will often fix the back angle in the squat as well. If the lifter's knees can only travel "so far" forward on the descent, then the hips will have to travel backward (since your hips and knees are connected by your femurs . . . you know . . . the leg bone). If the hips have to travel backward, the lifter will have to lean over during the descent to avoid falling over backward and stay balanced on the midfoot, and that leaned over position is precisely what we want in the low bar squat. Pretty awesome.
Are you one of those people who is deeply, intensely, spiritually, emotionally, and morally opposed to using the TUBOWs? If so, you're probably the type of person whose squat would benefit most from using them. And if your squat benefits, then you benefit, because you'll get stronger - faster.
Where do I get a TUBOW?
You can go to your nearest lumber supply store and get a 4 x 4 (and they'll often cut it to size for you), but if you'd rather just order a 2 foot section of 4 x 4 online and have it show up at your front door, then just click here.
(Some links may be affiliate links. As an Amazon Associate, Testify earns from qualifying purchases.)
If you found this helpful, you’ll love our weekly email. It’s got useful videos, articles, and training tips just like the one in this article. Sign up below, and of course, if you don’t love it, you can unsubscribe at any time.
At Testify, we offer small group training, private coaching (in-person or remotely via Zoom), online coaching, and form checks. Would you like to get quality coaching from a Starting Strength Coach?
Quick & Easy DIY Lifting Straps!
/
(A Blast from the Past article originally posted on 10/29/21)
You can buy lifting straps, or you can make this practically indestructible pair for about two bucks. Here we go:
Step 1:
Purchase some 1-inch climbing tubular webbing (it will be flat even though it’s actually a tube). You can simply type in “climbing tubular webbing” into the search engine of your choice, and you’ll see a host of options, or you can just click here.
You can get something a bit wider than an inch if you like, but the 1-inch material will do just fine. Climbing webbing is extremely durable - remember, climbers trust this stuff with their lives. We’re just trusting it with our deadlifts, rows, etc.

Step 2: Cut a length of webbing about 2 ft long.
Step 2
Cut a length of webbing that is about two feet long. The exact length will vary by person, but you’ll want to err on the longer side. If the straps are too big for your liking, you can easily make them shorter later on. If you have large hands, you might want to go a bit longer than two feet.

steps 3 and 4 (left and right, respectively)
Step 3
Burn the cut ends so the straps don’t fray. A few seconds of burning is all that is necessary.
Be sure to let the burnt ends cool before touching them. This may seem obvious, but trust me - it’s worth mentioning.
Step 4
Place one end of a strap on top of the opposite end of the same strap so that they overlap by an inch or so.

steps 5 and 6 (left and right, respectively)
Step 5
Wrap 6-8 inches of athletic tape around the overlapped ends.
Step 6
Repeat steps 2-5 to create the other strap, and you’re done!
As always, we hope this helps you get stronger and live better.
(Some links may be affiliate links. As an Amazon Associate, Testify earns from qualifying purchases.)
If you found this helpful, you’ll love our weekly email. It’s got useful videos, articles, and training tips just like the one in this article. Sign up below, and of course, if you don’t love it, you can unsubscribe at any time.
At Testify, we offer small group training, private coaching (in-person or remotely via Zoom), online coaching, and form checks. Would you like to get quality coaching from a Starting Strength Coach?
How to EASILY Move Stall Mats! | Gym Equipment
/
The classic ¾-inch-thick, 4 ft x 6 ft horse stall mat is very useful for gyms - whether a commercial gym or a home gym. We’ve used many, many mats in the construction of our lifting platforms, and you can also simply use them as gym flooring.
However, they are a pain to move. A real big pain in the butt in fact, so whether you’ve got a partner to help you or you’re moving mats on your own, let’s solve this problem.
Note: While I’ve provided photos to help, all of these solutions are far more easily understood in action in the included videos.

Figure 1: Two People - hanging the mat over a board (top) and rolling up the mat (bottom)
TWO PEOPLE
If you’ve got two people, there are a couple of solutions (Figure 1), and we’ll cover a third option in the “reverse taco” section later in this article.
Solution 1
One option is to lay a board (or pole) on the floor. Next, lay the mat on top of the board. Finally, pick up both ends of the board and rest them on one shoulder of each person.
Solution 2
A second option is to simply roll the mat up and have each person grab one end.

Figure 2: Don’t use either of these methods. they’re dumb.
ONE PERSON (Reverse Taco Method)
Having two people is nice, but there is a very easy way to drag a stall mat when you’re on your own. Now, don’t try to drag it like the fool in Figure 2 - you’ll have to pinch the mat extremely hard between your fingers, it will be very difficult to keep that grip, and half the time, the mat will simply slip out of your hands.
Instead, do the following as described in the three steps below and as demonstrated in Figure 3.
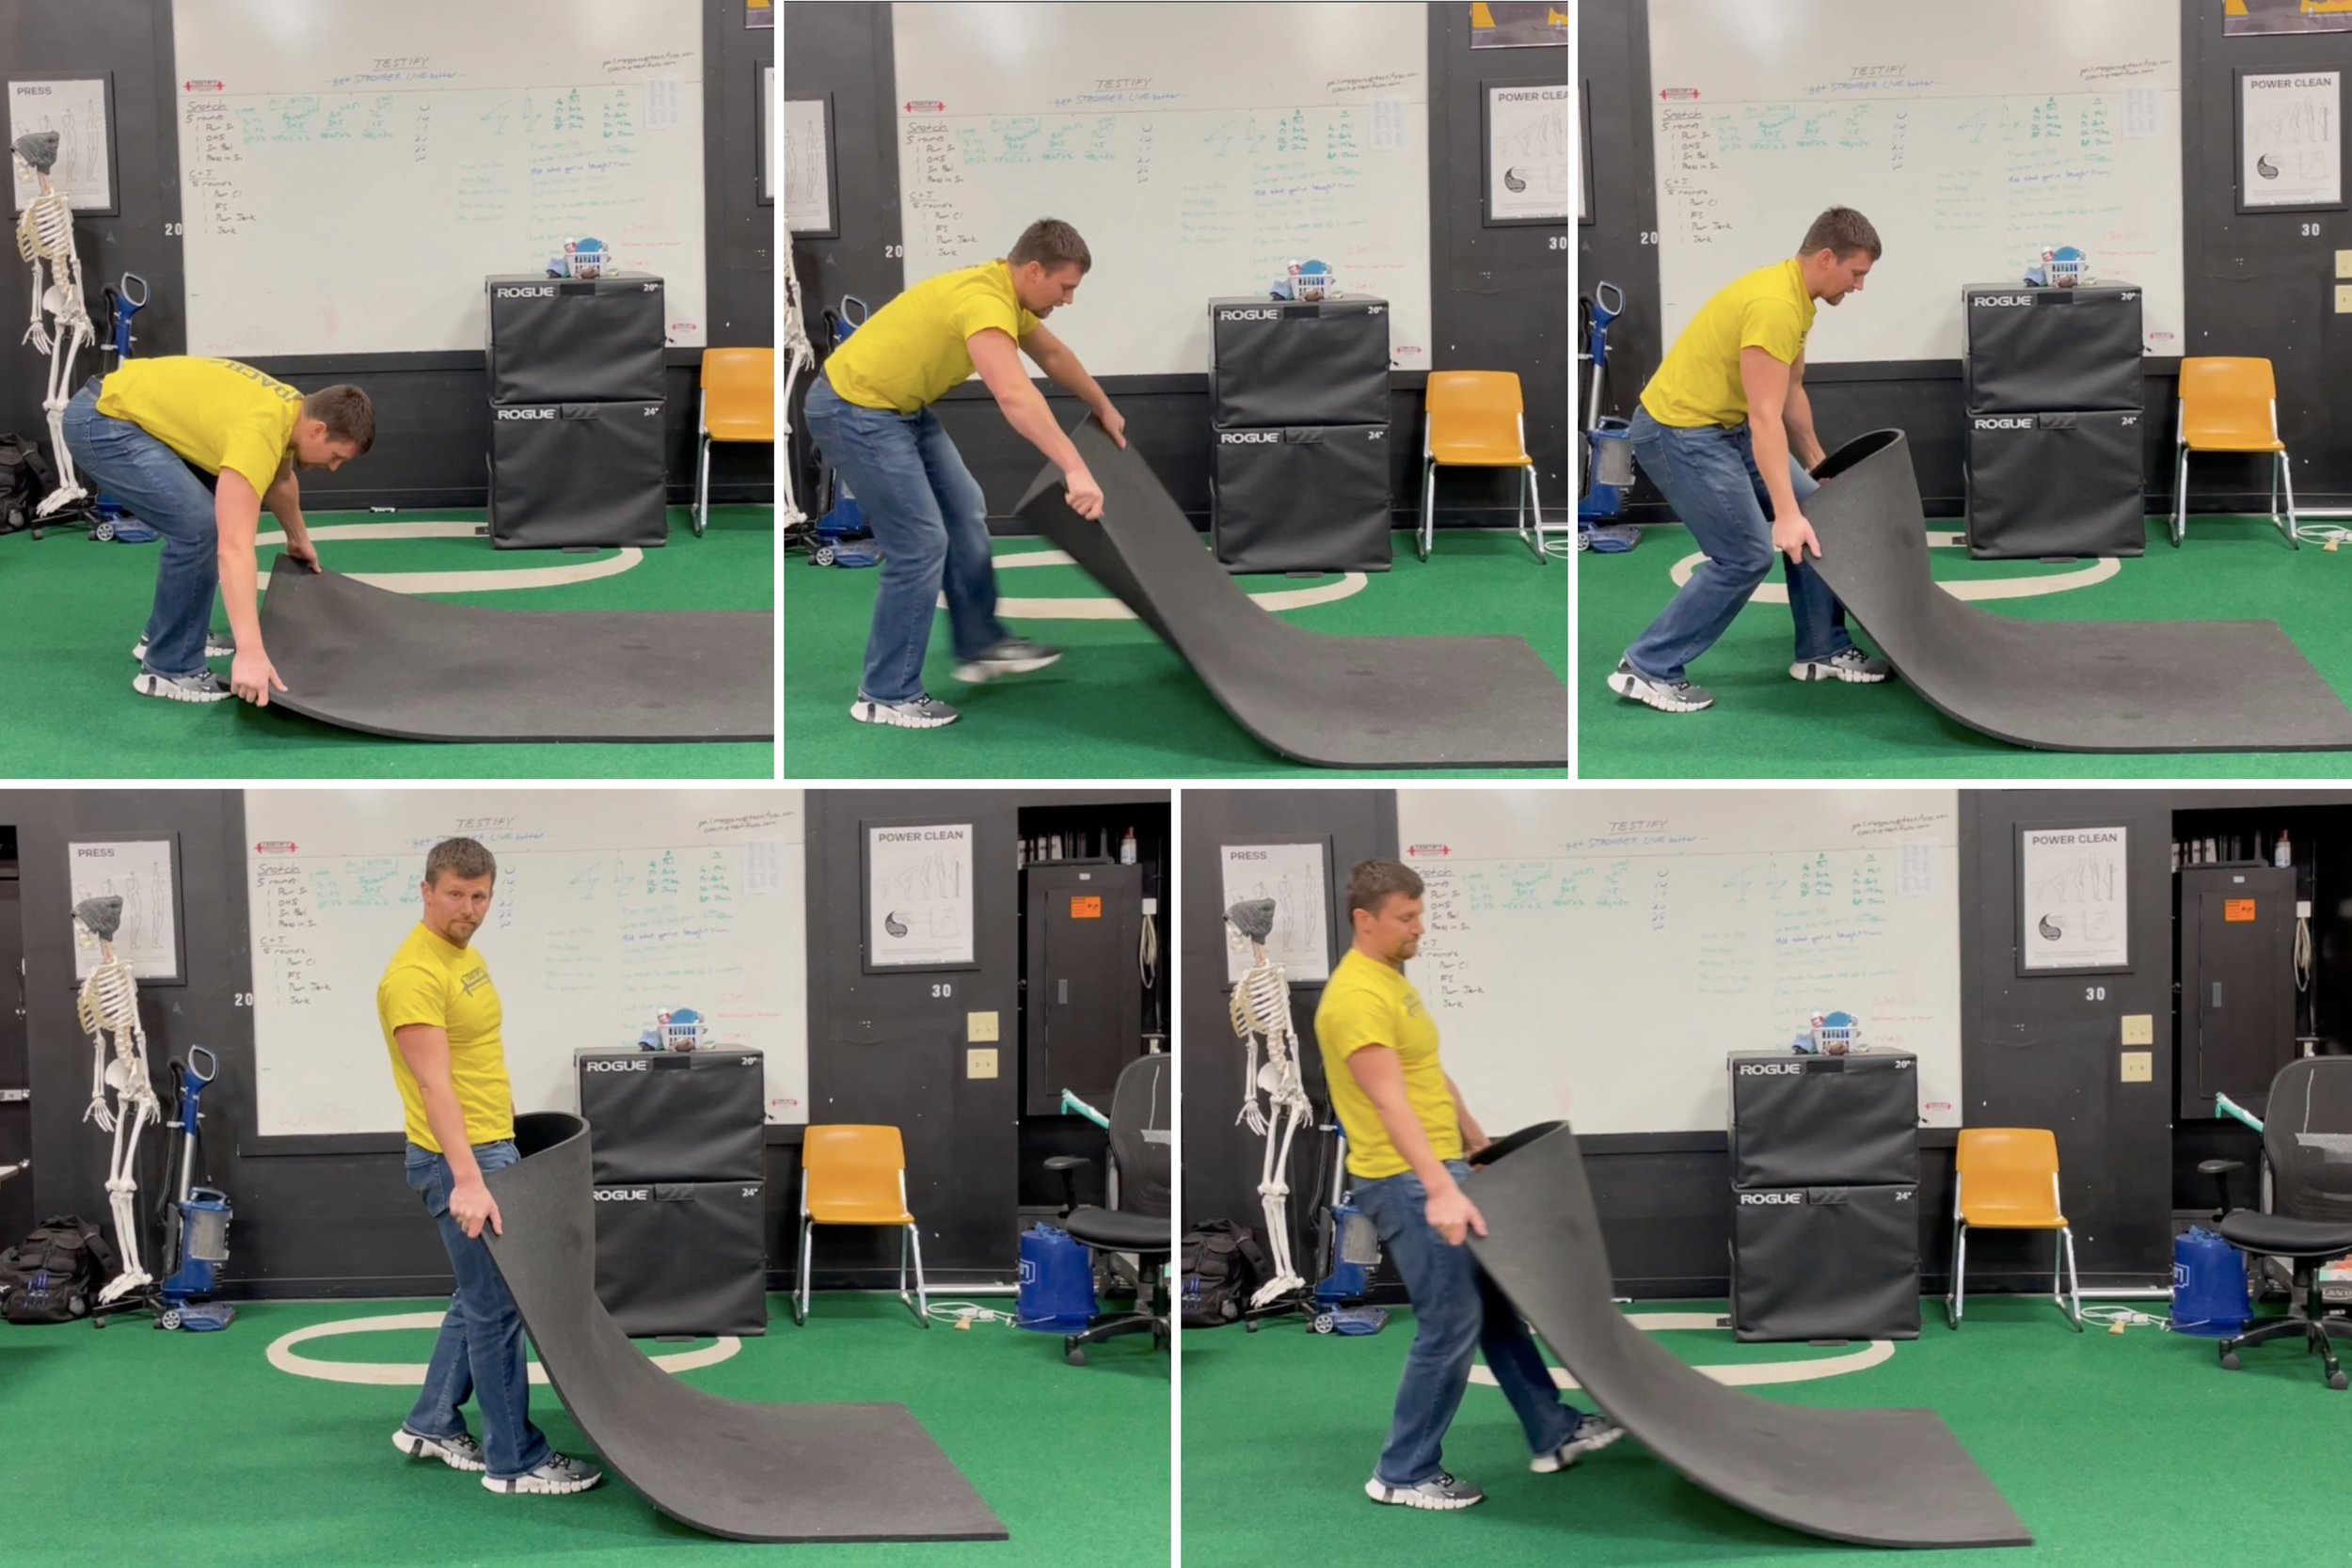
figure 3
Step 1
Pick the mat up from the edges.
Step 2
Flip the mat so the mat creates a “hill.” The edges of the mat will now be wedged into your hands, which means that you don’t have to hang on very tightly at all.
Step 3
Drag the mat. You’ll be surprised at how easily you can hang onto the mat utilizing this method.
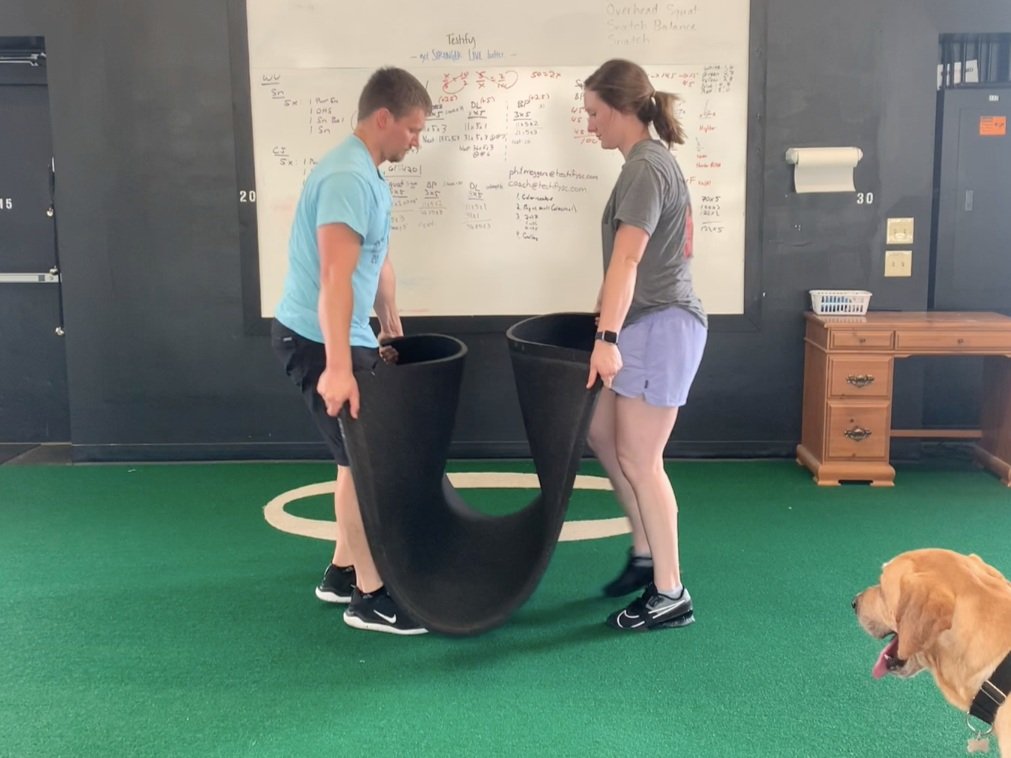
Figure 4: 2-person reverse taco method
This method can also be utilized by two people (Figure 4), and as mentioned earlier, this is far more easily demonstrated and understood on video than with the printed word and photos, so I’d recommend watching one of the included videos.
As always, we hope this helps you get stronger and live better.
(Some links may be affiliate links. As an Amazon Associate, Testify earns from qualifying purchases.)