DISASTROUS Weight Lifting Accident (don't let this happen...)

This article is not thrilling, it’s not earth-shattering, but it might keep you from some broken toes or even teeth . . .

One of the more disastrous mistakes you can make in the weight room is that of loading or unloading the barbell by too many plates on one side (Figure 1). Let’s quickly discuss what this error looks like, when you’re most likely to commit it, and how you can easily avoid it.

figure 1: disaster narrowly averted (but watch out for sliding plates!)

What This Mistake Looks Like (i.e., how it happens)
Typically, this error occurs with 45 lb plates, although if you train in kilograms, it will probably occur with either 20 kg or 25 kg plates. Specifically, the mistake you’ll make is that of loading or unloading too many 45 lb plates on one side of the bar (i.e., compared to the other side).

For instance, you finish squatting 315 lb for the day, so you’ve got three 45 lb plates on each side of the bar. You’re tired, but you’re happy to have successfully performed your work sets. You absentmindedly begin unloading the right side of the bar while talking to a buddy or listening to some music. You take one plate off the bar - no problem yet. You then take another plate off the same side - you still might not have a problem.

However, you go to take the third plate off the right side of the bar - remember that you still have three 45 lb plates on the left side of the bar - and you suddenly have a cartwheeling barbell (see Figure 1). The right side of the bar rotates upward, the left side rotates downward, plates fall off in a loud (and dangerous) crash, the bar rotates end-over-end, and the entire room (people, equipment, walls, windows, etc.) is in danger.

If you’ve trained long enough or been to enough powerlifting meets, you’ve seen it happen at least once, it’s a disaster whenever it happens, and nearby people can and do sometimes get injured in the process if they get hit by the falling plates or flying barbell.

When You’re Most Likely to Make This Error
You can make this mistake when loading, but it is far more likely to occur when a lifter is unloading the bar.

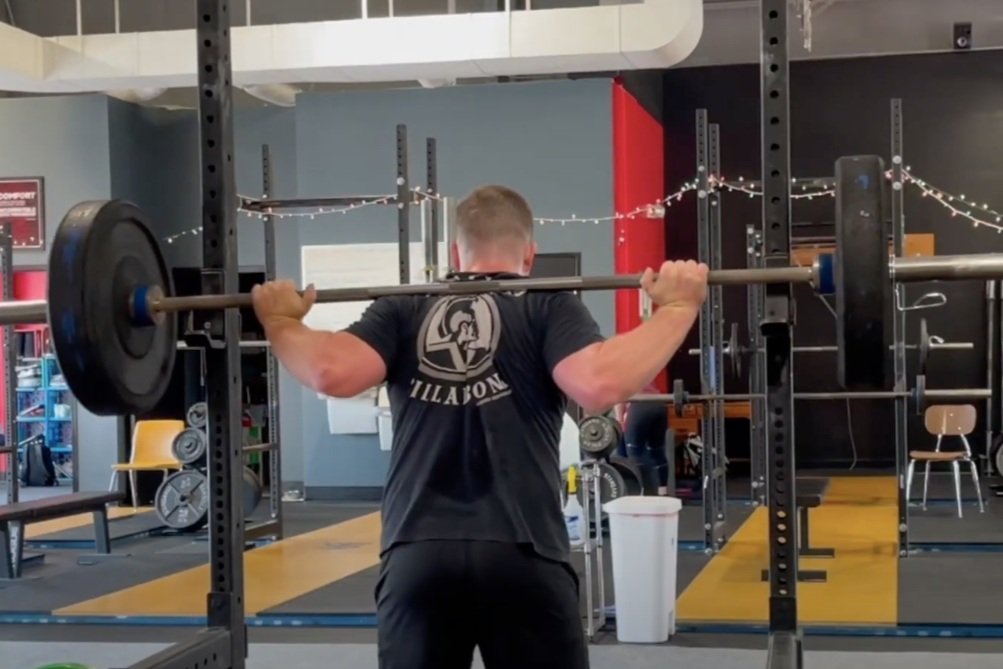
figure 2: A one plate difference (two 45 lb plates on the left side and one 45 lb plate on the right side)

Loading the bar during warm-ups tends to promote symmetrical loading since - unless you’re a lifting psychopath - you’re only moving up by 90 lb at most per warm-up set. For instance, moving from 135 lb to 225 lb means you add a 45 lb plate on the left side and then walk over and add a 45 lb plate on the right side. At most, you’ve briefly got a one plate difference (i.e., one 45 lb plate difference) between the two sides of the barbell, and this doesn’t cause a problem (Figure 2).

However, when you’re finished with your 315 lb squat, your goal is to unload all the plates from the bar, and if you don’t approach this in a sensible fashion, you might start unloading all the plates from one side and soon cause a big ruckus.

This most often happens with the squat, but it can happen on the bench or press as well, and if you’re fortunate enough to train with a deadlift jack, it can happen when unloading your deadlift (since a deadlift jack functions much like a pair of j-hooks on a squat rack). I’ve seen a fellow lifter nearly get popped right in the teeth by the barbell after absentmindedly unloading four 45 lb plates from one side of the bar before removing any of the plates from the other side.

The Easy Way to Prevent It
The easiest way to prevent this mistake and the potential disaster that accompanies it is to make the following rule:

No more than one 45 lb plate difference between the two sides of the bar.

For example, if you have two 45 lb plates on the left side of the bar and you’re using this rule, then the following are acceptable for the right side of the bar:

  • Three 45 lb plates (one plate difference)

  • Two 45 lb plates (no difference)

  • One 45 lb plate (one plate difference)

However, having either four or zero 45 lb plates on the right side of the bar is a no-go. Those situations are not guaranteed to cause a problem, but you’re starting to flirt with disaster. This rule does not give you the only safe method, but it does guarantee a simple and safe approach that’s easy to remember.

Keep that one plate difference in mind (which is sometimes the hardest part!), and we hope this helps you get stronger, live better, and also live without any unnecessary broken stuff!

-Phil

PS: Whenever you want even more Testify in your life, here are some free resources:

  • Book a free intro and strategy session with us HERE.

  • Pick up a free copy of Testify’s Squat Guide: 12 Tips to Improve Your Squat Now HERE.

  • Get our free weekly email - containing useful videos, articles, and training tips - HERE.

  • Follow Testify on Instagram HERE.

  • Subscribe to Testify’s YouTube channel HERE.

(Some links may be affiliate links. As an Amazon Associate, Testify earns from qualifying purchases.)


At Testify, we offer small group training, private coaching (in-person or remotely via Zoom), online coaching, and form checks. Interested in getting stronger, looking better, and having more energy?

Cheap & Easy DIY Sled Drag Harness Options

(A Blast from the Past article originally posted on 12/16/22)

The sled or prowler is an extremely effective conditioning tool (albeit a rather evil one). You can get in some great conditioning pushing the sled, but you can also get in some great conditioning pulling it, so let’s cover a couple of options to construct a simple and cheap sled drag harness so you don’t have to go out and buy an expensive one.

First, a few notes . . .

Sled vs Prowler
A sled has 2 skids while a prowler has 3 skids. They accomplish the same purpose as they both can be pushed or pulled, and for our purposes, I’m going to use the word “sled” for both implements.

Don’t Have a Sled?
If you don’t have a sled for pulling, you don’t need to go out and put down a bunch of cash for a new one. You can construct a “tire sled” from an old tire and an eyebolt - it’s cheap, pretty quick, and it works very well for pulls.

Watch the included video - Free (or cheap!) Strongman and Conditioning Equipment - to see what I’m talking about.

And now, let’s get to the harness options . . .

Sled Drag Harness - Waist Option
You’ll need a fairly large carabiner, and you’ll also need to get an automotive recovery strap, which you can obtain at pretty much any hardware store or by clicking here. Each end of the strap has a loop, and we’ll simply connect each loop to the carabiner, and then we’ll hook the carabiner to the sled. Simply place the middle of the recovery strap around your waist, and you’ve now got a cheap and easy-to-make harness for walking either forward or backward while dragging the sled.

Shoulder Harness option

Sled Drag Harness - Shoulder Option
For this version, you’ll need to get some 1-inch climbing webbing. This is the same tubular webbing that we use for making lifting straps (see the video below) - you can find this type of webbing at an R.E.I. or a something store, or you can get some on Amazon by clicking here. You could probably use wider material if you want to make it more comfortable, but conditioning is not terribly comfortable anyway, and this is what we had on hand, and it works well.

Take 7-8 feet of webbing and tie a water knot with the ends to create one long, continuous loop. To tie a water knot (other knots won’t work as well with webbing), check out the DIY Sled Drag Harness Options video above. Feeding that loop through the loop created by your recovery strap, you have now created “backpack straps,” so simply put one arm through each end of the backpack straps, and you’re all set to go.

Seeing this on video helps quite a bit, so as mentioned earlier, I’d recommend watching the short DIY Sled Drag Harness Options video above (this video was the basis for this article).

As always, we hope this helps you get stronger (or at least more conditioned!) and live better.

-Phil

PS: Whenever you want even more Testify in your life, here are some free resources:

  • Book a free intro and strategy session with us HERE.

  • Pick up a free copy of Testify’s Squat Guide: 12 Tips to Improve Your Squat Now HERE.

  • Get our free weekly email - containing useful videos, articles, and training tips - HERE.

  • Follow Testify on Instagram HERE.

  • Subscribe to Testify’s YouTube channel HERE.

(Some links may be affiliate links. As an Amazon Associate, Testify earns from qualifying purchases.)


At Testify, we offer small group training, private coaching (in-person or remotely via Zoom), online coaching, and form checks. Interested in getting stronger, looking better, and having more energy?

Gym Equipment: How to EASILY Move Stall Mats!

The classic rubber horse stall mat is extremely useful. It's also a pain to move . . . or is it? Starting Strength Coach Phil Meggers shows how to easily move a stall mat with just one person and without any special tools.

(A Blast from the Past video originally published on 09/10/22)


At Testify, we offer small group training, private coaching (in-person or remotely via Zoom), online coaching, and form checks. Interested in getting stronger, looking better, and having more energy?

"This Made Him Look STUPID!" | Squat Mistake

Quit making this mistake. It looks silly, it’s pointless, and it can cause a problem, so let’s fix it fast.

Figure 1: don’t do this.

The Mistake
What’s the mistake? It is that of looking for the hooks (AKA “j-hooks”) when racking the squat. After all, unless you have an incredibly cruel training partner, the hooks didn’t go anywhere while you were squatting, so there’s no need for you to look sideways for them when racking the barbell at the end of your set (Figure 1).

Why is This a Problem?
Looking for the hooks is unnecessary, it’s a waste of time and energy, and it makes you look like a newbie. Additionally - and most importantly - it increases the chance that someday (probably not today, but someday), you’re going to end up as a great candidate for a YouTube fail video because - while you’re going to make the hook that you’re looking for - you’re eventually going to miss the hook that you’re not looking for.

You Don’t Really Care About the Hooks Anyway, Right?
It’s useful to remember that you don’t aim for the hooks anyway - you simply want to get the bar to hit the uprights and then stay in contact with the uprights as you slide the bar down a few inches until it’s resting on the hooks.

figure 2: this . . . is much better.

How to Fix the Problem
With this in mind, when you finish your set of squats, keep looking at the same focal point you used when squatting (on the floor roughly four to six feet in front of you) and walk straight ahead until the bar runs into the uprights (Figure 2). You’ll know because . . . you’ll stop moving.

Once you’ve hit the uprights, and assuming that you’ve set your hooks at a reasonable height (and if you’re not sure, be sure to watch the included video below), maintain bar contact with the uprights while you use your legs to dip down slightly until the bar is sitting in the hooks.

This last point is worth repeating - as long as you maintain contact with the uprights, you’ll end up with the bar correctly resting in the hooks every single time.

Put simply, be smart. Looking at the hooks when racking the bar is unnecessary, it’s a waste of time and effort, and it increases the chance that you’re going to do something silly like end up with half a barbell still on your back when you think it’s completely back on the hooks.

As always, we hope this helps you get stronger and live better.

(Some links may be affiliate links. As an Amazon Associate, Testify earns from qualifying purchases.)

If you found this helpful, you’ll love our weekly email. It’s got useful videos, articles, and training tips just like the one in this article. Sign up below, and of course, if you don’t love it, you can unsubscribe at any time.


At Testify, we offer small group training, private coaching (in-person or remotely via Zoom), online coaching, and form checks. Interested in getting stronger, looking better, and having more energy?

How to Easily Build a Lifting Platform (and the EASIEST way to cut stall mats)

(A Blast from the Past article originally posted on 11/04/22)

A lifting platform is a very important part of your gym - it protects your equipment as well as your floor, it dampens the noise and vibrations of deadlifts, cleans, snatches, etc., and it clearly delineates the lifting space. This last factor - the abundantly clear “stay out of my lifting space” effect of the platform - is very useful when you have a training partner or little kids with you in the gym.

Fortunately, building a lifting platform is quite easy. In fact, “building” is a rather generous term for the process - we’re pretty much just assembling a platform. We’ll lay out the steps below, but I’d strongly recommend watching one of the videos linked throughout this article for a better understanding of the process.

First, lay two 4’ x 8’ sheets of OSB next to one another. I’d recommend what is commonly referred to as 3/4"-thick OSB, but the actual dimension will be listed as 23/32”.

Laying down the base layer of OSB sheets

These two sheets will run lengthwise, i.e., they’re run front-to-back. The sheets will probably have a slight bow to them (i.e., a curvature), and you’ll want to make sure that the crown of the board is up (so the board should make a mountain, not a valley).

Next, lay two more sheets of the same OSB on top of the base layer. These sheets will be perpendicular to the base layer sheets, so they’ll run side-to-side. Again, the crown should be up. Then you’ll use 1-1/4” screws to attach the second layer to the base layer. We use three screws on the short end of each board and four screws along the long end.

Laying down the 2nd layer of OSB sheets

Then, for the top layer, you’ll use a sheet of 3/4”-thick MDF to run down the middle. You could use something nicer like oak, but we like MDF as it’s nice and heavy and causes everything to lie nice and flat. You’ll need to do some cutting on the MDF as they are sized at 49” x 97”. You’ll cut the length to 96” (8 feet), and we recommend cutting the width to 42” (3.5 feet) as this gives you ample room between the plates and the MDF when you set down your deadlifts, cleans, etc (you can go with 4 feet wide, but 3.5 feet makes it much less likely that you’ll chip the MDF over time). You can do this yourself, or your lumber store may be willing to rip it for you.

Finally, you’ll use 3/4”-thick horse stall mats for the rest of the top layer. Stall mats are typically 4’ x 6’, so you’ll have some cutting to do here. The bigger piece on each side will be 72” x 27” (i.e., 6’ x 2’3”), and the smaller piece on each side will be 24” x 27” (i.e., 2’ x 2’3”). 

To attach the top layer to the second layer, use 1-5/8” screws. We put six screws into the MDF - three in front and three in back. For the stall mats, we simply put screws around the outside, front, and back of the platform - we don’t put any screws down the rubber edge near the MDF so that we can’t accidentally set our metal plates or bumper plates down on a screw that might be a bit proud.

Last note - when cutting stall mats, use a jig saw. It is - by far - the best way to do it. Check out the video above to see this process.

We hope this helps you quickly and easily build a lifting platform, and as always, we hope this helps you get stronger and live better.

Finished platform - complete with Addy, Milo, & Parker

(Some links may be affiliate links. As an Amazon Associate, Testify earns from qualifying purchases.)

If you found this helpful, you’ll love our weekly email. It’s got useful videos, articles, and training tips just like the one in this article. Sign up below, and of course, if you don’t love it, you can unsubscribe at any time.


At Testify, we offer small group training, private coaching (in-person or remotely via Zoom), online coaching, and form checks. Interested in getting stronger, looking better, and having more energy?

4 Ways You're Using Your Wrist Wraps Wrong

How should you use your wrist wraps? There are a number of mistakes lifters make without knowing it. Starting Strength Coach Phil Meggers covers 4 common errors as well as how to fix them.


At Testify, we offer small group training, private coaching (in-person or remotely via Zoom), online coaching, and form checks. Interested in getting stronger, looking better, and having more energy?