7 Signs You're Using Your Lifting Equipment WRONG - Stop Making These Mistakes With Your Lifting Gear | Part 3

You might be making some mistakes with your equipment, and if so, you probably don’t know it.

Welcome back to the third and final installment of this series. We covered 7 common mistakes in Part 1, another 7 mistakes in Part 2, and not surprisingly, we’re covering 7 more errors today.

Error #15: Straps in Front
A common mistake for lifters who are new to using straps is that of placing the strap in front of the barbell when setting up (Figure 1).
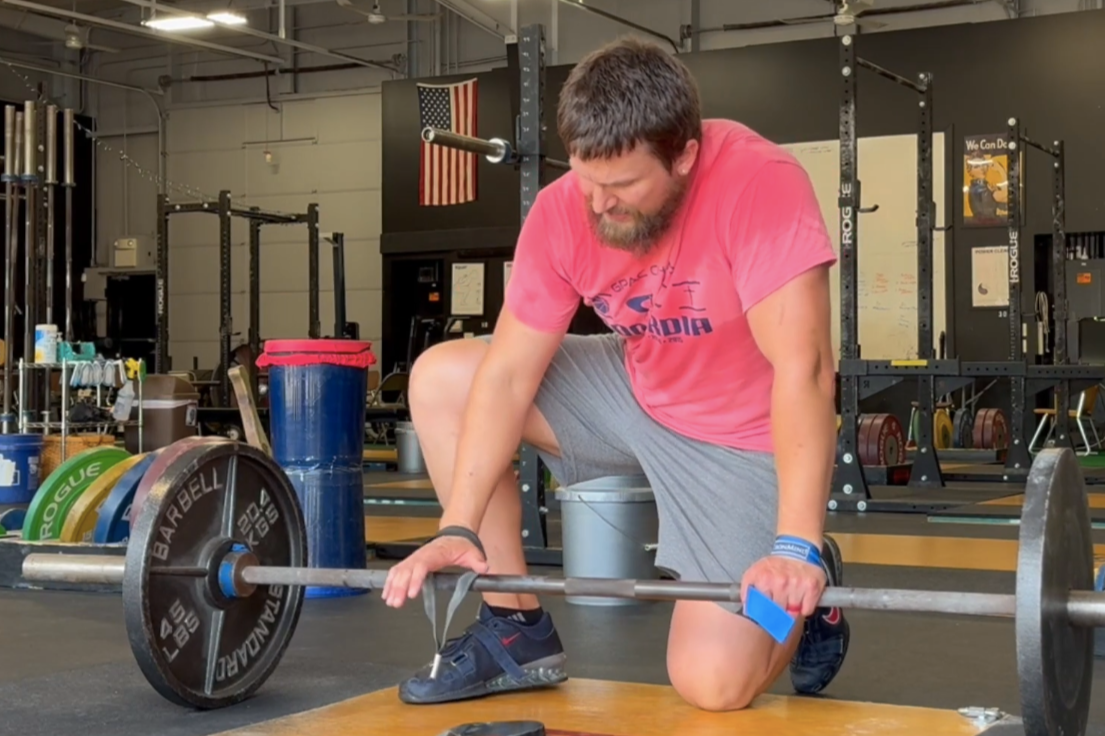
figure 1: this fool mistakenly put his strap in front of the bar.

Used correctly, the combination of your hand and the strap acts much like an alternate grip on the deadlift. In the alternate grip, the pronated hand and supinated hand work with each other to keep the bar from rolling and slipping out of your grip. Each hand can only permit the bar to roll in the direction opposite of that allowed by the other hand, so no rolling occurs.

Your hand and the strap perform the same function, but only if you remember that your hand goes in front of the bar while the strap goes on the other side of the bar, i.e., behind the bar. Check out the short video above to learn how to use straps correctly.

Error #16: Knee Sleeve Thickness
Both 5 mm thick and 7 mm thick knee sleeves provide warmth and compression for your knees, and your knees will thank you for it.

However, once you’ve used 7 mm sleeves, you won’t ever go back to 5 mm sleeves, so do yourself a favor and simply buy 7 mm sleeves to start with.

Here are a few solid options, and you can learn more about knee sleeves by watching the included video below:

Error #17: Safeties Too High
Safeties, pins, crash bars, spotter arms (if you’re using a squat stand) – whatever you want to call them, don’t set them too high.

For squat and bench press, your safeties need to be set low enough that they don’t disrupt the execution of your lift. For the squat, this means you probably want to set the safeties a couple of inches below the bottom position of your squat (i.e., below the bar’s position at the bottom of your squat). If you set them just barely below your bottom position – say, a quarter-inch lower than your bottom position – then the moment you go a touch too deep on your squat, you hit the safeties, and this is very disruptive to your lift. Setting them a couple of inches lower than your bottom position makes this much less likely to happen.

For the bench, when you’re correctly driving with your legs and supporting your arch, this means your safeties are low enough that they allow you to consistently touch the barbell to your chest. It also means they are low enough that if you lower the bar in a slightly uneven fashion (e.g., the right side of the bar is a bit lower than the left side), you don’t instantly hit the safeties.

Error #18: Not Knowing Your Rings
There are two sets of rings (AKA score marks or knurl marks) for barbells - powerlifting rings and weightlifting rings. They are extraordinarily useful for determining grip width, but if you don’t know which set you’ve been using, you can create a grip problem for yourself if you ever train (or compete) on a different bar.

Powerlifting rings are 81 cm (roughly 32 in) apart from one another, while weightlifting rings are 91 cm (roughly 36 in) apart from one another. Some bars have both sets of rings (so it’s easy to figure out which set is which) while many bars have only one set.

Figure out which set you’ve been using (use a tape measure if necessary), and then if you ever train on a different bar, you’ll know whether or not you need to adjust your grip relative to the rings.

Error #19: Straps . . . Again
Don’t wrap your straps multiple times around the bar.

Wrapping the strap around the bar once provides everything you need for a secure grip. Wrapping it multiple times is a waste of time and energy, which is why the DIY straps we make at the gym for our members (see the video below) are made to a length that only goes around the bar once with a little length left over.

If you have extra strap length hanging down after wrapping around the bar once, it’s not a problem – just let it hang there.

Error #20: Safeties Too Low
As discussed in Error #17, setting the safeties too high is a mistake. However, setting the safeties too low is an even bigger mistake – they absolutely have to be set high enough to save you from trouble in the event of a failed rep.

If you set them too low in the squat, you might not be able to set the bar down onto the pins at the bottom of a failed rep. Worse, in the event of a failed rep on the bench press, you could find your throat or face trapped (and potentially crushed) if you’ve set the safeties too low.

The solution is simple – set your safeties and then test them out (with an empty bar or light weight) by performing a “failed rep,” i.e., practice by failing with the empty bar, set the bar on the pins, and make sure you can get out from under the bar while it rests on the pins.

Error #21: Slick Bench
Don’t bench on a slippery surface.

The bench itself might be slick, you might be sweaty, or you might be wearing a “tech shirt” (i.e., moisture-wicking) that is made from a slippery material. Regardless, you want to drive with your legs and keep your shoulders pinned back without any part of you moving out of position on the bench.

There are a couple of ways to solve this problem, and you can check out the short video below for a few options. Our most common recommendation is a small section of rug pad material – it’s cheap, it provides a very secure grip, and it easily fits in your gym bag as well.

As always, we hope this helps you get stronger and live better.

-Phil

PS: Whenever you want even more Testify in your life, here are some free resources:

  • Book a free intro and strategy session with us HERE.

  • Pick up a free copy of Testify’s Squat Guide: 12 Tips to Improve Your Squat Now HERE.

  • Get our free weekly email - containing useful videos, articles, and training tips - HERE.

  • Follow Testify on Instagram HERE.

  • Subscribe to Testify’s YouTube channel HERE.

(Some links may be affiliate links. As an Amazon Associate, Testify earns from qualifying purchases.)


At Testify, we offer small group training, private coaching (in-person or remotely via Zoom), online coaching, and form checks. Interested in getting stronger, looking better, and having more energy?

What Strength Coaches Know About Squat Safeties That Most Lifters Don't

Confused about squat safeties and which type is best? In this video, Starting Strength Coach Phil Meggers breaks down the different types of squat and bench safeties, how to set them up correctly, and ranks them from worst to best.

Whenever you want even more Testify in your life, here are some free resources:

  • Book a free intro and strategy session with us HERE.

  • Pick up a free copy of Testify’s Squat Guide: 12 Tips to Improve Your Squat Now HERE.

  • Get our free weekly email - containing useful videos, articles, and training tips - HERE.

  • Follow Testify on Instagram HERE.

  • Subscribe to Testify’s YouTube channel HERE.


At Testify, we offer small group training, private coaching (in-person or remotely via Zoom), online coaching, and form checks. Interested in getting stronger, looking better, and having more energy?

DISASTROUS Weight Lifting Accident | Don't Let This Happen!

It's easy to make mistakes in the weight room, but some are more disastrous than others. Starting Strength Coach Phil Meggers explains and discusses how to avoid one particularly nasty error.

(A Blast from the Past video originally published on 05/13/23)

Whenever you want even more Testify in your life, here are some free resources:

  • Book a free intro and strategy session with us HERE.

  • Pick up a free copy of Testify’s Squat Guide: 12 Tips to Improve Your Squat Now HERE.

  • Get our free weekly email - containing useful videos, articles, and training tips - HERE.

  • Follow Testify on Instagram HERE.

  • Subscribe to Testify’s YouTube channel HERE.


At Testify, we offer small group training, private coaching (in-person or remotely via Zoom), online coaching, and form checks. Interested in getting stronger, looking better, and having more energy?

DISASTROUS Weight Lifting Accident (don't let this happen...)

This article is not thrilling, it’s not earth-shattering, but it might keep you from some broken toes or even teeth . . .

One of the more disastrous mistakes you can make in the weight room is that of loading or unloading the barbell by too many plates on one side (Figure 1). Let’s quickly discuss what this error looks like, when you’re most likely to commit it, and how you can easily avoid it.

figure 1: disaster narrowly averted (but watch out for sliding plates!)

What This Mistake Looks Like (i.e., how it happens)
Typically, this error occurs with 45 lb plates, although if you train in kilograms, it will probably occur with either 20 kg or 25 kg plates. Specifically, the mistake you’ll make is that of loading or unloading too many 45 lb plates on one side of the bar (i.e., compared to the other side).

For instance, you finish squatting 315 lb for the day, so you’ve got three 45 lb plates on each side of the bar. You’re tired, but you’re happy to have successfully performed your work sets. You absentmindedly begin unloading the right side of the bar while talking to a buddy or listening to some music. You take one plate off the bar - no problem yet. You then take another plate off the same side - you still might not have a problem.

However, you go to take the third plate off the right side of the bar - remember that you still have three 45 lb plates on the left side of the bar - and you suddenly have a cartwheeling barbell (see Figure 1). The right side of the bar rotates upward, the left side rotates downward, plates fall off in a loud (and dangerous) crash, the bar rotates end-over-end, and the entire room (people, equipment, walls, windows, etc.) is in danger.

If you’ve trained long enough or been to enough powerlifting meets, you’ve seen it happen at least once, it’s a disaster whenever it happens, and nearby people can and do sometimes get injured in the process if they get hit by the falling plates or flying barbell.

When You’re Most Likely to Make This Error
You can make this mistake when loading, but it is far more likely to occur when a lifter is unloading the bar.

figure 2: A one plate difference (two 45 lb plates on the left side and one 45 lb plate on the right side)

Loading the bar during warm-ups tends to promote symmetrical loading since - unless you’re a lifting psychopath - you’re only moving up by 90 lb at most per warm-up set. For instance, moving from 135 lb to 225 lb means you add a 45 lb plate on the left side and then walk over and add a 45 lb plate on the right side. At most, you’ve briefly got a one plate difference (i.e., one 45 lb plate difference) between the two sides of the barbell, and this doesn’t cause a problem (Figure 2).

However, when you’re finished with your 315 lb squat, your goal is to unload all the plates from the bar, and if you don’t approach this in a sensible fashion, you might start unloading all the plates from one side and soon cause a big ruckus.

This most often happens with the squat, but it can happen on the bench or press as well, and if you’re fortunate enough to train with a deadlift jack, it can happen when unloading your deadlift (since a deadlift jack functions much like a pair of j-hooks on a squat rack). I’ve seen a fellow lifter nearly get popped right in the teeth by the barbell after absentmindedly unloading four 45 lb plates from one side of the bar before removing any of the plates from the other side.

The Easy Way to Prevent It
The easiest way to prevent this mistake and the potential disaster that accompanies it is to make the following rule:

No more than one 45 lb plate difference between the two sides of the bar.

For example, if you have two 45 lb plates on the left side of the bar and you’re using this rule, then the following are acceptable for the right side of the bar:

  • Three 45 lb plates (one plate difference)

  • Two 45 lb plates (no difference)

  • One 45 lb plate (one plate difference)

However, having either four or zero 45 lb plates on the right side of the bar is a no-go. Those situations are not guaranteed to cause a problem, but you’re starting to flirt with disaster. This rule does not give you the only safe method, but it does guarantee a simple and safe approach that’s easy to remember.

Keep that one plate difference in mind (which is sometimes the hardest part!), and we hope this helps you get stronger, live better, and also live without any unnecessary broken stuff!

-Phil

PS: Whenever you want even more Testify in your life, here are some free resources:

  • Book a free intro and strategy session with us HERE.

  • Pick up a free copy of Testify’s Squat Guide: 12 Tips to Improve Your Squat Now HERE.

  • Get our free weekly email - containing useful videos, articles, and training tips - HERE.

  • Follow Testify on Instagram HERE.

  • Subscribe to Testify’s YouTube channel HERE.

(Some links may be affiliate links. As an Amazon Associate, Testify earns from qualifying purchases.)


At Testify, we offer small group training, private coaching (in-person or remotely via Zoom), online coaching, and form checks. Interested in getting stronger, looking better, and having more energy?