The Testify Morning News - June 24, 2024
/THIS WEEK'S SUBMISSION
From our video 8 Things Successful Lifters Do Before Benching HEAVY (plus BONUS tip) (click the title to watch):
Bernie
I always use a grip that's wider than that one shown here, is this one more effektive or is it just a better way to train (using more muscle mass)? Because when i go narrower, i just can't do my working weights.
Phil
Solid question. In general, we teach and coach a moderate-width grip, i.e., not a narrow grip (although we do program the close grip bench press at times for post-novice trainees), but not a wide grip either.
We usually start with a grip that's about one hand-width wider than where the knurling starts (or one full thumb-length from where the knurling starts, which is usually close to the same spot). From there, we'll make minor adjustments as needed as we're looking for a grip that permits vertical forearms at the bottom of the rep (vertical when viewed from the 12 o'clock or 6 o'clock viewing position).
This allows us to train a lot of muscle mass over a long range of motion, which is what we're looking for as we're training for strength. With that said, you'll sometimes see powerlifters take a wider grip than this as it shortens the range of motion and, as a result, will often permit heavier loads to be benched.
Probably a longer answer than you were looking for, but I hope it proves useful.
TESTIFY ONLINE COACHING
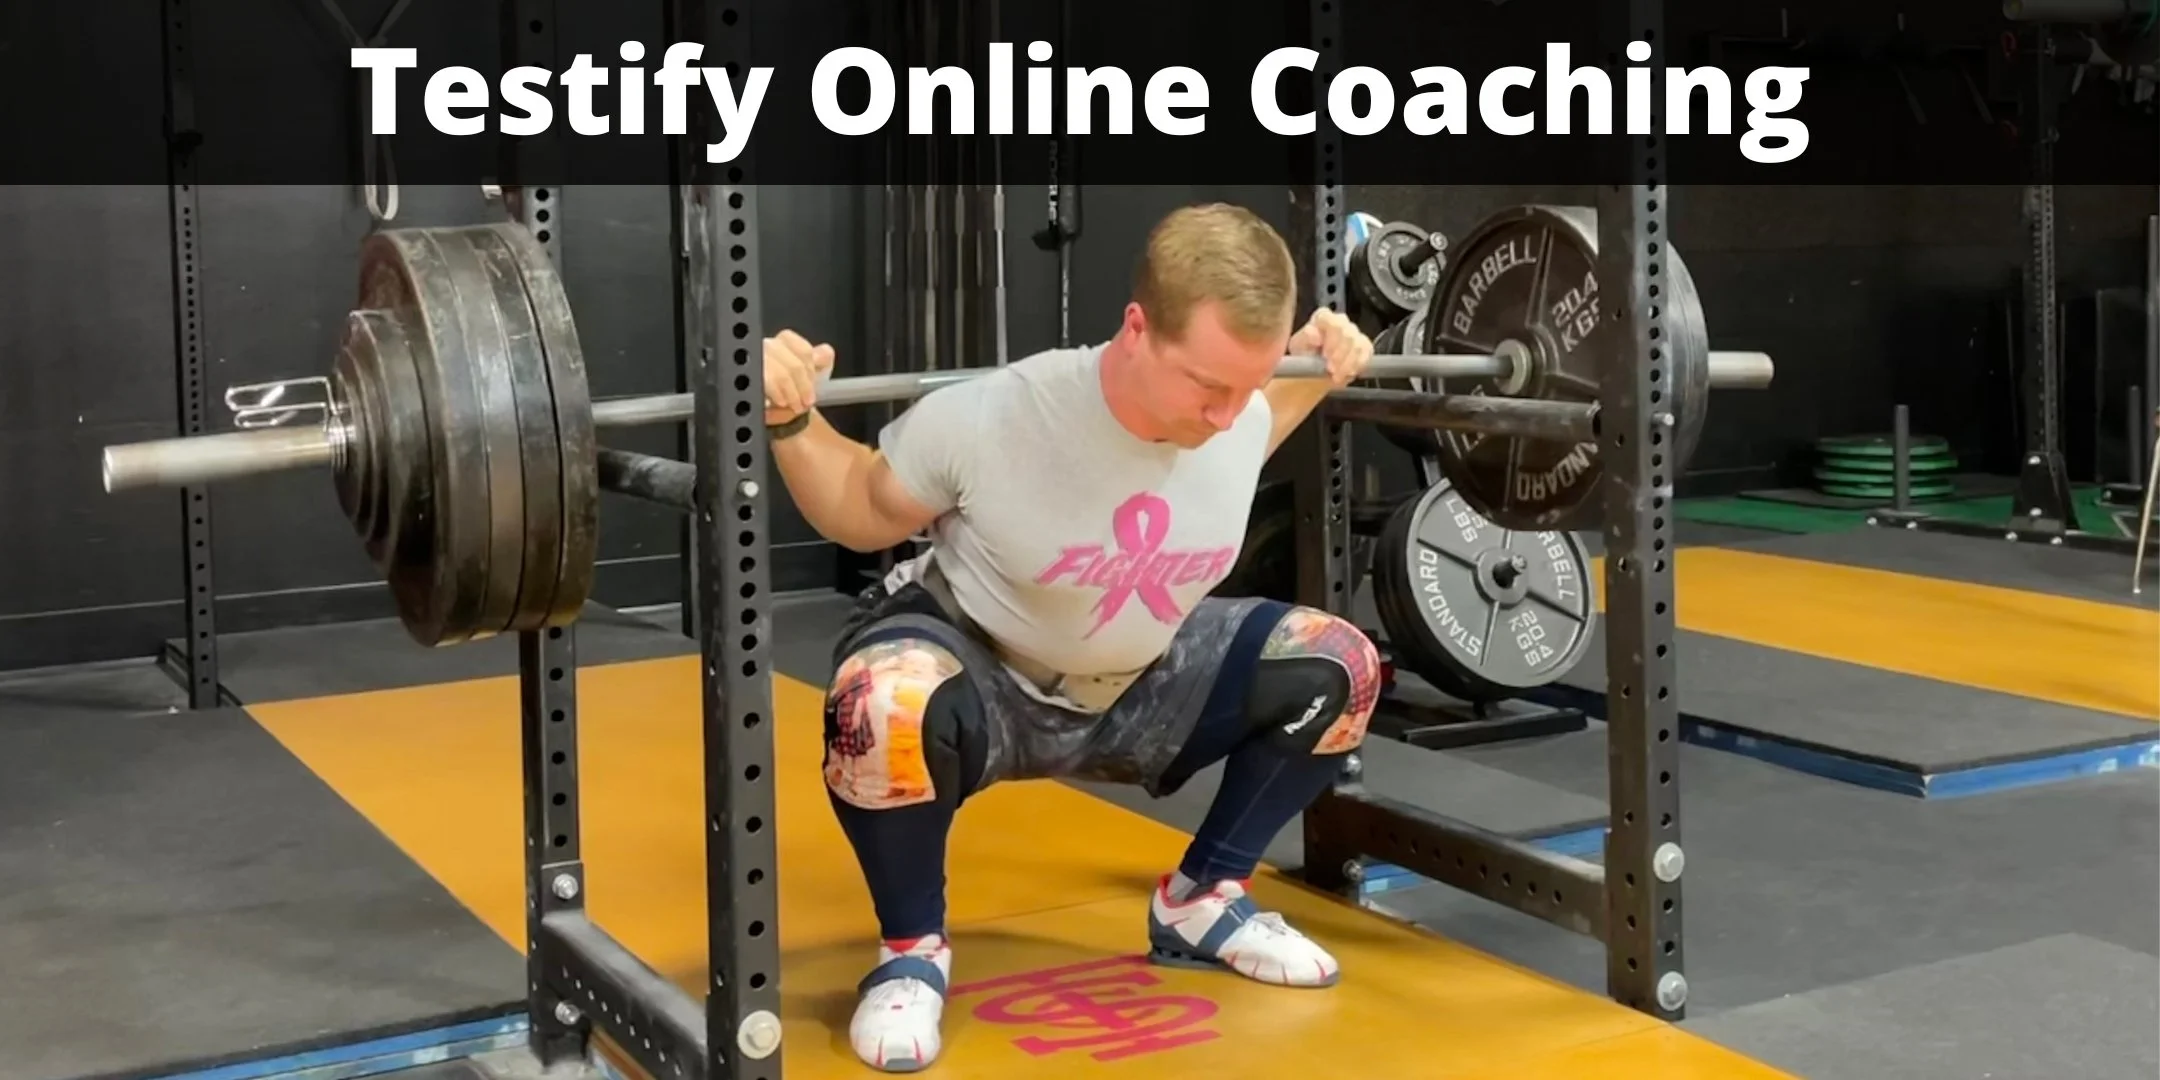
Want to get stronger working remotely with one of our Starting Strength Coaches? Click here to contact us and learn more.
Get Stronger. Live Better. Start today.
ARTICLES & VIDEOS

Get a Bigger Press TODAY | 3 Tactics to Triage Your Press FAST
Need to fix your press but not sure where to start? We address three major technical aspects of your press to focus on and evaluate when trying to improve your press. Click here to watch.

KNEE SLEEVES: The Complete Guide and the BEST Way to Put Them On (Lifting Gear Series)
We cover everything related to knee sleeves - why, how, what, where, when, and the EASIEST ways to put them on. This is the third article in the "Lifting Gear" series. Click here to read.

Blast from the Past: Rack Pull for a BIGGER Deadlift!
Want to improve your deadlift? The rack pull can help. Phil explains what a rack pull is, how to do it, and why you might want to utilize the rack pull in your training. Click here to watch.

Blast from the Past: The Bench Press: You're Forgetting to Do This - Part 3
Is your focal point - or lack thereof - destroying your bench press? We quickly discuss and demonstrate how to solve this problem. Click here to read.

“GET STRONGER - LIVE BETTER” SHIRTS ARE AVAILABLE!
Why do you train? Because getting stronger makes everything else easier. Get stronger. Live better. “Testify” to this message and represent your favorite gym with this shirt in several color options.
Click here to head to the Testify Store.
WHAT'S COMING UP
Reminder: We will be closed for training on Thursday, 07/04/24, in observance of Independence Day.
A big thank you goes out to everyone who competed, helped out, and showed up to cheer on the athletes at this year’s Testify Strongman Summer Showdown!
Below are a few of our upcoming events, and you can find out what else is on the calendar by heading to our events page at www.testifysc.com/events.
Testify IronFest VI
July 12, 2024
IronFest is a team-based strength meet wherein the contested lifts will be the squat, press, bench press, and deadlift. Competitors will form teams of 2 lifters/team and perform all 4 lifts; each lifter will perform one upper body lift and one lower body lift, and each lifter will receive 3 attempts for each lift.
Click here to register or for more information.
Deadapalooza! The Annual Testify Deadlift Festival
August 23, 2024
Deadapalooza is a strength meet wherein the only contested lift is - you guessed it - the deadlift. There will be one bar (possibly multiple bars if numbers dictate), and the meet will be conducted in a "rising bar" format, so the weight on the bar only goes up! It's a ton of fun, so come on out!
Click here to register or for more information.
Starting Strength Self-Sufficient Lifter Camp
September 28, 2024
Spend the day learning the Squat, Press, and Deadlift and how to self-evaluate your lifts while training in your garage or commercial gym without a coach.
Click here to register or for more information.
THIS WEEK’S CONDITIONING
Option 1
“Prowler Base+1”
1. Load up a manageable weight.
2. Sprint 40m at 85% intensity.
3. Rest 30 sec.
4. Repeat 5-15 times.
Courtesy of “Death by Prowler” (on Starting Strength).
Compare to 2024.04.22.
Option 2
Bike/row:
12 min TT
Score = distance
Compare to 2024.04.01.
Option 3
Outdoors:
8 rounds:
4 tire flips
50 yd sled push (25 yd down-back)
Rest 1 minute
Indoors:
8 rounds:
4 tire flips
100 ft sled push (50 ft down-back)
Rest 1 minute
Compare to 2024.03.04.
Option 4
5 rounds:
4 tire flips
8 sledgehammer strikes
6 pull-ups
10 push-ups
Pull-ups and push-ups can be modified – talk to the coaches for options.
Compare to 2024.03.04.
As always, we hope this helps you get stronger and live better!
KNEE SLEEVES: The Complete Guide and the BEST Way to Put Them On (Lifting Gear Series)
/Sometimes your knees need some lovin’, so we’re going to cover everything you wanted to know about knee sleeves - what they are, why you might want to wear them, where to purchase them, and more. We’ll provide a few solid knee sleeve recommendations, and perhaps most importantly, we’ll cover two easy and quick ways to put on your knee sleeves.
This is the third article in our “Lifting Gear” series, so be sure to check back in the coming weeks for future articles in the series. Click below to read the previous articles in the series:

Dave and Rich are both jealous of geneva’s knee sleeves.
What is a Knee Sleeve?
Let’s not complicate this - a knee sleeve is simply a sleeve that goes on your knee. Knee sleeves are usually made out of neoprene, and the most common thicknesses are either 5 mm or 7 mm.
Why Would You Want to Wear Knee Sleeves?
You want to wear knee sleeves if your knees have the very specific, medical condition known as “cranky knees.” In other words, if your knees are a bit achy when you train, you’ll probably appreciate wearing sleeves. Bear in mind that if your knees are bothersome, there may be some technical and/or programming issues to consider, but both of those are beyond the scope of this article (my recommendation: seek out a good coach).
Suffice to say that if your knees are a bit cranky, knee sleeves will probably be useful for you. They provide some warmth and compression and, to over-simplify things, they essentially act like a nice, warm hug for your knees.
Where Do You Get Knee Sleeves
In general, I recommend purchasing knee sleeves online. You might be able to find a decent pair locally, but Amazon, Rogue Fitness, and other online retailers provide far more options. In addition, many reputable manufacturers (e.g., Pioneer Fitness and SBD) sell directly from their websites, so that’s another option.
What to Get
While I’m not endorsing one specific brand, a few solid options include Rehband, Pioneer, Stoic, SBD, and Iron Bull, and some links are provided below:
As mentioned earlier, the most common thickness are 5 mm and 7 mm, and I recommend that you go with the 7 mm option. You’ll like 5 mm-thick sleeves as well, but the day you use a 7 mm sleeve, you’ll wonder why you didn’t go that route in the first place.
Most manufacturers have a sizing guide, and be sure to read this. You want your knee sleeves to be very snug - tight enough to provide warmth and compression, but not so tight that you need someone to help you get them on and off. Another way to approach it is that you want them quite snug, but not so tight that you feel the desire to take them off between sets.
What Do They Cost?
As of publication, prices currently run anywhere from $40 - $80 for a pair of knee sleeves. The more expensive sleeves tend to be thicker, denser, and last longer than the cheaper options.

Addy thinks rob’s knee sleeves are pretty swell.
Which Lifts Benefit From Knee Sleeves?
Primarily, you use knee sleeves when squatting. With this in mind, you may want to wear them when performing the Olympic lifts as well (i.e., snatch and clean-and-jerk), and specifically, you use them in these lifts due to the squatting involved in the receiving positions of the snatch and clean (they also help with the landing aspect and the impact involved in those lifts).
If you wish to use them on the press and bench press, that’s fine, but they will not provide any noticeable benefit to those lifts.

chris shows off his knee sleeves while snatching.
The deadlift needs a closer examination. In general, I recommend not wearing them when deadlifting as the deadlift has relatively little knee flexion (compared to the squat), and thus, you probably won’t feel the need to wear sleeves. Also, the sleeves provide a slight, additional thickness with which you have to deal when endeavoring to keep the bar close when dragging it up your legs.
For these reasons, I recommend not wearing sleeves when deadlifting, but if you knees bother you a bit when pulling, then wear them as their presence is not a make-or-break issue.
When Do You Wear Them?
As with many things, don’t complicate the issue. Some lifters will leave their knee sleeves down around their ankles when the weight is light and wait until later in the warm-ups before hiking them up into position. If you prefer to do this, I recommend pulling them up for your last warm-up so you’re used to wearing them before you get to your work set.
Most lifters, however, simply pull their knee sleeves all the way up into position when they initially put the sleeves on - it’s one less variable with which to deal later on. In this case, the lifters perform all of the warm-ups as well as the work sets with the sleeves at the knees.
How to Put On Your Knee Sleeves: Option A
For both Option A and Option B, I strongly recommend watching the included video (above) as it’s easier to see and understand than reading and looking at a few pictures.
Orient your knee sleeve so that it is inside out, upside down, and backwards (backwards isn’t necessary, but it usually helps the sleeve go around the ankle a bit easier).
Pull the sleeve on, rotate it until it faces forward again, and then pull it up until it’s just below your knee.
Grab the bottom of the sleeve (what will eventually be the top of the sleeve) and peel it up and over the rest of the sleeve. At this point, you can make minor adjustments.

Option A allows the sleeve to slide over itself instead of over your sticky skin as it passes over the knee joint, which is why it works well. Removing the sleeve is essentially just the reverse - peel the top down first, and then slide it down the rest of the way and take it off.
However, if you have 7 mm-thick sleeves that are very snug, a bit longer, and dense (e.g., Pioneer, SBD, Stoic), you may want to use . . .
How to Put On Your Knee Sleeves: Option B
Leave the sleeve in its normal orientation - right side out, correct side up, and with the front of the sleeve facing forward.
Fold the top half of the sleeve down over the bottom half.
Slide the sleeve on until it’s past your ankle.
Grab a pair of leather or cloth lifting straps (this is the only good use for cloth lifting straps) - even two short ropes will probably work.
From the top of the sleeve, insert the straps down inside of the sleeve until they come out the bottom. Insert them far enough that you create handles for yourself as shown in the picture.
Using the straps, pull the sleeve up until it’s roughly at your knee, pull the straps out, and then unfold the sleeve so that it covers the knee. At this point, you can make minor adjustments to the sleeve so it sits precisely where you want it.
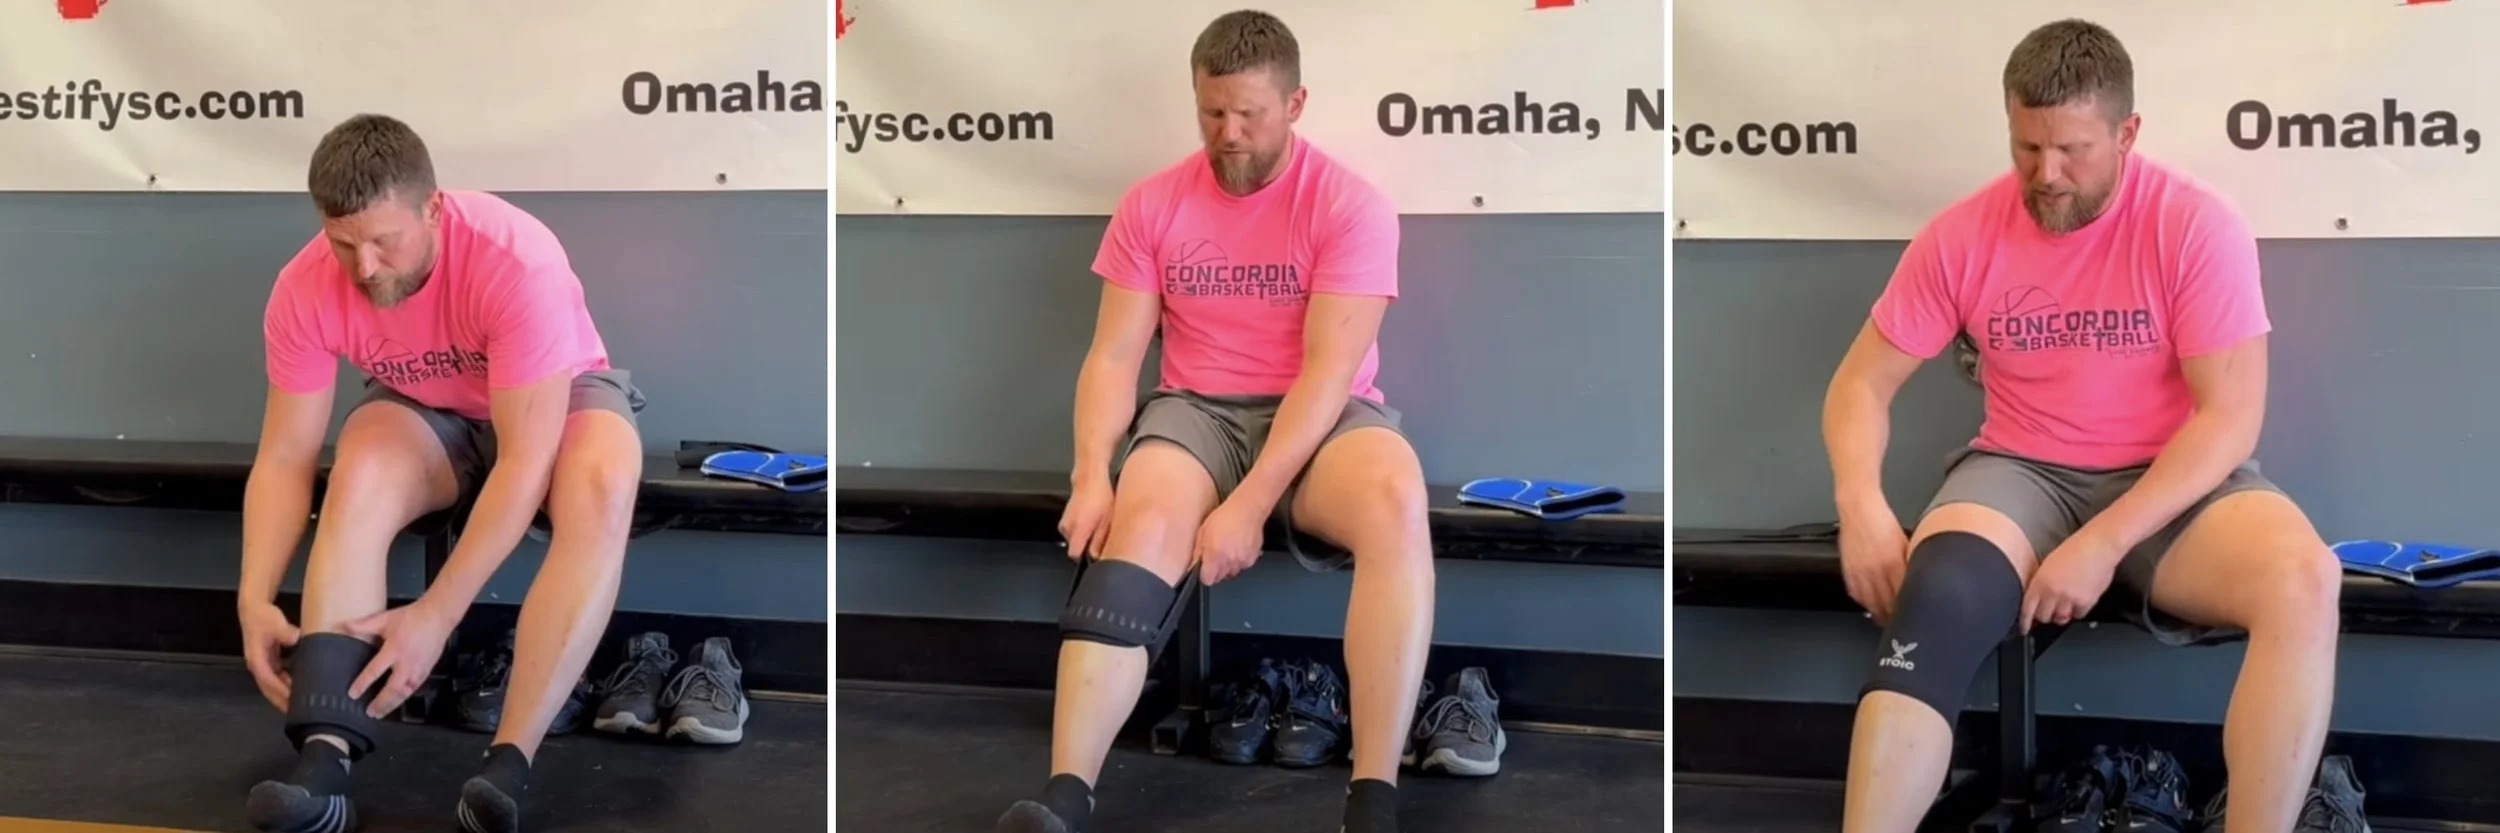
If you compete in a powerlifting federation, this tactic may or may not be allowed at the meet, but regardless, it’s still awfully handy for your training sessions.
As always, we hope this helps you get stronger and live better.
(Some links may be affiliate links. As an Amazon Associate, Testify earns from qualifying purchases.)
If you found this helpful, you’ll love our weekly email. It’s got useful videos, articles, and training tips just like the one in this article. Sign up below, and of course, if you don’t love it, you can unsubscribe at any time.
At Testify, we offer small group training, private coaching (in-person or remotely via Zoom), online coaching, and form checks. Would you like to get quality coaching from a Starting Strength Coach?
Rack Pull for a BIGGER Deadlift!
/Want to improve your deadlift? The rack pull can help. Phil explains what a rack pull is, how to do it, and why you might want to utilize the rack pull in your training.
(A Blast from the Past video originally published on 06/13/22)
At Testify, we offer small group training, private coaching (in-person or remotely via Zoom), online coaching, and form checks. Click the button below to get quality coaching from a Starting Strength Coach and start getting stronger TODAY.
The Bench Press: You're Forgetting to Do This - Part 3
/(A Blast from the Past article originally posted on 05/27/22)
You’re all set to bench - your grip is pronated, your shoulder blades are pinched back, and you’re driving with your legs, but you’re still forgetting one thing . . .

Jeremiah correctly fixes his gaze at a point on the ceiling.
Find your focal point.
After you’ve unracked the barbell but before starting the first rep, find a point directly above you on the ceiling and stare at that point. You now have created a “sight picture” as you can still see the barbell in your periphery even while staring at the ceiling. You’re going to recreate this picture at the end of each rep, so remind yourself that the bar needs to finish in this exact same position every single time.
Then, simply stare at that focal point during each rep and even between reps - there’s no need to introduce unnecessary variability into your benching by having to re-find the focal point before each rep, so just keep looking at it like you do in the squat (watch the included video).
Having a stationary reference point makes for a more consistent and efficient bar path, and it makes for better balance as well (we don’t watch the bar since it’s a moving reference point).
As always, we hope this helps you get stronger and live better.
(Some links may be affiliate links. As an Amazon Associate, Testify earns from qualifying purchases.)