KNEE SLEEVES: The Complete Guide and the BEST Way to Put Them On (Lifting Gear Series)

Sometimes your knees need some lovin’, so we’re going to cover everything you wanted to know about knee sleeves - what they are, why you might want to wear them, where to purchase them, and more. We’ll provide a few solid knee sleeve recommendations, and perhaps most importantly, we’ll cover two easy and quick ways to put on your knee sleeves.

This is the third article in our “Lifting Gear” series, so be sure to check back in the coming weeks for future articles in the series. Click below to read the previous articles in the series:

Dave and Rich are both jealous of geneva’s knee sleeves.

What is a Knee Sleeve?
Let’s not complicate this - a knee sleeve is simply a sleeve that goes on your knee. Knee sleeves are usually made out of neoprene, and the most common thicknesses are either 5 mm or 7 mm.

Why Would You Want to Wear Knee Sleeves?
You want to wear knee sleeves if your knees have the very specific, medical condition known as “cranky knees.” In other words, if your knees are a bit achy when you train, you’ll probably appreciate wearing sleeves. Bear in mind that if your knees are bothersome, there may be some technical and/or programming issues to consider, but both of those are beyond the scope of this article (my recommendation: seek out a good coach). 

Suffice to say that if your knees are a bit cranky, knee sleeves will probably be useful for you. They provide some warmth and compression and, to over-simplify things, they essentially act like a nice, warm hug for your knees.

Where Do You Get Knee Sleeves
In general, I recommend purchasing knee sleeves online. You might be able to find a decent pair locally, but Amazon, Rogue Fitness, and other online retailers provide far more options. In addition, many reputable manufacturers (e.g., Pioneer Fitness and SBD) sell directly from their websites, so that’s another option.

What to Get
While I’m not endorsing one specific brand, a few solid options include Rehband, Pioneer, Stoic, SBD, and Iron Bull, and some links are provided below:

As mentioned earlier, the most common thickness are 5 mm and 7 mm, and I recommend that you go with the 7 mm option. You’ll like 5 mm-thick sleeves as well, but the day you use a 7 mm sleeve, you’ll wonder why you didn’t go that route in the first place.

Most manufacturers have a sizing guide, and be sure to read this. You want your knee sleeves to be very snug - tight enough to provide warmth and compression, but not so tight that you need someone to help you get them on and off. Another way to approach it is that you want them quite snug, but not so tight that you feel the desire to take them off between sets.

What Do They Cost?
As of publication, prices currently run anywhere from $40 - $80 for a pair of knee sleeves. The more expensive sleeves tend to be thicker, denser, and last longer than the cheaper options.

Addy thinks rob’s knee sleeves are pretty swell.

Which Lifts Benefit From Knee Sleeves?
Primarily, you use knee sleeves when squatting. With this in mind, you may want to wear them when performing the Olympic lifts as well (i.e., snatch and clean-and-jerk), and specifically, you use them in these lifts due to the squatting involved in the receiving positions of the snatch and clean (they also help with the landing aspect and the impact involved in those lifts).

If you wish to use them on the press and bench press, that’s fine, but they will not provide any noticeable benefit to those lifts.

chris shows off his knee sleeves while snatching.

The deadlift needs a closer examination. In general, I recommend not wearing them when deadlifting as the deadlift has relatively little knee flexion (compared to the squat), and thus, you probably won’t feel the need to wear sleeves. Also, the sleeves provide a slight, additional thickness with which you have to deal when endeavoring to keep the bar close when dragging it up your legs.

For these reasons, I recommend not wearing sleeves when deadlifting, but if you knees bother you a bit when pulling, then wear them as their presence is not a make-or-break issue.

When Do You Wear Them?
As with many things, don’t complicate the issue. Some lifters will leave their knee sleeves down around their ankles when the weight is light and wait until later in the warm-ups before hiking them up into position. If you prefer to do this, I recommend pulling them up for your last warm-up so you’re used to wearing them before you get to your work set.

Most lifters, however, simply pull their knee sleeves all the way up into position when they initially put the sleeves on - it’s one less variable with which to deal later on. In this case, the lifters perform all of the warm-ups as well as the work sets with the sleeves at the knees.

How to Put On Your Knee Sleeves: Option A
For both Option A and Option B, I strongly recommend watching the included video (above) as it’s easier to see and understand than reading and looking at a few pictures.

  1. Orient your knee sleeve so that it is inside out, upside down, and backwards (backwards isn’t necessary, but it usually helps the sleeve go around the ankle a bit easier).

  2. Pull the sleeve on, rotate it until it faces forward again, and then pull it up until it’s just below your knee.

  3. Grab the bottom of the sleeve (what will eventually be the top of the sleeve) and peel it up and over the rest of the sleeve. At this point, you can make minor adjustments.

Option A allows the sleeve to slide over itself instead of over your sticky skin as it passes over the knee joint, which is why it works well. Removing the sleeve is essentially just the reverse - peel the top down first, and then slide it down the rest of the way and take it off.

However, if you have 7 mm-thick sleeves that are very snug, a bit longer, and dense (e.g., Pioneer, SBD, Stoic), you may want to use . . .

How to Put On Your Knee Sleeves: Option B

  1. Leave the sleeve in its normal orientation - right side out, correct side up, and with the front of the sleeve facing forward.

  2. Fold the top half of the sleeve down over the bottom half.

  3. Slide the sleeve on until it’s past your ankle.

  4. Grab a pair of leather or cloth lifting straps (this is the only good use for cloth lifting straps) - even two short ropes will probably work.

  5. From the top of the sleeve, insert the straps down inside of the sleeve until they come out the bottom. Insert them far enough that you create handles for yourself as shown in the picture.

  6. Using the straps, pull the sleeve up until it’s roughly at your knee, pull the straps out, and then unfold the sleeve so that it covers the knee. At this point, you can make minor adjustments to the sleeve so it sits precisely where you want it.

If you compete in a powerlifting federation, this tactic may or may not be allowed at the meet, but regardless, it’s still awfully handy for your training sessions.

As always, we hope this helps you get stronger and live better.

(Some links may be affiliate links. As an Amazon Associate, Testify earns from qualifying purchases.)

If you found this helpful, you’ll love our weekly email. It’s got useful videos, articles, and training tips just like the one in this article. Sign up below, and of course, if you don’t love it, you can unsubscribe at any time.


At Testify, we offer small group training, private coaching (in-person or remotely via Zoom), online coaching, and form checks. Would you like to get quality coaching from a Starting Strength Coach?

EASY Way to Put on Tight & Stiff Knee Sleeves (TWO TIPS)

What's the easiest way to put on knee sleeves - especially sleeves that are tight and stiff as with brands like SBD, Stoic, and Pioneer? Starting Strength Coach Phil Meggers gives you tactics to help you save your energy for . . . you know - actually training.


At Testify, we offer small group training, private coaching (in-person or remotely via Zoom), online coaching, and form checks. Click the button below to get quality coaching from a Starting Strength Coach and start getting stronger TODAY.

How to Put on Knee Sleeves (the super secret and easy way!)

Stop struggling to get your knee sleeves on! Phil, Becky, and Sharon show you this super secret method - it's simple and easy.

(This is a Blast from the Past video originally published on 02/21/22.)


At Testify, we offer small group training, private coaching (in-person or remotely via Zoom), online coaching, and form checks. Click the button below to get quality coaching from a Starting Strength Coach and start getting stronger TODAY.

The Super Secret Way to Put on Knee Sleeves!

(A Blast from the Past article originally posted on 08/13/21)

Oooh . . . secrets! We love us some secrets!

Knee+sleeve+1.jpg

Not everyone knows this - and this is especially true if you’re a new lifter or at least new to using knee sleeves - but when it comes to putting on your knee sleeves, there is one method to rule them all. Anything else is a waste of your time and energy, so let’s take a look at how you should put on a sleeve (watch the included video for a quick demonstration):

Step 1: Turn the sleeve inside-out.

Step 2: Grab the sleeve with both hands so that it’s upside down and backward (i.e., the front of the sleeve - the part that will cover your kneecap - is facing backward).

Steps 1 & 2: The sleeve is inside-out, upside down, and backward . . . and this is a good thing.

Steps 1 & 2: The sleeve is inside-out, upside down, and backward . . . and this is a good thing.

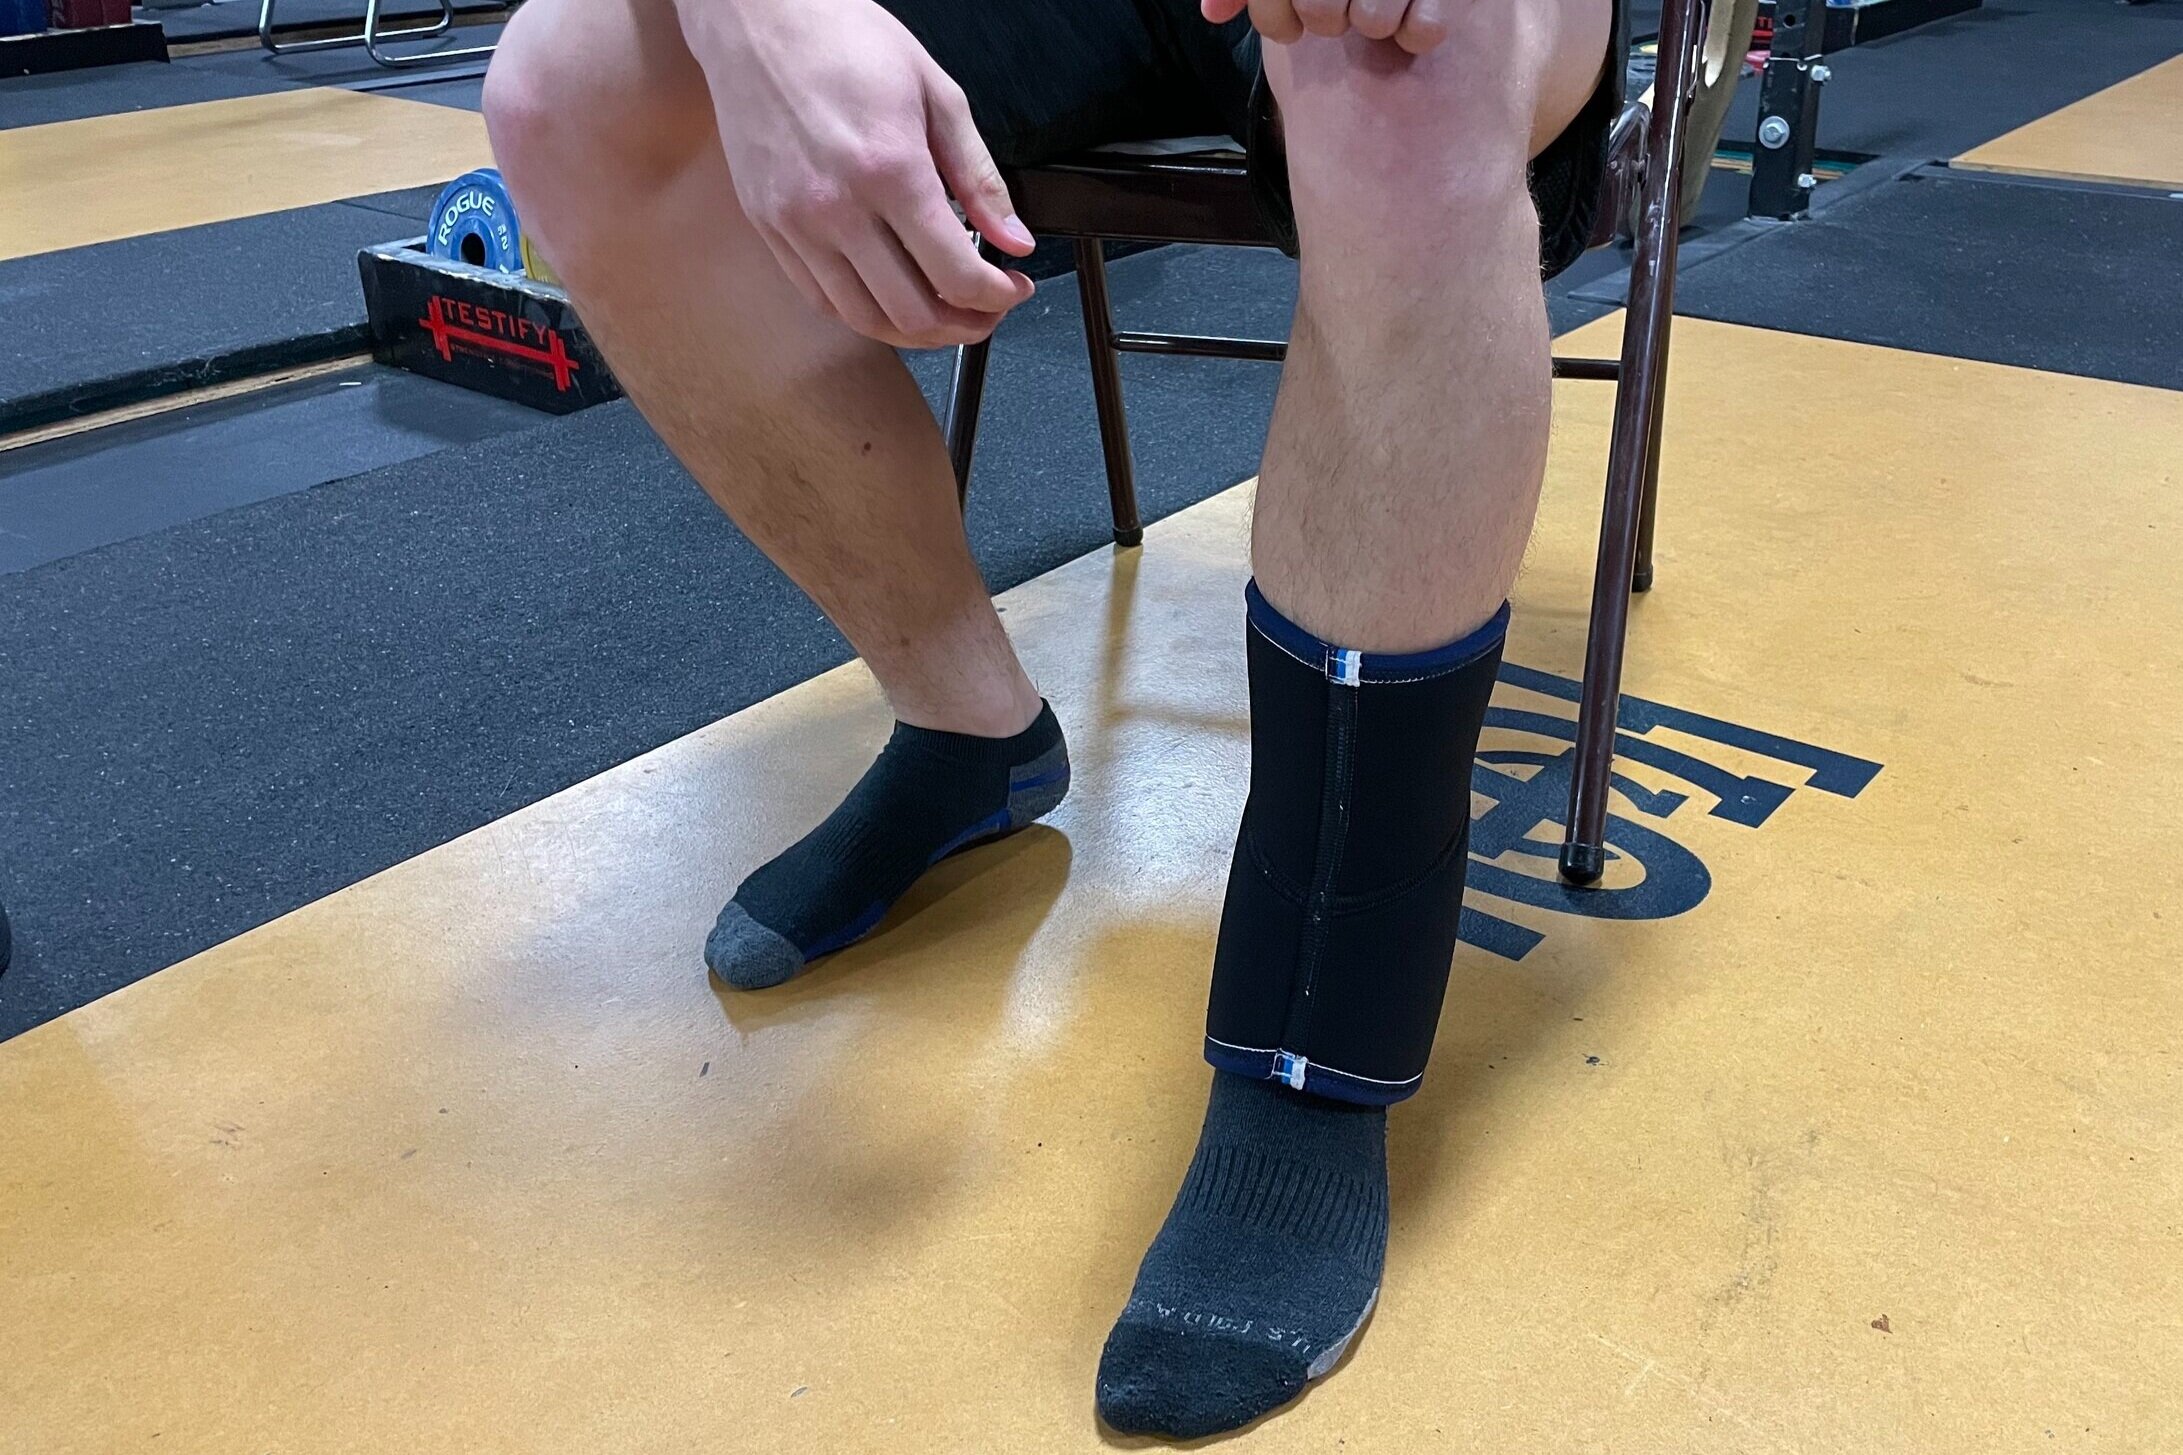
Step 3: Before you put on your shoe, pull the sleeve over your foot until it comes up just past your ankle.

Step 3

Step 3

Step 4: Spin the sleeve around so that it’s facing forward again (i.e., the front of the sleeve is facing forward).

Step 4

Step 4

Step 5: Pull on the uppermost part of the sleeve - sliding the sleeve upward until it reaches a point a few inches below your knee. (If you like, you can perform step 5 before step 4.)

Step 5

Step 5

Step 6: Grab the lowermost part of the sleeve (it’s actually the “top” of the sleeve, but it’s still upside down right now, remember?) and pull upward so that that portion of the sleeve starts sliding over the rest of the sleeve. As you continue doing this, the sleeve will be turning right-side-out again.

Step 6

Step 6

Step 7: Feel free to make some minor adjustments, but really, at this point, you’re done.

Step 7 - done!

Step 7 - done!

Now, go out and tell your friends because - after all - this is a secret that everyone kneeds to know.

If you’re looking for some knee sleeves, below are links to a few knee sleeve options that are popular with a number of our members at Testify:

As always, we hope this helps you get stronger and live better.

(Some links may be affiliate links. As an Amazon Associate, Testify earns from qualifying purchases.)
If you found this helpful, you’ll love our weekly email. It’s got useful videos, articles, and training tips just like the one in this article. Sign up below, and of course, if you don’t love it, you can unsubscribe at any time.


At Testify, we offer small group training, private coaching (in-person or remotely via Zoom), online coaching, and form checks. Would you like to get quality coaching from a Starting Strength Coach?

Knee Sleeves: What, Why, Where, and When!

(This is a Blast from the Past article originally posted on 07/16/21.)

What on earth are knee sleeves, and why might you want to wear them? Let’s chat.

Knee sleeve 2.JPG

What is a knee sleeve?

A knee sleeve is a sleeve . . . that goes on your knee. They are generally made of neoprene, and they should fit quite snugly. A reasonable approach is to make sure that they are snug, but not so snug that you need someone else to help you put them on. If they’re so tight that you need to take them off between sets, I’d recommend something a little less snug.

Why might you want knee sleeves?

The main reason is if you have the highly specific medical condition known as “cranky knees.” Now, if you have achy knees when you squat (and we’re generally talking about the squat here), there may be some technical considerations to examine as well as some programming considerations, and your coach can help you with that.

Knee sleeve 1.JPG

Nonetheless, to put it simply, knee sleeves simply help your knees feel better. They provide some warmth and some compression, and without getting into the weeds here, both of those factors generally make your knees more comfortable. It’s a nice, warm hug for your knees. One of our coaches, Mike, once accused me years ago of holding out on him because I evidently hadn’t suggested knee sleeves until a year or so into his training. Once he put them on, it was love at first squat.

Where can you get knee sleeves?

You can find some at your local sporting goods store, but your best bet is this thing they’ve developed called the internet, which they have on computers now. The usual suspects - Amazon, Rogue, etc. - will have a host of options, which brings us to . . .

What should you get?

5 mm and 7 mm are both common thicknesses, and having used both, I’d recommend the 7 mm option. There are a ton of companies that make them - some of the more popular ones are brands like Rehband, SBD, STrong (Mark Bell), Stoic, and Rogue. 

There’s a big price range from about $35-$45 for a pair of sleeves to $35-$45 for a single sleeve (which reflects the prices of the brands listed above). The biggest difference seems to be simple longevity - the cheap ones tend to wear out and tear within a couple of years, whereas the pricier ones typically last quite a bit longer - to the point that I’d probably say you’ll spend less money in the long run by going with the more expensive pairs. Of course, your mileage may vary. 

Below are links to a few knee sleeve options that are popular with a number of our members at Testify:

When do you use knee sleeves?

The short answer is - squats and Olympic lifting. You’ll appreciate them for squatting, and you’ll appreciate them for the Olympic lifts because of the squatting involved in both snatching and cleaning (there is probably some benefit for the impact of landing as well). 

What about using them on the press and bench press? Go ahead if you’d like - they won’t help, but they won’t hurt either. 

The deadlift gets a little more discussion. In the deadlift, the knee doesn’t go through a large range of motion (as opposed to the knee’s longer ROM in the squat), so if your knees ache while squatting, but they feel fine while deadlifting, I’d recommend not wearing sleeves. The thickness of the sleeve - while not huge - is still one more thing you have to deal with when trying to keep the bar close on the pull, so if you don’t need them, don’t use them. But if your knees also ache on the deadlift, and you find that the sleeves help, then go right ahead.

As always, we hope this helps you get stronger and live better!

(Some links may be affiliate links. As an Amazon Associate, Testify earns from qualifying purchases.)

If you found this helpful, you’ll love our weekly email. It’s got useful videos, articles, and training tips just like the one in this article. Sign up below, and of course, if you don’t love it, you can unsubscribe at any time.


At Testify, we offer small group training, private coaching (in-person or remotely via Zoom), online coaching, and form checks. Click the button below to get quality coaching from a Starting Strength Coach and start getting stronger TODAY.

The Super Secret Way to Put on Knee Sleeves!

Knee+sleeve+1.jpg

Oooh . . . secrets! We love us some secrets!

Not everyone knows this - and this is especially true if you’re a new lifter or at least new to using knee sleeves - but when it comes to putting on your knee sleeves, there is one method to rule them all. Anything else is a waste of your time and energy, so let’s take a look at how you should put on a sleeve (photos below):

  1. Turn the sleeve inside-out.

  2. Grab the sleeve with both hands so that it’s upside down and backward (i.e., the front of the sleeve - the part that will cover your kneecap - is facing backward).

  3. Before you put on your shoe, pull the sleeve over your foot until it comes up just past your ankle.

  4. Spin the sleeve around so that it’s facing forward again (i.e., the front of the sleeve is facing forward).

  5. Pull on the uppermost part of the sleeve - sliding the sleeve upward until it reaches a point a few inches below your knee. (If you like, you can perform step 5 before step 4.)

  6. Grab the lowermost part of the sleeve (it’s actually the “top” of the sleeve, but it’s still upside down right now, remember?) and pull upward so that that portion of the sleeve starts sliding over the rest of the sleeve. As you continue doing this, the sleeve will be turning right-side-out again.

  7. Feel free to make some minor adjustments, but really, at this point, you’re done.

Now, go out and tell your friends because - after all - this is a secret that everyone kneeds to know.

Steps 1 & 2: The sleeve is inside-out, upside down, and backward . . . and this is a good thing.

Steps 1 & 2: The sleeve is inside-out, upside down, and backward . . . and this is a good thing.

Step 3

Step 3

Step 4

Step 4

Step 5

Step 5

Step 6

Step 6

Step 7 - done!

Step 7 - done!