How to Deadlift: Set Your Back the RIGHT Way - Part 3

Quick Recap
In the previous articles in this series, we covered two cues to help get your back correctly set in rigid and flat extension. In Part 1, we discussed the “squeeze your chest up cue” that’s already present in the deadlift 5-step setup, and in Part 2, we examined the cue of “push your belly down between your thighs.”

In this article, we introduce a third cue to help you get the job done. I’d also recommend watching the included video above to see this cue in action.

Cue #3: Wrinkles in the Shirt
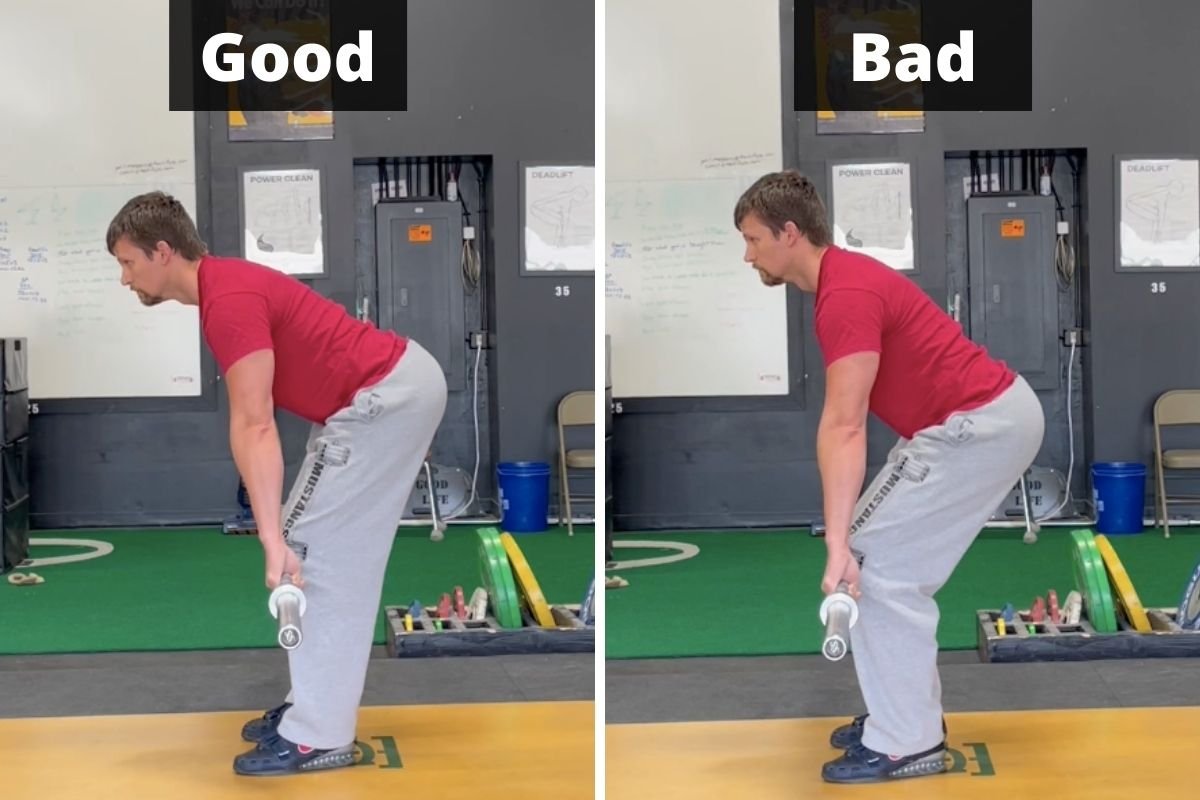
When using this cue, you try to create a series of wrinkles along your back in the fabric of your shirt.

Figure 1: this poor fool can’t see how ridiculous he looks.

This cue often works quite well because - even though you might not have a good sense of how to set your back or even what’s going on with your back (since you can’t see it while lifting a barbell as shown in Figure 1) - you might still have a solid idea of what movement is necessary to create wrinkles in the back of your shirt (Figure 2). 

Another way to picture it . . .
Picturing an arched back (i.e., the opposite of a flexed or rounded back) can help with this process.

figure 2: Notice the wrinkles in becky’s shirt? this is much better.

Granted, you don’t want an arched back - if you arch (i.e., overextend) your back, you’re actually overdoing it. We don’t want an overextended back, but if you’re having a tough time getting your back in extension when setting up to pull, you can try to arch your back because you won’t actually be able to accomplish it anyway. In other words, the picture of an arched back is a useful overcue.

Try this cue the next time you deadlift, and we’ll be back in Part 4 of this series in the near future.

As always, we hope this helps you get stronger and live better.

(Some links may be affiliate links. As an Amazon Associate, Testify earns from qualifying purchases.)

If you found this helpful, you’ll love our weekly email. It’s got useful videos, articles, and training tips just like the one in this article. Sign up below, and of course, if you don’t love it, you can unsubscribe at any time.


At Testify, we offer small group training, private coaching (in-person or remotely via Zoom), online coaching, and form checks. Would you like to get quality coaching from a Starting Strength Coach?

click here to start today

First Weightlifting or Powerlifting Meet? MOST Important Advice Ever!

What is the most important tip ever for your first weightlifting, powerlifting, or strengthlifting meet? Check it out.

(A Blast from the Past video originally published on 05/07/22)


At Testify, we offer small group training, private coaching (in-person or remotely via Zoom), online coaching, and form checks. Click the button below to get quality coaching from a Starting Strength Coach and start getting stronger TODAY.

Click here to start today

The Snatch & Clean: Stay Over the Bar!

DON’T CLEAN LIKE THIS DOOFUS.

(A Blast from the Past article originally posted on 03/11/22)

When learning to snatch and clean (sometimes even after we’ve learned!), a common error is that of pulling the barbell around the knees or - equivalently - making the back angle become more vertical too soon.

To fix this - cue yourself to “stay over the bar.” In other words, you need to keep your back relatively horizontal for longer than you think - in fact, roughly until after it passes your knees. Of course, the bar travels upward before this point, but it does so because of knee extension, i.e., you should be pushing the floor away from you like a leg press.

Here’s a mental picture: It’s raining, and you’ve decided to lift outside (not a good decision, mind you, but it’s too late now). Staying over the bar means that, from the start of the pull (i.e., your setup position) until just after it passes your knees, you want to stay leaned over so that your shoulders and upper back are keeping the middle of the bar from getting rained on (your shoulders will actually be slightly in front of the bar). If you raise your torso too soon, the bar gets wet, and that’s no good.

Eventually, your back angle will become more vertical as you reach what we call in the teaching progression the “jumping position,” but during the first part of the lift, stay over the bar. You’ll have a more vertical bar path (which means the bar doesn’t have to travel as far), and you’ll be able to accelerate the bar better as well.

We hope this helps you get stronger and live better!

(Some links may be affiliate links. As an Amazon Associate, Testify earns from qualifying purchases.)

If you found this helpful, you’ll love our weekly email. It’s got useful videos, articles, and training tips just like the one in this article. Sign up below, and of course, if you don’t love it, you can unsubscribe at any time.


At Testify, we offer small group training, private coaching (in-person or remotely via Zoom), online coaching, and form checks. Would you like to get quality coaching from a Starting Strength Coach?

click here to start today

The Knees Problem | If You Don't Change This, Your Deadlift Will NEVER Grow

There are 2 deadlift mistakes you're making with your knees. Let's fix both of them with one simple concept.


At Testify, we offer small group training, private coaching (in-person or remotely via Zoom), online coaching, and form checks. Click the button below to get quality coaching from a Starting Strength Coach and start getting stronger TODAY.

Click here to start today

Testify Optimist - April 1, 2024

THIS WEEK'S SUBMISSION

From our video How to Load & Unload the Barbell for the Deadlift (in less than 3 minutes!) (click the title to watch):

Kyriacos Kesta
Man...the trick with the small plate blew mind.. why didn't I think of that before? I've always been fighting with the bar in between warm up sets to load all these plates.. thanks for the video!

Phil
You’re welcome! And yep, it’s definitely a game changer – I still remember the first time I saw someone do that. And you don’t have to buy anything or make anything.


TESTIFY ONLINE COACHING

Want to get stronger working remotely with one of our Starting Strength Coaches? We have a few openings, so if you’re interested, click here to contact us and learn more.

Get Stronger. Live Better. Start today.


ARTICLES & VIDEOS

How to Squat with BAD KNEES | Knee Pain? Follow these 9 Tips
Do you have knee pain when squatting? Phil provides 9 tips to help you squat with less pain. Click here to watch.


How to Squat: The Setup | STOP Doing This!
Are you getting setup as well as you should be when you squat? In this short article, we cover a common error during the setup process. Click here to read.


Blast from the Past: The Rules of Olympic Weightlifting - How to Avoid Red Lights!
Did your lift even count? Know the rules for olympic lifting so that your lifts count on the competition platform! We cover a few basic rules so that you can avoid red lights at the meet. Click here to watch.


Blast from the Past: The Deadlift: Follow the Bar
Do you struggle to set the bar back down easily, accurately, and quickly when deadlifting? Here’s a cue to help solve this problem. Click here to read.


NEW TESTIFY HOODIES ARE AVAILABLE!

Looking to train in style? Get yourself a Testify hoodie - in practically any color! Get yours today and represent your favorite gym.

Click here to head to the Testify Store.


WHAT'S COMING UP

Reminder: We will be closed for training on Saturday, 04/06/24, as we are hosting the annual Testify Strengthlifting Challenge.

Below are a few of our upcoming events, and you can find out what else is on the calendar by heading to our events page at www.testifysc.com/events.

Testify Strengthlifting Challenge

  • April 6, 2024

  • The annual Testify Strengthlifting Challenge is back, and we invite you to be a part of it! This is a strengthlifting meet, which means the contested lifts will be the squat, press, and deadlift.

  • Click here to register or for more information.

Testify Barbell MAYhem

  • May 11, 2024

  • Come on out and join us for the annual Testify Barbell MAYhem! This is a weightlifting meet, so the contested lifts are the snatch and clean-and-jerk.

  • Click here for more information.

Starting Strength Self-Sufficient Lifter Camp

  • May 18, 2024

  • Spend the day learning the Squat, Press, and Deadlift and how to self-evaluate your lifts while training in your garage or commercial gym without a coach.

  • Click here to register or for more information.


THIS WEEK’S CONDITIONING

Option 1
Sled
Outdoors:
10 rounds of:
Push sled 100 ft
Pull sled 100 ft (hand over hand)

Indoors:
20 rounds of:
Push sled 50 ft
Pull sled 50 ft (hand over hand)

Compare to 2024.01.29.

Option 2
Bike/row:
12 min TT

Score = distance

Compare to 2024.01.08.

Option 3
5-10 rounds of:
30 sec ME tire flips
30 sec rest

Compare to 2023.12.11.

Option 4
For time:
500m row
5 x 80m sled push (200 ft if indoors)
500m row

Rest 1 minute after the first row and after each sled push.

Compare to 2023.12.11.

How to Squat: The Setup | STOP Doing This!

Welcome back to our series on fixing some common setup errors (and therefore how to correctly set up) for several of the lifts. We covered the bench press and the press in previous articles in this series, and today, we’re going to address the squat.

The main principle is constant throughout this series: Everything that can be set up before you unrack the bar should be set up before you unrack the bar.

Therefore, anything that can be tight, rigid, and correctly positioned before lifting the barbell off the hooks . . . should be. If you need to make a bunch of adjustments after you unrack the bar, this is a problem (Figure 1) - you’re accidentally setting up a habit that won’t work as the bar gets heavier. You might get away with this habit with the empty bar, but you don’t want to have 135 lb, 225 lb, 315 lb, etc. on your back and then try to adjust your grip, adjust your hand position, lift your chest, squeeze your back, etc.

figure 1: Don’t be like this fool. The bar’s too high, the grip is too wide, and the upper back is not set.

With this in mind, get everything set properly in position before unracking the bar. Here’s how to do it (and watch the included video above for a demonstration of the process):

Before You Unrack the Bar

1: Grip
Take the correct grip - as narrow as you can make it, but wide enough to permit the bar to sit in the correct position on your delts. If you end up making any grip adjustments after you unrack the bar, you didn’t do this step correctly in the first place. Do better next time.

figure 2: This . . . is much better.

2: Squeeze Yourself Under the Bar
Without moving your hands, slide under the bar and wedge yourself into position with the bar sitting on your delts (Figure 2). It should take some effort to do this correctly. If you can simply slide into place easily, you probably need to move your grip in a bit (i.e., narrower).

3: Stance
Take your squat stance (heels at roughly shoulder width with toes pointed out at about 30 degrees) with the middle of your feet directly under the bar. This doesn’t need to be a carbon copy of your squat stance - after all, you’re still going to back out of the rack and assume your actual squat stance - but it should be pretty close.

4: Chest up and Valsalva
Lift your chest, take a breath, and then hold that breath while simultaneously clamping down on your trunk with every possible muscle in your midsection.

Unracking the Bar

5: Stand Up
This should look like the last 2-3 inches of the ascent of your squat. In other words, straighten your hips and knees until you’re completely standing up. Stand up tall.

6: Two Steps
Take two steps back from the rack - one with your right foot and one with your left foot. At this point, you’re far enough from the rack, so take your squat stance. You’ll probably need to make a few minor adjustments to get your stance just right, but don’t walk a mile back from the rack.

At this point, you’re ready to squat without needing to make any adjustments to your grip, hand position, bar position, back extension, etc. Under a heavy load - at best - these adjustments are difficult and a waste of time and energy, and at worst, they’re impossible to accomplish, so take care of them deliberately and early.

As always, we hope this helps you get stronger and live better.

(Some links may be affiliate links. As an Amazon Associate, Testify earns from qualifying purchases.)

If you found this helpful, you’ll love our weekly email. It’s got useful videos, articles, and training tips just like the one in this article. Sign up below, and of course, if you don’t love it, you can unsubscribe at any time.


At Testify, we offer small group training, private coaching (in-person or remotely via Zoom), online coaching, and form checks. Would you like to get quality coaching from a Starting Strength Coach?

click here to start today