How to Squat: The Setup | STOP Doing This!

Welcome back to our series on fixing some common setup errors (and therefore how to correctly set up) for several of the lifts. We covered the bench press and the press in previous articles in this series, and today, we’re going to address the squat.

The main principle is constant throughout this series: Everything that can be set up before you unrack the bar should be set up before you unrack the bar.

Therefore, anything that can be tight, rigid, and correctly positioned before lifting the barbell off the hooks . . . should be. If you need to make a bunch of adjustments after you unrack the bar, this is a problem (Figure 1) - you’re accidentally setting up a habit that won’t work as the bar gets heavier. You might get away with this habit with the empty bar, but you don’t want to have 135 lb, 225 lb, 315 lb, etc. on your back and then try to adjust your grip, adjust your hand position, lift your chest, squeeze your back, etc.

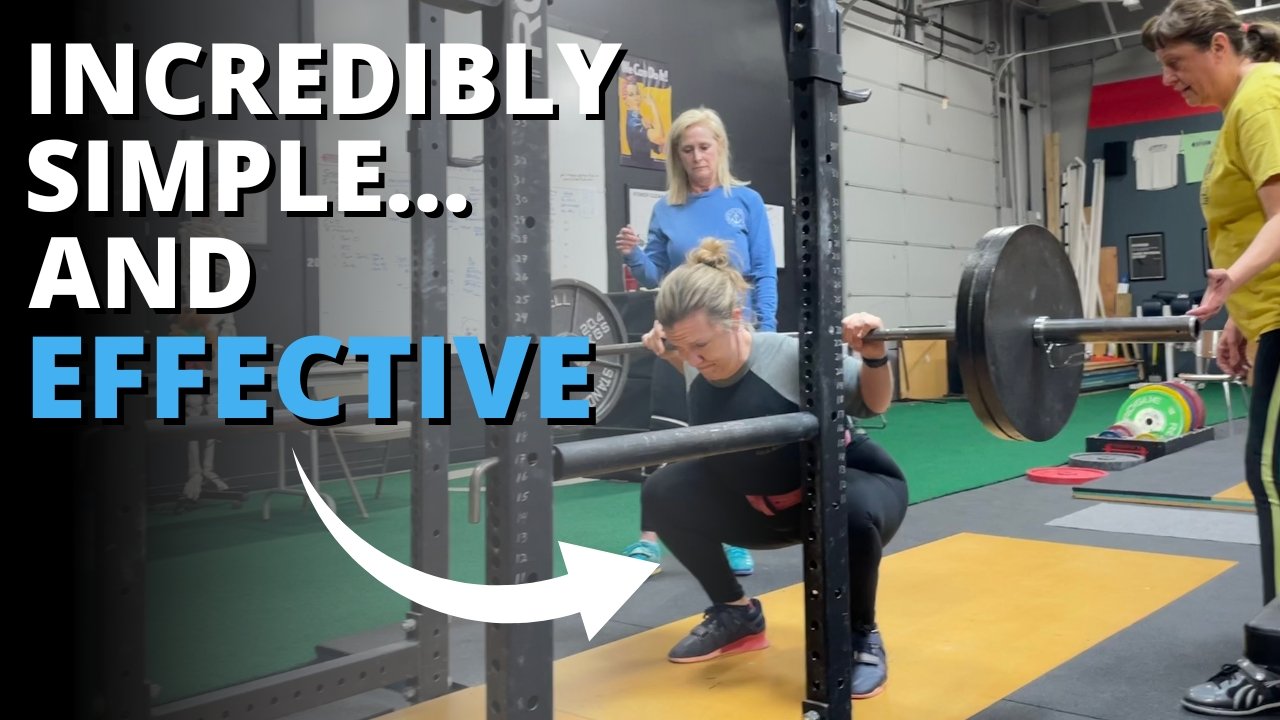
figure 1: Don’t be like this fool. The bar’s too high, the grip is too wide, and the upper back is not set.

With this in mind, get everything set properly in position before unracking the bar. Here’s how to do it (and watch the included video above for a demonstration of the process):

Before You Unrack the Bar

1: Grip
Take the correct grip - as narrow as you can make it, but wide enough to permit the bar to sit in the correct position on your delts. If you end up making any grip adjustments after you unrack the bar, you didn’t do this step correctly in the first place. Do better next time.

figure 2: This . . . is much better.

2: Squeeze Yourself Under the Bar
Without moving your hands, slide under the bar and wedge yourself into position with the bar sitting on your delts (Figure 2). It should take some effort to do this correctly. If you can simply slide into place easily, you probably need to move your grip in a bit (i.e., narrower).

3: Stance
Take your squat stance (heels at roughly shoulder width with toes pointed out at about 30 degrees) with the middle of your feet directly under the bar. This doesn’t need to be a carbon copy of your squat stance - after all, you’re still going to back out of the rack and assume your actual squat stance - but it should be pretty close.

4: Chest up and Valsalva
Lift your chest, take a breath, and then hold that breath while simultaneously clamping down on your trunk with every possible muscle in your midsection.

Unracking the Bar

5: Stand Up
This should look like the last 2-3 inches of the ascent of your squat. In other words, straighten your hips and knees until you’re completely standing up. Stand up tall.

6: Two Steps
Take two steps back from the rack - one with your right foot and one with your left foot. At this point, you’re far enough from the rack, so take your squat stance. You’ll probably need to make a few minor adjustments to get your stance just right, but don’t walk a mile back from the rack.

At this point, you’re ready to squat without needing to make any adjustments to your grip, hand position, bar position, back extension, etc. Under a heavy load - at best - these adjustments are difficult and a waste of time and energy, and at worst, they’re impossible to accomplish, so take care of them deliberately and early.

As always, we hope this helps you get stronger and live better.

(Some links may be affiliate links. As an Amazon Associate, Testify earns from qualifying purchases.)

If you found this helpful, you’ll love our weekly email. It’s got useful videos, articles, and training tips just like the one in this article. Sign up below, and of course, if you don’t love it, you can unsubscribe at any time.


At Testify, we offer small group training, private coaching (in-person or remotely via Zoom), online coaching, and form checks. Would you like to get quality coaching from a Starting Strength Coach?

The Rules of Olympic Weightlifting - How to Avoid Red Lights!

Did your lift even count? Know the rules for olympic lifting so that your lifts count on the competition platform! Phil covers a few basic rules so that you can avoid red lights at the meet.

(A Blast from the Past video originally published on 05/02/22)


At Testify, we offer small group training, private coaching (in-person or remotely via Zoom), online coaching, and form checks. Click the button below to get quality coaching from a Starting Strength Coach and start getting stronger TODAY.

The Deadlift: Follow the Bar

This is hideous (on multiple levels). Don’t be like this fool.

(A Blast from the Past article originally posted on 03/04/22)

Lowering the deadlift should be rather easy - after all, the tough part of the lift is already done, right? With that being said, setting the barbell down after the deadlift is locked out can be tricky for some lifters, especially new lifters.

Figure 1: How NOT to lower the deadlift. This nincompoop is trying to keep his torso vertical on the way down.

This is usually due to a misguided desire to keep the back as vertical as possible on the way down (Figure 1), although we’ve also seen it happen because someone is nervous about bending over with a heavy weight in hand.

Here’s a cue that can help simplify the process and potentially remove some nervousness: Follow the bar down.

At the top of the deadlift, you’ve already picked up the bar, which you know is the hardest part, and you were very bent over during a good portion of that process, so you also know - at least intellectually - that bending over again as you set it down should be even easier. But it’s sometimes tough to convince our bodies to follow that logic and actually bend over, so if the usual “hips back and bend at the the hips” cue isn’t working for you, just tell yourself to follow the bar down to the floor.

Figure 2: This . . . is much better. Hips back, chest down, and simply follow the bar down.

In other words, gravity will take the bar straight down to the floor, and you’re simply following the bar by keeping your hands attached to it (Figure 2).

Now, you’re not dropping the bar, but it should be relatively fast on the way down, and if thinking of the process as a controlled drop helps - at least for now - then go ahead and think of it that way. Simply follow the bar down and keep the rest of your body out of the way.

We hope this helps you get stronger and live better!

(Some links may be affiliate links. As an Amazon Associate, Testify earns from qualifying purchases.)

If you found this helpful, you’ll love our weekly email. It’s got useful videos, articles, and training tips just like the one in this article. Sign up below, and of course, if you don’t love it, you can unsubscribe at any time.


At Testify, we offer small group training, private coaching (in-person or remotely via Zoom), online coaching, and form checks. Would you like to get quality coaching from a Starting Strength Coach?

How to Squat with BAD KNEES | Knee Pain? Follow these 9 Tips

Do you have knee pain when squatting? Phil provides 9 tips to help you squat with less pain.


At Testify, we offer small group training, private coaching (in-person or remotely via Zoom), online coaching, and form checks. Click the button below to get quality coaching from a Starting Strength Coach and start getting stronger TODAY.

Testify Independent - March 25, 2024

THIS WEEK'S SUBMISSION

From our video DIY Dip Belt (AKA Chinning Belt) - Easy and Cheap! (click the title to watch):

Taric TheGemKnight
Saw this Russian today at the local park with a contraption instead of a belt and he apparently used something similar to this. Not the easiest find, but literal gold this video, cheers!

Phil
Glad it helped!


TESTIFY ONLINE COACHING

Want to get stronger working remotely with one of our Starting Strength Coaches? We have a few openings, so if you’re interested, click here to contact us and learn more.

Get Stronger. Live Better. Start today.


ARTICLES & VIDEOS

STOP Doing This!! Your Shoulders are DESTROYING Your Bench Press
Using your shoulders incorrectly in the bench press? Let's fix it quickly to add pounds to your bench. Click here to watch.


How to Deadlift: Set Your Back the RIGHT Way - Part 2
Do you have a tough time setting your back when you deadlift? In Part 2 of this series, Phil walks you through how to solve this problem. Click here to read.


Blast from the Past: Improve Your Press by FIXING This Problem!
Pushing the hips forward or incorrectly throwing the shoulders back when pressing? With Becky's help, Phil covers an easy way to check for the correct movement. Click here to watch.


Blast from the Past: Improve Your Squat in ONE Easy Step!
Want to improve your squat with one simple and easy tactic? You might not like it, but it's darn effective. Click here to read.


NEW TESTIFY HOODIES ARE AVAILABLE!

Looking to train in style? Get yourself a Testify hoodie - in practically any color! Get yours today and represent your favorite gym.

Click here to head to the Testify Store.


WHAT'S COMING UP

Reminder: We will be closed for training on Saturday, 04/06/24, as we are hosting the annual Testify Strengthlifting Challenge.

Below are a few of our upcoming events, and you can find out what else is on the calendar by heading to our events page at www.testifysc.com/events.

Testify Strengthlifting Challenge

  • April 6, 2024

  • The annual Testify Strengthlifting Challenge is back, and we invite you to be a part of it! This is a strengthlifting meet, which means the contested lifts will be the squat, press, and deadlift.

  • Click here to register or for more information.

Testify Barbell MAYhem

  • May 11, 2024

  • Come on out and join us for the annual Testify Barbell MAYhem! This is a weightlifting meet, so the contested lifts are the snatch and clean-and-jerk.

  • Click here for more information.

Starting Strength Self-Sufficient Lifter Camp

  • May 18, 2024

  • Spend the day learning the Squat, Press, and Deadlift and how to self-evaluate your lifts while training in your garage or commercial gym without a coach.

  • Click here to register or for more information.


THIS WEEK’S CONDITIONING

Option 1
Sled Pyramid – 4, 5, or 6 tiers
Go up and down a 4, 5, or 6 tier “sled pyramid” – rest as needed. The distance for each round is 80 m indoors (a down-back on the 40m course) or 200 ft outdoors (2 down-backs on the 50 ft course). Rest as needed.

For example, Bob does the following (4 tiers):
Round 1: Empty sled
Round 2: 25#
Round 3: 50#
Round 4: 75#
Round 5: 50#
Round 6: 25#
Round 7: Empty sled

Compare to 2024.01.22.

Option 2
Bike/row:
8 x 30 sec on/2:00 off

Score = least distance covered in any 30 second interval

Compare to 2024.01.01.

Option 3
Outdoors:
5-10 rounds:
50 yd sled push (25 yd down-back)
50 yd farmer carry (25 yd down-back)
Rest 1 min

Indoors:
5-10 rounds:
100 yd sled push (50 ft down-back)
100 yd farmer carry (50 ft down-back)
Rest 1 min

Compare to 2023.12.04.

Option 4
Row 10 x 100m
Rest 1 min between sprints. Your score is your slowest time.

Compare to 2023.12.04.

How to Deadlift: Set Your Back the RIGHT Way - Part 2

The Problem
When we deadlift, you want your back in flat and rigid extension before you pull the barbell off the floor, but this can be difficult to do (with the result being a soft, semi-rounded back as seen in Figure 1). With this in mind, welcome to Part 2 in our series on how to accomplish exactly that.

Figure 1: Not like this . . . not like this.

In Part 1, we covered how to use the cue that’s already present in the 5-step deadlift setup - i.e., “squeeze your chest up” - the idea being that applying this cue sets off a wave of contraction that runs from your thoracic spine all the way down to your lumbar spine and thus gets your back rigid and flat (Figure 2).

However, if that cue isn’t working well for you and your back is still a bit rounded, try the following cue instead . . .

Figure 2: This . . . is much better.

Cue #2: Push Your Belly Down Between Your Thighs.
If you push your stomach down between your thighs (you can also cue “push your belly down between your femurs”), you’re going to get a nice, tight, flat, rigid back (Figure 2), which is exactly the type of efficient, force-transferring segment that we want when we deadlift.

Another Way to Picture It
If it helps, you can instead imagine a rope attached to your belly button, and that rope is pulling your belly button down toward the floor (leaving your hips and shoulders exactly where they are).

Hopefully, you found this useful, and we’ll be back in Part 3 of this series in the near future to cover more ways to address this problem.

As always, we hope this helps you get stronger and live better.

(Some links may be affiliate links. As an Amazon Associate, Testify earns from qualifying purchases.)

If you found this helpful, you’ll love our weekly email. It’s got useful videos, articles, and training tips just like the one in this article. Sign up below, and of course, if you don’t love it, you can unsubscribe at any time.


At Testify, we offer small group training, private coaching (in-person or remotely via Zoom), online coaching, and form checks. Would you like to get quality coaching from a Starting Strength Coach?