WHERE Should I Put the Bar for the Squat?

In the squat, the location of the barbell on your back matters. If it’s sitting too high, too low, or if you’re just not sure where it should sit in general, you've got a problem. Let’s fix it.

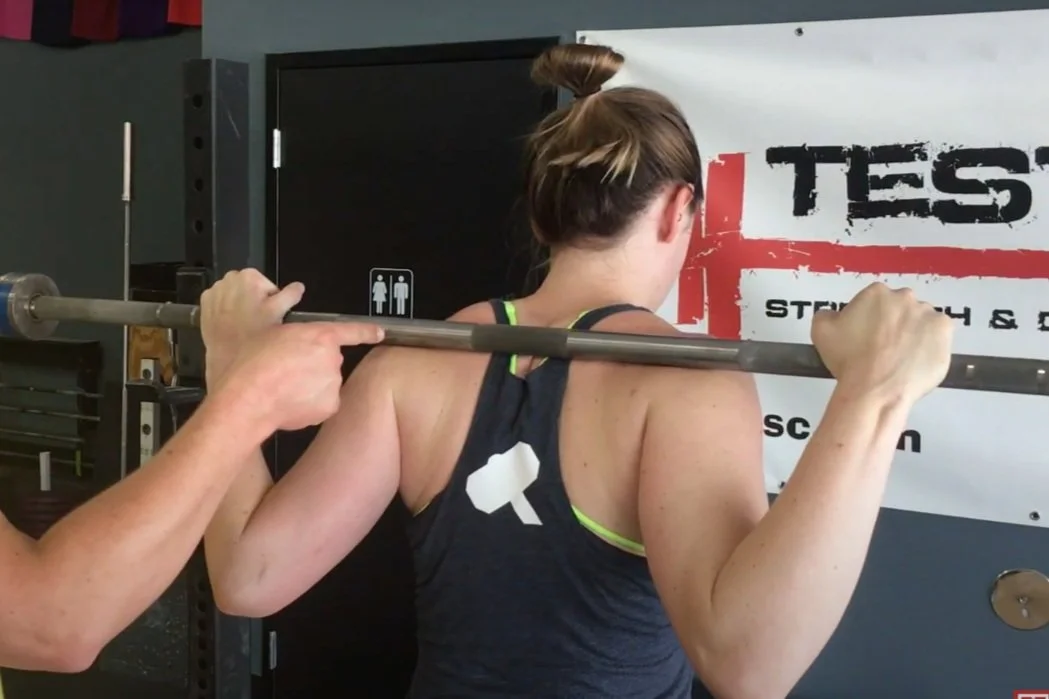
Figure 1: Becky demonstrates the correct position for the barbell.

Where to Place the Bar
You want the barbell to sit below the spine of the scapula and rest securely on the delts (Figure 1). “Where is the spine of my scapula?” you ask? Solid question.

The spine of your scapula is a bony ridge that runs horizontally along your shoulder blades. You can find it on your own scapula, or better yet, have someone find it for you.

This is far more easily demonstrated on video, so I recommend watching the included video.

Your “scapula spotter” should run his fingers out to the edge of your scapula (the most lateral aspect of this bony ridge), and then simply roll his thumb or fingers below that edge. He can press into your delts and put an indentation on your back - this indentation represents where you want the bar to sit when you squat.

Figure 2: no good - mike has the bar positioned too high.

What Happens if the Bar is in the Wrong Position?
If you don’t get the bar in the right spot, one of two things will occur.

If the bar is sitting too high as in Figure 2, it will tend to roll or slide up your back, which is no fun at all. This makes for an insecure position, and it will also prevent you from pointing your chest at the floor (i.e., leaning over) and achieving the correct back angle when you squat.

Figure 3: no good again - now, mike has the bar positioned too low.

On the other hand, if the bar is sitting too low as in Figure 3 - below the shelf provided by your delts (less common, but it does happen) - the bar will tend to slide down your back. This is also terrible as it leaves your hands supporting a lot of the bar’s weight (which tends to cause a lot of wrist, elbow, and shoulder discomfort).

How Can I Make Sure I’ve Got It Right?
Your best bet is to get a coach to help you, so contact us if you’d like to set up a coaching session (click here). The second best option is to have a friend watch the video above and have him help you find the correct spot on your back. In lieu of those options, you can video yourself getting under the bar and unracking it (get the camera behind you and pretty high up if possible) and see if you have the bar in the right location.

As always, we hope this helps you get stronger and live better.

(Some links may be affiliate links. As an Amazon Associate, Testify earns from qualifying purchases.)

If you found this helpful, you’ll love our weekly email. It’s got useful videos, articles, and training tips just like the one in this article. Sign up below, and of course, if you don’t love it, you can unsubscribe at any time.


At Testify, we offer small group training, private coaching (in-person or remotely via Zoom), online coaching, and form checks. Would you like to get quality coaching from a Starting Strength Coach?

Fast and Easy Barbell Math Tricks to Save You from Misloading the Barbell!

Don't misload your barbell! Thought you set a PR only to discover the weight on the bar was wrong? Here are two quick and easy methods to see right away if you've loaded the wrong weight on the bar.

(A Blast from the Past video originally published on 04/11/22)


At Testify, we offer small group training, private coaching (in-person or remotely via Zoom), online coaching, and form checks. Click the button below to get quality coaching from a Starting Strength Coach and start getting stronger TODAY.

These Aren't the Rests You're Looking For

(A Blast from the Past article originally posted on 02/13/19)

Take a look at Figure 1 . . . this isn't the rest position you think it is.

Figure 1: Not a great resting position

You know that moment - that moment when you’ve pulled three heavy reps on your deadlift, you’ve set the barbell down, you still have two more reps to go, and . . . you start fidgeting around before you pull the next rep.

Let me offer a suggestion - don’t do that.

The temptation to hang out down there is understandable; after all, you’ve already done something extremely challenging multiple times, and you’re getting tired.  The problem is that this position in the deadlift - the position with you crouched over a heavy bar sitting on the floor - isn’t really a resting position.

Yes, it is where you’ll take your breath, and yes, you’re not supporting the weight of the bar at this point, but this is still not a good resting position (ask yourself - would you normally choose to rest in a semi-crouched-over position?). The longer you stay down there, the more tired you’ll get, and the longer the set will take. The best resting position for a set of deadlifts? Taking a well deserved seat after you’re done with the set.

So, the next time you deadlift, I challenge you - be efficient with your time when the bar is on the floor. Give yourself one breath between reps, set the back in rigid extension with tension on the bar, and then smoothly pull the next rep. Don’t rush the setup, but don’t dilly-dally either. Be efficient.

One breath between reps. No muss. No fuss. And you’ll be done with your set a lot sooner than that silly person who takes five breaths between each rep.

As always, we hope this helps you get stronger and live better.

(Some links may be affiliate links. As an Amazon Associate, Testify earns from qualifying purchases.)

If you found this helpful, you’ll love our weekly email. It’s got useful videos, articles, and training tips just like the one in this article. Sign up below, and of course, if you don’t love it, you can unsubscribe at any time.


At Testify, we offer small group training, private coaching (in-person or remotely via Zoom), online coaching, and form checks. Would you like to get quality coaching from a Starting Strength Coach?

What "Internet Fitness" and "Trainers" Get WRONG About Lifting Weights

What should you focus on when lifting weights? What should you think about? The mainstream fitness industry gets this wrong all the time.


At Testify, we offer small group training, private coaching (in-person or remotely via Zoom), online coaching, and form checks. Click the button below to get quality coaching from a Starting Strength Coach and start getting stronger TODAY.

Testify Source - February 12, 2024

THIS WEEK'S SUBMISSION

From our video How to Start Lifting: Learn to Squat (click the title to watch):

PrideNeverDies
Should you use your quads on the way up? It's normal to feel the quads working right?

Phil
You should indeed use your quads, but if you cue yourself to drive your hips up, then your quads will get used as they are responsible for straightening the knees, and the only way for the hips to go up is for the knees to straighten.

In general, think (and cue) movements - not muscle groups. The exception is when you're trying to prevent movement. For example, we cue "tight abs" to help cue the Valsalva maneuver (bracing) before descending into the squat. This helps turn the trunk into a rigid, non-deformable column.

You might feel your quads the next day after squatting, but it's completely normal (and usual) to not feel them when you're actually squatting (unless you're doing something like a set of 20 - which I don't recommend - in which case you'll start to feel a bunch of things get fatigued toward the end).

Think of it like throwing a baseball or shooting a basketball - focus on the movement, not any one muscle group.

PrideNeverDies
wow what a great response I get exactly what you mean, thank you!!! @TestifySC 

Phil
I'm glad it was helpful, and you're welcome!


ARTICLES & VIDEOS

STOP Bench Pressing VERTICALLY! How to Bench Press Correctly
Are you bench pressing in a nice, straight, vertical line? Well . . . don't do that. We cover how and why to bench correctly. Click here to watch.


Slippery Lifting Platform?! Use THIS.
A slick lifting platform can cause a lot of problems, so we help you solve this problem simply, quickly, and cheaply. Click here to read.


Blast from the Past: Get Stronger . . . Faster! Save Time at the Gym!
You want to get stronger, but you don't have all day to spend at the gym. In just over two minutes, Phil covers how to productively train while saving time at the gym. Click here to watch.


Blast from the Past: Looking Down in the Squat
Where should you look when you squat? We address where to look and why we do so. Click here to read.


NEW TESTIFY HOODIES ARE AVAILABLE!

Looking to train in style and comfort this winter? Get yourself a Testify hoodie - in practically any color! Get yours today and represent your favorite gym.

Click here to head to the Testify Store.


WHAT'S COMING UP

Below are a few of our upcoming events, and you can find out what else is on the calendar by heading to our events page at www.testifysc.com/events.

Free Intro to Squat Session

  • February 17, 2024

  • Are you interested in getting stronger? Book your free "Intro to Squat" session and learn to squat, meet some of our coaches, and see the gym! All ages and abilities are welcome.

  • Click here to book your session.

Bring Your Grandparent to Squat Saturday!

  • February 24, 2024

  • Is your grandma or grandpa interested in getting stronger? Bring your grandparent (or parent!) to the gym on February 24!

  • They'll learn how to squat, meet some of our coaches, and it's FREE!

  • If they join Testify, you and they EACH get a $75 discount for 1 month of membership.

  • Click here to register or for more information.

Starting Strength Self-Sufficient Lifter Camp

  • May 18, 2024

  • Spend the day learning the Squat, Press, and Deadlift and how to self-evaluate your lifts while training in your garage or commercial gym without a coach.

  • Click here to register or for more information.


THIS WEEK’S CONDITIONING

Option 1
“Prowler Base”
1. Load up a manageable weight.
2. Sprint 40m at 85% intensity.
3. Rest until breathing and heart rate slow down. (45 sec – 2 min)
4. Repeat 5-15 times.

Courtesy of “Death by Prowler” (on Starting Strength).

Compare to 2023.12.11.

Option 2
Bike/row:
4 x 3 minutes

Rest 3 minutes between each round. Score = lowest distance.

Compare to 2023.11.20.

Option 3
5-10 rounds of:
30 sec ME tire flips
30 sec rest

Compare to 2023.10.23.

Option 4
1. 5 yoke carries @ 30 yd (15 yd downback) – work up to heaviest carry
2. 5 rounds of 5 reps on the axle “clean and press away” – work up to heavy set of 5

Compare to 2023.10.23.

Slippery Lifting Platform?! Use THIS.

The last thing you want when you're training is a slippery lifting surface - at the very least, it's inefficient and a good way to miss a lift, and on the other end of the spectrum, it's a good way to accidentally end up doing the splits and perhaps get injured in the process.

you don’t want a slippery platform when lifting.

The Problem: Lack of Friction
A lifting surface with reasonable friction is rather important, and it's especially important in the Olympic lifts. Picture the split jerk wherein your feet leave the ground and then come back down in different positions - friction is vital as you’ve got some decent front-to-back force between your feet, and you don't want to end up doing the splits. However, friction is important in the slow lifts or “strength lifts” as well - you don't want any chance of your feet slipping under the load of a heavy squat.

So, if you train on a surface that tends to be a bit slick, or if you train in a humid environment that can occasionally create such a situation, what do you do?

The Answer
Rosin powder. It’s cheap, it works well, and you can get it quickly from Amazon (click here). Rosin powder is simply rock rosin mixed with magnesium carbonate - in other words, crystallized tree resin mixed with chalk so that it comes in a powder form that’s easy to apply. You can also get rosin in rock or crystal form, but this powder is tough to beat for convenience and portability.

How to Use It
Perform the following steps (watch the included video above for a demonstration and explanation)

Step 1
Sprinkle some powder on your platform. You don’t need much, and it doesn’t matter where you sprinkle it as the goal is to get it on the soles of your shoes (not the platform).

Step 2
Grind and/or stab your shoes into the powder repeatedly until all of the powder is on the soles of your shoes.

Step 3
Check that you’ve gotten all of it on your shoes. You know you’re done when you can’t see any more powder on the platform. You also know you’ve done it correctly (and didn’t use too much) when you can walk around your platform and not leave white footprints wherever you go.

Wrapping Up
A 4 oz shaker bottle of rosin powder costs roughly $10-15, and it should last years. A bottle at Testify typically lasts a few years, and bear in mind that’s with multiple people using it, so if you’re just purchasing it for personal use, it might last longer than you do.

Interestingly, rosin is actually required at weightlifting meets, but we have never seen it present at a local meet (well . . . except ours). With this in mind, if you intend to compete, I recommend bringing your own in case the platform (warm-up or competition) is a bit slick.

As always, we hope this helps you get stronger and live better.

(Some links may be affiliate links. As an Amazon Associate, Testify earns from qualifying purchases.)

If you found this helpful, you’ll love our weekly email. It’s got useful videos, articles, and training tips just like the one in this article. Sign up below, and of course, if you don’t love it, you can unsubscribe at any time.


At Testify, we offer small group training, private coaching (in-person or remotely via Zoom), online coaching, and form checks. Would you like to get quality coaching from a Starting Strength Coach?