Your Hideous Deadlift: Do It WRONG . . . to Get It Right?
/
Are you having a tough time setting your back correctly when deadlifting? To get it right, it can help to do it wrong first.
(Watch the included video near the end of this article for a quick demonstration of how to do this.)
In this approach, you're going to set the barbell on the pins (AKA “safeties) of your squat rack with some weight on the bar. You don’t need a lot of weight - just enough to allow yourself to put some tension on the bar (i.e., some upward pull) without actually allowing the bar to start moving upward.
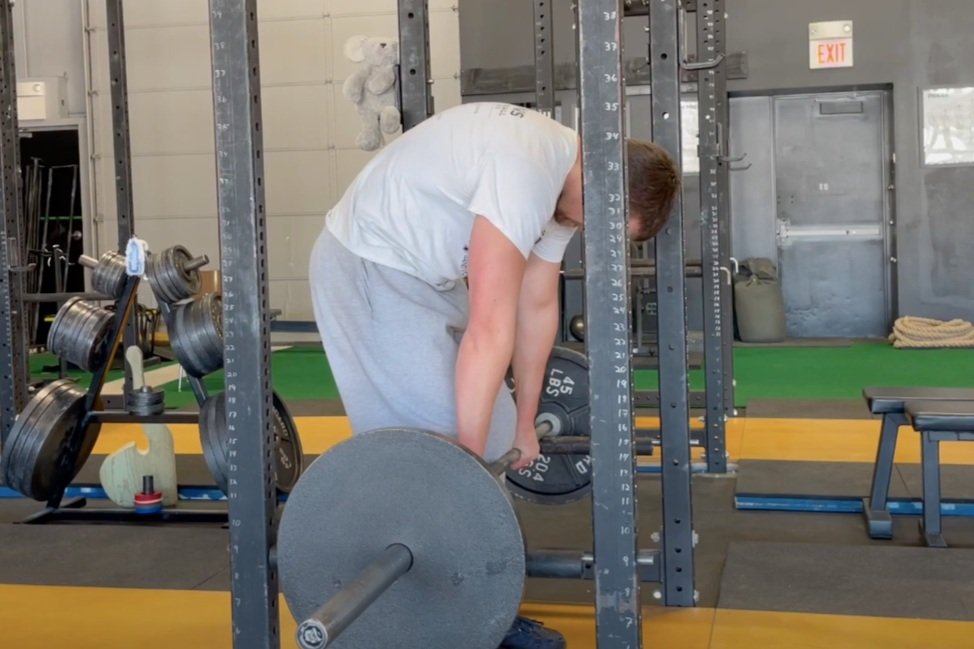
figure 1: his back is so terrible he won’t even show his face.
You're setting the bar on the pins because - when going through the 5-step setup for the deadlift (click here for a video) - most people find it easier to set the back correctly in rigid extension from this higher position as compared to the usual position wherein the plates are on the floor. In Figure 2, I have the barbell set just below my knees, but if you need to start higher than this, that’s perfectly acceptable.

figure 2: The bar is set just below the knees.
Back flexion - or rounding your back - is pretty easy for most people to achieve, and you're going to take advantage of that here. First, cue yourself to flex your back (Figure 3). In other words, you're going to do it wrong. Remember that a person who struggles with back extension can usually do this pretty well - in fact, it’s typically the default position - but if you need a little additional help, you can cue yourself to round your back as high in the air as possible or cue yourself to make your back into a mountain.

figure 3: back flexion
Additionally, make sure your shins stay in contact with the bar throughout this process, and the bar must remain motionless. From your hips on down, nothing should move or change shape.
Once you're in this position, you can feel what it’s like to do it incorrectly, so you're simply going to cue yourself to do the exact opposite of what you just did. You're going to push your belly down between your thighs, thus extending - or straightening - your back (Figure 4). Previously, your back was a mountain, and you now cue yourself to make it a valley (which is an overcue, but we’ll cover that in a bit).

figure 4: Back extension
Perform five reps alternating between the positions of flexion and extension. The cues now become: “Flex - Extend” or simply “Round - Arch.” The cues “arch” and “make a valley” are overcues as you don’t want your back actually arched or overextended. You just want it to be straight, but for someone who struggles with extension, these two overcues can be quite useful.
Once you can set your back in extension at a given pin height, move the pins lower and repeat the process - a set of five reps works pretty well. If you’re working without a coach, record yourself so you can watch it afterward and see if you were indeed setting your back correctly. Once you’ve “graduated” from a certain height, continue to work lower and lower until you’re setting up correctly for a regular deadlift with the plates on the floor.
As always, we hope this helps you get stronger and live better.
-Phil
PS: Whenever you want even more Testify in your life, here are some free resources:
Book a free intro and strategy session with us HERE.
Pick up a free copy of Testify’s Squat Guide: 12 Tips to Improve Your Squat Now HERE.
Get our free weekly email - containing useful videos, articles, and training tips - HERE.
Follow Testify on Instagram HERE.
Subscribe to Testify’s YouTube channel HERE.
(Some links may be affiliate links. As an Amazon Associate, Testify earns from qualifying purchases.)
At Testify, we offer small group training, private coaching (in-person or remotely via Zoom), online coaching, and form checks. Interested in getting stronger, looking better, and having more energy?
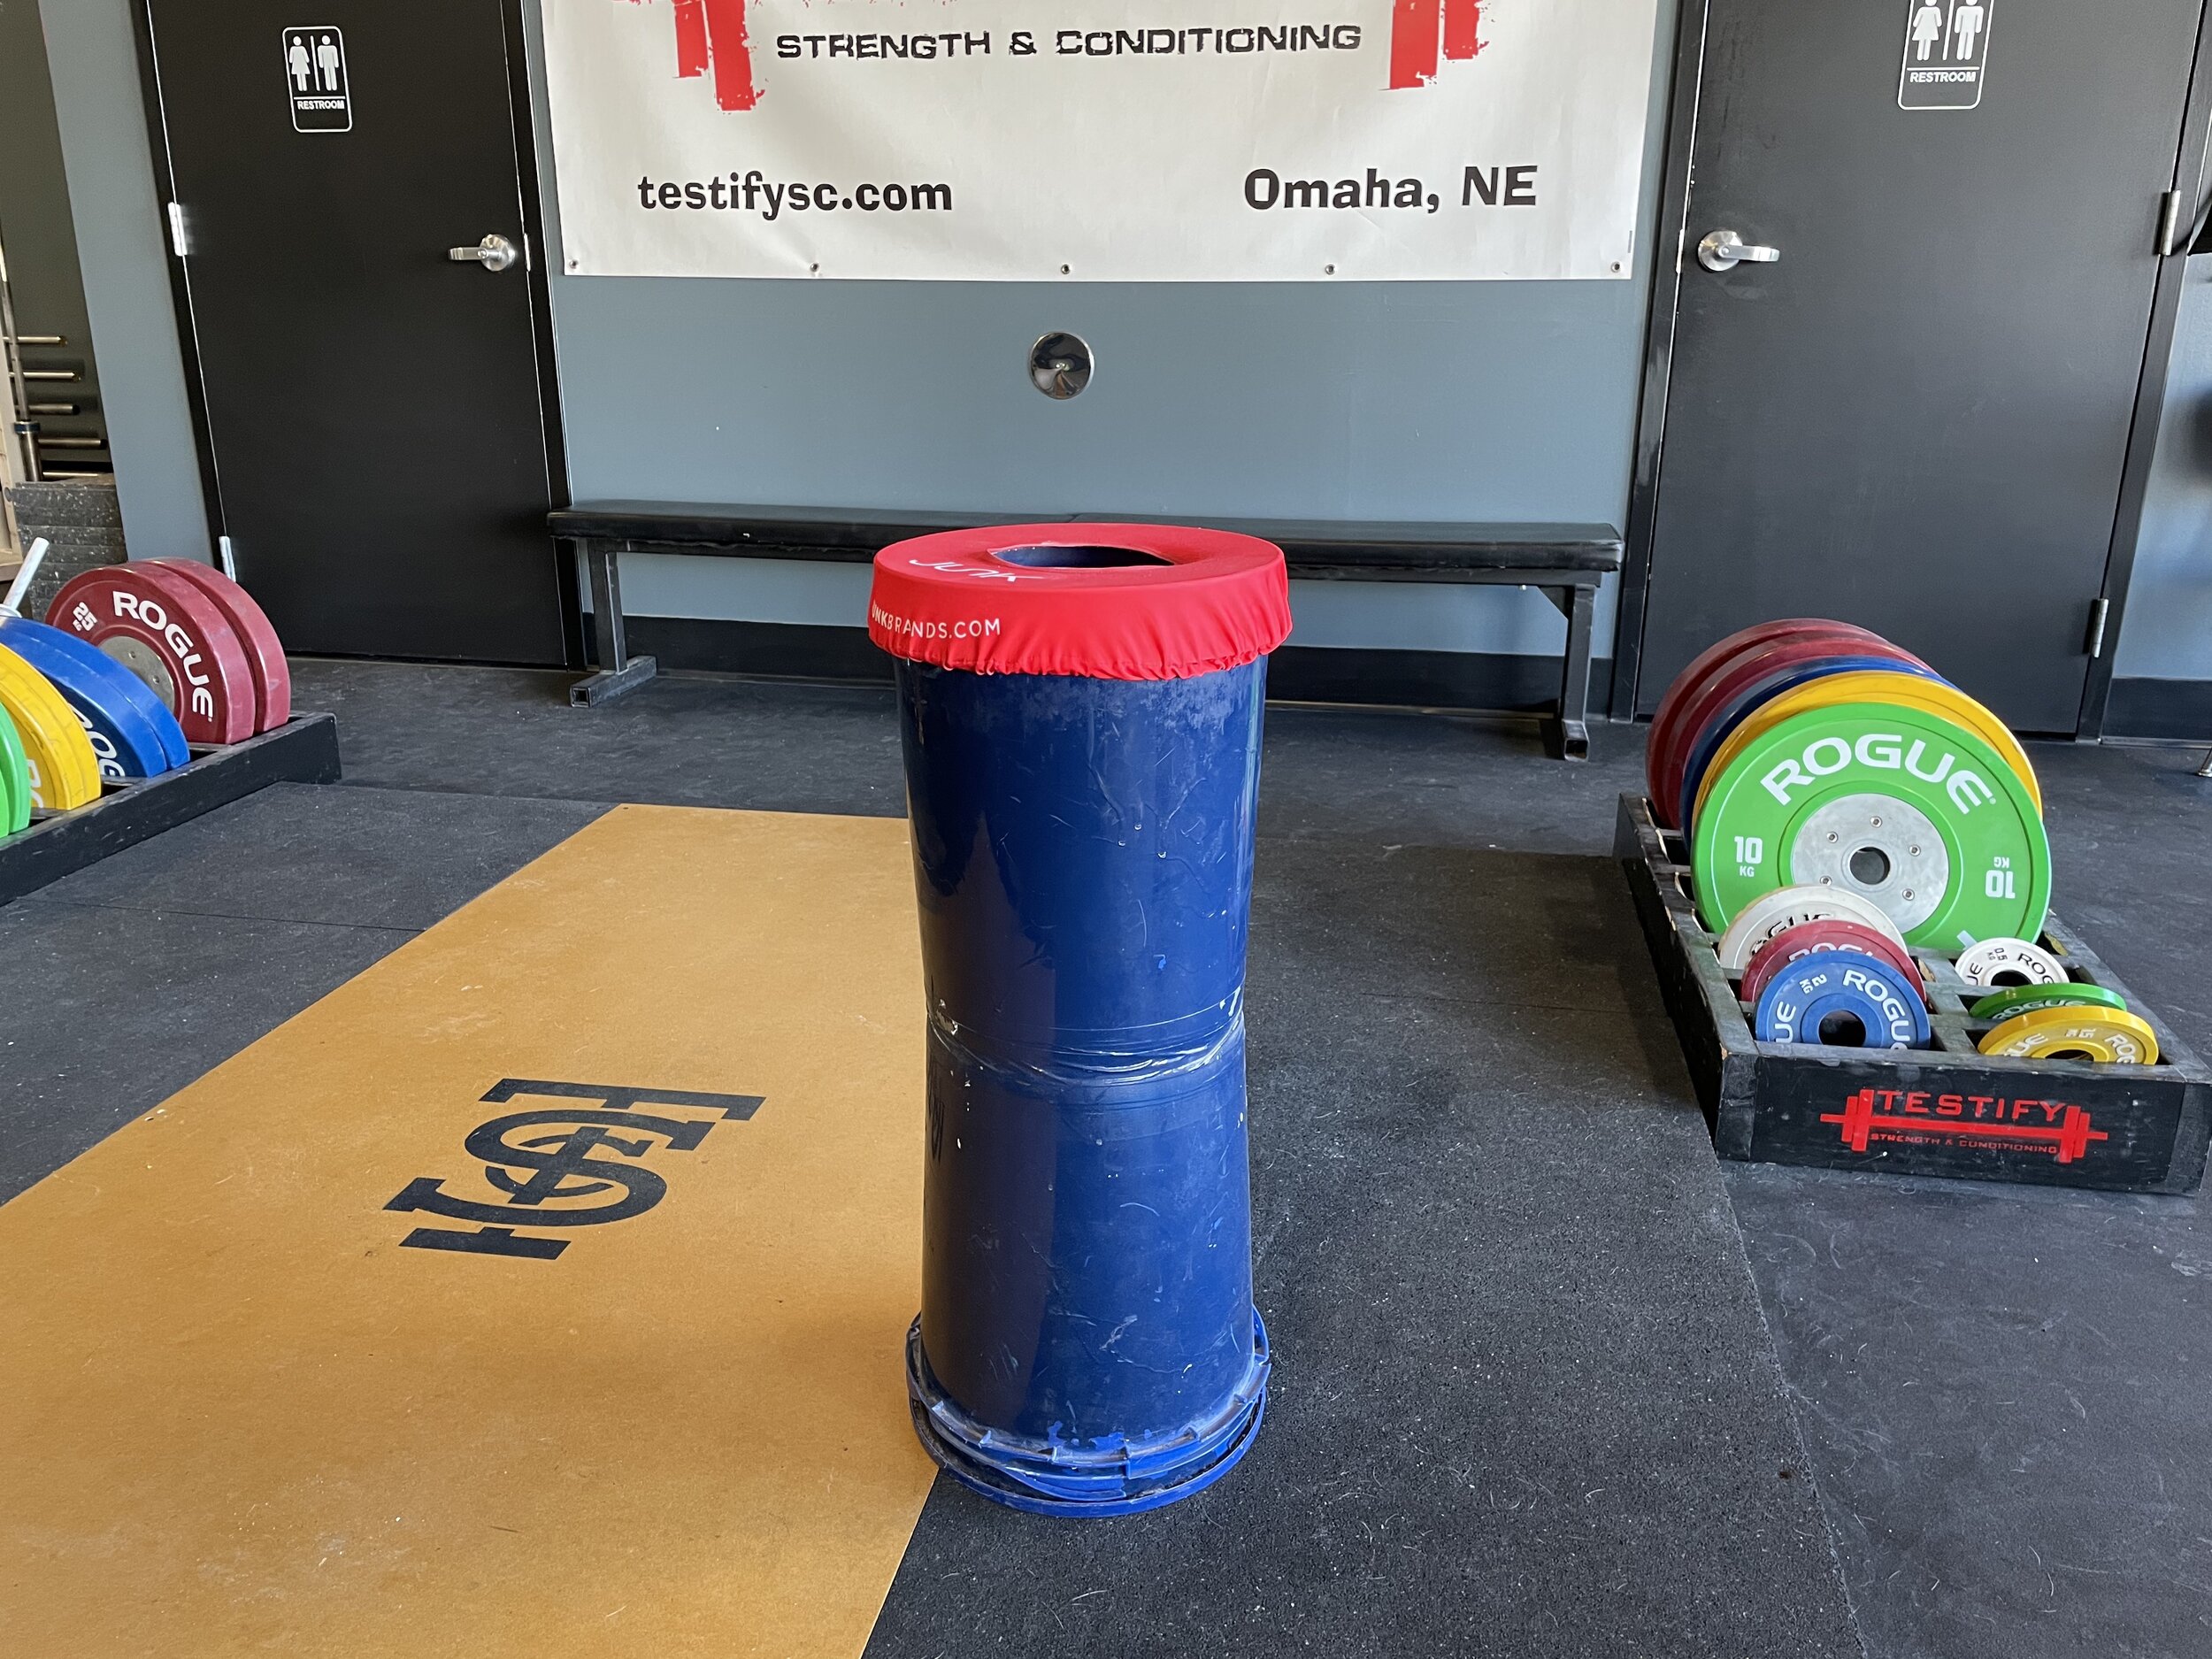
Simple and Cheap DIY Chalk Stand
/
(A Blast from the Past article originally posted on 02/26/21)
When you chalk up for your next set, it’s nice to have a chalk stand. It’s not absolutely necessary, of course, as you can just use a bag of chalk or - better yet - a chalk bucket sitting on the ground. Although those options work, a chalk stand makes much less of a mess than a bag of chalk, and as the stand is raised, you don’t have to reach all the way down to the floor level as you do with a bucket of chalk, which can be a bit of pain if you already have your belt tightened.
With all this in mind, here’s how you can make a simple and cheap chalk stand (feel free to watch the video above if you’d rather not read the steps below):
Step 1
Go to your nearest hardware store and purchase the following items (you may already have some of these items at home). If you’d rather not make the trip, you can click the items below and order from Amazon.
Two 5-gallon buckets. Choose a color option that allows you to find matching spray paint.
A lid for one of the buckets (preferably the same color as the buckets). You only need one lid.
One can of spray paint - ideally the same color as the buckets
One roll of duct tape
Step 2
Set one bucket on the ground - upside down.
Step 3
Set the other bucket on top of the first bucket - right side up. The closed ends of the two buckets should now be touching.

Step 4
Tape the two buckets together by wrapping duct tape around the buckets several times. Tape the “seam” between the buckets as well as above and below the seam. Five or six times around the buckets should do nicely.
Step 5
Spray paint the buckets. This step is optional and is for aesthetic purposes only - it covers up any logos or printing on the buckets. It’s nice to have the paint match the buckets (or as closely as possible) for two reasons:
This is supposed to be a quick process, so don’t worry too much about whether you’ve painted the entire apparatus or not. If the logos are covered and the paint closely matches the bucket, it will look just fine.
Eventually, the paint will chip or wear in places, and if the bucket is close to the same color as the paint, this won’t be a big deal.
Step 6
Place the lid on the ground - upside down - with a brick, 10 lb plate, or some other relatively heavy object on top of the lid, and then set your new chalk stand on top of the lid and press down so that the lid is attached to the stand. You’ve now weighted the base of your chalk stand and made it much less likely to tip over and spill.

Step 7
Put a chalk-topper over the top of the stand. This is optional, but if other people use your chalk stand, you’ll find this greatly helps keep the chalk dust inside the stand. Our chalk toppers are from www.junkbrands.com.
Step 8
Place some chalk in the top bucket, and you’re good to go!
As always, we hope this helps you get stronger and live better.
-Phil
PS: Whenever you want even more Testify in your life, here are some free resources:
Book a free intro and strategy session with us HERE.
Pick up a free copy of Testify’s Squat Guide: 12 Tips to Improve Your Squat Now HERE.
Get our free weekly email - containing useful videos, articles, and training tips - HERE.
Follow Testify on Instagram HERE.
Subscribe to Testify’s YouTube channel HERE.
(Some links may be affiliate links. As an Amazon Associate, Testify earns from qualifying purchases.)
At Testify, we offer small group training, private coaching (in-person or remotely via Zoom), online coaching, and form checks. Interested in getting stronger, looking better, and having more energy?
The TRUTH About Lifting (What No One Tells You!)
/Phil briefly covers why lifting weights is pretty stupid and - more importantly - why it isn't. This is why we do what we do.
At Testify, we offer small group training, private coaching (in-person or remotely via Zoom), online coaching, and form checks. Click the button below to get quality coaching from a Starting Strength Coach and start getting stronger TODAY.
Week of 2023.04.24
/THIS WEEK’S QUESTION
From our video Valsalva and Your Deadlift (click the title to watch):
Duguay Lima
What if i release the air and “renew” the valsava on the top?
Phil
Breathing in and out only occurs at one point (on pretty much every lift). In the squat, this is the top of the movement. In the deadlift, this is when the bar is sitting on the floor.
With this in mind, we specifically coach lifters to continue holding the Valsalva at the top of the deadlift and until the bar is back on the floor. Air is support, and you're still supporting the bar at the top of the lift, so we want to keep that held breath.
This can be a hard habit to break (like any habit) if you're used to releasing your breath at the top (not difficult physically - you just have to remind yourself, and that's the easy part to mess up), but in the long run, you'll adjust, and it's not difficult to do.
Hope this helps!
ARTICLES & VIDEOS
Get a Bigger Squat Now with 3 Simple Tips!
Want to get your squat moving in the right direction? Of course you do. In this video, we cover three simple and quick ways to improve your squat. Click here to watch.
Never Make This Squat Mistake Again! | Fast Fix
This squat mistake either makes you look ignorant or like you're compensating for something. Either way, it's not a good look. We help you fix it in this short video. Click here to watch.
This is Destroying Your Press . . . and Driving Me Nuts
"This error is wreaking havoc on your press . . . and driving me nuts," says Phil. Learn to correct it quickly and permanently. Click here to read.
Blast from the Past: Free (or cheap!) Strongman and Conditioning Equipment
Whether you're interested in competing in strongman or spicing up your conditioning options, there are a number of strongman equipment options that you can get for free or at least very cheaply - especially if you're willing to put in a bit of DIY effort. Click here to watch.
Blast from the Past: Why Do You Put the Bar There When You Squat?
We cover the correct location for the bar when squatting as well as why we put it there. Click here to read.

NEW TESTIFY GEAR!
Summer's coming, and we've got women's and men’s tank tops in multiple colors. Get 'em while they're hot! (Ok, actually, get 'em before it gets hot.)
Click here to head to the Testify Store.
WHAT'S COMING UP
Below are a few of our upcoming events, and you can find out what else is on the calendar by heading to our events page at www.testifysc.com/events.
Testify Barbell MAYhem weightlifting meet
May 6, 2023
Click here to register or for more information.
Starting Strength Self-Sufficient Lifter Camp
May 20, 2023
Spend the day learning the Squat, Press, and Deadlift and how to self-evaluate your lifts while training in your garage or commercial gym without a coach.
Click here to register or for more information.
Testify Strongman Summer Showdown
June 17, 2023
Show up to lift, throw, carry, push, and pull big things, but most importantly, show up to have a great time with your fellow competitors and perhaps try something new!
Click here to register or for more information.
THIS WEEK’S CONDITIONING
Option 1
Sled
Outdoors:
10 rounds of:
Push sled 100 ft
Pull sled 100 ft (hand over hand)
Indoors:
20 rounds of:
Push sled 50 ft
Pull sled 50 ft (hand over hand)
Compare to 2023.02.20
Option 2
Bike/row:
8 x 30 sec on/2:00 off
Score = least distance covered in any 30 second interval
Compare to 2023.01.30.
Option 3
Outdoors:
5-10 rounds:
50 yd sled push (25 yd down-back)
50 yd farmer carry (25 yd down-back)
Rest 1 min
Indoors:
5-10 rounds:
100 yd sled push (50 ft down-back)
100 yd farmer carry (50 ft down-back)
Rest 1 min
Compare to 2023.01.02.
Option 4
Row 10 x 100m
Rest 1 min between sprints. Your score is your slowest time.
Compare to 2023.01.02.
THIS is Destroying Your Press . . . and Driving Me Nuts
/
Are you adjusting your wrist and elbow positioning after unracking the barbell when pressing? Stop that. Stop unracking the press like a doofus. Doofusses (Doofuses? Doofusi?) are the worst at pressing.

This makes me want to throw up in my mouth just a little bit.
We see this mistake often - the mistake of unracking the press, stepping back, and only then getting the elbows slightly forward of the bar and wrists neutral. This is inefficient, it wastes time when you’re supporting the bar, and it gets harder and harder to do as the weight on the bar gets heavier.
In the squat, we don’t make adjustments to the bar or our grip after unracking the bar, and the press is no different.
In fact, this same concept is how you check if you’re doing it correctly - after unracking the bar (i.e., after standing it up from the hooks with your legs), if nothing from your waist upward needs to change position before starting the set, you’ve got it right. You simply take two small steps back from the rack, take a breath, and start the set. On the other hand, if you have to adjust anything above the waist between the unrack and the start of your first rep, you’re unracking it incorrectly.
So, let’s get it right before you unrack it. Set your grip and wrists correctly, dip down far enough (with your hips and legs) so that you can get your elbows slightly in front of the bar, and then stand the bar up while maintaining that exact position. Watch the included video (above) for a quick demonstration of how to correctly - and incorrectly - accomplish this.
If you mess up, don’t fix your wrists and elbows after the unrack; when you do this, you’re reinforcing a bad habit. Instead, simply re-rack the bar, fix it, and then unrack it. Be correct and consistent - from the empty bar up to your work weight, every unracking of the bar should be the same.
If you unrack it correctly every time, your press will be better off, and you won’t look like a doofus. Which is good.
As always, we hope this helps you get stronger and live better.
-Phil
PS: Whenever you want even more Testify in your life, here are some free resources:
Book a free intro and strategy session with us HERE.
Pick up a free copy of Testify’s Squat Guide: 12 Tips to Improve Your Squat Now HERE.
Get our free weekly email - containing useful videos, articles, and training tips - HERE.
Follow Testify on Instagram HERE.
Subscribe to Testify’s YouTube channel HERE.
(Some links may be affiliate links. As an Amazon Associate, Testify earns from qualifying purchases.)