Why Do You Put the Bar There When You Squat?

(A Blast from the Past article originally posted on 02/19/21)

Listen up, folks - we’re going to discuss something you’ve probably never thought about before - why we put the barbell in the low bar position when we squat. Specifically, we’re going to discuss an anatomical rationale for placing the bar in The Position, so for today, we’ll be skipping the mechanical discussions about moment arms, hip drive, etc. (but as I was a physics teacher in a past life, we can geek out on that some other time if you like).

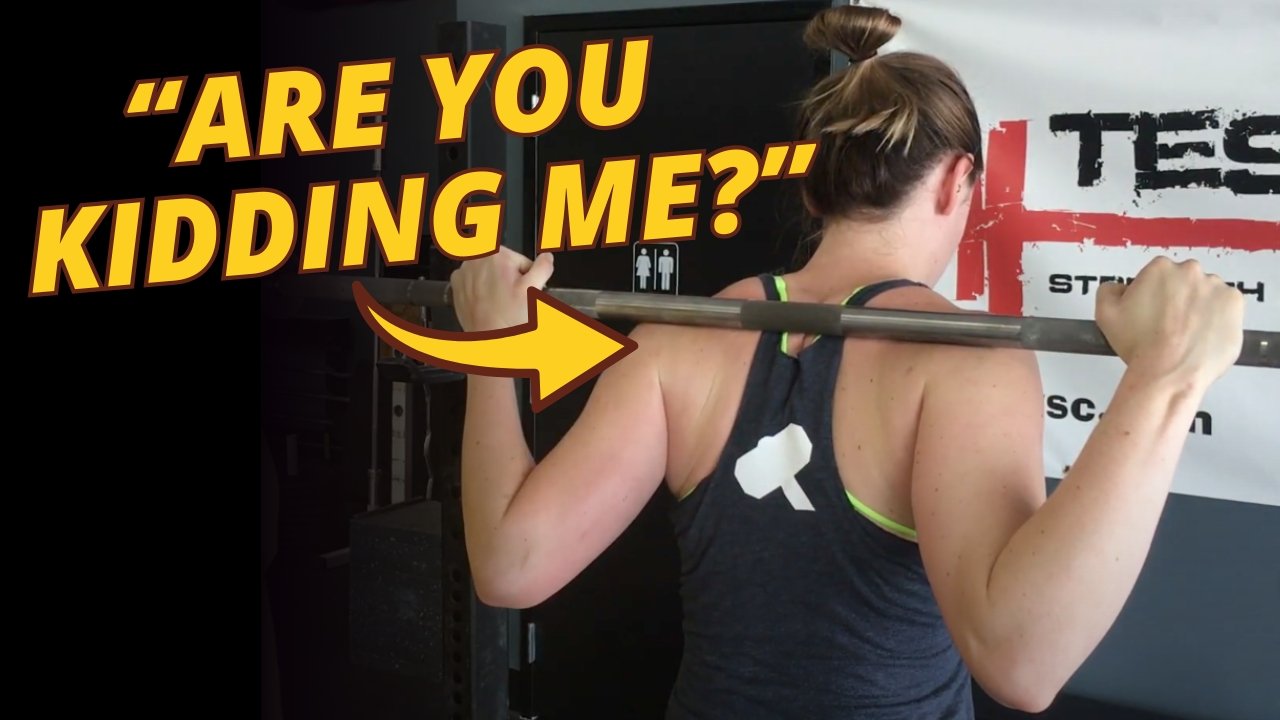
If you take a person who has never squatted before, maybe even a person who has squatted before, and you say, “Hey, go over there and squat that bar down and up” - which is unfortunately a fairly common approach to coaching - pretty much everyone in the world will go over to the rack, get under the bar, and they will then place the bar in what is called the high bar position (only they don’t know it’s called that), and they’ll stand upright with the bar sitting up high on the shelf provided by your traps.

They will do this because it’s easy and it’s obvious. It’s easy because it doesn’t require much - if any - flexibility (although it actually can be tough for some people), and it’s obvious because it’s the first potential shelf that the bar runs into as you slide under the bar.

However, remember that this position - the position of standing upright - is the easiest position in the entire squat. You know this because you can stand there supporting a lot more weight than you can actually squat. As this is the easiest position to assume, we might be wise not to let this position dictate the location of the bar.

Instead, we’re going to slide just a bit further forward - further under the bar, if you will - until the bar slides past the traps and is now supported on the shelf provided by your delts. We choose this location for the bar - not because it’s the easiest position to achieve when standing up (because it is not) - but rather because it’s the most secure location for the bar when you’re actually squatting.

Picture yourself at the bottom of your squat - you’ve got a nice, leaned-over torso, and now, with the bar sitting in The Position, any downward motion of the bar (i.e., rolling or sliding down your back) is blocked by your delts, and any upward motion is blocked by your traps. The bar is pinned between these two muscle groups in a very secure manner, and a bar that doesn’t want to move up or down your back is a very good thing when squatting heavy weights.

Now that you’ve got something to think about as you rest between work sets, it’s time to get to squatting.

As always, we hope this helps you get stronger and live better.

-Phil

PS: Whenever you want even more Testify in your life, here are some free resources:

  • Book a free intro and strategy session with us HERE.

  • Pick up a free copy of Testify’s Squat Guide: 12 Tips to Improve Your Squat Now HERE.

  • Get our free weekly email - containing useful videos, articles, and training tips - HERE.

  • Follow Testify on Instagram HERE.

  • Subscribe to Testify’s YouTube channel HERE.

(Some links may be affiliate links. As an Amazon Associate, Testify earns from qualifying purchases.)


At Testify, we offer small group training, private coaching (in-person or remotely via Zoom), online coaching, and form checks. Interested in getting stronger, looking better, and having more energy?

book a free intro

Week 2023.04.17

THIS WEEK’S QUESTION
From our video What You Should NEVER Do When Deadlifting! (click the title to watch):

Zachary Klimczak
Hey Phil - how do straps come into play? You've done a few videos on lifting straps, but it wasn't clear where those could be introduced over the hook grip and/or the mixed grip. Love your content. Thanks.

Phil
Thanks, Zackary! When a guy (or gal) is working through the linear progression, we just have him use hook grip or mixed grip. If he's got some type of problem with one hand (we've seen injuries, etc.) where that's not possible past a certain point, then we'd have him use straps as soon as it's necessary, but in general, on the LP, use hook grip or mixed grip.

As the program changes, a lifter might have heavy rack pulls or more deadlift volume on certain days. For rack pulls, use straps (they get very heavy - a set of 5 can be pulled around your 1 RM deadlift weight). For a session with multiple work sets of deadlift, we usually have a lifter pull his first set with hook grip or mixed grip and then use straps for any subsequent sets.

This is especially useful for olympic lifters. They hook grip a lot throughout the week due to the snatch and clean, so their thumbs (and hands in general) can take a beating, and thus straps are useful to preserve their hands (because they MUST hook grip for snatches and cleans).


ARTICLES & VIDEOS

Do CrossFitters Make the Best Deadlifters?!
What are CrossFitters good at when it comes to the deadlift, and how can this particular phenomenon help you improve your deadlift? Click here to watch.

What You Should Never Do When Deadlifting!
Are you making this mistake when deadlifting? Well . . . don't. Let's fix it fast. Click here to watch.

Motivation is for Suckers
Struggling with motivation to get to the gym and train? Learn why you're approaching it all wrong. Phil explains in Testify's weekly article. Click here to read.


NEW TESTIFY GEAR!
Summer's coming, and we've got men's and women's tank tops in multiple colors. Get 'em while they're hot! (Ok, actually, get 'em before it gets hot.)

Click here to head to the Testify Store.


WHAT'S COMING UP
Below are a few of our upcoming events, and you can find out what else is on the calendar by heading to our events page at www.testifysc.com/events.

Testify Barbell MAYhem weightlifting meet

  • May 6, 2023

  • Click here to register or for more information.

Starting Strength Self-Sufficient Lifter Camp

  • May 20, 2023

  • Spend the day learning the Squat, Press, and Deadlift and how to self-evaluate your lifts while training in your garage or commercial gym without a coach.

  • Click here to register or for more information.

Testify IronFest V

  • July 8, 2023

  • IronFest is a team-based strength meet wherein the contested lifts will be the squat, press, bench press, and deadlift. Competitors will form teams of 2 lifters/team and perform all 4 lifts; each lifter will perform one upper body lift and one lower body lift, and each lifter will receive 3 attempts for each lift.

  • Click here to register or for more information.


THIS WEEK’S CONDITIONING

Option 1
Sled Pyramid – 4, 5, or 6 tiers
Go up and down a 4, 5, or 6 tier “sled pyramid” – rest as needed. The distance for each round is 80 m indoors (a down-back on the 40m course) or 200 ft outdoors (2 down-backs on the 50 ft course). Rest as needed.

For example, Bob does the following (4 tiers):
Round 1: Empty sled
Round 2: 25#
Round 3: 50#
Round 4: 75#
Round 5: 50#
Round 6: 25#
Round 7: Empty sled

Compare to 2023.02.13.

Option 2
Bike/row:
4 x 800m

Rest 3 minutes between each round. Score = slowest time.

Compare to 2023.01.23.

Option 3
1st: 5 x 50 ft seated sled pull. Add weight each round. Rest as needed.
2nd: 5 x 100 ft duck walk. Add weight each round. Rest as needed.

Compare to 2022.12.26.

Option 4
Outdoors
4 rounds:
50 yd farmer carry
80 m sled drag
Rest 2 min

Indoors
4 rounds:
100 ft farmer carry
100 ft sled drag
Rest 2 min

Compare to 2022.12.26.

Motivation is for SUCKERS

Motivation is for fools. Motivation is for wieners. Don’t trust your motivation.

People far more eloquent and well-known than me - admittedly a rather low bar in both cases - have said some version of this sentiment, but if you’ve never seen or heard it, it’s important that you do so today: Motivation is for suckers.

We are all fools and suckers at various times in our lives - I’ve certainly been both of those on more occasions than I care to admit - but when it comes to training, you’ve got to know that you do not trust motivation.

Instead, trust habit. Trust discipline. Trust delayed gratification. These are all various ways of saying essentially the same thing. Go in and simply punch the clock on a regular basis.

99% of the time, training is exactly that - going in and punching the clock. Sure, you’ll have days where you’re jazzed up to train, but you’re going to have a ton of days where you don’t particularly want to touch a barbell, and this is especially true the longer you’ve trained. PRs get harder to come by over time - after all, the stronger you get, the harder it is to get even stronger.

Punch the clock anyway. You have permission from me - for all that matters - to not want to train . . . and still go and train anyway. All those workouts where you’re excited to get in the gym and train? In the long run, those aren’t the difference makers - those aren’t the ones where you make the most progress. But the workouts where you didn’t feel like going to the gym and went anyway? Those are your moneymakers. You keep stringing those days together, and over time, that’s how you make progress. Being consistent. Punching the clock.

Are you stoked to brush your teeth? Probably not, but you do it anyway. On the days that you’re not motivated to get to the gym, treat your training the same way.

It’s ok to not be motivated and still train. Training isn’t life, but it makes the quality of the rest of your life better. Get to work. Punch that clock.

As always, we hope this helps you get stronger and live better.

-Phil

PS: Whenever you want even more Testify in your life, here are some free resources:

  • Book a free intro and strategy session with us HERE.

  • Pick up a free copy of Testify’s Squat Guide: 12 Tips to Improve Your Squat Now HERE.

  • Get our free weekly email - containing useful videos, articles, and training tips - HERE.

  • Follow Testify on Instagram HERE.

  • Subscribe to Testify’s YouTube channel HERE.

(Some links may be affiliate links. As an Amazon Associate, Testify earns from qualifying purchases.)


At Testify, we offer small group training, private coaching (in-person or remotely via Zoom), online coaching, and form checks. Interested in getting stronger, looking better, and having more energy?

book a free intro

Week 2023.04.10

This Week’s Conditioning

Option 1
”Prowler Base+1”
1. Load up a manageable weight.
2. Sprint 40m at 85% intensity.
3. Rest 30 sec.
4. Repeat 5-15 times.

Courtesy of “Death by Prowler” (on Starting Strength).

Compare to 2023.02.06.

Option 2
Bike/row:
4 x 3 minutes

Rest 3 minutes between each round. Score = lowest distance.

Compare to 2023.01.16.

Option 3
1. Work up to a heavy single on the axle clean-and-press (i.e., ground to overhead).
2. 5 x 100 ft Zercher carry (50 ft down-back). Add weight each round. Rest as needed.

Compare to 2022.12.19.

Option 4
Outdoors:
5 rounds:
15 cal row
50 yd sled push, 100#/50#

Indoors:
5 rounds:
15 cal row
100 ft sled push, 250#/125#

Push sled slow for recovery. Score is slowest row.

Compare to 2022.12.19.

THIS is Destroying Your Deadlift

You’ve got deadlift problems. Perhaps your deadlift swings away from you when you break the barbell off the ground. Maybe you spend too much time between reps with the bar sitting on the floor. It may be that you find yourself moving your butt up and down in the neverending quest to find that just right position for your hips before you start the pull. The possibilities are endless.

Hey. Relax. It’s not you. It’s the floor.

No, I don’t mean you need a more robust lifting platform, or that there’s actually something wrong with your floor. I mean that the deadlift rests on the floor between reps - which makes it different from the squat, the press, or the bench press - and it’s this seemingly insignificant detail that might be causing you to ruin your deadlift.

Because the bar sits on the floor between reps, it permits you to perform all sorts of ridiculous antics while it’s down there. You rock forward, you lean on the bar, you rock back, you take three thousand breaths before setting your back for the next rep - the list of potential shenanigans goes on. In short, you perform all sorts of unnecessary tomfoolery, and this is extremely detrimental to your deadlift.

You’ve never even dreamed of doing this sort of nonsense in the squat. Because you are supporting the bar all of the time in the squat, you are highly motivated to be efficient between reps. Of course you stay balanced over your midfoot between reps - holding several hundred pounds on your back while balanced on the balls of your feet seems rather silly, so you never do it. You also spend relatively little time between reps - enough time to take a breath or two and get tight again - because you want to get the set over with and get that heavy bar off your back sometime today.

When you do silly things between reps of your deadlift - and this sort of thing happens all the time - you cause several problems. First - and this is the big one - all this unnecessary movement greatly reduces your chances of getting in the correct position for the next pull. Second, you exhaust yourself. The bottom of the deadlift is the only resting position for a deadlift work set, but it’s a lousy resting position, and you already know this. You’re crouched over, so your back and legs get tired down there, and it’s not much fun breathing in that position for very long. Third, you make your work set take much longer than it should. Get the set done, already.

How can you fix this problem? Keep it simple and be religious about your 5-step setup.

The 5-step setup applies for the first rep, of course, but it is especially important for all subsequent reps. Here’s a quick recap (watch the included video for a better and more complete understanding), but it’s steps 3-5 that we’re going to focus on in the next section:

5-Step Deadlift Setup

  1. Stance: Shins 1” inch from the bar. Narrow stance with toes slightly turned out.

  2. Grip: Bend at the hips to grab the bar while keeping your shins as vertical as possible - do NOT touch the bar with your legs yet. (also, never push down on the bar, i.e., don’t rest with your own weight on the bar)

  3. Shins: Bend your knees (i.e., drop your butt slightly) until your shins lightly touch the bar.

  4. Chest: Squeeze your chest up to set your back.

  5. Pull: Drag the bar up your legs.

We use the 5-step setup for every rep, but for every rep after the first one, steps 1 and 2 are already completed. They’re already completed because you’re going to set the bar down right over the middle of your foot (“stance”), and you’re not going to let go of the bar (“grip”). If you set the bar down a little out of position, that’s not a problem - simply roll the bar to the correct spot over the middle of your foot. Keep your shins OFF the bar while doing this, make sure that you are balancing on your midfoot (not the balls of your feet), and don’t push down on the bar (if anything, keep a little upward tension on the bar).

Is this fool setting up for his 1st rep . . . or has he just finished his 1st rep? you’ll never know, and that’s the way we like it.

Think of it this way: Set the bar down so that it looks like you’ve just completed steps 1 and 2 of your very first rep. If Lawrence takes a picture of you at this moment, he shouldn’t be able to tell if you’re about to do your first rep or if you’ve set the bar down after a rep.

If you do this, then the rest of the setup for that next rep is simple. It’s steps 3-5: shins lightly to the bar, squeeze the chest up, and pull.

Keep it simple, and keep it repeatable.

As always, we hope this helps you get stronger and live better.

-Phil

PS: Whenever you want even more Testify in your life, here are some free resources:

  • Book a free intro and strategy session with us HERE.

  • Pick up a free copy of Testify’s Squat Guide: 12 Tips to Improve Your Squat Now HERE.

  • Get our free weekly email - containing useful videos, articles, and training tips - HERE.

  • Follow Testify on Instagram HERE.

  • Subscribe to Testify’s YouTube channel HERE.

(Some links may be affiliate links. As an Amazon Associate, Testify earns from qualifying purchases.)


At Testify, we offer small group training, private coaching (in-person or remotely via Zoom), online coaching, and form checks. Interested in getting stronger, looking better, and having more energy?

book a free intro

Week 2023.04.03

Congratulations to everyone who competed at this past weekend’s Testify Strengthlifting Challenge and thank you so much to everyone who helped out! Judges, loaders, spotters, table officials, those who helped set up and tear down - you all were wonderful, and we absolutely could not have done it without you!

This Week’s Conditioning

Option 1
“Prowler Base”
1. Load up a manageable weight.
2. Sprint 40m at 85% intensity.
3. Rest until breathing and heart rate slow down. (45 sec – 2 min)
4. Repeat 5-15 times.

Courtesy of “Death by Prowler” (on Starting Strength).

Compare to 2023.01.30.

Option 2
Bike/row:
5 min on
4 min off
4 min on
3 min off
3 min on
2 min off
2 min on
1 min off
1 min on

Record distance for each interval and add for total distance.

Compare to 2023.01.09.

Option 3
Outdoors:
8 rounds:
4 tire flips
50 yd sled push (25 yd down-back)
Rest 1 minute

Indoors:
8 rounds:
4 tire flips
100 ft sled push (50 ft down-back)
Rest 1 minute

Compare to 2022.12.12.

Option 4
5 rounds:
4 tire flips
8 sledgehammer strikes
6 pull-ups
10 push-ups

Pull-ups and push-ups can be modified – talk to the coaches for options.

Compare to 2022.12.12.