Spotting the Squat: Don't Make These Mistakes!

Spotting the squat is important, but it’s often done terribly and awkwardly, so let’s briefly discuss how NOT to spot the squat.

Don’t Space Out.
This isn’t the time for selfies or catching up on your pleasure reading. You need to keep your hands off the barbell unless it moves in a direction other than upward, but you still need to be available and attentive throughout the entire set.

A missed rep can happen quickly, especially if it’s due to a loss of balance, so be ready.

figure 1: Don’t Do This. (note the crooked barbell)

Don’t Touch the Bar . . . When the Lifter is Walking It Back In.
At the end of a successful set, do not try to help the lifter get the bar back to the hooks (Figure 1). By touching the bar, you’ll simply cause the lifter to be uneven (because you and the other spotter will not provide equal amounts of assistance) and possibly miss one or both of the hooks.

At the end of a set, the lifter already squatted the weight on his own - he can certainly walk it back on his own. Spotters should simply be present as the bar contacts the uprights to make sure that the bar does not bounce back from the rack.

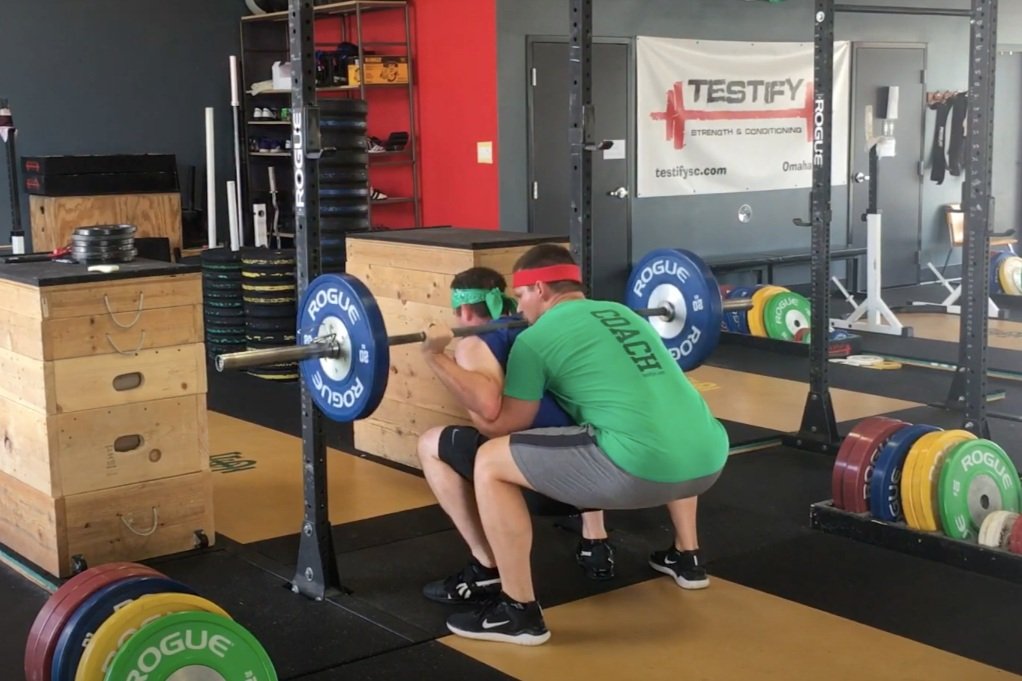
figure 2: Don’t be like these fools.

No 1-Person Spots
Spotting the squat is performed by two people - never one person. Spotting the squat from behind the lifter is awkward at best and dangerous at worst as the spotter is in a terrible position to handle a heavy load should the lifter fail (Figure 2).

When setting up to spot, the spotter on the lifter’s left should have his left foot forward, and the spotter on the lifter’s right should have his right foot forward - this way, you are both facing the lifter as well as each other.

Keep your hands off the bar unless the bar moves in a direction other than up - any rep touched by you cannot be counted by the lifter. However, if the lifter does need assistance, you need to provide it, and you do so by spotting the bar with the crook of your elbow, and both hands will help by grabbing the plate (Figure 3). At this point, the lifter and the spotters together will lift the bar and take it back to the hooks (the lifter should NEVER abandon the bar).

Figure 3: The correct way to spot a failed rep

As always, we hope this helps you get stronger and live better.

(Some links may be affiliate links. As an Amazon Associate, Testify earns from qualifying purchases.)

If you found this helpful, you’ll love our weekly email. It’s got useful videos, articles, and training tips just like the one in this article. Sign up below, and of course, if you don’t love it, you can unsubscribe at any time.


At Testify, we offer small group training, private coaching (in-person or remotely via Zoom), online coaching, and form checks. Would you like to get quality coaching from a Starting Strength Coach?

Click here to start today

Week 2022.08.15

This Week’s Conditioning

Option 1
Sled
Outdoors:
10 rounds of:
Push sled 100 ft
Pull sled 100 ft (hand over hand)

Indoors:
20 rounds of:
Push sled 50 ft
Pull sled 50 ft (hand over hand)

Compare to 2022.06.13.

Option 2
Bike/row:
8 x 30 sec on/2:00 off

Score = least distance covered in any 30 second interval

Compare to 2022.05.23.

Option 3
5-10 rounds:
50 ft yoke carry
50 ft yoke push
100 ft sandbag carry and S.O.B. (sandbag-over-bar)

Perform 1 round every 2-3 minutes.

Compare to 2022.04.25.

Option 4
Row/Tire 10 min ladder:
2 cal row
2 tire flips
4 cal row
4 tire flips
6 cal row
6 tire flips

Climb the ladder as high as possible in 10 minutes.

Compare to 2022.04.25.

Spotting the Bench Press: Don't Make These Mistakes!

Spotting the bench press shouldn’t be complicated, but people mess it up frequently, so let’s briefly discuss how NOT to spot the bench press.

Don’t Yank Your Lifter Out of Position
Take an over-under grip on the barbell (i.e., one hand facing up and one hand facing down - also known as an alternating grip or mixed grip) and simply provide enough assistance to help guide the bar into place. Don’t pull your lifter out of position because you’re so eager to help.

Stay Out of Your Lifter’s Line of Sight
You should give your lifter an unobstructed line of sight to the ceiling; with this in mind, stay relatively close to the bench so you can provide assistance if necessary, but beyond that, stay out of the way. Don’t straddle the bench, don’t straddle your lifter (yes, I’ve seen this), and don’t even lean over your lifter.

Keep your hands, your face, and your body out of the way and out of your lifter’s line of sight - none of those things are in the way of your lifting buddy on his other lifts, and they shouldn’t be in the way on the bench press, either.

Don’t Space Out
Pay attention to your lifter. Get your hands out of your pockets, put down your coffee, and simply pay attention to your lifter so that - in the event that he needs assistance - you’re actually prepared to provide it.

Don’t Touch the Bar
This is the big one, folks - they’ve even got shirts about this one. Lifting is not a team sport. Benching is not a team sport. If you touch the bar, the rep doesn’t count, so stay out of the way. Don’t. Touch. The. Bar.

“I’m all pinkies, bro!” Don’t be like these fools.

Of course, you need to be able to provide assistance in the event that the barbell goes anywhere other than up, but beyond that, stay out of your lifter’s way. The spotter shouldn’t exist (figuratively speaking) unless the lifter needs help.

As always, we hope this helps you get stronger and live better.

(Some links may be affiliate links. As an Amazon Associate, Testify earns from qualifying purchases.)
If you found this helpful, you’ll love our weekly email. It’s got useful videos, articles, and training tips just like the one in this article. Sign up below, and of course, if you don’t love it, you can unsubscribe at any time.


At Testify, we offer small group training, private coaching (in-person or remotely via Zoom), online coaching, and form checks. Would you like to get quality coaching from a Starting Strength Coach?

Click here to start today

Week 2022.08.08

This Week’s Conditioning

Option 1
Sled Pyramid – 4, 5, or 6 tiers
Go up and down a 4, 5, or 6 tier “sled pyramid” – rest as needed. The distance for each round is 80 m indoors (a down-back on the 40m course) or 200 ft outdoors (2 down-backs on the 50 ft course). Rest as needed.

For example, Bob does the following (4 tiers):
Round 1: Empty sled
Round 2: 25#
Round 3: 50#
Round 4: 75#
Round 5: 50#
Round 6: 25#
Round 7: Empty sled

Compare to 2022.06.06.

Option 2
Bike/row:
4 x 800m

Rest 3 minutes between each round. Score = slowest time.

Compare to 2022.05.16.

Option 3
Outdoors:
5-10 rounds:
10 sledgehammer strikes (5R, 5L)
50 yd farmer carry (25 yd down-back)
Rest 1 minute

Indoors:
5-10 rounds:
10 sledgehammer strikes (5R, 5L)
100 ft farmer carry (50 ft down-back)

Rest 1 minute

Compare to 2022.04.18.

Option 4
5-8 rounds:
50 ft sled push
50 ft sled pull (hand over hand)
Row 1 minute
Rest 1 minute

This can also be done in a group of three where the sledder determines how long the other two people row and rest.

Compare to 2022.04.18.


At Testify, we offer small group training, private coaching (in-person or remotely via Zoom), online coaching, and form checks. Would you like to get quality coaching from a Starting Strength Coach?

Click here to start today

Your Training Log - Part 1: Just Do It

(If you like, you can scroll down to the end of this article and watch a video on this topic. This article is a Blast from the Past article originally posted on 08/28/20.)

I was having a conversation with one of our members the other day (you know - not this day, but the other one), and this member  - let’s call him Bill - had come upon a startling revelation. Bill had recently gone through several workouts without using his training log, and when he started using it again, he immediately realized that not using his training log had been a huge mistake. He realized that - without the log - his lifting had been unfocused, and the weights were often incorrect. Bill even asked me to never let him get away with that again. Bill is a wise man.

When we train with weights, we do exactly that – we train. Training has a purpose - a goal in mind. To achieve these purposes, to work toward these goals, we need data, and this is where the training log comes in. Without the log (or journal, notebook, etc.), we quickly find ourselves adrift in a sea of barbells and weights with no direction whatsoever. We find ourselves lost in the Sea of Exercise . . . and there be monsters.

Mind you, there is nothing wrong with Exercise, and it's certainly better than Doing Nothing, but let us not confuse Exercise with Training. Exercise is what you do when you want to get hot and sweaty and tired and feel like you’ve accomplished something. Training is how you actually accomplish something. The log separates Training from Exercise.

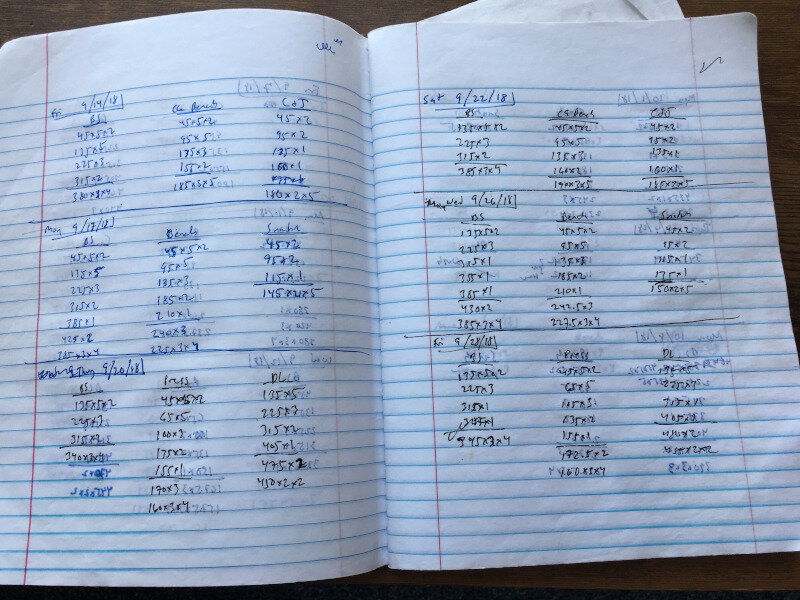
The log is our history - it tells us where we've been, what we've done - our lifts, warm-up sets, work sets. But it is a more complete history than this - it also includes PRs, how we felt on certain days, how proud we were of our accomplishments, how utterly disappointed we were with our failures. If you had a poopy day squatting 185 lbs for your work sets, write it down in your training log (seriously . . . “this was a poopy day”). Success is magnified by knowing how far we’ve come, and on the day when 185 lbs becomes your second-to-last warm-up set (and that day will come), the knowledge that this weight used to be terribly heavy will remind you of the progress you’ve made.

The log is also our compass - it tells us where we’re going. We write down the weights for our next workout, yes, but we also write down our plans and our goals. I want to bench press three plates. I’m gonna deadlift 250 lbs at the next meet. I WILL get my first pull-up this year. Write this stuff down. All of it. Write down the date on which you set that goal. Someday, you’ll reach that goal, cross it out . . . and set another one.

Don’t kid yourself. If you want to exercise, go right ahead - you’ve got plenty of options. But if you want to put in the hard work of actually training, keep a log. You’ll thank me later, and your coach won’t lose his or her mind when you can’t remember what you’re supposed to squat today.

Next time . . . how to keep a training log (hint: it’s not complicated).


At Testify, we offer small group training, private coaching (in-person or remotely via Zoom), online coaching, and form checks. Would you like to get quality coaching from a Starting Strength Coach?

Click here to start today

Week 2022.08.01

This Week’s Conditioning

Option 1
”Prowler Base+1”
1. Load up a manageable weight.
2. Sprint 40m at 85% intensity.
3. Rest 30 sec.
4. Repeat 5-15 times.

Courtesy of “Death by Prowler” (on Starting Strength).

Compare to 2022.05.30.

Option 2
Bike/row:
4 x 3 minutes

Rest 3 minutes between each round. Score = lowest distance.

Compare to 2022.05.09.

Option 3
5-10 rounds of:
30 sec ME tire flips
30 sec rest

Compare to 2022.04.11.

Option 4
1. 5 yoke carries @ 30 yd (15 yd downback) – work up to heaviest carry
2. 5 rounds of 5 reps on the axle “clean and press away” – work up to heavy set of 5

Compare to 2022.04.11.