Fix Your Early Arm Bend on Your Cleans and Snatches!
/
(A Blast from the Past article originally posted on 12/03/21)
Bent arms on a clean or snatch are a problem, so we’re going to try to solve this.

Figure 1: Becky reaches the top of the clean with straight arms, which is what we want.
In Figure 1, Becky demonstrates a clean with straight arms - which is what we want at this point in the lift.
In Figure 2, Becky demonstrates what we don’t want to see, which is a clean with an early arm pull (or “early arm bend”). In other words, we see her bend her arms before they are supposed to bend (for a real time view of this, watch the included video below).

Figure 2: Becky demonstrates an early arm pull (notice the bent elbows), which we don’t want.
The problem with bent arms is that they are deformable, i.e., they can change shape. If you’re Babe Ruth, and you want to hit a baseball, you want to do so with a bat - a rigid, non-deformable object. You don’t want to hit a baseball with a pool noodle because, no matter how strong or fast you are, you can’t effectively transfer that power into the baseball through a squishy pool noodle.
Likewise, during a clean (or snatch) you are trying to take all the power generated in your legs and hips and transfer it through your (hopefully) rigid spine and then down through your long, straight arms into the barbell. If your back isn’t rigid or if the arms aren’t straight, then those structures are deformable, which means they can absorb some of the power you’re trying to transmit to the bar. We don’t want this, so let’s cover some cues to solve this problem.
Cue #1: Long arms (or “straight arms”)
The first cue we’re going to use is the simplest approach. Just cue yourself “long arms” or “straight arms” (or even “straight elbows”). If this works, don’t make it any more complicated. The goal was long, straight arms, so we cued exactly that.
Cue #2: Flex your triceps (or “tight triceps”)
The job of the triceps is to extend (i.e., straighten) the elbow, so if you cue yourself to flex your triceps or tighten your triceps, then your elbows will be nice and straight, which is exactly what we’re looking for.
Cue #3: Shrug
If the first two cues don’t work, try cueing yourself to shrug at the top of the pull (i.e., the top part of the clean where your knees and hips are straight and you’re up on your toes - the top of the “jump”). A shrug is inherent to the movement anyway, but reminding yourself to aggressively shrug at the top of the clean will often solve a bent arm situation (very few people shrug with bent arms).
Cue #4: Leave it on the floor
This one requires some explanation before you actually try it out. The idea here is that you are endeavoring to have such long arms, straight arms that - even though you’re moving upward as you pull the bar off the floor - you are simultaneously trying to leave the bar on the floor. You’re trying to actively stretch your arms out so that, even while standing up, you’re trying to keep the bar down on the floor. It’s obviously an exaggerated mental picture - kind of a “go, go, Gadget-arms!” type of situation - but the cue itself shortens up to “leave it on the floor,” and it tends to work quite well.
We hope these cues help, and as always, we hope this helps you get stronger and live better!
(Some links may be affiliate links. As an Amazon Associate, Testify earns from qualifying purchases.)
If you found this helpful, you’ll love our weekly email. It’s got useful videos, articles, and training tips just like the one in this article. Sign up below, and of course, if you don’t love it, you can unsubscribe at any time.
At Testify, we offer small group training, private coaching (in-person or remotely via Zoom), online coaching, and form checks. Would you like to get quality coaching from a Starting Strength Coach?
Use This Grip for a BIGGER Deadlift! (Tension Grip)
/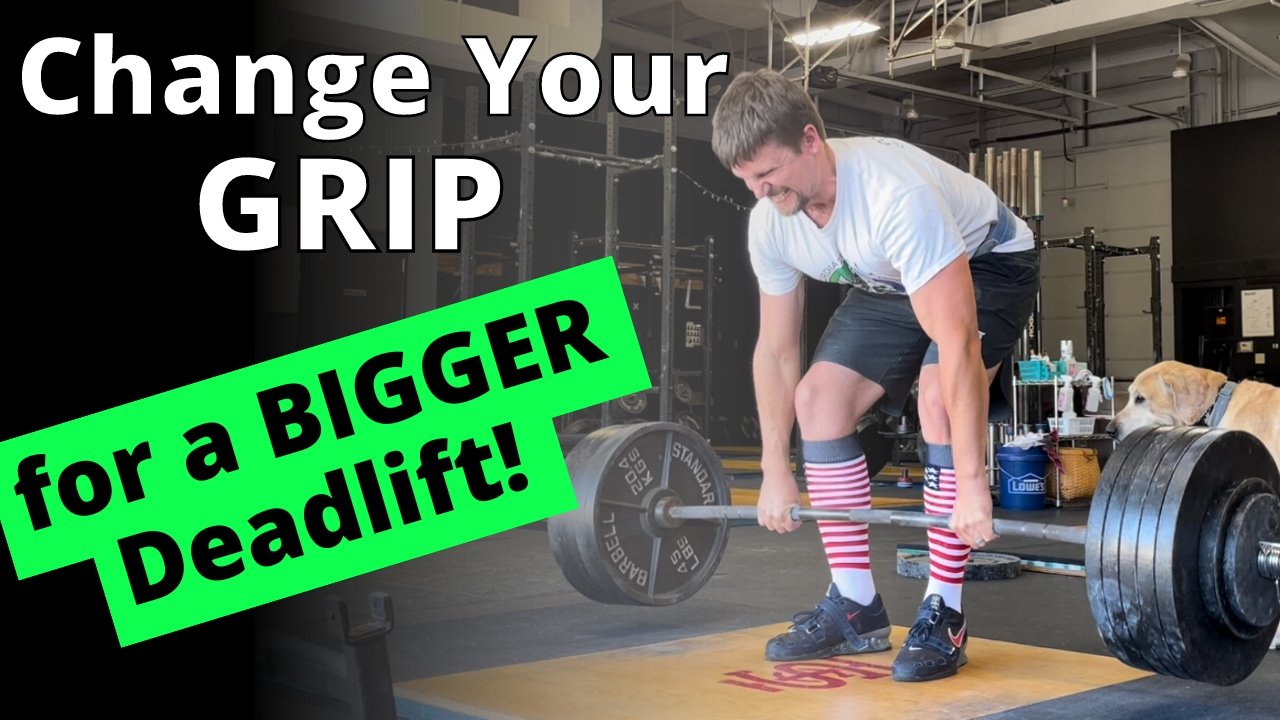
What is a tension grip, and why should you use it for pulling movements like the deadlift, row, and clean? This is the second article in our short series on the correct grip for each lift. In the first article, we discussed the compression grip, which is useful for pressing movements such as the bench press, press, close grip bench press, etc., and you can read that article by clicking here.
Today’s Topic: Pulling Movements
The grip we are covering today is the type of grip you would take for pulling movements such as the deadlift, the row, the clean, etc. This grip is commonly referred to as a tension grip (watch the included video for a demonstration).
Whether you execute a pulling lift (e.g., deadlift) or a pressing movement (e.g., bench press), the same principle is true - gravity wants the bar to go down, so your grip should put the bar in the lowest stable position possible. In this way, the bar cannot accidentally reach a lower position than that which it’s already occupying.
What NOT To Do
In a pressing movement - as discussed in the compression grip article - you place the bar at the base of the palm. However, since the hand will be pointing downward in a pulling movement, putting the base of the palm against the bar puts the bar in an unstable position. The compression grip is very strong for pushing and pretty terrible for pulling.

Figure 1: compression grip (shown in reverse for viewing purposes): good for pushing - terrible for pulling
Placing the base of the palm against the bar - this will look like you’re pushing down on the bar (Figure 1) - compromises the grip, and this will show up in several ways. First, if you can even break the bar off the floor, it may result in a soft lockout at the top of the lift (e.g., knees that are still bent) or the complete inability to finish the lift at all. Second, when your grip is compromised, everything else starts to compensate - your back starts to round, the weight feels heavier, and it will actually be harder to pull the bar off the floor.

Figure 2: tension grip (shown in reverse for viewing purposes): good for pulling
The Answer
Take a grip that permits the bar to sit a little lower in the hand - down by the fingers a bit more (Figure 2).
(As a side note, don’t take a monkey grip - you shouldn’t have a visible air gap between your hands and the bar.)
Put simply, it should look like you’re pulling up on the bar and not pushing down on the bar. Note the differences between a compression grip (bad for pulling) and a tension grip (good for pulling) in the photos below.


Whether you use a double overhand grip, a hook grip, or an alternate grip, make sure the bar is carried down by the fingers and not positioned up by the base of the palm. When in doubt, put some upward tension on the bar, and voilà - your wrists will straighten out, and the bar will be positioned correctly.
As always, we hope these tips help you get stronger and live better.
(Some links may be affiliate links. As an Amazon Associate, Testify earns from qualifying purchases.)
If you found this helpful, you’ll love our weekly email. It’s got useful videos, articles, and training tips just like the one in this article. Sign up below, and of course, if you don’t love it, you can unsubscribe at any time.
At Testify, we offer small group training, private coaching (in-person or remotely via Zoom), online coaching, and form checks. Would you like to get quality coaching from a Starting Strength Coach?
Easy Setup for Deadlift, Snatch, & Clean (in less than 3 minutes!)
/In less than 3 minutes, learn how to setup for your deadlift, snatch, and clean in a manner that is simple, efficient, and consistent.
(This is a Blast from the Past video originally published on 02/26/22.)
At Testify, we offer small group training, private coaching (in-person or remotely via Zoom), online coaching, and form checks. Click the button below to get quality coaching from a Starting Strength Coach and start getting stronger TODAY.
What's the Difference: Snatch vs Hang Snatch vs Power Snatch | FAST & EASY
/Snatch, hang snatch, power snatch, hang power snatch . . . all in less than 3 minutes! What are the differences between these lifts, and how can we easily remember each one?
At Testify, we offer small group training, private coaching (in-person or remotely via Zoom), online coaching, and form checks. Click the button below to get quality coaching from a Starting Strength Coach and start getting stronger TODAY.
Easy Setup for Deadlift, Snatch, & Clean
/
Whether you’re deadlifting, cleaning, or snatching, we’d like a setup process that is as simple, efficient, and consistent as possible. With that in mind, we’re going to take the 5-step deadlift setup process and quickly learn how to apply it - with very minor modifications - to the clean and the snatch.
DEADLIFT SETUP
Let’s briefly recap the 5-step deadlift process, and for a more detailed treatment, you can watch the included video.
Step 1: Stance
The stance is narrow (heels about hip width apart), your shins are one inch from the barbell, which places the bar over the middle of your foot, and your toes are pointed out slightly (roughly 10-15 degrees).
Step 2: Grip
Bend over and take your grip on the barbell. Your grip is relatively narrow - just outside the legs. Don’t let your shins touch the bar during this step, and DO NOT move the bar (i.e., don’t let the bar roll forward or backward at all).

tyler demonstrates the deadlift start position and is ready to pull.
Step 3: Shins
Bend your knees slightly until your shins touch the bar (this means your hips should drop, but only a bit). Also, shove your knees out slightly - your knees should touch the insides of your arms. Again, do not move the bar.
Step 4: Chest
Squeeze your chest up to set your back in rigid, flat extension. Your hips DO NOT drop during this step, and you still DO NOT move the bar.
Step 5: Pull
Pushing the floor away from you with your legs, drag the bar up your legs until you’ve locked out the bar at the top of the lift.
CLEAN SETUP
Moving on to the clean, there are two small changes. Step 1 (stance) is the same, and we then encounter the first change in Step 2 (grip): your grip for the clean is one hand-width wider than it was for the deadlift.

maddie demonstrates the start position for the clean.
Step 3 (shins) brings about the other small change. You still bring your shins to the bar by bending your knees slightly, but since your grip is a bit wider, you also shove your knees out a little more than you did in the deadlift so that the knees still touch the insides of your arms.
After this, you then move on to Step 4 (chest) and Step 5 (pull).
SNATCH SETUP
Moving on to the snatch, we have three changes. The first change shows up right away in Step 1 (stance): point your toes out wider than they were in the deadlift and clean - roughly 30 degrees (you’ll see the reason for this shortly).
The second change arrives in Step 2 (grip): your grip is significantly wider than it was in the deadlift or the clean. It should be wide enough that the barbell hangs at the crease of your hips when you are holding the bar with straight arms in a completely upright (i.e., standing) position.

becky demonstrates the start position for the snatch.
The third and final change shows up in Step 3 (shins): once again, you still bend your knees to bring your shins to the bar, but since your grip is significantly wider than that of the deadlift or clean, you also shove your knees out significantly wider than you did with the other two lifts. This very noticeable “knees out” position is why you point your toes out quite a bit in Step 1 of the snatch setup.
After Step 3, you then move on to Step 4 (chest) and Step 5 (pull).
SUMMARY
To recap, the 5 steps are always as follows: stance, grip, shins, chest, and pull. However, the execution of certain steps changes due to the grip width of the clean and the snatch.
As always, we hope this helps you get stronger and live better.
-Phil
PS: Whenever you want even more Testify in your life, here are some free resources:
Book a free intro and strategy session with us HERE.
Pick up a free copy of Testify’s Squat Guide: 12 Tips to Improve Your Squat Now HERE.
Get our free weekly email - containing useful videos, articles, and training tips - HERE.
Follow Testify on Instagram HERE.
Subscribe to Testify’s YouTube channel HERE.
(Some links may be affiliate links. As an Amazon Associate, Testify earns from qualifying purchases.)