Easy Fix for a Slanted Lifting Platform (cheap & fast)

If you’ve got a slightly sloped platform, and if it causes the barbell to roll a bit when setting up for pulls from the floor (e.g., deadlifts, rows, snatches, cleans, etc.), this problem needs to be addressed. There are a few ways to fix the issue, so let’s cover them quickly.

Solution #1: Shim the Platform
If the slope is significant, the best solution is to shim your platform. My wife and I often train in our garage gym, and the garage floor has a pretty decent slope to it (as most garage floors do for drainage reasons). We shimmed our platform when we built it, and as a result, the platform is level and works wonderfully for training.

Although very effective, shimming a platform is a pretty involved project and a topic for another article or video as we’re talking about a relatively small slope today. With this in mind, let’s move on to . . .

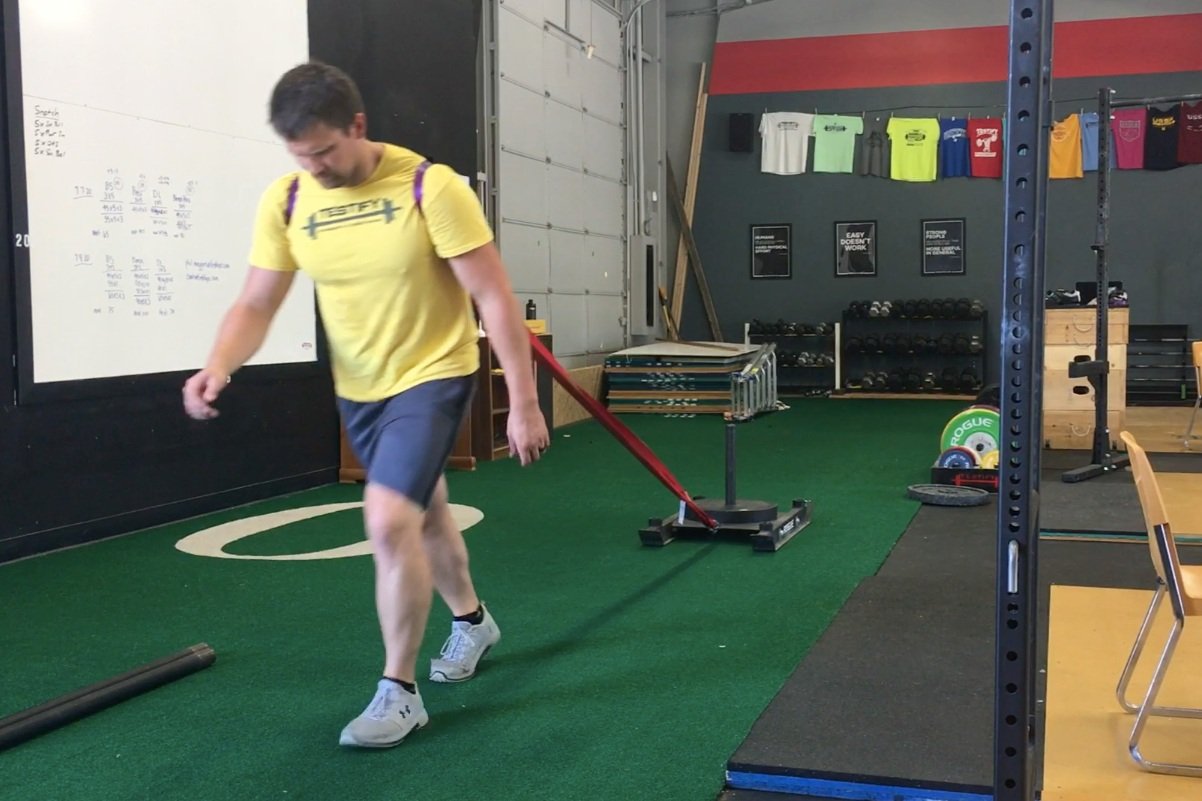
figure 1: got a bar that rolls away from you? just stand on the other side of the bar.

Solution #2: Lift From the Other Side of the Barbell
If the barbell wants to roll away from you when you set up to deadlift, simply step over the barbell, turn around, and set up facing the opposite direction (Figure 1). The bar will still want to roll, but now it will roll toward you, and your shins will serve as a good barrier for the bar’s unruly behavior.

The drawback here is small but worth noting - we want to set up with the bar over the middle of the foot, and since the bar will roll toward your shins, you’ll need to actually roll the bar forward just a bit when setting up. In summary, it’s not ideal, but it works. Better yet, go with . . .

Solution #3: Use Your Wrist Wraps
The easiest way to solve the problem is to take your wrist wraps, lay one of them flat on the ground immediately in front of the plate(s) on the right side of the barbell, and lay the other wrap flat on the ground immediately in front of the plate(s) on the left side of the barbell (Figure 2). Of course, you can use socks, sponges, lifting straps, etc. - the key is to use something soft and relatively thin (i.e., just thick enough to keep the bar from rolling)

figure 2: Phil & Loren have put wrist wraps on the ground in front of the plates, and this solution stops the bar from rolling.

This solution will arrest the bar’s roll, so you can set up according to a stationary barbell, which is what you’d have if you were lifting on a level platform.

I do not recommend using a small metal weight plate (e.g., a 2.5 lb plate) for two reasons. The first reason is that if you set the bar down slightly forward of where you picked it up - thus landing on the edge of the plate - the bar may come careening back toward your shins, and shins and rolling barbells do not get along well (hint: the barbell wins every time). The wrist wrap solution is much better in this regard since you can set the bar down directly on the wrist wrap with no adverse effects - it has enough “squish” not to pose a problem.

The second reason to avoid using a small plate is that - again - if you set the bar down slightly forward of its original position, you may chip either the small plate or the larger plates on the barbell. Since you obviously don’t want to damage your equipment, just grab your wrist wraps, and you’ll be good to go.

Finally, if a wrist wrap won’t stop the barbell from rolling, your platform probably has enough of a slope that you need to shim it. More on that another day.

As always, we hope this helps you get stronger and live better.

-Phil

PS: Whenever you want even more Testify in your life, here are some free resources:

  • Book a free intro and strategy session with us HERE.

  • Pick up a free copy of Testify’s Squat Guide: 12 Tips to Improve Your Squat Now HERE.

  • Get our free weekly email - containing useful videos, articles, and training tips - HERE.

  • Follow Testify on Instagram HERE.

  • Subscribe to Testify’s YouTube channel HERE.

(Some links may be affiliate links. As an Amazon Associate, Testify earns from qualifying purchases.)


At Testify, we offer small group training, private coaching (in-person or remotely via Zoom), online coaching, and form checks. Interested in getting stronger, looking better, and having more energy?

The BEST Single Device to Prevent Frailty in Older Adults

What's the best device for seniors to get strong, prevent frailty, and stay independent? Starting Strength Coach Phil Meggers answers that question and provides 7 reasons why.

Whenever you want even more Testify in your life, here are some free resources:

  • Book a free intro and strategy session with us HERE.

  • Pick up a free copy of Testify’s Squat Guide: 12 Tips to Improve Your Squat Now HERE.

  • Get our free weekly email - containing useful videos, articles, and training tips - HERE.

  • Follow Testify on Instagram HERE.

  • Subscribe to Testify’s YouTube channel HERE.


At Testify, we offer small group training, private coaching (in-person or remotely via Zoom), online coaching, and form checks. Interested in getting stronger, looking better, and having more energy?

Pulling Blocks: What, Why, and DIY vs. Commercial (Which Should YOU Use?)

Today, we’re covering everything related to blocks - pulling blocks, jerk blocks, what they are, why you might use them, as well as what kind you might want to use.

DC Blocks
In short, DC Blocks are made of a very durable plastic, they’re very useful, and they’re also quite expensive. 

Figure 1: setting up to perform a block pull from DC blocks

DC blocks (Figure 1) are most commonly used as pulling blocks, i.e., blocks upon which you perform a pulling motion such as a block pull or a block clean. For example, suppose you want to perform a rack pull, which requires a bent bar or, at the very least, a bar that you’re willing to allow to bend, since rack pulls will do this to barbells over time. If you don’t have such a bar, you can simply perform a block pull instead with your regular barbell (with no worry about what will happen to that bar).

Note: Although DC blocks are quite durable, I’d recommend using bumper plates with them as opposed to metal plates. To be fair, I’ve seen metal plates used with DC Blocks on rare occasions, but I wouldn’t be surprised to see a lifter damage the blocks this way, and that would be an expensive mistake.

Figure 2: power snatch from DC blocks

You can also perform snatches and cleans from DC Blocks (Figure 2). If you’re working to eliminate a pesky early arm pull on your clean, you can start with a block height at which you pull correctly and then slowly lower the height of the blocks over time until you’re pulling from the floor.

As another example, if you struggle to set your back in the deadlift setup, you can practice this from a higher position (using blocks) where it’s easier to achieve. Then you can slowly work your way down by lowering the block height until you’re pulling from the floor with a correctly set back.

Since these blocks are stackable, they are very useful because of how versatile they are as well as how easy it is to achieve differing heights of blocks. However, they are a bit on the small side, which doesn’t give you a lot of room to err forward or backward when setting the bar down. This should not be a problem for a block pull, but it can potentially be an issue when lowering cleans and snatches.

We have a full set of DC Blocks, and they’re great, but we bought them used, and we never would have bought them new as there are other solid options at significantly lower price points. This corresponds to my recommendation for most people - if you can get them used at a great price, go for it, but otherwise, I’d recommend other options.

figure 3: one stack of jerk blocks (also pulling blocks if not stacked this high)

Wood Jerk Blocks/Pulling Blocks
Blocks such as those seen in Figure 3 are commonly known as jerk blocks if stacked this high since lifters can perform split jerks and power jerks from them. As they’re stackable, they are also referred to as pulling blocks since you can create a stack that’s much lower to the ground and suitable for block pulls, cleans, and snatches.

You can build these on your own or buy a set, and if constructed well, they are very durable and incredibly useful. Purchasing a set is comparable in cost to DC Blocks, but you have a much larger area onto which you can lower the barbell, which is a huge advantage when dropping snatches, cleans, and jerks (Figure 4). Constructing your own set does represent a significant investment in terms of building time, but it will also save you a lot of money.

We built our set, the total price was around one-third that of what it would have been if we had purchased a set, and the savings was even more when compared to a similar stack height of DC Blocks. Above, you can find one of our DIY videos we created for these blocks (the first of a three-part series), or you can simply click the links below:

figure 4: wood pulling and jerk blocks provide a large, durable platform for cleans, snatches, jerks, and block pulls.

Horse Stall Mats
You can also make pulling blocks from horse stall mats. Simply take the typical 4’ x 6’ stall mat (¾” thick), and use a jig saw to cut it to the appropriate size. You can create stacks of multiple mats to create blocks of different heights.

These blocks are useful, easy to make, and we’ve got a video covering how to do exactly that (check out the video below). You can purchase horse stall mats by clicking here, but they are generally significantly cheaper if purchased locally, e.g., at a Tractor Supply or something similar.

This sort of block is easily stackable, but the stacks do get heavy rather quickly, and they don’t connect together in the secure fashion that DC Blocks or wood blocks do, so these are limited in height and thus will serve only as pulling blocks (and not as jerk blocks). However, if you only need blocks up to about 6-8” in height, this is the easiest and cheapest way to go.

As always, we hope this helps you get stronger and live better.

-Phil

PS: Whenever you want even more Testify in your life, here are some free resources:

  • Book a free intro and strategy session with us HERE.

  • Pick up a free copy of Testify’s Squat Guide: 12 Tips to Improve Your Squat Now HERE.

  • Get our free weekly email - containing useful videos, articles, and training tips - HERE.

  • Follow Testify on Instagram HERE.

  • Subscribe to Testify’s YouTube channel HERE.

(Some links may be affiliate links. As an Amazon Associate, Testify earns from qualifying purchases.)


At Testify, we offer small group training, private coaching (in-person or remotely via Zoom), online coaching, and form checks. Interested in getting stronger, looking better, and having more energy?

DISASTROUS Weight Lifting Accident (don't let this happen...)

This article is not thrilling, it’s not earth-shattering, but it might keep you from some broken toes or even teeth . . .

One of the more disastrous mistakes you can make in the weight room is that of loading or unloading the barbell by too many plates on one side (Figure 1). Let’s quickly discuss what this error looks like, when you’re most likely to commit it, and how you can easily avoid it.

figure 1: disaster narrowly averted (but watch out for sliding plates!)

What This Mistake Looks Like (i.e., how it happens)
Typically, this error occurs with 45 lb plates, although if you train in kilograms, it will probably occur with either 20 kg or 25 kg plates. Specifically, the mistake you’ll make is that of loading or unloading too many 45 lb plates on one side of the bar (i.e., compared to the other side).

For instance, you finish squatting 315 lb for the day, so you’ve got three 45 lb plates on each side of the bar. You’re tired, but you’re happy to have successfully performed your work sets. You absentmindedly begin unloading the right side of the bar while talking to a buddy or listening to some music. You take one plate off the bar - no problem yet. You then take another plate off the same side - you still might not have a problem.

However, you go to take the third plate off the right side of the bar - remember that you still have three 45 lb plates on the left side of the bar - and you suddenly have a cartwheeling barbell (see Figure 1). The right side of the bar rotates upward, the left side rotates downward, plates fall off in a loud (and dangerous) crash, the bar rotates end-over-end, and the entire room (people, equipment, walls, windows, etc.) is in danger.

If you’ve trained long enough or been to enough powerlifting meets, you’ve seen it happen at least once, it’s a disaster whenever it happens, and nearby people can and do sometimes get injured in the process if they get hit by the falling plates or flying barbell.

When You’re Most Likely to Make This Error
You can make this mistake when loading, but it is far more likely to occur when a lifter is unloading the bar.

figure 2: A one plate difference (two 45 lb plates on the left side and one 45 lb plate on the right side)

Loading the bar during warm-ups tends to promote symmetrical loading since - unless you’re a lifting psychopath - you’re only moving up by 90 lb at most per warm-up set. For instance, moving from 135 lb to 225 lb means you add a 45 lb plate on the left side and then walk over and add a 45 lb plate on the right side. At most, you’ve briefly got a one plate difference (i.e., one 45 lb plate difference) between the two sides of the barbell, and this doesn’t cause a problem (Figure 2).

However, when you’re finished with your 315 lb squat, your goal is to unload all the plates from the bar, and if you don’t approach this in a sensible fashion, you might start unloading all the plates from one side and soon cause a big ruckus.

This most often happens with the squat, but it can happen on the bench or press as well, and if you’re fortunate enough to train with a deadlift jack, it can happen when unloading your deadlift (since a deadlift jack functions much like a pair of j-hooks on a squat rack). I’ve seen a fellow lifter nearly get popped right in the teeth by the barbell after absentmindedly unloading four 45 lb plates from one side of the bar before removing any of the plates from the other side.

The Easy Way to Prevent It
The easiest way to prevent this mistake and the potential disaster that accompanies it is to make the following rule:

No more than one 45 lb plate difference between the two sides of the bar.

For example, if you have two 45 lb plates on the left side of the bar and you’re using this rule, then the following are acceptable for the right side of the bar:

  • Three 45 lb plates (one plate difference)

  • Two 45 lb plates (no difference)

  • One 45 lb plate (one plate difference)

However, having either four or zero 45 lb plates on the right side of the bar is a no-go. Those situations are not guaranteed to cause a problem, but you’re starting to flirt with disaster. This rule does not give you the only safe method, but it does guarantee a simple and safe approach that’s easy to remember.

Keep that one plate difference in mind (which is sometimes the hardest part!), and we hope this helps you get stronger, live better, and also live without any unnecessary broken stuff!

-Phil

PS: Whenever you want even more Testify in your life, here are some free resources:

  • Book a free intro and strategy session with us HERE.

  • Pick up a free copy of Testify’s Squat Guide: 12 Tips to Improve Your Squat Now HERE.

  • Get our free weekly email - containing useful videos, articles, and training tips - HERE.

  • Follow Testify on Instagram HERE.

  • Subscribe to Testify’s YouTube channel HERE.

(Some links may be affiliate links. As an Amazon Associate, Testify earns from qualifying purchases.)


At Testify, we offer small group training, private coaching (in-person or remotely via Zoom), online coaching, and form checks. Interested in getting stronger, looking better, and having more energy?

Cheap & Easy DIY Sled Drag Harness Options

(A Blast from the Past article originally posted on 12/16/22)

The sled or prowler is an extremely effective conditioning tool (albeit a rather evil one). You can get in some great conditioning pushing the sled, but you can also get in some great conditioning pulling it, so let’s cover a couple of options to construct a simple and cheap sled drag harness so you don’t have to go out and buy an expensive one.

First, a few notes . . .

Sled vs Prowler
A sled has 2 skids while a prowler has 3 skids. They accomplish the same purpose as they both can be pushed or pulled, and for our purposes, I’m going to use the word “sled” for both implements.

Don’t Have a Sled?
If you don’t have a sled for pulling, you don’t need to go out and put down a bunch of cash for a new one. You can construct a “tire sled” from an old tire and an eyebolt - it’s cheap, pretty quick, and it works very well for pulls.

Watch the included video - Free (or cheap!) Strongman and Conditioning Equipment - to see what I’m talking about.

And now, let’s get to the harness options . . .

Sled Drag Harness - Waist Option
You’ll need a fairly large carabiner, and you’ll also need to get an automotive recovery strap, which you can obtain at pretty much any hardware store or by clicking here. Each end of the strap has a loop, and we’ll simply connect each loop to the carabiner, and then we’ll hook the carabiner to the sled. Simply place the middle of the recovery strap around your waist, and you’ve now got a cheap and easy-to-make harness for walking either forward or backward while dragging the sled.

Shoulder Harness option

Sled Drag Harness - Shoulder Option
For this version, you’ll need to get some 1-inch climbing webbing. This is the same tubular webbing that we use for making lifting straps (see the video below) - you can find this type of webbing at an R.E.I. or a something store, or you can get some on Amazon by clicking here. You could probably use wider material if you want to make it more comfortable, but conditioning is not terribly comfortable anyway, and this is what we had on hand, and it works well.

Take 7-8 feet of webbing and tie a water knot with the ends to create one long, continuous loop. To tie a water knot (other knots won’t work as well with webbing), check out the DIY Sled Drag Harness Options video above. Feeding that loop through the loop created by your recovery strap, you have now created “backpack straps,” so simply put one arm through each end of the backpack straps, and you’re all set to go.

Seeing this on video helps quite a bit, so as mentioned earlier, I’d recommend watching the short DIY Sled Drag Harness Options video above (this video was the basis for this article).

As always, we hope this helps you get stronger (or at least more conditioned!) and live better.

-Phil

PS: Whenever you want even more Testify in your life, here are some free resources:

  • Book a free intro and strategy session with us HERE.

  • Pick up a free copy of Testify’s Squat Guide: 12 Tips to Improve Your Squat Now HERE.

  • Get our free weekly email - containing useful videos, articles, and training tips - HERE.

  • Follow Testify on Instagram HERE.

  • Subscribe to Testify’s YouTube channel HERE.

(Some links may be affiliate links. As an Amazon Associate, Testify earns from qualifying purchases.)


At Testify, we offer small group training, private coaching (in-person or remotely via Zoom), online coaching, and form checks. Interested in getting stronger, looking better, and having more energy?

Gym Equipment: How to EASILY Move Stall Mats!

The classic rubber horse stall mat is extremely useful. It's also a pain to move . . . or is it? Starting Strength Coach Phil Meggers shows how to easily move a stall mat with just one person and without any special tools.

(A Blast from the Past video originally published on 09/10/22)


At Testify, we offer small group training, private coaching (in-person or remotely via Zoom), online coaching, and form checks. Interested in getting stronger, looking better, and having more energy?