Most Common Deadlift Error? (It's NOT What You Think)
/Are you making this deadlift error? It's extremely common, and it's making your deadlifts a lot harder (and last longer!) than they should be. Let's fix it.
At Testify, we offer small group training, private coaching (in-person or remotely via Zoom), online coaching, and form checks. Click the button below to get quality coaching from a Starting Strength Coach and start getting stronger TODAY.
Don't Let This Mistake RUIN Your Deadlift!
/With a very simple cue, Phil addresses a common deadlift mistake that lifters make when setting their backs and starting to pull the bar off the floor.
At Testify, we offer small group training, private coaching (in-person or remotely via Zoom), online coaching, and form checks. Click the button below to get quality coaching from a Starting Strength Coach and start getting stronger TODAY.
The Deadlift: Use Your Lats . . . But DON'T Think About Them
/
Do you think he’s thinking about his lats?
Got a barbell that wants to drift away from you when you deadlift? It’s a miserable experience. Let’s fix it fast.
(Watch the included video for a quick demonstration of how to do this.)
Your latissimus dorsi (your “lats”) form a connection between your upper arm and your spine, and because of this, they perform an important function in the deadlift - they keep the barbell close to you as you pull, i.e, they are responsible for keeping the bar over the middle of the foot.
However, if you tend to let the bar swing away from you when you pull, simply cueing yourself to “use your lats” may not be terribly useful as it can be difficult to picture what the lats are actually doing. With this in mind, let’s cover a useful mental picture as well as a few cues to help you use your lats . . . without ever thinking about them.

figure 1
Mental Picture
Instead of holding a barbell, picture yourself holding a pool noodle - you know, those flexible, floaty pieces of foam that you use to whack your friends over the head . . . in the pool. With this mental picture (Figure 1), use one of the following cues:
Cue #1: Bend the bar backward.
If you’re holding a pool noodle, you can actually bend it backward around your shins (as shown in Figure 2). This action of pulling back on the bar is performed by the lats, but you don’t need to think about your lats - you simply think about the action of bending the bar backward around your shins, and the lats will automatically do their job. As a side note, it is rarely useful to think about individual muscles while lifting - think “movements” not “muscles.”

Figure 2: Bend it backward
Cue #2: Pin it to your shins.
Same idea - just a different way to think about it. Cue yourself to keep the bar pinned to your shins, and if you accomplish this, your lats will be doing their job.
As always, we hope this helps you get stronger and live better.
-Phil
PS: Whenever you want even more Testify in your life, here are some free resources:
Book a free intro and strategy session with us HERE.
Pick up a free copy of Testify’s Squat Guide: 12 Tips to Improve Your Squat Now HERE.
Get our free weekly email - containing useful videos, articles, and training tips - HERE.
Follow Testify on Instagram HERE.
Subscribe to Testify’s YouTube channel HERE.
(Some links may be affiliate links. As an Amazon Associate, Testify earns from qualifying purchases.)
At Testify, we offer small group training, private coaching (in-person or remotely via Zoom), online coaching, and form checks. Interested in getting stronger, looking better, and having more energy?
Your Hideous Deadlift: Do It WRONG . . . to Get It Right?
/
Are you having a tough time setting your back correctly when deadlifting? To get it right, it can help to do it wrong first.
(Watch the included video near the end of this article for a quick demonstration of how to do this.)
In this approach, you're going to set the barbell on the pins (AKA “safeties) of your squat rack with some weight on the bar. You don’t need a lot of weight - just enough to allow yourself to put some tension on the bar (i.e., some upward pull) without actually allowing the bar to start moving upward.
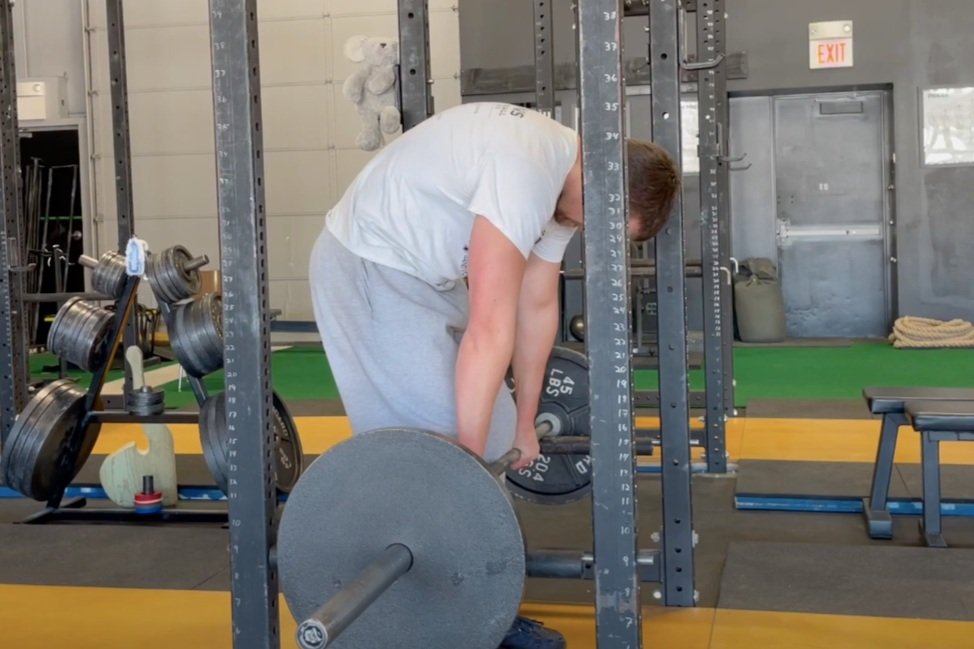
figure 1: his back is so terrible he won’t even show his face.
You're setting the bar on the pins because - when going through the 5-step setup for the deadlift (click here for a video) - most people find it easier to set the back correctly in rigid extension from this higher position as compared to the usual position wherein the plates are on the floor. In Figure 2, I have the barbell set just below my knees, but if you need to start higher than this, that’s perfectly acceptable.

figure 2: The bar is set just below the knees.
Back flexion - or rounding your back - is pretty easy for most people to achieve, and you're going to take advantage of that here. First, cue yourself to flex your back (Figure 3). In other words, you're going to do it wrong. Remember that a person who struggles with back extension can usually do this pretty well - in fact, it’s typically the default position - but if you need a little additional help, you can cue yourself to round your back as high in the air as possible or cue yourself to make your back into a mountain.

figure 3: back flexion
Additionally, make sure your shins stay in contact with the bar throughout this process, and the bar must remain motionless. From your hips on down, nothing should move or change shape.
Once you're in this position, you can feel what it’s like to do it incorrectly, so you're simply going to cue yourself to do the exact opposite of what you just did. You're going to push your belly down between your thighs, thus extending - or straightening - your back (Figure 4). Previously, your back was a mountain, and you now cue yourself to make it a valley (which is an overcue, but we’ll cover that in a bit).

figure 4: Back extension
Perform five reps alternating between the positions of flexion and extension. The cues now become: “Flex - Extend” or simply “Round - Arch.” The cues “arch” and “make a valley” are overcues as you don’t want your back actually arched or overextended. You just want it to be straight, but for someone who struggles with extension, these two overcues can be quite useful.
Once you can set your back in extension at a given pin height, move the pins lower and repeat the process - a set of five reps works pretty well. If you’re working without a coach, record yourself so you can watch it afterward and see if you were indeed setting your back correctly. Once you’ve “graduated” from a certain height, continue to work lower and lower until you’re setting up correctly for a regular deadlift with the plates on the floor.
As always, we hope this helps you get stronger and live better.
-Phil
PS: Whenever you want even more Testify in your life, here are some free resources:
Book a free intro and strategy session with us HERE.
Pick up a free copy of Testify’s Squat Guide: 12 Tips to Improve Your Squat Now HERE.
Get our free weekly email - containing useful videos, articles, and training tips - HERE.
Follow Testify on Instagram HERE.
Subscribe to Testify’s YouTube channel HERE.
(Some links may be affiliate links. As an Amazon Associate, Testify earns from qualifying purchases.)
At Testify, we offer small group training, private coaching (in-person or remotely via Zoom), online coaching, and form checks. Interested in getting stronger, looking better, and having more energy?
THIS is Destroying Your Deadlift
/
You’ve got deadlift problems. Perhaps your deadlift swings away from you when you break the barbell off the ground. Maybe you spend too much time between reps with the bar sitting on the floor. It may be that you find yourself moving your butt up and down in the neverending quest to find that just right position for your hips before you start the pull. The possibilities are endless.
Hey. Relax. It’s not you. It’s the floor.
No, I don’t mean you need a more robust lifting platform, or that there’s actually something wrong with your floor. I mean that the deadlift rests on the floor between reps - which makes it different from the squat, the press, or the bench press - and it’s this seemingly insignificant detail that might be causing you to ruin your deadlift.
Because the bar sits on the floor between reps, it permits you to perform all sorts of ridiculous antics while it’s down there. You rock forward, you lean on the bar, you rock back, you take three thousand breaths before setting your back for the next rep - the list of potential shenanigans goes on. In short, you perform all sorts of unnecessary tomfoolery, and this is extremely detrimental to your deadlift.
You’ve never even dreamed of doing this sort of nonsense in the squat. Because you are supporting the bar all of the time in the squat, you are highly motivated to be efficient between reps. Of course you stay balanced over your midfoot between reps - holding several hundred pounds on your back while balanced on the balls of your feet seems rather silly, so you never do it. You also spend relatively little time between reps - enough time to take a breath or two and get tight again - because you want to get the set over with and get that heavy bar off your back sometime today.
When you do silly things between reps of your deadlift - and this sort of thing happens all the time - you cause several problems. First - and this is the big one - all this unnecessary movement greatly reduces your chances of getting in the correct position for the next pull. Second, you exhaust yourself. The bottom of the deadlift is the only resting position for a deadlift work set, but it’s a lousy resting position, and you already know this. You’re crouched over, so your back and legs get tired down there, and it’s not much fun breathing in that position for very long. Third, you make your work set take much longer than it should. Get the set done, already.
How can you fix this problem? Keep it simple and be religious about your 5-step setup.
The 5-step setup applies for the first rep, of course, but it is especially important for all subsequent reps. Here’s a quick recap (watch the included video for a better and more complete understanding), but it’s steps 3-5 that we’re going to focus on in the next section:
5-Step Deadlift Setup
Stance: Shins 1” inch from the bar. Narrow stance with toes slightly turned out.
Grip: Bend at the hips to grab the bar while keeping your shins as vertical as possible - do NOT touch the bar with your legs yet. (also, never push down on the bar, i.e., don’t rest with your own weight on the bar)
Shins: Bend your knees (i.e., drop your butt slightly) until your shins lightly touch the bar.
Chest: Squeeze your chest up to set your back.
Pull: Drag the bar up your legs.
We use the 5-step setup for every rep, but for every rep after the first one, steps 1 and 2 are already completed. They’re already completed because you’re going to set the bar down right over the middle of your foot (“stance”), and you’re not going to let go of the bar (“grip”). If you set the bar down a little out of position, that’s not a problem - simply roll the bar to the correct spot over the middle of your foot. Keep your shins OFF the bar while doing this, make sure that you are balancing on your midfoot (not the balls of your feet), and don’t push down on the bar (if anything, keep a little upward tension on the bar).

Is this fool setting up for his 1st rep . . . or has he just finished his 1st rep? you’ll never know, and that’s the way we like it.
Think of it this way: Set the bar down so that it looks like you’ve just completed steps 1 and 2 of your very first rep. If Lawrence takes a picture of you at this moment, he shouldn’t be able to tell if you’re about to do your first rep or if you’ve set the bar down after a rep.
If you do this, then the rest of the setup for that next rep is simple. It’s steps 3-5: shins lightly to the bar, squeeze the chest up, and pull.
Keep it simple, and keep it repeatable.
As always, we hope this helps you get stronger and live better.
-Phil
PS: Whenever you want even more Testify in your life, here are some free resources:
Book a free intro and strategy session with us HERE.
Pick up a free copy of Testify’s Squat Guide: 12 Tips to Improve Your Squat Now HERE.
Get our free weekly email - containing useful videos, articles, and training tips - HERE.
Follow Testify on Instagram HERE.
Subscribe to Testify’s YouTube channel HERE.
(Some links may be affiliate links. As an Amazon Associate, Testify earns from qualifying purchases.)