What is a Clean (AKA Squat Clean or Full Clean)? | Olympic Weightlifting Technique

What is a clean? How is it different from a power clean or hang clean? What is a squat clean? What is a full clean? Let’s dive in, and for a demonstration with explanation, watch the included (and short) video near the end of this article.

the lift starts with the bar on the floor (since “hang” is not present).

No “Hang”
We begin by looking at the words present or - in this case - not present in the name of the lift.

The word “hang” is not present, so the clean doesn’t start with the barbell hanging in the hands. Instead - by default - the lift starts with the bar sitting on the floor.

the lift is received in a full depth front squat (since “power” and “split” are not present).

No “Power” or “Split”
The words “power” and “split” are also absent, so the lift will not be received in the power position (i.e., a partial depth front squat), nor will it be received in the split position (i.e., with one foot in front of the torso and one foot behind the torso). As a result, and again by default, this means the lift will be received in a full depth front squat.

The fact that the clean is received in a full depth front squat is why the lift is also sometimes referred to as a full clean or a squat clean.

So . . . What IS a Clean?
Thus, a clean is a lift wherein the bar starts on the floor and is then accelerated upward, imparting enough momentum to the bar that the bar continues upward, whereupon it is then racked (AKA “caught” or “received”) in a full depth front squat position before it is then stood up.

As always, we hope this helps you get stronger and live better.

(Some links may be affiliate links. As an Amazon Associate, Testify earns from qualifying purchases.)

If you found this helpful, you’ll love our weekly email. It’s got useful videos, articles, and training tips just like the one in this article. Sign up below, and of course, if you don’t love it, you can unsubscribe at any time.


At Testify, we offer small group training, private coaching (in-person or remotely via Zoom), online coaching, and form checks. Would you like to get quality coaching from a Starting Strength Coach?

Spotting the Bench Press | You're Doing It WRONG!

Spotting the bench press isn't complicated, but people do it wrong all the time. In under 2 minutes, we cover some basic mistakes as well as how to spot the bench correctly.

(A Blast from the Past video originally published on 05/28/22)


At Testify, we offer small group training, private coaching (in-person or remotely via Zoom), online coaching, and form checks. Click the button below to get quality coaching from a Starting Strength Coach and start getting stronger TODAY.

The Bench Press: You're Forgetting to Do This - Part 1

(A Blast from the Past article originally posted on 04/22/22)

You’re all set to bench - your grip is pronated, your shoulder blades are pinched back, and you’ve got your focal point nailed down, but you’re forgetting one thing . . .

Use. Your. Legs.

Don’t worry - Dave is NOT forgetting to do this.

When benching, drive up the bench with your legs. In other words, use your legs to drive your body in the direction of your head (i.e., “up the bench”). You should be driving in such a manner that - if the barbell wasn’t pinning your shoulders to the bench - you might actually start sliding up the bench.

Make sure you’re driving horizontally and not vertically - remember that the rep doesn’t count if your butt comes up off the bench. Drive with your legs throughout the entire rep - drive hard on the descent and drive even harder on the ascent.

Leg drive is easy to forget about - especially if you’re new to the bench press - but it’s important. Your legs give you lateral stability (the bench doesn’t help much here as it’s not very wide), they support your arch, and they help make everything between your feet and your shoulders that much more rigid, which makes for a more stable platform from which to bench.

So use your legs next time, and if you find that you keep forgetting, write “leg drive” down in your training log as a cue for yourself next time.

As always, we hope this helps you get stronger and live better.

(Some links may be affiliate links. As an Amazon Associate, Testify earns from qualifying purchases.)

If you found this helpful, you’ll love our weekly email. It’s got useful videos, articles, and training tips just like the one in this article. Sign up below, and of course, if you don’t love it, you can unsubscribe at any time.


At Testify, we offer small group training, private coaching (in-person or remotely via Zoom), online coaching, and form checks. Would you like to get quality coaching from a Starting Strength Coach?

8 Tips to Breathe & Brace CORRECTLY When Lifting Heavy (Also: #1 Mistake!)

How and when should you breathe and brace when lifting weights? Whether you're training for general strength or for a sport such as weightlifting, powerlifting, strengthlifting, or strongman, the process is not complicated, but there's a lot of poor information out there to sift through, so Phil explains it all in this short video.


At Testify, we offer small group training, private coaching (in-person or remotely via Zoom), online coaching, and form checks. Click the button below to get quality coaching from a Starting Strength Coach and start getting stronger TODAY.

Testify Today - May 13, 2024

THIS WEEK'S SUBMISSION

From our video How to (EASILY) Put on Tight & Stiff Knee Sleeves (TWO TIPS) (click the title to watch):

Matt Ronan
Just used the tip of the lifting sleeves inside a Stoic sleeve. Worked perfectly! I was starting to think I might need to size up but this works great. Thanks Phil!

Phil
Excellent – I’m glad it worked well for you!


TESTIFY ONLINE COACHING

Stop spinning your wheels and start getting stronger working remotely with one of our Starting Strength Coaches. Click here to contact us and learn more.

Get Stronger. Live Better. Start today.


ARTICLES & VIDEOS

How to (EASILY) Put on Tight & Stiff Knee Sleeves (TWO TIPS)
What's the easiest way to put on knee sleeves - especially sleeves that are tight and stiff as with brands like SBD, Stoic, and Pioneer? Click here to watch.


EASY Way to Open Your Barbell Packaging | How to Unbox Your New Barbell
Stop prying staples open or twisting your barbell packaging. We've opened a lot of barbells, and this method is - by far - the quickest and easiest way to open your new barbell packaging. Click here to read.


Blast from the Past: Can't do a Chin-up or Pull-up? Do This!
Why can't I do a chin-up or pull-up, and what's the first step I should take toward the goal of getting my first chin-up or pull-up? Click here to watch.


Blast from the Past: Get the Most Out of Your Warm-up
Don't waste your warm-up! Phil explains how NOT to miss out on the valuable opportunity provided by your warm-up. Click here to read.


TESTIFY HOODIES ARE AVAILABLE!

Looking to train in style? Get yourself a Testify hoodie - in practically any color! Get yours today and represent your favorite gym.

Click here to head to the Testify Store.


WHAT'S COMING UP

The annual Testify Barbell MAYhem was a great event this weekend, and we are extremely thankful to everyone involved! Loaders, referees, table officials, those who helped setup and tear down - thank you so much!

Below are a few of our upcoming events, and you can find out what else is on the calendar by heading to our events page at www.testifysc.com/events.

Starting Strength Self-Sufficient Lifter Camp

  • May 18, 2024

  • Spend the day learning the Squat, Press, and Deadlift and how to self-evaluate your lifts while training in your garage or commercial gym without a coach.

  • Click here to register or for more information.

Testify Strongman Summer Showdown

  • June 22, 2024

  • Show up to lift, throw, carry, push, and pull big things, but most importantly, show up to have a great time with your fellow competitors and perhaps try something new!

  • Click here to register or for more information.

Testify IronFest VI

  • July 12, 2024

  • IronFest is a team-based strength meet wherein the contested lifts will be the squat, press, bench press, and deadlift. Competitors will form teams of 2 lifters/team and perform all 4 lifts; each lifter will perform one upper body lift and one lower body lift, and each lifter will receive 3 attempts for each lift.

  • Click here to register or for more information.


THIS WEEK’S CONDITIONING

Option 1
Sled
Outdoors:
10-20 x 25 yds EMOM at a weight of your choice

Every minute, push the sled 25 yards, i.e., if pushing the sled takes 20 seconds, then you have 40 seconds to rest. Perform 10-20 rounds.

Indoors:
10-20 x 100 ft EMOM at a weight of your choice

Every minute, push the sled 100 feet, i.e., if pushing the sled takes 20 seconds, then you have 40 seconds to rest. Perform 10-20 rounds.

Compare to 2024.03.11.

Option 2
Bike/row:
4 x 800m

Rest 3 minutes between each round. Score = slowest time.

Compare to 2024.02.19.

Option 3
Outdoors:
10 rounds:
25 yd yoke carry
Rest 1 minute

Indoors:
10 rounds:
30 yd yoke carry (15 yd down-back)
Rest 1 minute

Compare to 2024.01.22.

Option 4
10 x 50 ft farmer carry
Each carry is 25 ft down and 25 ft back and is for time. Rest 1 minute between carries.

Women: 97# per handle (80# of plates)
Men: 137# per handle (120# of plates)
(Note: Each handle weighs 17#.)

Compare to 2024.01.22.


As always, we hope this helps you get stronger and live better!

EASY Way to Open Your Barbell Packaging | How to Unbox Your New Barbell

Historically speaking, unpackaging a brand new barbell has been a fairly horrific experience. The method covered in this article, however, is going to change your life (better yet, watch the included video for a demonstration).

If you’ve bought a new barbell, you already know what I’m talking about, and if you haven’t bought one but are going to purchase one soon, you’re about to experience this cardboard-and-metal terror.

A new barbell comes in a thick cardboard tube, and it has a metal end cap or insert at each end of the tube. Each manufacturer does things a bit differently, but typically, the end cap will be anchored in place very securely with staples or some other fastener.

On one hand, this is good - you want your barbell safe and unscathed while traveling to you. On the other hand, it’s a pain to open the tube as a result of this packaging. The manufacturer’s recommendation is usually to grab a utility knife, cut along one of the seams in the cardboard tube, and then twist to open the packaging (picture yourself opening a tube of Pillsbury dough, and you’ll get the idea well enough).

Don’t do this. I write - unfortunately - from personal experience, and this is a terrible way to open the packaging.

You can see the torn section where I had started the process with the old “screwdriver-and-pliers” method before looking for a better option.

Many people settle on using a flathead screwdriver to pry the staples open and out a bit, whereupon they use a needle nose pliers (or something similar) to finish pulling out the staples. This method works reasonably well, but it takes a while, which is annoying.

The last time I opened a barbell, I had used this screwdriver-and-pliers method on the first of several staples when I thought I’d take a look on the web and see if anyone had come up with a better method . . . and indeed someone had. This method comes courtesy of Colin Burke and his video, and here’s how to do it:

Step 1
Grab a nail punch and a hammer. A flat head screwdriver will probably work if you don’t have a nail punch.

Note: This is the part where I should tell you not to use a flat head screwdriver for this task as you might damage the screwdriver. With that said, if I didn’t have a nail punch, I would certainly have used a flat head screwdriver.

step 2: Use a hammer and nail punch to tap the staples through.

Step 2
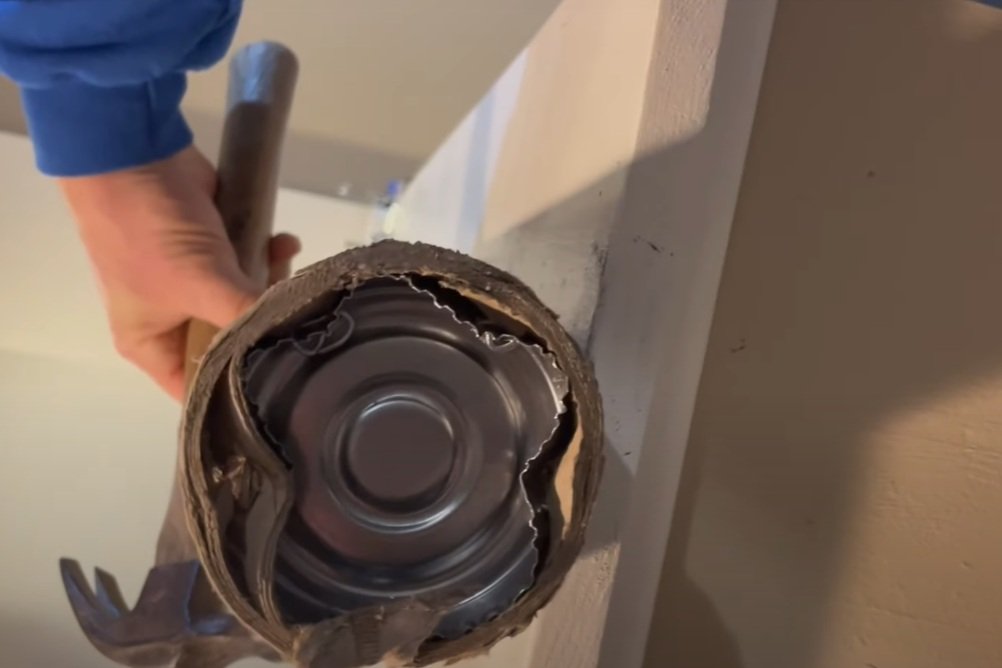
Set the tip of the nail punch on top of a staple and then use the hammer to tap that staple several times until the staple has broken through the cardboard (at which point it is no longer anchoring the end cap to the cardboard tube). Repeat this process with all of the staples.

After step 2, all staples have been pounded through.

Step 3
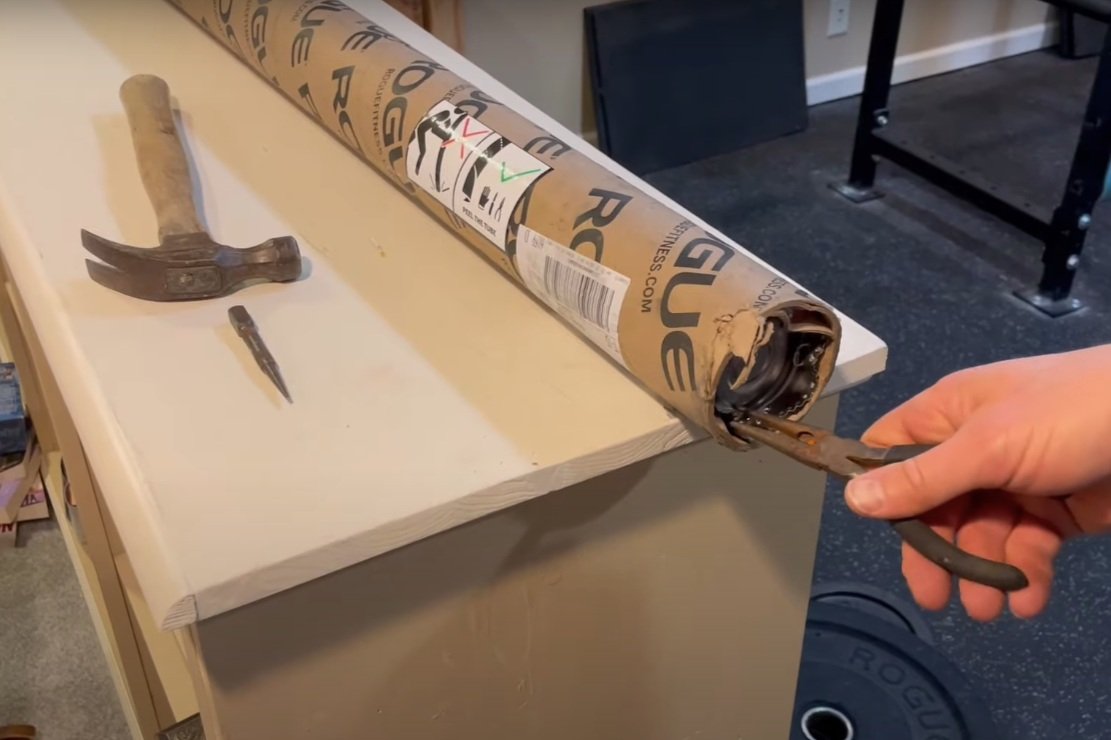
Once the staples have all been pounded through, the end cap is still wedged into place but is no longer attached to the tube, so use a pliers (needle nose pliers or otherwise) and simply pull the end cap out.

step 3: Use pliers to pull out the end cap

Step 4
Set the open end of the cylinder on the floor, lift up the other end, and pull the tube up and back until the barbell is completely out of the packaging (don’t let the bar drop to the floor).

Step 4: allowing barbell to slide out of tube

This process requires only a few tools, it’s quick, and most importantly - it’s easy. After unpackaging a barbell with this method, you’ll never go back to the cut-and-twist and screwdriver-and-pliers methods again.

As always, we hope this helps you get stronger and live better.

(Some links may be affiliate links. As an Amazon Associate, Testify earns from qualifying purchases.)

If you found this helpful, you’ll love our weekly email. It’s got useful videos, articles, and training tips just like the one in this article. Sign up below, and of course, if you don’t love it, you can unsubscribe at any time.


At Testify, we offer small group training, private coaching (in-person or remotely via Zoom), online coaching, and form checks. Would you like to get quality coaching from a Starting Strength Coach?