4 Tips for a Better Bench Press
/
(A Blast from the Past article originally posted on 12/10/21)
Let’s briefly cover a few tips to help you achieve a better, stronger bench press.
Tip #1: Grip
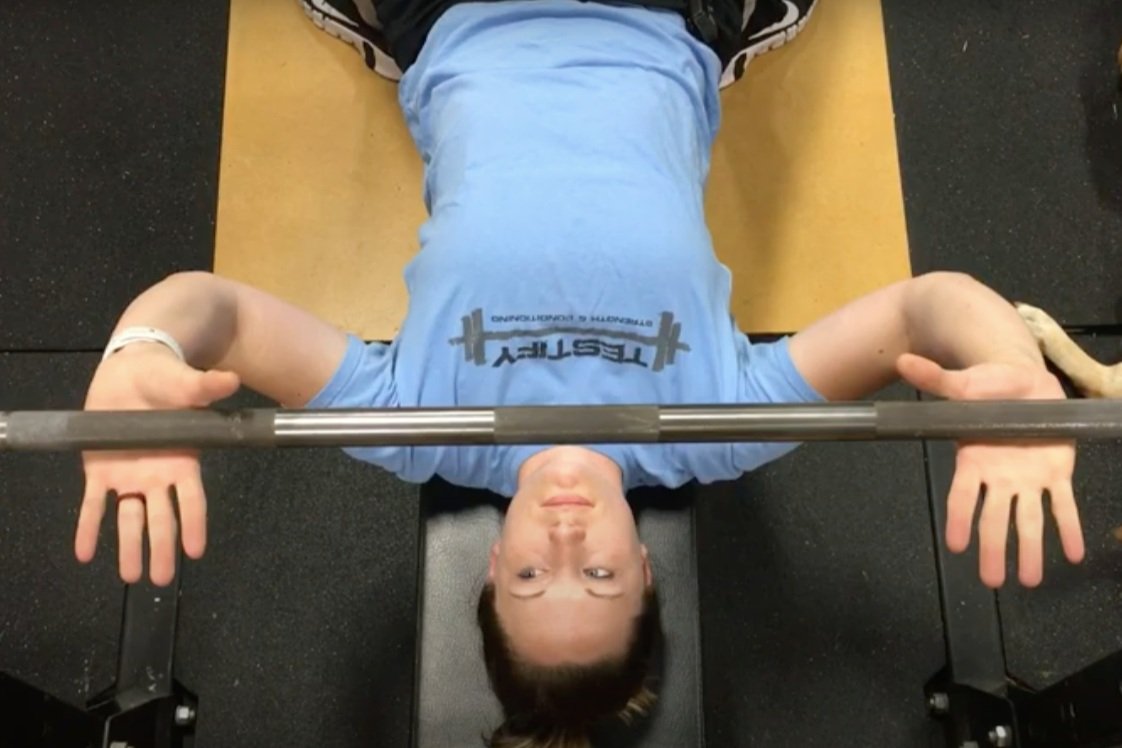
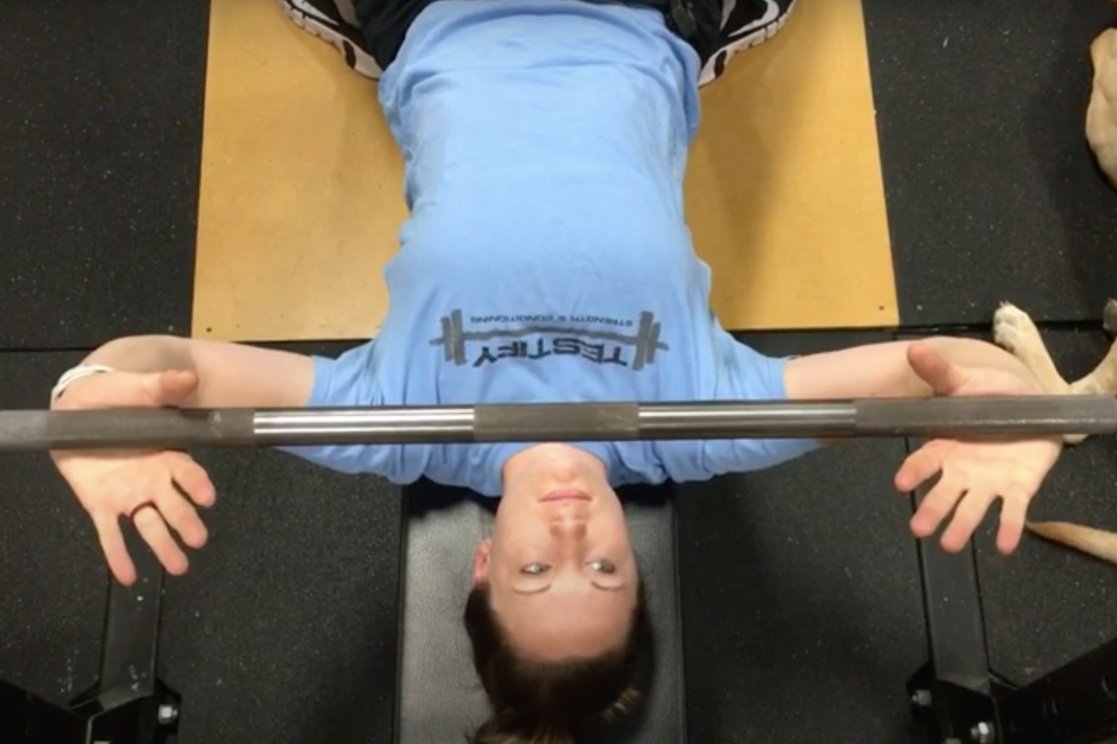
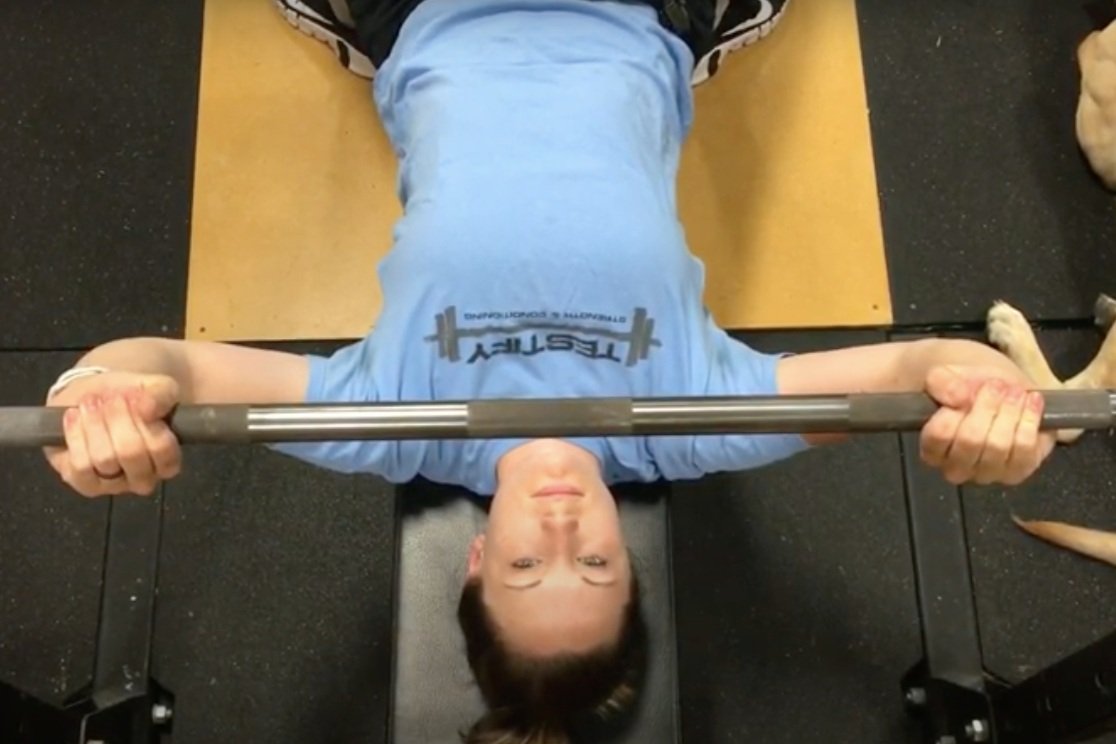
Take your grip so that the barbell rests on the base or heel of the palm, i.e., directly over the bones of the forearm. This is the best position for efficient force transfer between you and the bar.
To do this, simply pronate your hands slightly by internally rotating your arms a bit and then squeezing the bar tightly with your fingers. (scroll through the photos below for a demonstration)
Tip #2: Retract Your Shoulder Blades
For demonstrative purposes, imagine that you’re sitting upright (Figure 2), and there is a pen oriented vertically between your shoulder blades. You want to try and pull your shoulder blades back (i.e., retract your shoulder blades) so that the pen is pinched in place.

figure 2: at left, Becky demonstrates protracted shoulders (bad), and at right, becky demonstrates retracted shoulders (much better).
Now, simply perform that same motion (lying down, of course) when setting up for your bench press. Retract your shoulder blades before you unrack the bar, and then re-retract your shoulder blades after the unrack as well in case you lose a bit of shoulder positioning during the unracking process. Some people find the uprights of the rack useful to assist the process of setting the shoulders. Then, keep your shoulders retracted throughout your set (and re-retract them between reps if they get a bit out of position).
Tip #3: Leg Drive
Drive up the bench with your legs, i.e., use your legs to drive your body horizontally in the direction of your head (“up the bench”). The drive is horizontal, not vertical, so don’t lift your butt up off of the bench (the rep doesn’t count if you do that). Engage your legs before the start of each rep and drive up the bench throughout the entire movement (not just on the ascent).
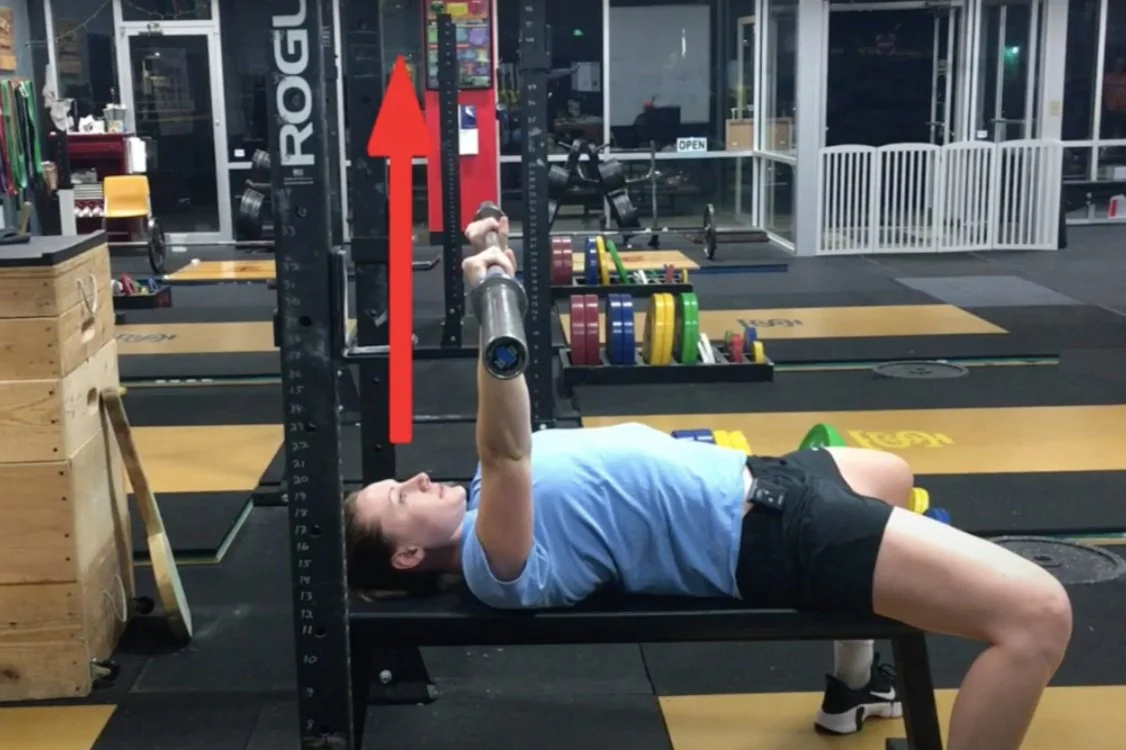
figure 2: Becky stares at the ceiling
Tip #4: Focal Point
Find a point directly above you on the ceiling and stare at that point throughout the entire set (Figure 2). Before you start your first rep, you can see the bar in your periphery, and the bar needs to finish in that same spot each time. A stationary reference point makes for a more consistent and efficient bar path, so we watch the immovable ceiling and not the moving bar.
We hope these tips help you get stronger and live better!
(Some links may be affiliate links. As an Amazon Associate, Testify earns from qualifying purchases.)
If you found this helpful, you’ll love our weekly email. It’s got useful videos, articles, and training tips just like the one in this article. Sign up below, and of course, if you don’t love it, you can unsubscribe at any time.
At Testify, we offer small group training, private coaching (in-person or remotely via Zoom), online coaching, and form checks. Would you like to get quality coaching from a Starting Strength Coach?
Why You Must NOT Use Your Shoulders in the Deadlift
/Phil covers two mistakes lifters commonly make with their shoulders when deadlifting.
At Testify, we offer small group training, private coaching (in-person or remotely via Zoom), online coaching, and form checks. Click the button below to get quality coaching from a Starting Strength Coach and start getting stronger TODAY.
The Testify Christmas Chronicle - December 25, 2023
/
THIS WEEK'S SUBMISSION
From our video TRAINING LOG: How to Keep a Training Log and Why You Should (Lifting Gear Series) (click the title to watch):
Mark Dawson
Hi, at 4:08 you say reps always go second and then proceed to write the warm up with the reps second, as you said, but now the sets are moved to the end after the reps unlike your first entry. Is this standard format? Just a little confusing. Thanks.
Phil
Solid question, and yes, that's the standard format (and one of the reasons for that is given a bit later when I mention that if only 1 set is performed, the # of sets can be left off). Specifically, there are two formats which make up the standard:
Sets x reps (if no weight is listed)
Weight x reps x sets (if a weight is given)
This is addressed very briefly at the 6:02 point and explained more completely in our video on this topic:
Reps are Always Second! The #1 Mistake You're Making in Your Training Log
https://youtu.be/xr4_gIWDntw
I hope this helps!
ARTICLES & VIDEOS

12 Days of a Lifter's Christmas
Shopping for a Christmas gift for that lifter in your life? Maybe you're just shopping for yourself. In either case, we cover 12 gift ideas for productive training. Click here to watch.

Correct Grip for Snatch, Clean, and Jerk
Gripping the bar for the Olympic lifts shouldn't be complicated, but there are a few simple things you must do to ensure you're getting the most out of your lifts. Click here to read.

Blast from the Past: Taping Your Thumbs for the Hook Grip
In less than 3 minutes, Phil shows you 2 easy ways to tape your thumbs for the hook grip, whether you're snatching, cleaning, or deadlifting. Milo tries to help, too. Click here to watch.

Blast from the Past: Fix Your Early Arm Bend on Your Cleans and Snatches!
Struggling to keep your arms straight on your cleans and snatches? We provide 4 cues to help avoid that power leak as well as the inconsistency it often brings. Click here to read.

NEW TESTIFY HOODIES ARE AVAILABLE!
Looking to train in style and comfort this winter? Get yourself a Testify hoodie - in practically any color! Get yours today and represent your favorite gym.
Click here to head to the Testify Store.
WHAT'S COMING UP
Reminder: Below are the hours for the weeks of Christmas and New Year's (you can also find these on our Location & Hours page). Any days not listed retain their normal hours.
Christmas Week (2023)
Monday, 12/25/23: Closed
Tuesday, 12/26/23: 4:00 p.m. - 7:30 p.m. (closed in the morning)
New Year’s Week (2023-2024)
Saturday, 12/30/23: Regular Hours
Monday, 01/01/24: Closed
Tuesday, 01/02/24: 4:00 p.m. - 7:30 p.m. (closed in the morning)
Below are a few of our upcoming events, and you can find out what else is on the calendar by heading to our events page at www.testifysc.com/events.
Free Intro to Squat Session
January 6, 2024
Are you interested in getting stronger? Book your free "Intro to Squat" session and learn to squat, meet some of our coaches, and see the gym! All ages and abilities are welcome.
Click here to book your session.
Testify Leprechaun Lift-off
March 16, 2024
Want to join us for the annual Testify Leprechaun Lift-off? Of course you do! This is a weightlifting meet, so the contested lifts are the snatch and clean-and-jerk.
Click here to register or for more information.
Testify Strengthlifting Challenge
April 6, 2024
The annual Testify Strengthlifting Challenge is back, and we invite you to be a part of it! This is a strengthlifting meet, which means the contested lifts will be the squat, press, and deadlift.
Click here to register or for more information.
THIS WEEK’S CONDITIONING
Option 1
Sled Pyramid – 4, 5, or 6 tiers
Go up and down a 4, 5, or 6 tier “sled pyramid.” The distance for each round is 80 m indoors (a down-back on the 40m course) or 200 ft outdoors (2 down-backs on the 50 ft course). Rest as needed.
For example, Bob does the following (4 tiers):
Round 1: Empty sled
Round 2: 25#
Round 3: 50#
Round 4: 75#
Round 5: 50#
Round 6: 25#
Round 7: Empty sled
Compare to 2023.10.23.
Option 2
Bike/row:
4 x 800m
Rest 3 minutes between each round. Score = slowest time.
Compare to 2023.10.02.
Option 3
Outdoors:
10 rounds:
25 yd yoke carry
Rest 1 minute
Indoors:
10 rounds:
30 yd yoke carry (15 yd down-back)
Rest 1 minute
Compare to 2023.09.04.
Option 4
10 x 50 ft farmer carry
Each carry is 25 ft down and 25 ft back and is for time. Rest 1 minute between carries.
Women: 97# per handle (80# of plates)
Men: 137# per handle (120# of plates)
(Note: Each handle weighs 17#.)
Compare to 2023.09.04.
Correct Grip for Snatch, Clean, and Jerk
/When gripping the bar for the Olympic lifts (i.e., the snatch and the clean-and-jerk), there are a few special considerations to bear in mind, so let’s address these.
This is the third and final article in our series on the correct grip for each lift. In the first article, we discussed the compression grip, which is useful for pressing movements such as the press and bench press, and in the second article, we covered the tension grip, which is useful for pulling movements such as deadlifts, cleans, and rows.
#1: Chalk
Use it.
Hopefully, all of this goes without saying, but sadly, that is often not the case. Chalk is useful for all of the lifts (both pushing movements and pulling movements), but it is especially useful for pulling movements like the deadlift and - in this case - the snatch and the clean. Specifically, chalk is useful for friction, so it contributes mightily to your ability to securely grip the bar.
If you’re training efficiently, you go through more chalk in a weightlifting (AKA Olympic lifting) session than you do in a strength training session (deadlifts, squats, presses, etc.). When training the Olympic lifts, you perform a lot of singles, doubles, and triples, so there is quite a bit of gripping and re-gripping of the barbell, and as a result, you go through a healthy dose of chalk. It doesn’t need to be caked on your hands, but chalk up on a regular basis.
#2: Hook Grip
For every single snatch and clean you perform for the rest of your life, use the hook grip (this doesn’t apply to the jerk).

Figure 1: The hook grip
Don’t use a double overhand grip, don’t use an alternate grip (AKA mixed grip or switch grip). Use the hook grip, i.e., the grip wherein your thumbs go on the bar first, and your fingers go over your thumbs (Figure 1).
The hook grip video included below goes more in-depth on how and why we hook grip, but suffice to say we use it because, although the Olympic lifts are not as heavy as a deadlift (which certainly requires a modified grip such as a hook or alternate grip), they must be pulled quickly. Because they have to be accelerated, your grip will be compromised if you don’t modify your grip.
With this in mind, get used to the hook grip right away. Start hook gripping your snatches and your cleans immediately at the outset of your training.
#3: Hook Grip and the Snatch
As discussed, you hook grip when you snatch, but when you rack the bar overhead, you may or may not keep the hook grip.
Some lifters may need to let the thumb slip out of the hook grip, and to determine whether or not this applies to you, keep the hook grip (when racking the bar) at first, and you’ll know pretty quickly if you need to make a change. If you experience discomfort when racking the bar overhead, or if keeping the hook grip is slowing down your turnover, then you’ll need to let the thumb slip out of the hook grip on the turnover (i.e., transition).
Note that when letting the thumb slip out from the hook, you don’t actually release the grip. Admittedly, this process is often referred to as “releasing the hook grip,” but all you simply do is allow the thumb to slip out of the hook grip while maintaining a solid purchase on the bar (refer to the video below to see how this is done).
To recap, try keeping the hook grip at first, and if that doesn’t work, let the thumb slip out of the hook as you rack the bar.
#4: Hook Grip and the Clean
Unlike the situation with the snatch, you always “release the hook grip” when performing the clean. Specifically, let the thumb slide out of the hook during the turnover (AKA transition), i.e., as your elbows rotate forward and up and as you rack the bar on your shoulders (Figure 2).

Figure 2: Maddie has released the hook grip (incidentally, she has also let her pinky slip off the bar, which is unimportant).
Attempting to keep the hook grip when racking the bar results in a slower turnover that is very often uncomfortable or even painful on the elbows and wrists. Because of these issues, keeping the hook results in a greater likelihood of missed lifts, so with this in mind, be sure to release the hook on your cleans.
#5: Hook Grip and the Jerk
It doesn’t make any sense to use the hook grip on the jerk, so don’t do it (Figure 3).
When you prepare for the jerk, the bar is sitting on your shoulders since you just cleaned it, and since you read tip #4 above, you’ve already released your hook grip. Additionally, the hook grip is useful for pulling movements (e.g., deadlifts, snatches, and cleans) and completely useless for pushing movements like the jerk, so attempting to regain the hook grip before performing the jerk is pointless and - even worse - a waste of time and energy.

figure 3: brianne wisely avoids the hook grip when jerking.
No hook grip on jerks.
As always, we hope these tips help you get stronger and live better.
(Some links may be affiliate links. As an Amazon Associate, Testify earns from qualifying purchases.)