Testify Union - July 31, 2023
/THIS WEEK'S SUBMISSION
From our video Knee Sleeves: What, Why, and When (click the title to watch):
5.7 hemi
Do the knee sleeves affect quad activation in the squat? I'd imagine if they're aiding knee extension they would take away from the workload on the quads.
Phil
Nah - knee sleeves will provide some compression and warmth for the joint, which makes things more comfortable, but they're not providing an appreciable amount of assistance to knee extension.
Now, knee wraps, on the other hand, specifically the competition version (read: rather thick and extremely tight and restrictive) used by equipped powerlifters will absolutely aid in knee extension. As they stretch on the descent, they store potential energy, which is then used to come back up out of the hole. Of course, this is the point of such a wrap as they are legal in equipped powerlifting (as opposed to raw powerlifting, where only knee sleeves are permitted) and help lift more weight.
Even with this in mind, competition knee wraps won't necessarily reduce quad activation because the lifter will simply lift more weight. Simplistic example here with an arbitrary numbers, but I think it will do the job: 90% "quad activation" without knee sleeves = 400 lb squat while 90% "quad activation" with knee sleeves = 450 lb squat since the sleeves provide the extra 50 lb.
And . . . all this said, we don't train anyone who does equipped powerlifting at Testify, but you'll recognize competition wraps at a meet right away - it visibly affects how stiff someone's knees look when they walk.
Short version: I'd recommend knee sleeves, and I'd stay away from competition wraps unless you want to do equipped powerlifting. (Training wraps are fine - they're thinner than competition wraps and will function like knee sleeves.)
Sorry for the long answer.
Viraj V
nicely explained
Phil
Thanks very much.
ARTICLES & VIDEOS

The BEST Conditioning Tool NOBODY Uses
What's the most effective conditioning tool that people hardly ever use? Learn what it is, why it's so effective, how to program its use, and pick up some sample workouts as well. Click here to watch.

Training When It's HOT: 11 Lifting Tips in 4 Minutes
How to handle training when it's hot? Phil gives you 11 tips in less than 4 minutes. Click here to watch.

Easy Setup for Deadlift, Snatch, & Clean
Phil teaches you how to setup for your deadlift, snatch, and clean in a manner that is simple, efficient, and consistent. Click here to read.

Blast from the Past: 5 Ways You're Ruining Your Deadlift!
Quit making these mistakes when deadlifting! We cover 5 common deadlift errors and also cover how to fix these mistakes. Click here to watch.

Blast from the Past: The Clean: Landing Positions
Phil covers the three different landing positions for the clean as well as the advantages that go with each position. Click here to read.

NEW TESTIFY GEAR!
Baseball season is here, and so is Testify’s new 3/4 raglan shirt - in multiple colors! Get yours today and represent your favorite gym!
Click here to head to the Testify Store.
WHAT'S COMING UP
Below are a few of our upcoming events, and you can find out what else is on the calendar by heading to our events page at www.testifysc.com/events.
Deadapalooza! The Annual Testify Deadlift Festival
August 25, 2023
Deadapalooza is a strength meet wherein the only contested lift is - you guessed it - the deadlift. There will be one bar (possibly multiple bars if numbers dictate), and the meet will be conducted in a "rising bar" format, so the weight on the bar only goes up! It's a ton of fun, so come on out!
Click here to register or for more information.
Starting Strength Self-Sufficient Lifter Camp
September 23, 2023
Spend the day learning the Squat, Press, and Deadlift and how to self-evaluate your lifts while training in your garage or commercial gym without a coach.
Click here to register or for more information.
Testify Fall Classic
October 21, 2023
The Testify Fall Classic is back for 2023, and we invite you to be a part of it! This is a strengthlifting meet, which means the contested lifts will be the squat, press, and deadlift.
Click here to register or for more information.
IN OTHER NEWS . . .
There will be a small price increase for members who have grandfathered membership rates. Please be on the lookout for an email with the details (only members with grandfathered rates will receive an email from me). If you have any questions or concerns, please reach out to me at barb.mueller@testifysc.com.
Thank you for your understanding and commitment to getting stronger with us at Testify Strength & Conditioning!
Barb Mueller
barb.mueller@testifysc.com
THIS WEEK’S CONDITIONING
Option 1
Sled
Outdoors:
10-20 x 25 yds EMOM at a weight of your choice
Every minute, push the sled 25 yards, i.e., if pushing the sled takes 20 seconds, then you have 40 seconds to rest. Perform 10-20 rounds.
Indoors:
10-20 x 100 ft EMOM at a weight of your choice
Every minute, push the sled 100 feet, i.e., if pushing the sled takes 20 seconds, then you have 40 seconds to rest. Perform 10-20 rounds.
Compare to 2023.05.29.
Option 2
Bike/row:
3 rounds of:
8 x 20 sec on/40 sec off
Rest 3 min between rounds
Score = lowest distance
Compare to 2023.05.08.
Option 3
1. Work up to a heavy single on the axle clean-and-press (i.e., ground to overhead).
2. 5 x 100 ft Zercher carry (50 ft down-back). Add weight each round. Rest as needed.
Compare to 2023.04.10.
Option 4
Outdoors:
5 rounds:
15 cal row
50 yd sled push, 100#/50#
Indoors:
5 rounds:
15 cal row
100 ft sled push, 250#/125#
Push sled slow for recovery. Score is slowest row.
Compare to 2023.04.10.
Training When It's HOT: 11 Lifting Tips in 4 Minutes
/How to handle training when it's hot? Phil gives you 11 tips in less than 4 minutes.
At Testify, we offer small group training, private coaching (in-person or remotely via Zoom), online coaching, and form checks. Click the button below to get quality coaching from a Starting Strength Coach and start getting stronger TODAY.
Easy Setup for Deadlift, Snatch, & Clean
/Whether you’re deadlifting, cleaning, or snatching, we’d like a setup process that is as simple, efficient, and consistent as possible. With that in mind, we’re going to take the 5-step deadlift setup process and quickly learn how to apply it - with very minor modifications - to the clean and the snatch.
DEADLIFT SETUP
Let’s briefly recap the 5-step deadlift process, and for a more detailed treatment, you can watch the included video.
Step 1: Stance
The stance is narrow (heels about hip width apart), your shins are one inch from the barbell, which places the bar over the middle of your foot, and your toes are pointed out slightly (roughly 10-15 degrees).
Step 2: Grip
Bend over and take your grip on the barbell. Your grip is relatively narrow - just outside the legs. Don’t let your shins touch the bar during this step, and DO NOT move the bar (i.e., don’t let the bar roll forward or backward at all).

tyler demonstrates the deadlift start position and is ready to pull.
Step 3: Shins
Bend your knees slightly until your shins touch the bar (this means your hips should drop, but only a bit). Also, shove your knees out slightly - your knees should touch the insides of your arms. Again, do not move the bar.
Step 4: Chest
Squeeze your chest up to set your back in rigid, flat extension. Your hips DO NOT drop during this step, and you still DO NOT move the bar.
Step 5: Pull
Pushing the floor away from you with your legs, drag the bar up your legs until you’ve locked out the bar at the top of the lift.
CLEAN SETUP
Moving on to the clean, there are two small changes. Step 1 (stance) is the same, and we then encounter the first change in Step 2 (grip): your grip for the clean is one hand-width wider than it was for the deadlift.

maddie demonstrates the start position for the clean.
Step 3 (shins) brings about the other small change. You still bring your shins to the bar by bending your knees slightly, but since your grip is a bit wider, you also shove your knees out a little more than you did in the deadlift so that the knees still touch the insides of your arms.
After this, you then move on to Step 4 (chest) and Step 5 (pull).
SNATCH SETUP
Moving on to the snatch, we have three changes. The first change shows up right away in Step 1 (stance): point your toes out wider than they were in the deadlift and clean - roughly 30 degrees (you’ll see the reason for this shortly).
The second change arrives in Step 2 (grip): your grip is significantly wider than it was in the deadlift or the clean. It should be wide enough that the barbell hangs at the crease of your hips when you are holding the bar with straight arms in a completely upright (i.e., standing) position.

becky demonstrates the start position for the snatch.
The third and final change shows up in Step 3 (shins): once again, you still bend your knees to bring your shins to the bar, but since your grip is significantly wider than that of the deadlift or clean, you also shove your knees out significantly wider than you did with the other two lifts. This very noticeable “knees out” position is why you point your toes out quite a bit in Step 1 of the snatch setup.
After Step 3, you then move on to Step 4 (chest) and Step 5 (pull).
SUMMARY
To recap, the 5 steps are always as follows: stance, grip, shins, chest, and pull. However, the execution of certain steps changes due to the grip width of the clean and the snatch.
As always, we hope this helps you get stronger and live better.
-Phil
PS: Whenever you want even more Testify in your life, here are some free resources:
Book a free intro and strategy session with us HERE.
Pick up a free copy of Testify’s Squat Guide: 12 Tips to Improve Your Squat Now HERE.
Get our free weekly email - containing useful videos, articles, and training tips - HERE.
Follow Testify on Instagram HERE.
Subscribe to Testify’s YouTube channel HERE.
(Some links may be affiliate links. As an Amazon Associate, Testify earns from qualifying purchases.)
At Testify, we offer small group training, private coaching (in-person or remotely via Zoom), online coaching, and form checks. Interested in getting stronger, looking better, and having more energy?
5 Ways You're Ruining Your Deadlift!
/Quit making these mistakes when deadlifting! We cover 5 common deadlift errors and also cover how to fix these mistakes.
(This video is a Blast from the Past video originally published on 12/13/21.)
At Testify, we offer small group training, private coaching (in-person or remotely via Zoom), online coaching, and form checks. Click the button below to get quality coaching from a Starting Strength Coach and start getting stronger TODAY.
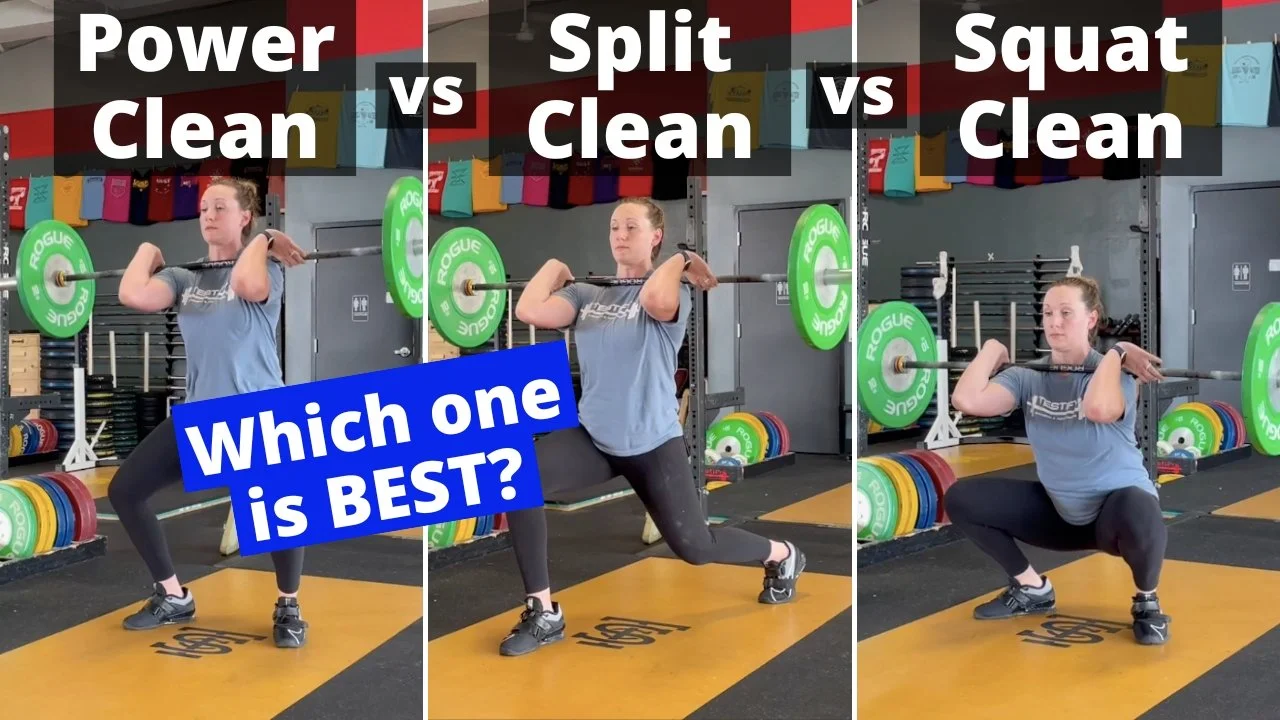
The Clean: Landing Positions
/
(A Blast from the Past article originally posted on 06/04/21)
A couple of weeks ago, we covered the three landing positions for the snatch. There are also three landing positions for the clean, and as with the snatch landing positions, each has its own advantages. Let’s briefly cover them here:
POWER CLEAN
Landing Position: Partial squat (i.e., partial-depth front squat)

Maddie performs a power clean.
Advantage: The power clean is the simplest to learn as your feet do not travel far from their original pulling position. It also doesn’t require learning how to perform a front squat as in the . . .
CLEAN (AKA full clean or squat clean)
Landing Position: Front squat (i.e., full-depth front squat)
Advantage: Of the three landing positions, the full clean allows lifters to lift the heaviest weights as this lower receiving position means the barbell doesn’t have to be lifted as high before racking it on the shoulders.

Maddie performs a clean.
SPLIT CLEAN
Landing Position: Split stance - nearly identical to the split jerk stance, but the split is often even longer and deeper.
Advantage: The split clean allows the lifter to drop further under the bar than the power clean without requiring the ability to drop into an front squat position as in the full clean. For this reason, the split clean - although potentially useful at all ages - is especially well-suited to older lifters.

Maddie performs a split clean.
You’ll notice that the word “hang” - as in hang clean or hang power clean or hang split clean - is conspicuously absent in this discussion. This is because “hang” refers to a starting position, not a landing position.
If “hang” is added as a prefix, then the lift simply starts with the bar hanging in the hands (usually at about mid-thigh height) as opposed to starting with the bar resting on the floor.
As always, we hope this helps you get stronger and live better.
-Phil
PS: Whenever you want even more Testify in your life, here are some free resources:
Book a free intro and strategy session with us HERE.
Pick up a free copy of Testify’s Squat Guide: 12 Tips to Improve Your Squat Now HERE.
Get our free weekly email - containing useful videos, articles, and training tips - HERE.
Follow Testify on Instagram HERE.
Subscribe to Testify’s YouTube channel HERE.
(Some links may be affiliate links. As an Amazon Associate, Testify earns from qualifying purchases.)