The Snatch & Clean: Stay Over the Bar!

DON’T CLEAN LIKE THIS DOOFUS.

When learning to snatch and clean (sometimes even after we’ve learned!), a common error is that of pulling the barbell around the knees or - equivalently - making the back angle become more vertical too soon.

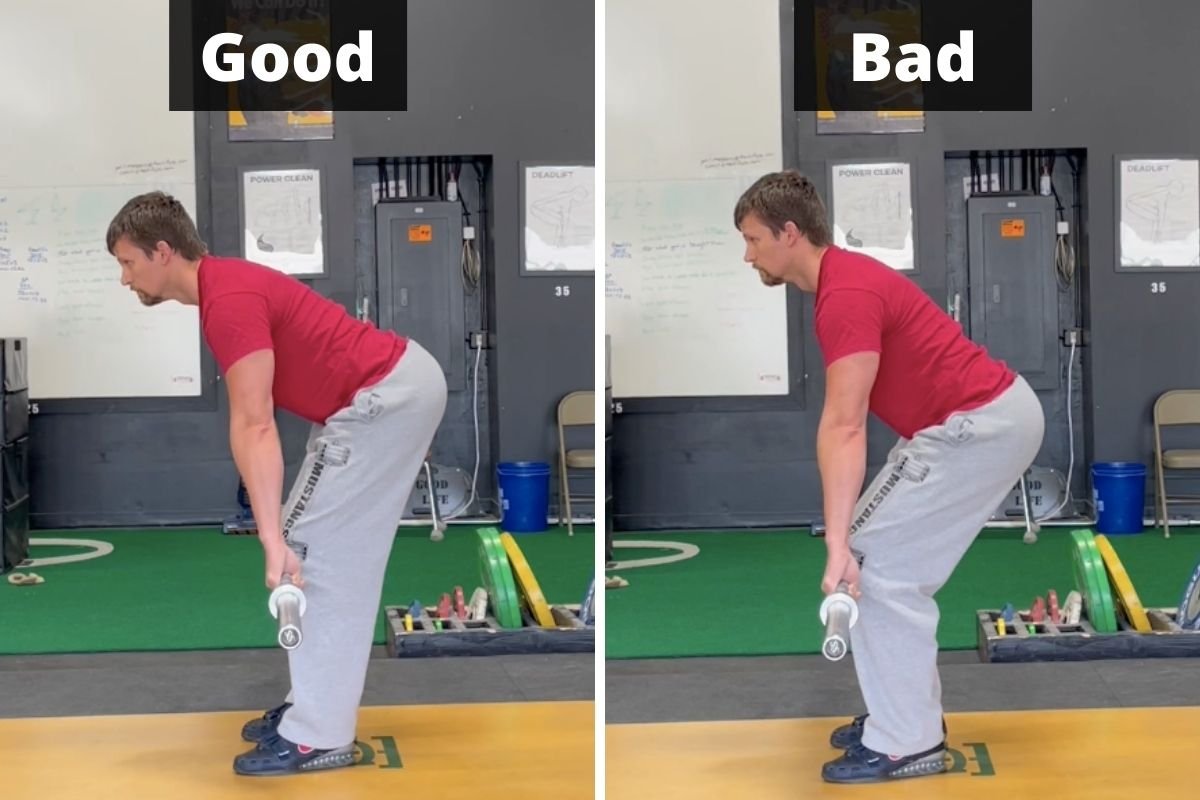
To fix this - cue yourself to “stay over the bar.” In other words, you need to keep your back relatively horizontal for longer than you think - in fact, roughly until after it passes your knees. Of course, the bar travels upward before this point, but it does so because of knee extension, i.e., you should be pushing the floor away from you like a leg press.

Here’s a mental picture: It’s raining, and you’ve decided to lift outside (not a good decision, mind you, but it’s too late now). Staying over the bar means that, from the start of the pull (i.e., your setup position) until just after it passes your knees, you want to stay leaned over so that your shoulders and upper back are keeping the middle of the bar from getting rained on (your shoulders will actually be slightly in front of the bar). If you raise your torso too soon, the bar gets wet, and that’s no good.

Eventually, your back angle will become more vertical as you reach what we call in the teaching progression the “jumping position,” but during the first part of the lift, stay over the bar. You’ll have a more vertical bar path (which means the bar doesn’t have to travel as far), and you’ll be able to accelerate the bar better as well.

We hope this helps you get stronger and live better!

(Some links may be affiliate links. As an Amazon Associate, Testify earns from qualifying purchases.)

If you found this helpful, you’ll love our weekly email. It’s got useful videos, articles, and training tips just like the one in this article. Sign up below, and of course, if you don’t love it, you can unsubscribe at any time.

At Testify, we offer small group training, private coaching (in-person or remotely via Zoom), online coaching, and form checks. Would you like to get quality coaching from a Starting Strength Coach?

Week 2022.03.07

Reminder: Please note that the gym will be closed for training this Saturday (03/12/22) as we are hosting the annual Testify Leprechaun Lift-off weightlifting meet.

This Week’s Conditioning

Option 1
Sled
Outdoors:
10 rounds of:
Push sled 100 ft
Pull sled 100 ft (hand over hand)

Indoors:
20 rounds of:
Push sled 50 ft
Pull sled 50 ft (hand over hand)

Compare to 2022.01.03.

Option 2
Bike/row:
12 min TT
Score = distance

Compare to 2021.12.13.

Option 3
5-10 rounds of:
30 sec ME tire flips
30 sec rest

Compare to 2021.11.15.

Option 4
Sandbag-over-bars
Set yoke at #33 for women or #35 for men.
1. 1 minute AMRAP
2. 5 rounds of 2 reps every 2 minutes (speed!)
3. 1 minute AMRAP

Weights
Female under 40 years
140 lbs and under: 75 lbs
140.1 lbs – 185 lbs: 100 lbs
185.1 lbs and over: 150 lbs

Female 40 years and over
140 lbs and under: 50 lbs
185 lbs and under: 75 lbs
185.1 lbs and over: 100 lbs

Male under 40 years
185 lbs and under: 150 lbs
185.1 lbs – 235 lbs: 200 lbs
235.1 lbs and over: 250 lbs

Male 40 years and over
185 lbs and under: 100 lbs
185.1 lbs – 235 lbs: 150 lbs
235.1 lbs and over: 200 lbs

Compare to 2021.11.15.

The Deadlift: Follow the Bar

This is hideous (on multiple levels). Don’t be like this fool.

Lowering the deadlift should be rather easy - after all, the tough part of the lift is already done, right? With that being said, setting the barbell down after the deadlift is locked out can be tricky for some lifters, especially new lifters.

Figure 1: How NOT to lower the deadlift. This nincompoop is trying to keep his torso vertical on the way down.

This is usually due to a misguided desire to keep the back as vertical as possible on the way down (Figure 1), although we’ve also seen it happen because someone is nervous about bending over with a heavy weight in hand.

Here’s a cue that can help simplify the process and potentially remove some nervousness: Follow the bar down.

At the top of the deadlift, you’ve already picked up the bar, which you know is the hardest part, and you were very bent over during a good portion of that process, so you also know - at least intellectually - that bending over again as you set it down should be even easier. But it’s sometimes tough to convince our bodies to follow that logic and actually bend over, so if the usual “hips back and bend at the the hips” cue isn’t working for you, just tell yourself to follow the bar down to the floor.

Figure 2: This . . . is much better. Hips back, chest down, and simply follow the bar down.

In other words, gravity will take the bar straight down to the floor, and you’re simply following the bar by keeping your hands attached to it (Figure 2).

Now, you’re not dropping the bar, but it should be relatively fast on the way down, and if thinking of the process as a controlled drop helps - at least for now - then go ahead and think of it that way. Simply follow the bar down and keep the rest of your body out of the way.

We hope this helps you get stronger and live better!

(Some links may be affiliate links. As an Amazon Associate, Testify earns from qualifying purchases.)

If you found this helpful, you’ll love our weekly email. It’s got useful videos, articles, and training tips just like the one in this article. Sign up below, and of course, if you don’t love it, you can unsubscribe at any time.


At Testify, we offer small group training, private coaching (in-person or remotely via Zoom), online coaching, and form checks. Would you like to get quality coaching from a Starting Strength Coach?

Week 2022.02.28

This Week’s Conditioning

Option 1
Sled Pyramid – 4, 5, or 6 tiers
Go up and down a 4, 5, or 6 tier “sled pyramid” – rest as needed. The distance for each round is 80 m indoors (a down-back on the 40m course) or 200 ft outdoors (2 down-backs on the 50 ft course). Rest as needed.

For example, Bob does the following (4 tiers):
Round 1: Empty sled
Round 2: 25#
Round 3: 50#
Round 4: 75#
Round 5: 50#
Round 6: 25#
Round 7: Empty sled

Compare to 2021.12.27.

Option 2
Bike/row:
8 x 30 sec on/2:00 off

Score = least distance covered in any 30 second interval

Compare to 2021.12.06.

Option 3
Outdoors:
5-10 rounds:
10 sledgehammer strikes (5R, 5L)
50 yd farmer carry (25 yd down-back)
Rest 1 minute

Indoors:
5-10 rounds:
10 sledgehammer strikes (5R, 5L)
100 ft farmer carry (50 ft down-back)
Rest 1 minute

Compare to 2021.11.08.

Option 4
1. 5 yoke carries @ 30 yd (15 yd downback) – work up to heaviest carry
2. 5 rounds of 5 reps on the axle “clean and press away” – work up to heavy set of 5

Compare to 2021.11.08.

Improve Your Squat in ONE Easy Step!

Want to improve your squat in one easy step? It’s ridiculously simple.

Squat with spotters.

Seriously, that’s it. Now, of course, squatting with safeties (AKA pins, crash bars, spotter arms) is just fine, and if you train on your own, that’s the only option you have. However, if you train with some other reasonably intelligent and educated lifters, get two of them to spot you.

One person stands on either side of you (watch the included video for more on how to spot the squat . . . and how not to spot the squat). Do not have a single person spot you from behind because that’s stupid. It’s common, but it’s still stupid (the physics of this situation becomes rather obvious and untenable with heavy loads . . . try holding 300, 400, or 500+ lb out in front of you, and you’ll quickly agree).

You’ll squat better because the pressure of having two people right next to you will force you to do so. You’ll focus better and work harder because you don’t want to fail and make your spotters actually take the bar. You’re using peer pressure for good instead of evil. This is a very real effect, and we see it all the time.

If you’re not used to being spotted when you squat, you probably won’t like it at first, but you’ll get used to it, and in the long run, you’ll squat better for having done it. We hope this helps you get stronger and live better!

(Some links may be affiliate links. As an Amazon Associate, Testify earns from qualifying purchases.)

If you found this helpful, you’ll love our weekly email. It’s got useful videos, articles, and training tips just like the one in this article. Sign up below, and of course, if you don’t love it, you can unsubscribe at any time.


At Testify, we offer small group training, private coaching (in-person or remotely via Zoom), online coaching, and form checks. Would you like to get quality coaching from a Starting Strength Coach?

Week 2022.02.21

This Week’s Conditioning

Option 1
Sled
Outdoors:
10 rounds of:
Push sled 100 ft
Pull sled 100 ft (hand over hand)

Indoors:
20 rounds of:
Push sled 50 ft
Pull sled 50 ft (hand over hand)

Compare to 2021.12.20.

Option 2
Bike/row:
4 x 800m

Rest 3 minutes between each round. Score = slowest time.

Compare to 2021.11.29.

Option 3
Outdoors:
10 rounds:
25 yd yoke carry
Rest 1 minute

Indoors:
10 rounds:
30 yd yoke carry (15 yd down-back)
Rest 1 minute

Compare to 2021.11.01.

Option 4
10 x 50 ft farmer carry
Each carry is 25 ft down and 25 ft back and is for time. Rest 1 minute between carries.

Women: 97# per handle (80# of plates)
Men: 137# per handle (120# of plates)
(Note: Each handle weighs 17#.)

Compare to 2021.11.01.