How to Use Lifting Straps

In a past article and a couple of videos, we’ve covered how to quickly and cheaply make yourself a pair of durable lifting straps. Today, let’s cover how to use them.

As is often the case, this process is best understood when you can see it, so I’d recommend watching one of the included videos.
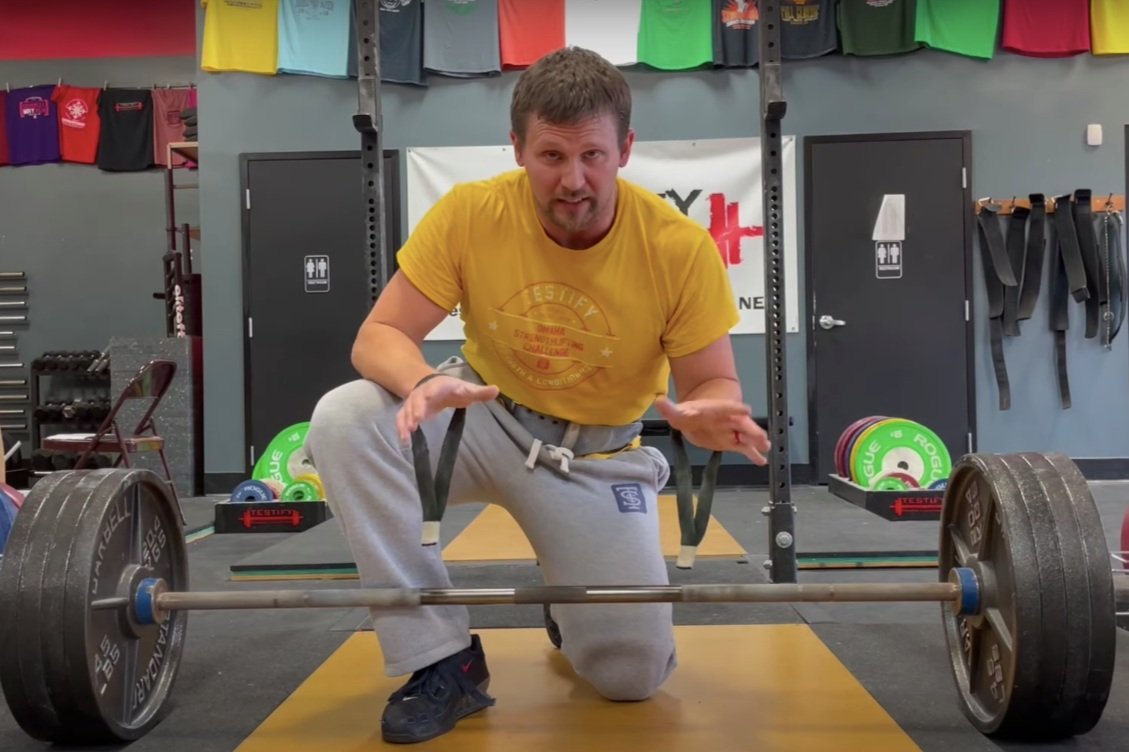
Step 1
Place the straps over both hands. The threads face up, and the smooth side of the straps (the side without the threads) should face forward.

This step assumes you’re using the type of DIY straps we make in this video (or a similar commercial design). If you’re using the “loop-and-cinch” style of strap such as this pair, you can move on to step 2, but make sure that your straps are oriented in the correct direction (click here to see a demonstration).
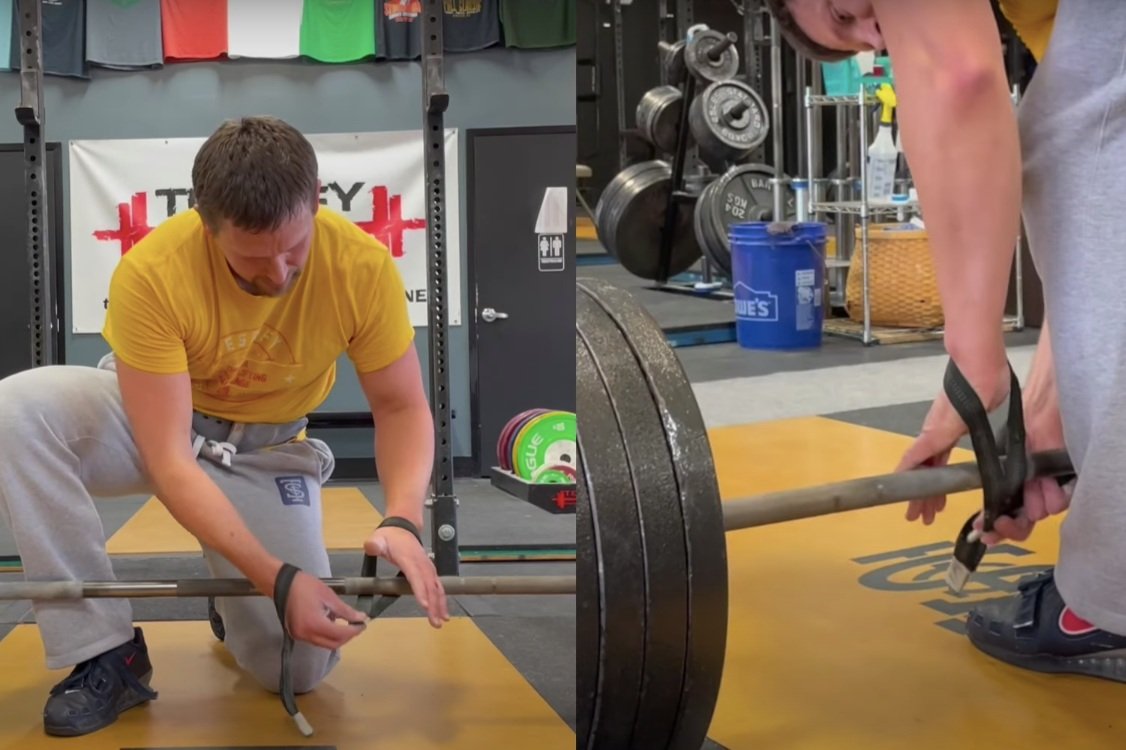
Step 2
Place your left hand on the barbell - your hand goes over the bar, and the strap goes behind the bar.
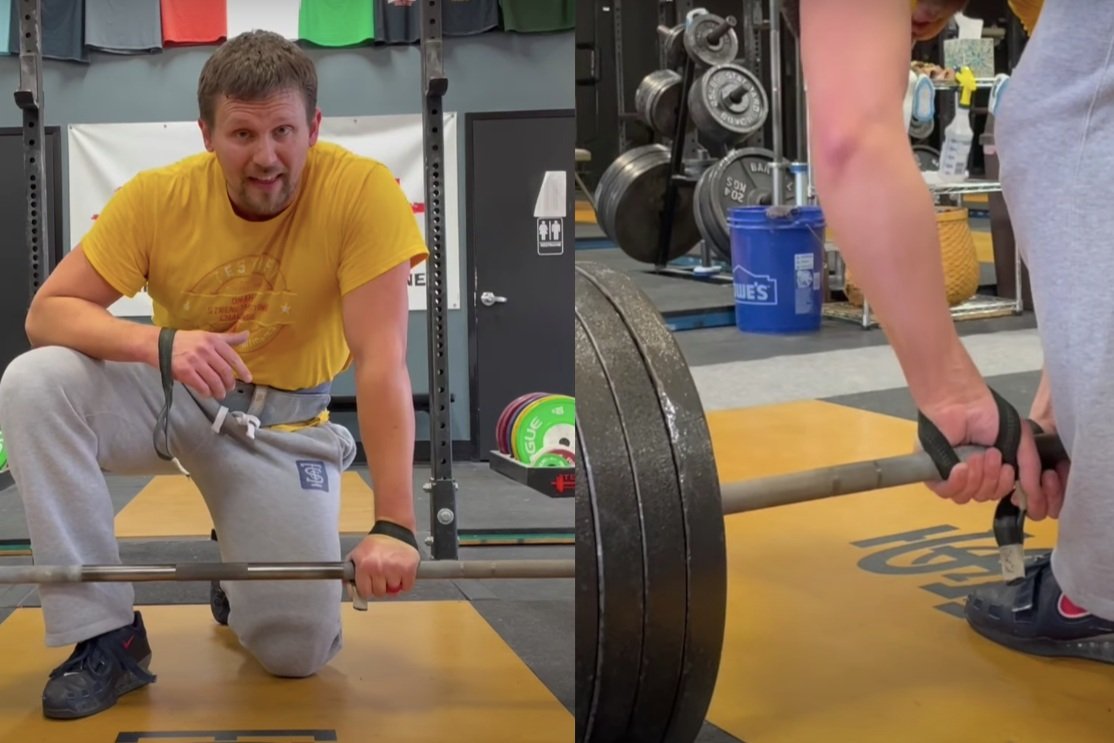
Step 3
Use your right hand to help wrap the strap around the bar once, pinning it into place with your left thumb.
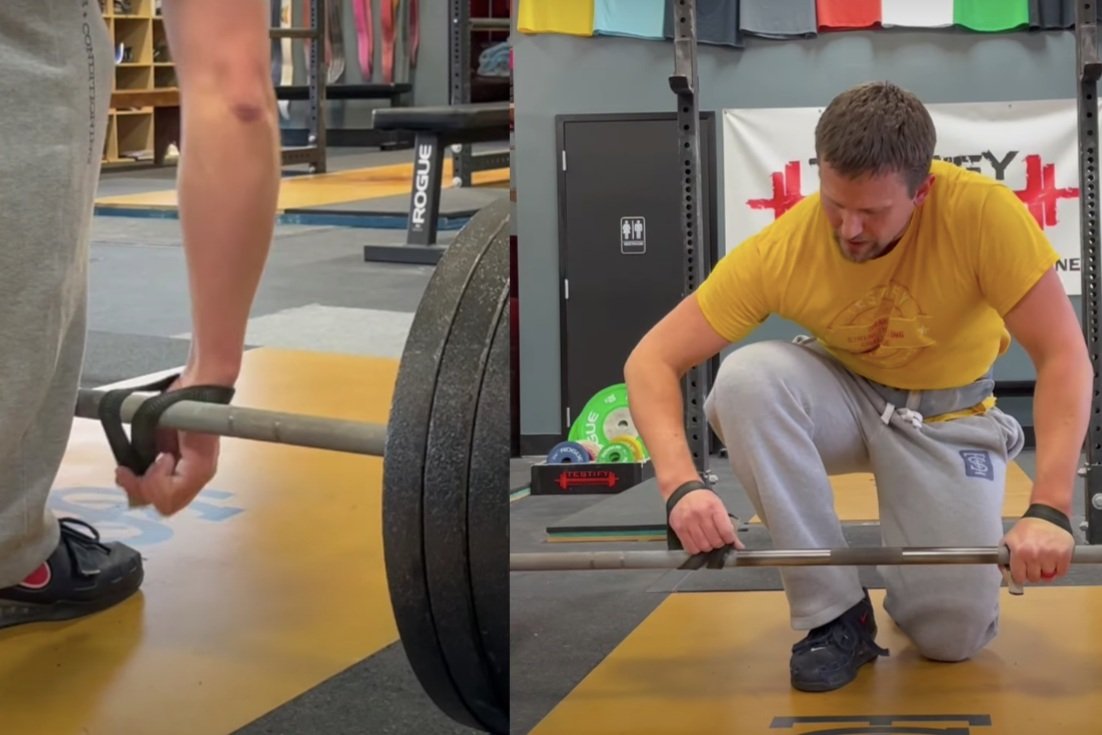
Step 4
Repeat steps 2 and 3 to get your right hand and its strap securely attached to the barbell, but note that the right hand will have to do this on its own as it doesn’t get any help from your left hand, which is already attached to the bar.

Step 5
When you tighten up the right strap (i.e., when you make it so that it’s wrapped snugly around the bar), you may find that you have to allow the left strap to loosen just a bit so that both straps have the same amount of “snugness” against the bar. Once that’s done, you can rotate both hands to tighten up both straps.

Step 6
Even though you’re using straps, be sure to still use chalk and grab the bar tightly. No hook grip is needed (don’t attempt a mixed grip either).

As always, we hope this helps you get stronger and live better.

(Some links may be affiliate links. As an Amazon Associate, Testify earns from qualifying purchases.)

If you found this helpful, you’ll love our weekly email. It’s got useful videos, articles, and training tips just like the one in this article. Sign up below, and of course, if you don’t love it, you can unsubscribe at any time.


At Testify, we offer small group training, private coaching (in-person or remotely via Zoom), online coaching, and form checks. Would you like to get quality coaching from a Starting Strength Coach?

Your Training Log - Part 2: How to Keep One

(If you like, you can scroll down to the end of this article and watch a video on this topic. This article is a Blast from the Past article originally posted on 09/04/20.)

In last week’s article, Your Training Log - Part 1: Just Do It, we covered the importance of keeping a training log. Now that you’re utterly and forever convinced of the wisdom of keeping a training log, let’s discuss how to keep one. Your log needs to contain several basic elements organized in a readable fashion, but it’s not a complicated process. Grab a plain old composition notebook, and let’s get started.

First, give each week its own page. We tend to think and plan in these chunks called weeks anyway, so it makes sense to organize our training log this way as well. If you complete all your training for a given week and you have extra space at the bottom of the page, don’t be tempted to start another week on the same page. Again, each week gets its own page - no matter what - so start a new page every time you start a new week. The blank space on the preceding page will remind you that you didn’t do your job last week, and hopefully, this will compel you to do better this week.

At the beginning of the week, divide your new page according to the number of days you train per week. For example, if you train three days per week, you’ll divide the page into three sections (horizontally or vertically - either will work). You can and will fit three or four days of training (even five!) onto one page, and allocating a specific amount of space to each day at the beginning of the week will ensure that you color inside the lines.

When training, label each lift, e.g., squat, press, deadlift, snatch, etc. Abbreviations are fine, but you need to be able to go back and understand what you’re written, so don’t get too clever there, Copernicus.

Next, write the goal - the prescription - for the lift you’re about to perform. If you’re planning to squat three sets of five reps for your work sets today, then simply write “3 x 5.” After that, write out your warm-ups and your work sets (remember, reps are always written second), and finally, write out what you’re going to lift next time. Here’s an example:

Squat
3 x 5 Today’s goal
----------
45 x 5 x 2
95 x 5 x 1
135 x 3 x 1 Warm-up sets
185 x 2 x 1
215 x 1 x 1
----------
240 x 5 x 3 Work sets
Next: 245

If you’re only doing one set of something, the “1” for the number of sets is optional (remember multiplying by “1” in school?), so you can leave that part out if you like. In that case, it looks like this:

Squat
3 x 5 Today’s goal
----------
45 x 5 x 2
95 x 5
135 x 3 Warm-up sets
185 x 2
215 x 1
----------
240 x 5 x 3 Work sets
Next: 245

Beyond this, you’ll also want to write down cues that you’re using or will use next time (“Midfoot!”), reminders (“Next time, put belt on for last warm-up and all work sets”), and even how the training session went (“Smoked it today!”). Keeping a PR sheet somewhere in your training log is also a great idea, and perhaps we’ll cover that in a future article.

Of course, you can keep a training log anyway you want to, but this is my article, so you’re getting my recommendations. If you’d like to do it differently, that’s fine . . . just don’t tell me.


At Testify, we offer small group training, private coaching (in-person or remotely via Zoom), online coaching, and form checks. Would you like to get quality coaching from a Starting Strength Coach?

Your Training Log - Part 1: Just Do It

(If you like, you can scroll down to the end of this article and watch a video on this topic. This article is a Blast from the Past article originally posted on 08/28/20.)

I was having a conversation with one of our members the other day (you know - not this day, but the other one), and this member  - let’s call him Bill - had come upon a startling revelation. Bill had recently gone through several workouts without using his training log, and when he started using it again, he immediately realized that not using his training log had been a huge mistake. He realized that - without the log - his lifting had been unfocused, and the weights were often incorrect. Bill even asked me to never let him get away with that again. Bill is a wise man.

When we train with weights, we do exactly that – we train. Training has a purpose - a goal in mind. To achieve these purposes, to work toward these goals, we need data, and this is where the training log comes in. Without the log (or journal, notebook, etc.), we quickly find ourselves adrift in a sea of barbells and weights with no direction whatsoever. We find ourselves lost in the Sea of Exercise . . . and there be monsters.

Mind you, there is nothing wrong with Exercise, and it's certainly better than Doing Nothing, but let us not confuse Exercise with Training. Exercise is what you do when you want to get hot and sweaty and tired and feel like you’ve accomplished something. Training is how you actually accomplish something. The log separates Training from Exercise.

The log is our history - it tells us where we've been, what we've done - our lifts, warm-up sets, work sets. But it is a more complete history than this - it also includes PRs, how we felt on certain days, how proud we were of our accomplishments, how utterly disappointed we were with our failures. If you had a poopy day squatting 185 lbs for your work sets, write it down in your training log (seriously . . . “this was a poopy day”). Success is magnified by knowing how far we’ve come, and on the day when 185 lbs becomes your second-to-last warm-up set (and that day will come), the knowledge that this weight used to be terribly heavy will remind you of the progress you’ve made.

The log is also our compass - it tells us where we’re going. We write down the weights for our next workout, yes, but we also write down our plans and our goals. I want to bench press three plates. I’m gonna deadlift 250 lbs at the next meet. I WILL get my first pull-up this year. Write this stuff down. All of it. Write down the date on which you set that goal. Someday, you’ll reach that goal, cross it out . . . and set another one.

Don’t kid yourself. If you want to exercise, go right ahead - you’ve got plenty of options. But if you want to put in the hard work of actually training, keep a log. You’ll thank me later, and your coach won’t lose his or her mind when you can’t remember what you’re supposed to squat today.

Next time . . . how to keep a training log (hint: it’s not complicated).


At Testify, we offer small group training, private coaching (in-person or remotely via Zoom), online coaching, and form checks. Would you like to get quality coaching from a Starting Strength Coach?

I Forgot My Belt! (Simple Lifting Trick)

(A Blast from the Past article originally posted on 01/08/20)

Do you ever forget to put your belt on for your heavier sets? Perhaps you forget to wear your wrist wraps every once in a while?

Problem solved

These types of situations tend to occur more often when you’re a newer lifter, but even an experienced lifter can forget a belt or wrist wraps every now and then.

If you find yourself in one of the above situations from time to time, try this: hang your belt and wrist wraps on your barbell between sets.

By doing so, you’ll be forced to grab them before starting your next set, and the problem is solved. The next time you lift, give it a try. Hope this helps!

(Some links may be affiliate links. As an Amazon Associate, Testify earns from qualifying purchases.)

If you found this helpful, you’ll love our weekly email. It’s got useful videos, articles, and training tips just like the one in this article. Sign up below, and of course, if you don’t love it, you can unsubscribe at any time.


At Testify, we offer small group training, private coaching (in-person or remotely via Zoom), online coaching, and form checks. Would you like to get quality coaching from a Starting Strength Coach?

Don't be a Noob: Loading the Bar

(A Blast from the Past article originally posted on 01/06/19)

You have probably noticed (hopefully!) that whenever we load metal plates on a barbell, we always load them so that the numbers printed on the plates face inward (Figure 1), i.e., the numbers of the plates on one end of the bar can “see” the numbers of the plates on the other end of the bar.

figure 1: ted demonstrates the proper method of plate loading on his 405 lb squat.

You may also have wondered to yourself, “Self, why do we always load the plates this way?”

We briefly allude to the primary rationale for this method of loading on everyone’s first day at Testify, but in case you’ve forgotten, let’s chat.

Each metal plate has a lip - a ledge - that makes grasping the plate easier. Loading a plate with the lip facing inward (i.e., away from you) allows your fingers to grasp the plate in a very secure manner. This secure grip is important since the most common injury in a weight room is not a back injury, it’s not a knee injury, and it’s not a wrist injury - it’s a broken toe (or other bone in the foot) caused by dropping a plate on one’s foot.

Every plate is easier to grasp with the numbers facing inward rather than outward, and this is especially true for the 25 lb and 45 lb plates, which - dropped from even a few inches up in the air - are superbly unforgiving to one’s tarsals, metatarsals, and phalanges (mind you, dropping the smaller plates can have some nasty effects as well). With this in mind, we always load the plates with the numbers facing inward.

What about the bumper plates, you say? Bumper plates have a lip on both sides (albeit a rather small one), so load them as you please. There’s no rules!

(Some links may be affiliate links. As an Amazon Associate, Testify earns from qualifying purchases.)

If you found this helpful, you’ll love our weekly email. It’s got useful videos, articles, and training tips just like the one in this article. Sign up below, and of course, if you don’t love it, you can unsubscribe at any time.


At Testify, we offer small group training, private coaching (in-person or remotely via Zoom), online coaching, and form checks. Would you like to get quality coaching from a Starting Strength Coach?

Lifting Shoes: What and Why

What are lifting shoes, and why should you use them? We’re going to cover the 3 features of a lifting shoe, why lifting shoes are beneficial, and we’ll also touch on what not to buy.

Feature #1: Sole
The first and most important feature of a lifting shoe is its rigid, non-compressible sole. This helps with force transfer, which is rather important when lifting heavy weights.

If you're going to squat, press, or clean-and-jerk in running shoes, you’ll find that doing so is similar to trying to do those while standing on a pillow - comfy on the feet, of course, but also rather silly. We would like to have a very rigid surface on which to lift so that we have efficient force transfer between us and the floor. A lifting shoe provides this. A regular shoe does not. 

Feature #2: Metatarsal Strap(s)
The second feature of a lifting shoe is either one or two metatarsal straps. These straps provide lateral support as well as arch support, and the presence of both types of support provide yet another reason why a regular shoe is not as good of an option as an actual lifting shoe.

To a certain extent, the metatarsal strap(s) will also prevent the foot from sliding forward, which is a nice feature to have when performing something like a split jerk.

Feature #3: Heel
The third feature you’ll notice on a lifting shoe is the slightly raised heel. Typically, a heel height somewhere between ½ inch and ¾ inch will work nicely. Some Olympic lifters may prefer a slightly taller heel, but this range serves most people quite well. The heel gets a little more quad involvement in the lift and also makes depth in the squat easier to achieve.

These 3 features will give you an idea of what to look for when you’re shopping for lifting shoes. A number of manufacturers make quality lifting shoes - Nike, Do-Win, Inov-8, and Adidas are just a few of the more well-known brands. Below are some of the shoe recommendations and links we usually send to new members as a starting point for shopping:

If you’re going to lift, wear lifting shoes. Runners wear running shoes, basketball players wear basketball shoes, and lifters wear lifting shoes. Once you’ve trained in lifting shoes, trying to lift in regular shoes (tennis shoes, running shoes, etc.) will feel like lifting while standing on a pillow.

Finally, a note on lifting in Chuck Taylors. Just . . . don’t. Chucks are the lifting shoe for people who started to think about lifting shoes but never completed the thought. They don’t have a rigid sole, they don’t provide any arch or lateral support, and they don’t have an elevated heel, so they fail all of the criteria listed above. For those who prefer to lift in a non-heeled shoe, there are options out there that provide a far more rigid sole, and for those who want to deadlift in an extremely low-profile (i.e., close to the ground) shoe, there are options out there that are far more low-profile.

Can you lift in Chucks? Of course you can. If LeBron James wore running shoes, he could still play basketball, and he would certainly still beat me in a game of 1-on-1 . . . but he chooses to play in basketball shoes. I recommend that you choose to lift in lifting shoes.

As always, we hope this helps you get stronger and live better.

(Some links may be affiliate links. As an Amazon Associate, Testify earns from qualifying purchases.)

If you found this helpful, you’ll love our weekly email. It’s got useful videos, articles, and training tips just like the one in this article. Sign up below, and of course, if you don’t love it, you can unsubscribe at any time.


At Testify, we offer small group training, private coaching (in-person or remotely via Zoom), online coaching, and form checks. Would you like to get quality coaching from a Starting Strength Coach?