BEST Strategy for a Stronger, Smoother Deadlift (6 Simple Tips)

Quit trying to yank or jerk your deadlifts off the floor.

Heavy weights cannot be yanked off the floor. Light weights can, of course, but in doing so, you’re accidentally practicing something that won’t work when things get heavy.

With this in mind, let’s cover six ways to fix this problem along with a bonus tip at the end to tie it all together.

The Mistake
The error of trying to yank the bar off the floor is usually caused by poor execution of step four in the five-step deadlift setup process. Here’s a quick recap of that process, and you can watch the video below for a more in depth treatment:

  1. Stance - shins one inch from the barbell

  2. Grip - bend over and grab the bar (don’t move the bar)

  3. Shins - bend your knees slightly (i.e., drop the hips slightly) until your shins lightly touch the bar

  4. Chest - squeeze your chest up to set your back

  5. Pull - drag the bar up your legs as you stand up

When you squeeze your chest up in step four, you should be putting a significant amount of tension on the bar, and lifters who don’t do this tend to then yank the bar off the floor when they try to execute step five (i.e., pull).

Here are six cues to ensure you put tension on the barbell when you set your back.

Cue #1: Bend the bar.
With this cue, you are reminding yourself that when you squeeze your chest up with long, straight arms, there should be enough tension on the bar at this point that the bar starts to bend upward in the middle. In other words, you create a bit of a hill with the bar. 

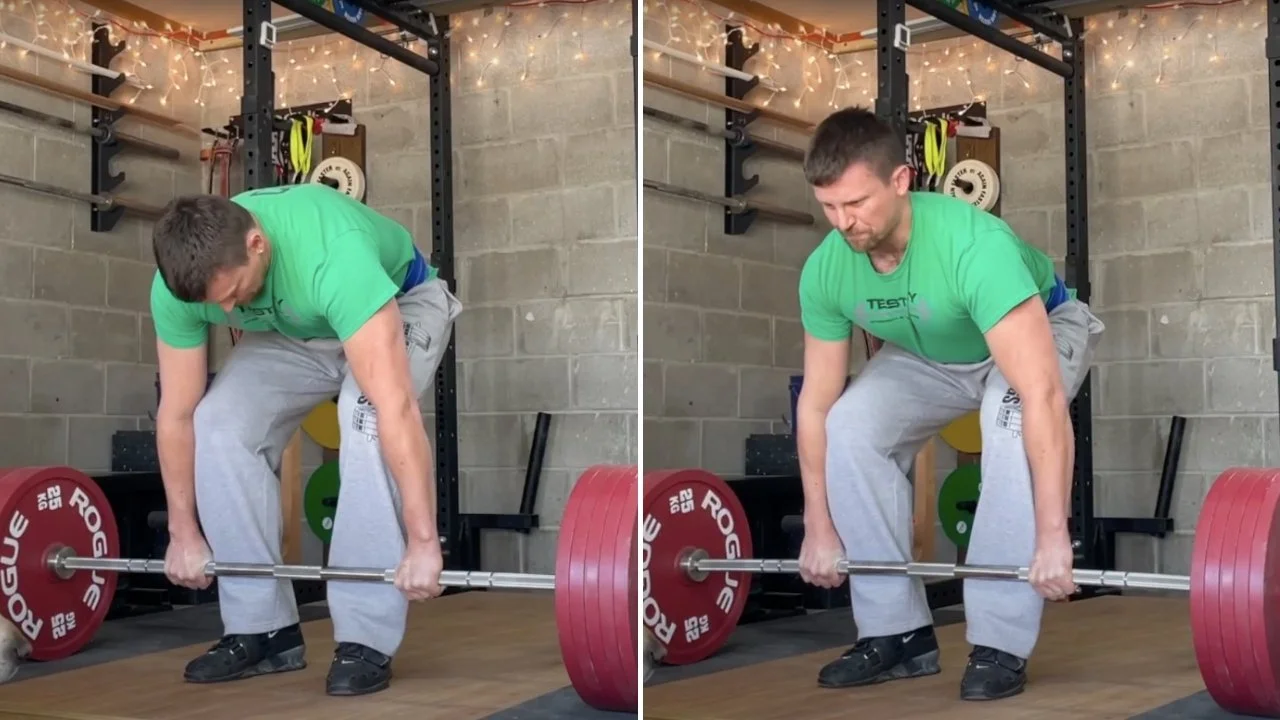
Figure 1: The difference in bar shape between no tension (left) and tension (right) is very noticeable, and it’s even more noticeable when watching it in person or on video.

Cue #2: Bend it before you break it.
The same concept applies here, but this is a bit catchier. It’s the “try it before you buy it” cue of smooth pulls.

This cue also has the benefit of illustrating the timing needed - you bend the bar before you break it off the floor. You don’t bend the bar and try to break it off the floor at the same time.

Think “set the back, pause, then pull.”

Cue #3: Flex the bar.
This is another cue that emphasizes the change in the shape of the bar that should happen when you set your back. You should see and feel the bar flex upward when you squeeze your chest up to set your back.

Witness the noticeable difference in bar shape (between tension and no tension) at the 1:02 mark in the video below.

Cue #4: Pull the slack out of the bar.
Every bar has some slop (i.e, some gap or distance) between the shaft and the collars, and you also have slop between the sleeve of the bar and the plates themselves. When you squeeze your chest up - applying tension to the bar - you should make this slop disappear.

You can see this happen on video, so watch the video below at the 1:55 mark.

Cue #5: Pull the click out of the bar.
This is the same idea as cue #4, but you’re focusing on the audible aspect instead of the visual aspect. When you put tension on the bar, you’ll hear the barbell click as the shaft moves upward against the collar of the bar, and you’ll also hear some noise as the plates rattle a bit.

Make some noise when you set your back (you can hear this at the 2:29 mark of the video above).

Cue #6: Heavy in the hands
Before you squeeze your chest up and consciously apply tension to the bar, you probably aren’t supporting much of the weight of the bar in your hands. You shouldn’t be resting on the bar, but you’re not pulling upward much either.

However, when you squeeze your chest up to set your back, you should absolutely be supporting a significant portion of the bar’s weight in your hands. If it’s a 400 lb deadlift, you might now be applying 100 lb, 200 lb, maybe 300 lb of upward pull at this point. The specific numbers aren’t important (and they’re made up in this example, anyway) - the point is that you should feel significant weight in your hands because your hands are now supporting that weight (and correspondingly, the floor is supporting less of that weight).

Bonus Tip: Squeeze the bar off the floor.
Some lifters will do a good job of setting their backs with proper tension on the bar, and then they’ll make the mistake of slightly releasing that tension and then trying to yank the bar off the floor. This is usually a subconscious effort to get a bit of “down-up” movement out of the lift akin to the bounce you see at the bottom of the squat.

However, the floor prevents this movement as the bar can’t actually go downward, and as a result, slack is created in the arms, which then is “yanked” back out again as the lifter tries to jerk the bar off the floor.

Cue yourself to squeeze the bar off the floor.

As you squeeze something hard, you grip it tightly, then tighter, then tighter yet.

Likewise, this reminds you to pull harder, then harder, then harder yet as you pull the bar smoothly off the floor. An efficient start to your pull is analog - not digital. It’s not a switch, but rather a dial. You turn that dial up when you set your back with tension, and then you smoothly turn it up further to start the pull.

As always, we hope these tips help you get stronger and live better.

-Phil

PS: Whenever you want even more Testify in your life, here are some free resources:

  • Book a free intro and strategy session with us HERE.

  • Pick up a free copy of Testify’s Squat Guide: 12 Tips to Improve Your Squat Now HERE.

  • Get our free weekly email - containing useful videos, articles, and training tips - HERE.

  • Follow Testify on Instagram HERE.

  • Subscribe to Testify’s YouTube channel HERE.

(Some links may be affiliate links. As an Amazon Associate, Testify earns from qualifying purchases.)


At Testify, we offer small group training, private coaching (in-person or remotely via Zoom), online coaching, and form checks. Interested in getting stronger, looking better, and having more energy?

Lifting Gear | What to Wear and What NOT to Wear!

In our first video in the "Lifting Gear" series, Starting Strength Coach Phil Meggers quickly dives into what to wear as well as what not to wear when it comes to training clothes.

(A Blast from the Past video originally published on 01/16/23)

Whenever you want even more Testify in your life, here are some free resources:

  • Book a free intro and strategy session with us HERE.

  • Pick up a free copy of Testify’s Squat Guide: 12 Tips to Improve Your Squat Now HERE.

  • Get our free weekly email - containing useful videos, articles, and training tips - HERE.

  • Follow Testify on Instagram HERE.

  • Subscribe to Testify’s YouTube channel HERE.


At Testify, we offer small group training, private coaching (in-person or remotely via Zoom), online coaching, and form checks. Interested in getting stronger, looking better, and having more energy?

Types of Barbells: Weightlifting vs Powerlifting vs Hybrid

(A Blast from the Past article originally posted on 06/16/23)

Weightlifting bars, powerlifting bars, and dual purpose bars (i.e., hybrid bars) - what is the difference between these types of barbells, and specifically, what’s the deal with the rings (i.e., score marks or knurl marks) on each bar?

That Poor Soul
Some bars have one set of rings, and some bars have two sets of rings. Every time we go to (or host) a powerlifting meet, weightlifting meet, or strengthlifting meet, there is always some poor soul who shows up having trained on one type of bar - for example, a bar that has two sets of rings - and then he steps onto the competition platform and discovers he’s about to use a bar that only has one set of rings.

Now, he’s not sure which set of rings he was using in training, and as a result, he doesn’t know where to take his grip on the competition bar. This situation can also happen in training - either you’re forced to use a different bar than you usually do, or perhaps you’re traveling and are training at an unfamiliar gym.

Let’s prevent this problem.

The Solution
The solution is straightforward - familiarize yourself with the two types of rings, and you’ll be good to go. We use a hybrid bar as you see in Figure 1 for this purpose.

Figure 1: dual rings (hybrid bar)

The inner set of rings are 81 cm apart (approximately 32 in) and are commonly referred to as the “powerlifting rings” or simply the “power rings”. On a dedicated powerlifting barbell or “power bar,” this is the only set of rings you see (Figure 2), so if you go to a powerlifting meet, this is most likely what you’ll be using.

figure 2: power rings (power bar)

The outer set of rings are 91 cm apart (approximately 36 in) and are commonly referred to as the “weightlifting rings” or the “Olympic lifting rings.” If you go to a weightlifting meet, you’ll probably be lifting on a dedicated weightlifting bar (Figure 3), and that bar will only have the outer set of rings.

figure 3: Weightlifting rings (weightlifting bar)

But Why?
The rings are simply there as reference points for your grip so that your lifts can be more consistent and hopefully more successful as well. In the case of a power bar, the rings also serve as the markers for the maximum legal grip width for the bench press (i.e., in competition).

What To Do?
Know what bar you’re using. If you’re using a bar that has only one set of rings, get out a tape measure and measure the distance between the rings or - at the very least - measure it relative to some part of your body (arm length, etc.). This way, you know what bar you’re using, and if you have to use a different bar - whether training somewhere else or competing - your grip (and therefore your lifts) will still be consistent, which means you are more likely to hit your lifts successfully.

As always, we hope this helps you get stronger and live better.

-Phil

PS: Whenever you want even more Testify in your life, here are some free resources:

  • Book a free intro and strategy session with us HERE.

  • Pick up a free copy of Testify’s Squat Guide: 12 Tips to Improve Your Squat Now HERE.

  • Get our free weekly email - containing useful videos, articles, and training tips - HERE.

  • Follow Testify on Instagram HERE.

  • Subscribe to Testify’s YouTube channel HERE.

(Some links may be affiliate links. As an Amazon Associate, Testify earns from qualifying purchases.)


At Testify, we offer small group training, private coaching (in-person or remotely via Zoom), online coaching, and form checks. Interested in getting stronger, looking better, and having more energy?

How To Make Strength Training 5x Times Easier

Strength training doesn’t have to be intimidating or complicated. In this video, Starting Strength Coach Phil Meggers covers 5 simple tips that make lifting more approachable, more accessible, and more effective for anyone—no matter your age, experience, or fitness level.

Whenever you want even more Testify in your life, here are some free resources:

  • Book a free intro and strategy session with us HERE.

  • Pick up a free copy of Testify’s Squat Guide: 12 Tips to Improve Your Squat Now HERE.

  • Get our free weekly email - containing useful videos, articles, and training tips - HERE.

  • Follow Testify on Instagram HERE.

  • Subscribe to Testify’s YouTube channel HERE.


At Testify, we offer small group training, private coaching (in-person or remotely via Zoom), online coaching, and form checks. Interested in getting stronger, looking better, and having more energy?

Testify Free Press - August 18, 2025

THIS WEEK'S SUBMISSION

From our video Deadlift Pro Tips (The "Don't Stand Up" Trick) (click the title to watch):

Jonathan Martin
I always laugh when people give goofy cues, but those are the ones I always remember!

Phil
Absolutely!


TESTIFY ONLINE COACHING

Interested in getting stronger working one-on-one remotely with us? Click here to book your free strategy session.

Get Stronger. Live Better. Start Today.


ARTICLES & VIDEOS

5 simple tips to unlock Squat GENIUS mode… plus a bonus tip
Struggling to get your squat right? In this video, Phil breaks down 5 simple, practical tips to help you lift more weight with better technique—and he shares a bonus tip regarding a common mistake lifters make with their backs. Click here to watch.


5 Mistakes That DESTROY Your Lifting Warm-up
Want to have a more effective and efficient warm-up? Avoid these mistakes. Click here to read.


Blast from the Past: The Mistake That is KILLING Your Deadlift! | How to Set Your Back for the Deadlift: Part 4
Is your hideously rounded back wreaking havoc on your deadlift? We help you fix it fast in Part 4 of this Saturday Shorts series. Click here to watch.


Blast from the Past: 3 Obvious Gym Tips…That No One Follows
In Part 2 of this series, Phil covers more tips and tricks to help the new lifter. Click here to read.


SLEEVES ARE OVERRATED - GRAB A TESTIFY TANK!

Sun's out, guns out, and we've got men's and women’s tank tops in multiple colors.

Get yours today and represent your favorite gym!

Click here to head to the Testify Store.


WHAT'S COMING UP

Congratulations to everyone who competed at this past Friday's Deadapalooza and thank you so much to everyone who helped out! Judges, loaders, table officials, those who helped set up and tear down - you all were great, and we couldn't have wonderful events like this without you!

Reminder: We will be closed for training on Monday, 09/01/25, in observance of Labor Day.

Below are a few of our upcoming events, and you can find out what else is on the calendar by heading to our events page at www.testifysc.com/events.

Friday Night Fun Night: Trivia Teams!

  • Join us for the first-ever Testify Friday Night Fun Night at 6:30 p.m. on Friday, September 26!

  • Grab your smartest friends (or the ones who make you laugh the most) and join us for a night of trivia, laughs, and good food!

  • Teams of up to 5 people will compete in a friendly trivia contest with fun prizes up for grabs.

  • More details to come!

Minneapolis, MN: Starting Strength Squat & Deadlift Camp

  • October 4, 2025

  • Spend the day learning the theory and practice of the low bar back squat and the deadlift.

  • Participants will spend lots of time on the platform receiving coaching and instruction on the squat and deadlift in a small group setting. We will also have a lecture and discussion on programming and cover how to identify and correct common technical problems.

  • Click here to register or for more information.

Kansas City, MO: Starting Strength Squat & Deadlift Camp

  • October 25, 2025

  • Spend the day learning the theory and practice of the low bar back squat and the deadlift.

  • Participants will spend lots of time on the platform receiving coaching and instruction on the squat and deadlift in a small group setting. We will also have a lecture and discussion on programming and cover how to identify and correct common technical problems.

  • Click here to register or for more information.

Benching Bonanza! The Annual Testify Bench Press Jubilee

  • November 21, 2025

  • Benching Bonanza is a strength meet wherein the only contested lift is - not surprisingly - the bench press. There will be one bar, and the meet will be conducted in a "rising bar" format, so the weight on the bar only goes up! It’s a great time for all involved, and we hope to see you there!

  • Click here to register or for more information.


THIS WEEK’S CONDITIONING

Option 1
“Prowler Base”
1. Load up a manageable weight.
2. Sprint 40m at 85% intensity.
3. Rest until breathing and heart rate slow down. (45 sec – 2 min)
4. Repeat 5-15 times.

Courtesy of “Death by Prowler” (on Starting Strength).

Compare to 2025.07.14.

Option 2
Bike/row:
12 min TT

Score = distance

Compare to 2025.05.26.

Option 3
Outdoors:
5-10 rounds:
50 yd sled push (25 yd down-back)
50 yd farmer carry (25 yd down-back)
Rest 1 min

Indoors:
5-10 rounds:
100 ft sled push (50 ft down-back)
100 ft farmer carry (50 ft down-back)
Rest 1 min

Compare to 2025.04.28.

Option 4
10 x 50 ft farmer carry
Each carry is 25 ft down and 25 ft back and is for time. Rest 1 minute between carries.

Women: 97# per handle (80# of plates)
Men: 137# per handle (120# of plates)
(Note: Each handle weighs 17#.)

Compare to 2025.04.28.


As always, we hope this helps you get stronger and live better!

Whenever you want even more Testify in your life, here are some free resources:

  • Book a free intro and strategy session with us HERE.

  • Pick up a free copy of Testify’s Squat Guide: 12 Tips to Improve Your Squat Now HERE.

  • Get our free weekly email - containing useful videos, articles, and training tips - HERE.

  • Follow Testify on Instagram HERE.

  • Subscribe to Testify’s YouTube channel HERE.

5 Mistakes That DESTROY Your Lifting Warm-up

You want to warm-up effectively and efficiently, so let’s eliminate five mistakes that lifters commonly make when warming up.

Mistake #1: Using a Percentage Chart
Percentage charts are the diapers of the lifting world - they can be useful when just starting out to keep you from making a big mess of things, but in the long run, your life will be much better if you outgrow them.

There’s nothing wrong with using a percentage chart at first - you’ve got a lot going on in your head - technique, rest periods, weight jumps from session to session, etc. - and a warm-up chart makes for one less thing to think about.

with practice, warming up is simpler, easier, and quicker without a chart like this one.

However, with experience and some trial-and-error, you’ll learn that - after you do a few sets of five reps with the empty barbell - you’ll select the rest of your warm-up weights by simply taking two to four roughly even jumps in weight, and you’ll be at your work weight.

The longer you train, the more your warm-ups will remain mostly the same from session to session, and this is a weakness of charts as the percentage-based warm-up weights change each time your work weight changes. For an experienced lifter, on the other hand, the first few warm-up sets tend to remain the same, and he only has to deal with making subtle changes to the last warm-up set or two.

If you want to use a chart for the first few weeks, go ahead, but try and wean yourself off of it pretty quickly. Your warm-ups will be simpler and quicker when you do.

Mistake #2: Using a Warm-up App (or Spreadsheet)
I see what you did there.

A warm-up app is just a percentage chart shrouded in technology, so all of the same logic from Mistake #1 applies here as well.

With practice, warm-ups are easier, quicker, and simpler without these items.

Mistake #3: Using Plates That Are Too Small
Don’t use 1.25 lb plates in your warm-ups.

These plates (and smaller ones) are very useful for work weights, but you generally don’t need to be that precise for your warm-ups.

Make all your warm-ups end in either a zero (e.g., 80, 90, 100) or a five (e.g., 85, 95, 105), and you won’t need the 1.25 lb plates for warming up. As you get stronger, you can make most (if not all) of your warm-ups end with a five, and at that point, you won’t need 2.5 lb plates for your warm-ups either.

don’t use 1.25 lb plates in your warm-ups, and as you get stronger, you won’t use 2.5 plates (like this one here) as often either when warming up.

Remember - fewer options for warm-up weights means less to think about, which is generally a good thing. Warm-ups weights should be intelligently chosen, but you generally don’t need razor-sharp precision, and if you do, it won’t be until your last warm-up.

Mistake #4: Taking Too Much Time Between Warm-up Sets
Don’t rest between your warm-up sets.

Perform a warm-up set, load the weight for the next warm-up set, then perform that warm-up set, and so on.

Ample rest is very important between work sets, but we’re talking about warm-up sets. Since they are warm-ups, they’re not heavy yet, and the act of changing the weight between sets will provide enough rest for your next warm-up set.

If it’s a warm-up, there’s no need to rest - the act of changing the plates provides enough rest time.

It’s worth nothing that you want to rest a few minutes after your last warm-up set since you now have a work set coming up, but beyond that, you don’t need to rest between warm-ups.

If you want to rest several minutes between your warm-up sets, you are welcome to do so, but if you’re looking to save some time in the gym (and there are far more interesting things to do in life then spend all day in the gym), this is where to look first.

Mistake #5: Too Many or Too Few Warm-up Sets
Warming up should both prepare you for the work set and not exhaust you by the time you get there, so you want to find a reasonable middle ground in terms of how many sets to perform. After the empty bar, you don’t need seven more warm-up sets (i.e., too many warm-up sets), and conversely, you don’t want to jump from the empty bar right to your 275 lb squat (i.e., too few warm-up sets).

As mentioned earlier, after the empty bar (except the deadlift), most people can simply perform two to four more warm-up sets with gradually increasing loads on the bar to prepare for the work sets. A useful approach is to perform a set of five reps, then three reps, then two reps, and any sets after that would be 1 rep sets (i.e., singles). Here are a few examples (weight x reps x sets):

Example 1
45 x 5 x 2 (empty bar)
95 x 5 x 1
135 x 3 x 1
185 x 2 x 1
215 x 1 x 1
—————
235 x 5 x 3 (work sets)

Example 2
45 x 5 x 2 (empty bar)
65 x 5 x 1
85 x 3 x 1
105 x 2 x 1
—————
115 x 5 x 3 (work sets)

Example 3
45 x 5 x 2 (empty bar)
135 x 5 x 1
225 x 3 x 1
275 x 2 x 1
315 x 1 x 1
—————
345 x 5 x 3 (work sets)

For the deadlift, start with full-size plates, so you’ll either use bumper plates or 45 lb metal plates. Here are two examples:

Example 1
75 x 5 x 1
105 x 3 x 1
135 x 2 x 1
155 x 1 x 1
—————
170 x 5 x 1 (work set)

Example 2
135 x 5 x 1
225 x 3 x 1
315 x 2 x 1
355 x 1 x 1
—————
390 x 5 x 1 (work set)

Note that with this 5-3-2-1 scheme, the warm-up sets are tapered, i.e., you perform fewer reps as the weight on the bar increases. This allows you to prepare yourself for your work sets by increasing the load while not exhausting yourself in the process (since you’re doing fewer reps as the weight goes up).

As always, we hope these tips help you get stronger and live better.

-Phil

PS: Whenever you want even more Testify in your life, here are some free resources:

  • Book a free intro and strategy session with us HERE.

  • Pick up a free copy of Testify’s Squat Guide: 12 Tips to Improve Your Squat Now HERE.

  • Get our free weekly email - containing useful videos, articles, and training tips - HERE.

  • Follow Testify on Instagram HERE.

  • Subscribe to Testify’s YouTube channel HERE.

(Some links may be affiliate links. As an Amazon Associate, Testify earns from qualifying purchases.)


At Testify, we offer small group training, private coaching (in-person or remotely via Zoom), online coaching, and form checks. Interested in getting stronger, looking better, and having more energy?