WHERE Should I Put the Bar for the Squat?
/
In the squat, the location of the barbell on your back matters. If it’s sitting too high, too low, or if you’re just not sure where it should sit in general, you've got a problem. Let’s fix it.
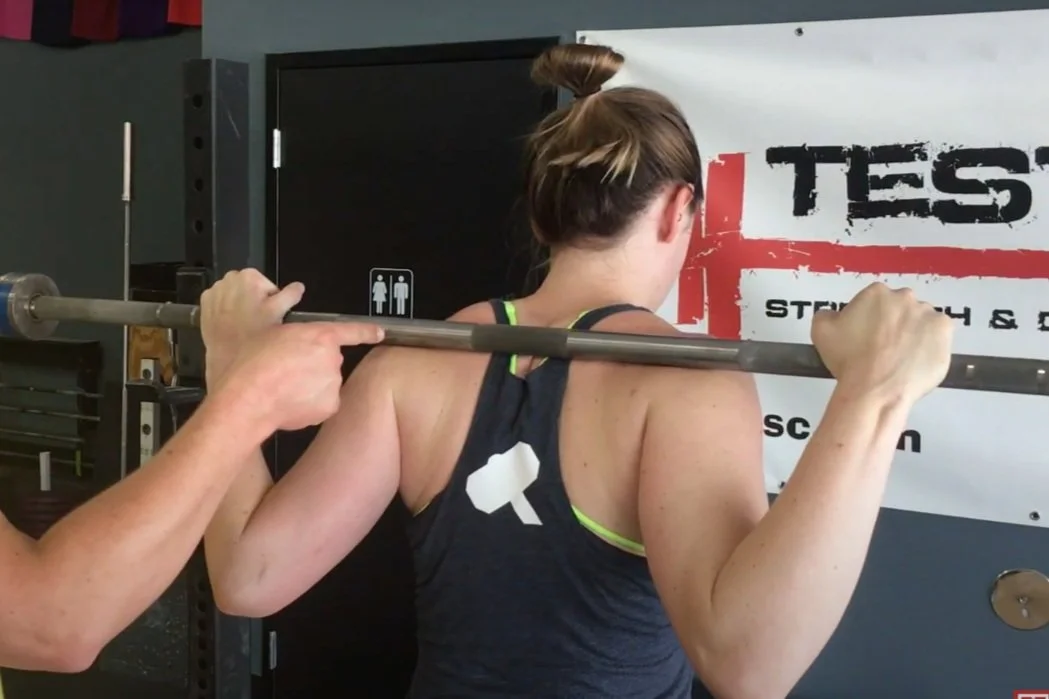
Figure 1: Becky demonstrates the correct position for the barbell.
Where to Place the Bar
You want the barbell to sit below the spine of the scapula and rest securely on the delts (Figure 1). “Where is the spine of my scapula?” you ask? Solid question.
The spine of your scapula is a bony ridge that runs horizontally along your shoulder blades. You can find it on your own scapula, or better yet, have someone find it for you.
This is far more easily demonstrated on video, so I recommend watching the included video.
Your “scapula spotter” should run his fingers out to the edge of your scapula (the most lateral aspect of this bony ridge), and then simply roll his thumb or fingers below that edge. He can press into your delts and put an indentation on your back - this indentation represents where you want the bar to sit when you squat.

Figure 2: no good - mike has the bar positioned too high.
What Happens if the Bar is in the Wrong Position?
If you don’t get the bar in the right spot, one of two things will occur.
If the bar is sitting too high as in Figure 2, it will tend to roll or slide up your back, which is no fun at all. This makes for an insecure position, and it will also prevent you from pointing your chest at the floor (i.e., leaning over) and achieving the correct back angle when you squat.

Figure 3: no good again - now, mike has the bar positioned too low.
On the other hand, if the bar is sitting too low as in Figure 3 - below the shelf provided by your delts (less common, but it does happen) - the bar will tend to slide down your back. This is also terrible as it leaves your hands supporting a lot of the bar’s weight (which tends to cause a lot of wrist, elbow, and shoulder discomfort).
How Can I Make Sure I’ve Got It Right?
Your best bet is to get a coach to help you, so contact us if you’d like to set up a coaching session (click here). The second best option is to have a friend watch the video above and have him help you find the correct spot on your back. In lieu of those options, you can video yourself getting under the bar and unracking it (get the camera behind you and pretty high up if possible) and see if you have the bar in the right location.
As always, we hope this helps you get stronger and live better.
(Some links may be affiliate links. As an Amazon Associate, Testify earns from qualifying purchases.)
If you found this helpful, you’ll love our weekly email. It’s got useful videos, articles, and training tips just like the one in this article. Sign up below, and of course, if you don’t love it, you can unsubscribe at any time.
At Testify, we offer small group training, private coaching (in-person or remotely via Zoom), online coaching, and form checks. Would you like to get quality coaching from a Starting Strength Coach?
Looking Down in the Squat
/
A Blast from the Past article originally posted on 11/20/18)
When we teach the squat, we teach people to look at a point on the floor about 3-6 feet in front of them. In other words, we look down (and forward, but I digress). But why?

Loren looks down . . . to go up.
Let's chat . . .
If you lifted in high school, you probably heard some “coach” tell you to look up when squatting. “You gotta look up to go up!” is the loud refrain heard throughout high school weight rooms and powerlifting meets ‘round the world. Rarely is any type of rationale given for this advice, but if pressed for a reason, people might offer something like “ . . . your body follows your head, so to stand up, you should look up.”
This might sound reasonable at first, but let’s think about it. Do you look at the ceiling when you get up out of bed in the morning? What about when you get up out of a chair? I’m going to guess your answer is no. Considering this, we can see that the body doesn’t necessarily follow the head, but it is true that your chest typically does.
Therein lies the major problem with lifting the head while squatting - lifting the head typically causes the lifter to lift the chest. When the chest comes up (i.e., the torso becomes more vertical), the knees shift forward. When the knees shift forward, so do the hips (since the hips and knees are connected by the femurs), and in this “knees forward/hips forward” position, we have now asked the knees to do more and the hips to do less, which is rather silly of us since the hips are the larger of the two joints and are surrounded by more muscle mass than the knees. Without diving too deeply into the physics and anatomy of the situation, we use both the hips and the knees when squatting, and since we want to use them to drive the barbell upward in the most efficient manner possible, that means asking the larger joint (i.e., the hips) to do its fair share of the work.
With this in mind, you look down when you squat since it’s an effective way to keep your hips (and knees) right where they are supposed to be, and this allows you drive upward efficiently with your hips.
As always, we hope this helps you get stronger and live better.
(Some links may be affiliate links. As an Amazon Associate, Testify earns from qualifying purchases.)
If you found this helpful, you’ll love our weekly email. It’s got useful videos, articles, and training tips just like the one in this article. Sign up below, and of course, if you don’t love it, you can unsubscribe at any time.
At Testify, we offer small group training, private coaching (in-person or remotely via Zoom), online coaching, and form checks. Would you like to get quality coaching from a Starting Strength Coach?
Squat Tip: Hips Back AND Chest Down
/
(A Blast from the Past article originally posted on 01/14/22)
Here’s a quick squat tip: When you initiate your squat by reaching back with your hips (i.e., your butt), you need to also point your chest at the floor (i.e., lean over). The converse is also true - when you point your chest at the floor, you need to reach back with your hips.

Note that Tyler’s hips are traveling back while he points his chest at the floor.
These two movements - hips back and chest down - go hand-in-hand with each other, and if you briefly think about it, it will seem rather obvious why this is so. On one hand, if you reach back with your hips while trying to maintain an upright torso, you’ll fall over backward, which is rather unfortunate in any circumstance and especially when squatting with a barbell on your back. On the other hand, if you lean over (i.e., point your chest at the floor) without reaching back with your hips, you’ll fall over forward. Again - preposterous.
So remember, when you initiate your squat, if you’ve got a cue like one of the following running through your head . . .
Hips back
Butt back
Reach backward
Sit back
. . . it can be useful to also tell yourself one of the following cues . . .
Chest down
Lean over
Point your chest at the floor
This will help your balance, and it will also help you get into a position where you can effectively drive your hips out of the bottom of the squat.
We hope this helps you get stronger and live better!
(Some links may be affiliate links. As an Amazon Associate, Testify earns from qualifying purchases.)
If you found this helpful, you’ll love our weekly email. It’s got useful videos, articles, and training tips just like the one in this article. Sign up below, and of course, if you don’t love it, you can unsubscribe at any time.
At Testify, we offer small group training, private coaching (in-person or remotely via Zoom), online coaching, and form checks. Would you like to get quality coaching from a Starting Strength Coach?
10 RULES to Make You a BETTER Squatter (2 Minutes!)
/We cover 10 rules to help you get a bigger, better squat . . . right now.
At Testify, we offer small group training, private coaching (in-person or remotely via Zoom), online coaching, and form checks. Click the button below to get quality coaching from a Starting Strength Coach and start getting stronger TODAY.
The BEST Squat Accessory Ever?!
/
What is the best squat accessory ever? Answer: The TUBOW. What is a TUBOW, you ask? Let’s quickly dive into that, as well as why and how you use one.
I also recommend watching the included video for a demonstration of how to use the TUBOW.
What is a TUBOW?
The TUBOW is a Terribly Useful Block Of Wood. It’s a 2-foot long block of 4” x 4” wood, and while you are welcome to use a section of 2” x 4” instead, I’d recommend sticking with 4” x 4” for stability. If you go to Lowe’s, Home Depot, or a similar big box home improvement store, you can often have them cut it to length for you, or you can cut it yourself. If you’d rather order one and not have to deal with any measuring or cutting, just click here, and you’ll be good to go.
Why Use a TUBOW?
Two common squat errors are 1) allowing the knees to continue traveling forward throughout the entire descent - thus ending up too far forward at the bottom of the squat - and 2) the lifter doesn’t allow the knees to move forward enough in the first half of the descent with the result being that the knees will eventually shoot forward at the bottom of the squat - resulting in problems with back angle and often balance as well.
The TUBOW solves these problems by giving the knees a target at which to aim. Using the TUBOW allows the lifter to set the knees’ correct position about one-third to one-half of the way into the descent. This makes sure that the knees go far enough forward at the right time while simultaneously ensuring that they don’t go too far forward.
How Do You Use a TUBOW? (hint: it’s not complicated)
First, position the TUBOW right at your toes - perhaps a half-inch or an inch in front of your toes depending on anthropometry (you’ll figure this out with practice). You can use one TUBOW or two.
Next (after unracking the bar and taking your squat stance), as you start your descent, cue your knee to touch the TUBOW lightly about one-third to one-half of the way into your descent. Again, touch it lightly - don’t knock it over.
After this, you simply keep your knee glued lightly to the TUBOW the rest of the way into your descent. Since the TUBOW won’t allow you to shove your knee any further forward, this will force you to reach back with your hips, and this, in turn, will force you to correctly lean over as you reach the bottom of the squat. The result is that, by fixing the knees’ position, we automatically fix the hips’ position and back angle as well. For this reason, we often refer to the TUBOW as the portable squat coach (especially useful for those who train without a coach).
Once you reach the bottom of the squat, drive your hips up out of the hole as normal.
A Second Benefit of the TUBOW
The TUBOW can also help fix the knees’ lateral position. You want your knees to travel in line with your toes, i.e., they shouldn’t be traveling inside of your toes (“valgus knees”), nor should they be traveling outside of your toes (“varus knees”). With the TUBOW in place, you now have a target for your knees, and this can help you fix any issues you might have with the lateral positioning of your knees.
Last Thing . . .
When needed, use the TUBOW during your warm-ups - don’t use it for your work sets (at heavy weights, the TUBOW will be a distraction). Also, don’t use the TUBOW forever - it’s a tool, not a crutch. Use it a few times to get the sense of where your knees should be, or use it if your suspect that your form has degraded over the past few sessions, but after that, use your brain to position your knees correctly. The TUBOW taught you how to control your knees - now it’s your turn to execute.
As always, we hope this helps you get stronger and live better.
(Some links may be affiliate links. As an Amazon Associate, Testify earns from qualifying purchases.)