Want Your Press to Go Up? Make It Go Down First.

Struggling to drive your press up? Maybe you’re quite literally trying to take it in the wrong direction.

What on earth do I mean?

When you use the hips in the press, you perform a “reach-and-bounce” movement with your hips, i.e., you reach your hips forward, you get a stretch across your anterior musculature (because you’re flexing your abs and quads hard), and the hips bounce back as you stand up.

In turn, this helps your launch or “throw” the barbell upward . . . but only if you get the timing correct.
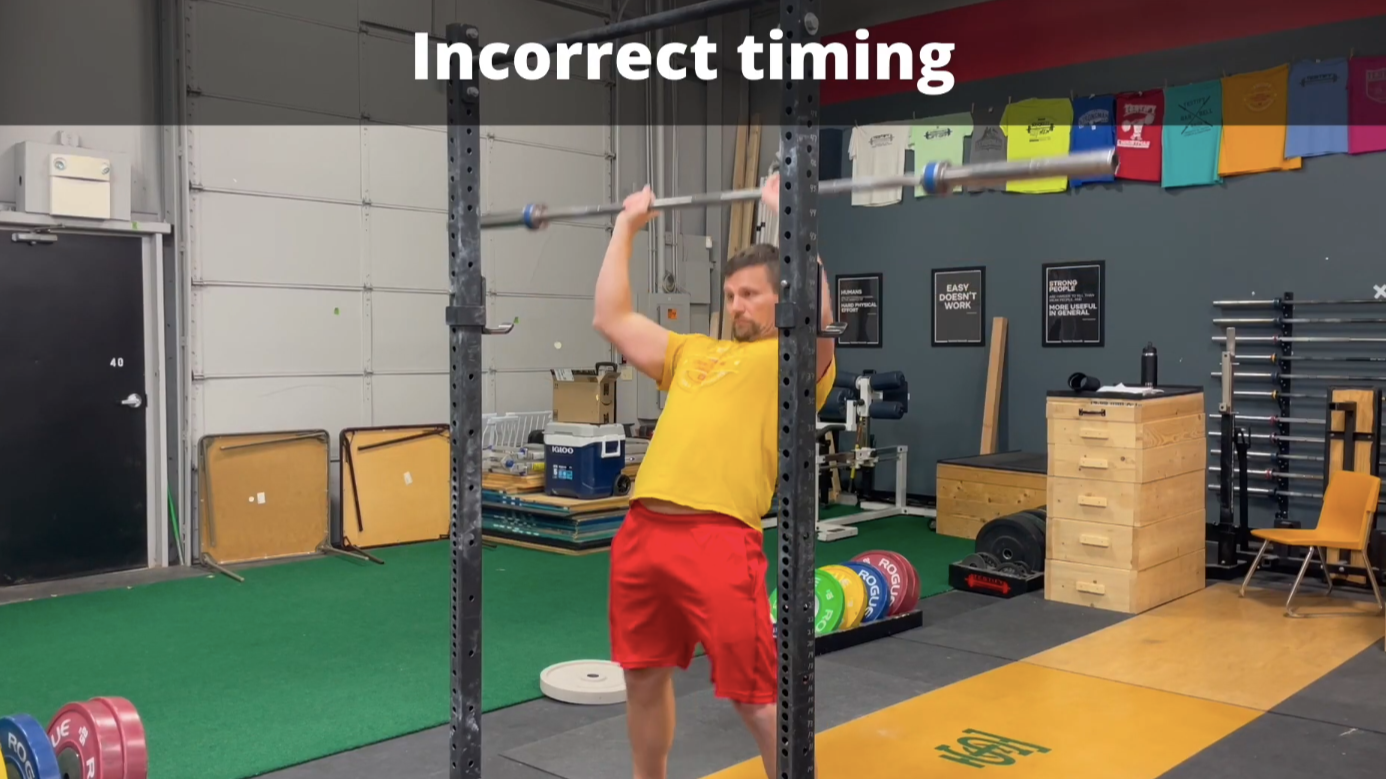
this fool has mistakenly reached his hips forward while simultaneously driving the bar upward.

Some lifters make the error of reaching with the hips and press the bar upward at the same time.

Don’t do this.

(to see this error in action, watch the short video below)

The correct sequence is “reach-then-press” or “reach-bounce-press.” Correctly executed, you will see the bar dip a couple of inches (as the hips reach forward) before it is launched upward - and therein lies a cue that can help you out if you struggle with the timing of the press.

“Make the bar dip.”

In other words, as you reach your hips forward, remind yourself that you’re going to make the bar go down slightly before it goes up. Think of it as compressing a spring (i.e., you) before it launches something upward (i.e., the bar).

Again, cue yourself to make the bar dip as you start the press. You can also try the rather catchy cue of “hip-and-dip,” i.e., when you reach with the hips, you should make the barbell dip at the same time.

This will help your timing, which will in turn help you get a bigger throw from the hip movement of your press, and that will help you drive your press upward - both physically and numerically.

As always, we hope this helps you get stronger and live better.

-Phil

PS: Whenever you want even more Testify in your life, here are some free resources:

  • Book a free intro and strategy session with us HERE.

  • Pick up a free copy of Testify’s Squat Guide: 12 Tips to Improve Your Squat Now HERE.

  • Get our free weekly email - containing useful videos, articles, and training tips - HERE.

  • Follow Testify on Instagram HERE.

  • Subscribe to Testify’s YouTube channel HERE.

(Some links may be affiliate links. As an Amazon Associate, Testify earns from qualifying purchases.)


At Testify, we offer small group training, private coaching (in-person or remotely via Zoom), online coaching, and form checks. Interested in getting stronger, looking better, and having more energy?

How Many Lifters Are Actually Using the Wrong Grip on Bench Press and Press?

Are you using the right grip on the bench press and press? Many lifters aren’t—and it’s costing them strength and consistency. Starting Strength Coach Phil Meggers gives you the grip that sets you up for stronger, more effective lifts.

Whenever you want even more Testify in your life, here are some free resources:

  • Book a free intro and strategy session with us HERE.

  • Pick up a free copy of Testify’s Squat Guide: 12 Tips to Improve Your Squat Now HERE.

  • Get our free weekly email - containing useful videos, articles, and training tips - HERE.

  • Follow Testify on Instagram HERE.

  • Subscribe to Testify’s YouTube channel HERE.


At Testify, we offer small group training, private coaching (in-person or remotely via Zoom), online coaching, and form checks. Interested in getting stronger, looking better, and having more energy?

When Your Press Feels Off, Try This One Small Cue Instead

As anyone who presses knows, the press is supremely dependent on the bar path. If that barbell is just a bit out of the correct groove on a heavy press, your attempt is toast.

It’s possible to miss a press by pushing the weight too far back, of course, but it’s certainly far more common to struggle with a bar path that is forward of where you want it to be. With this in mind, if you find yourself leaving the bar out front on your presses, try this cue . . .

Aim for your face.

Don’t worry about hitting your face. Remember that, as you reach your hips forward, your shoulders and head will naturally counterbalance by moving backward slightly. As a result, you can cue yourself to aim for your face since your face won’t actually be there anymore by the time the barbell gets there.

“Aim for your nose” and “throw it back” are similar cues and ones that we use often, but if you find they’re not working for you, you’ll find that “aim for your face” drives home the concept a bit more aggressively, and that might just do the trick.

As always, we hope this helps you get stronger and live better.

-Phil

PS: Whenever you want even more Testify in your life, here are some free resources:

  • Book a free intro and strategy session with us HERE.

  • Pick up a free copy of Testify’s Squat Guide: 12 Tips to Improve Your Squat Now HERE.

  • Get our free weekly email - containing useful videos, articles, and training tips - HERE.

  • Follow Testify on Instagram HERE.

  • Subscribe to Testify’s YouTube channel HERE.

(Some links may be affiliate links. As an Amazon Associate, Testify earns from qualifying purchases.)


At Testify, we offer small group training, private coaching (in-person or remotely via Zoom), online coaching, and form checks. Interested in getting stronger, looking better, and having more energy?

7 Ways You're Ruining Your Press: Part 2

(A Blast from the Past article originally posted on 09/01/23)

You’ve read Starting Strength: Basic Barbell Training, you’ve watched the videos, and you are endeavoring to press correctly. Yet . . . you still have problems. Let’s fix them.

In Part 1 of this series, which went up last week, we covered several common press mistakes. In today’s Part 2, we wrap things up by addressing a few more errors as well as how to fix them.

Mistake #5: Ridiculous or Nonexistent Focal Point
When pressing, pick a spot on the wall directly in front of you (at about eye height) and stare at that point the entire time. Stare at it before your first rep, through and between each rep, and until you’ve racked the bar.

Don’t let your gaze wander, and certainly don’t press with your eyes closed, no matter how hard you’re struggling through a particular rep. Focal point contributes mightily toward balance, and the press is very balance-dependent.

Mistake #6: Awful Knees
Don’t let your knees bend when pressing. This is the press, not the push press, and if your knees bend, the lift doesn’t count. To fix this issue, flex your quads before starting the rep and keep them flexed during the entire rep. You can cue yourself to “pull your kneecaps up” or simply tell yourself to “keep your knees tight,” but don’t let your knees get loose when pressing.

Mistake #7: Comically Bad Hip Timing
Remember, the timing is “hips-then-press” - your hips reach forward and then slam back into place, i.e., it’s when you stand back up that you launch the bar upward. The mistake we’re talking about here happens to almost every new lifter when learning the press at some point, especially if you are teaching yourself how to do it.

Here’s what happens - you get a few solid reps, and then you simply get the timing wrong on the next rep. You accidentally reach forward with your hips and try to press the barbell upward at the same time. It feels awkward, and if you record yourself on camera and watch afterward, it makes you want to throw up mentally - just a bit - because something isn’t quite right.

The timing is the issue - you did “hips-and-press-at-the-same-time” when you meant to do “hips-then-press.” And, in fact, that’s exactly how you solve the problem, simply tell yourself “hips-THEN-press,” and you’ll do just fine.

As always, we hope these tips help you get stronger and live better.

-Phil

PS: Whenever you want even more Testify in your life, here are some free resources:

  • Book a free intro and strategy session with us HERE.

  • Pick up a free copy of Testify’s Squat Guide: 12 Tips to Improve Your Squat Now HERE.

  • Get our free weekly email - containing useful videos, articles, and training tips - HERE.

  • Follow Testify on Instagram HERE.

  • Subscribe to Testify’s YouTube channel HERE.

(Some links may be affiliate links. As an Amazon Associate, Testify earns from qualifying purchases.)


At Testify, we offer small group training, private coaching (in-person or remotely via Zoom), online coaching, and form checks. Interested in getting stronger, looking better, and having more energy?

What You Should NEVER Do When Pressing!

Is your bar path all sorts of terrible when you press? It's destroying your press. Starting Strength Coach Phil Meggers helps you fix it with 3 simple cues.

(A Blast from the Past video originally published on 03/27/23)

Whenever you want even more Testify in your life, here are some free resources:

  • Book a free intro and strategy session with us HERE.

  • Pick up a free copy of Testify’s Squat Guide: 12 Tips to Improve Your Squat Now HERE.

  • Get our free weekly email - containing useful videos, articles, and training tips - HERE.

  • Follow Testify on Instagram HERE.

  • Subscribe to Testify’s YouTube channel HERE.


At Testify, we offer small group training, private coaching (in-person or remotely via Zoom), online coaching, and form checks. Interested in getting stronger, looking better, and having more energy?

7 Ways You're Ruining Your Press: Part 1

(A Blast from the Past article originally posted on 08/25/23)

Let’s cover several mistakes you might be making with your press, and then let’s fix them fast. We address a few issues this week in Part 1, and we’ll return next week and wrap things up with a few more errors in Part 2.

Mistake #1: Poor Stance
When you unrack the bar, don’t walk a mile back from the rack, and don’t take a narrow stance. Simply take two small steps back - right, then left - that’s it. Two half-steps, if you will - i.e., stay relatively close to the rack. When you do so, set up with a nice, wide stance. Your squat stance will serve as a good approximation of the stance you’re looking for, and you can even stand a bit wider than that, but don’t take a narrow stance.

Mistake #2: Atrocious Grip Width
Don’t take a wide grip. When pressing, the grip is fairly narrow - when taking your grip, simply reach out in front of you like you’re Frankenstein’s monster, and that will serve quite well for your grip width. Don’t use a grip width that looks even remotely as wide as your bench press grip.

For a lot of guys, this will place the grip right on the edge of the knurl, and for a lot of gals, this will place the index finger on the smooth part of the bar and the rest of the fingers on the knurl. These are very general approximations, so to check your grip width, remember that - when you’re setup and ready to press (i.e., at the bottom of the movement) - you want vertical forearms as seen from directly in front of you.

Mistake #3: Terrible Elbows
Don’t let your elbows be situated behind the barbell when you’re set up and ready to press. When unracking the bar, do so with your legs. Dip down far enough (with your legs) so that you can move your elbows into the correct position, which is slightly in front of the bar as viewed from the side. Every single rep should start with your elbows in this position. If the elbows are behind the bar, you will tend to press the bar forward, which makes for a miserable pressing experience.

Mistake #4: Hideous Wrists
Your wrists should not be bent back in extreme extension. Go ahead and make a tight fist - yes, right now . . .while you’re reading this . . . seriously. Notice the amount of wrist extension you see, i.e., notice how much - or rather how little - your wrists are bent backward. We’re looking for that position when pressing as well - about 10-15 degrees of wrist extension.

We want the base of the palm to support the bar so that the bar is situated directly over the bones of the forearm. On the other hand, if the wrists are bent back in extreme extension, the bar sits up near the pads at the base of your fingers with your wrists in a very floppy and inefficient position (see the video above).

Your wrists shouldn’t be totally straight (although we may sometimes use the overcue “straight wrists” when setting up), but they definitely shouldn’t be in extreme extension, so get your elbows in the correct position (see Mistake #3), and that permits you to achieve the correct wrist position as well. As the weight gets heavier, you’ll find that a decent pair of correctly worn wrist wraps will certainly help this positioning, but most of the solution is up to you.

We’ll see you next week in Part 2 of this series, and as always, we hope this helps you get stronger and live better.

-Phil

PS: Whenever you want even more Testify in your life, here are some free resources:

  • Book a free intro and strategy session with us HERE.

  • Pick up a free copy of Testify’s Squat Guide: 12 Tips to Improve Your Squat Now HERE.

  • Get our free weekly email - containing useful videos, articles, and training tips - HERE.

  • Follow Testify on Instagram HERE.

  • Subscribe to Testify’s YouTube channel HERE.

(Some links may be affiliate links. As an Amazon Associate, Testify earns from qualifying purchases.)


At Testify, we offer small group training, private coaching (in-person or remotely via Zoom), online coaching, and form checks. Interested in getting stronger, looking better, and having more energy?