What is a Hang Snatch? | Olympic Weightlifting Technique

What is a hang snatch? How is it different from a power snatch, hang power snatch, or snatch?

FIGURE 1: THE LIFT STARTS WITH THE BAR HANGING IN THE HANDS (SINCE “HANG” IS PRESENT).

As in our snatch and power snatch articles, let’s break this down simply and quickly, and for a demonstration with explanation, watch the included (and short) video.

“Hang” is Present
We begin by examining the words present or not present in the name of the lift. The word “hang” is present, so the hang snatch starts with the barbell hanging in the hands (Figure 1). Usually, the lift will start somewhere around the middle or lower part of the thigh, but you can also start a hang snatch from a lower or higher position.

Again - and this is the important part - a hang snatch simply starts with the bar hanging in the hands, and thus the lift does not start with the bar resting on the floor.

figure 2: THE LIFT IS RECEIVED IN A FULL DEPTH overhead SQUAT (SINCE “POWER” AND “SPLIT” ARE NOT PRESENT).

No “Power” or “Split”
The words “power” and “split” are absent, so the lift will not be received overhead in the power position (i.e., a partial depth overhead squat), nor will it be received in the split position (i.e., with one foot in front of the torso and one foot behind the torso). By default, this means the lift will be received in a full depth overhead squat (Figure 2).

So . . . What IS a Hang Snatch?
Thus, a hang snatch is a lift wherein the bar starts hanging in the hands and is then accelerated upward, imparting enough momentum to the bar that the bar continues upward, whereupon it is then locked out overhead (AKA “received,” “racked,” or “caught”) in a full depth overhead squat position before it is then stood up.

As always, we hope this helps you get stronger and live better.

(Some links may be affiliate links. As an Amazon Associate, Testify earns from qualifying purchases.)

If you found this helpful, you’ll love our weekly email. It’s got useful videos, articles, and training tips just like the one in this article. Sign up below, and of course, if you don’t love it, you can unsubscribe at any time.


At Testify, we offer small group training, private coaching (in-person or remotely via Zoom), online coaching, and form checks. Would you like to get quality coaching from a Starting Strength Coach?

FIX Your Press | Correct Your AWFUL Grip to Press More!

Is your awful grip ruining your press? In this video - our 5th in the series of Saturday Shorts on fixing the press - Starting Strength Coach Phil Meggers quickly discusses and demonstrates how to solve this problem.

(A Blast from the Past video originally published on 07/09/22)


At Testify, we offer small group training, private coaching (in-person or remotely via Zoom), online coaching, and form checks. Click the button below to get quality coaching from a Starting Strength Coach and start getting stronger TODAY.

The Deadlift: You're Doing This Wrong - Part 4

(A Blast from the Past article originally posted on 07/15/22)

This is Part 4 in our series of articles on common deadlift errors and how to fix them. Today’s error is that of raising your chest prematurely or, equivalently, pulling the barbell around your knees.

Good heavens - it’s painful to watch, let alone actually DO.

When the deadlift begins, it is dominated by knee extension, i.e., your knees need to start straightening right off the floor. Now, it’s true that your hip joint starts to open right away as well (i.e., your back angle starts to become more vertical right away), but the start of the movement is dominated by knee extension.

If you start raising your chest too much as you’re pulling the bar off the floor, your knees won’t be contributing as effectively to the start of the movement, and not only this, your knees have actually become an obstacle as you’ve now forced yourself to pull the bar around your knees, thus ruining that nice, vertical bar path you were trying to achieve.

A couple of cues to help with this (and watch the included video to see these cues in action):

  1. Push the floor: Imagine that your body is stuck in place and you are instead pushing the floor down and away from you by straightening your knees.

  2. Pull your kneecaps back or push your kneecaps back: Try to make your kneecaps go backward slightly as you start the movement.

A final note - the goal is not to make your knees lock out right away. After all, your knees shouldn’t finish extending until the top of the deadlift, but they do need to start straightening right away.

As always, we hope this helps you get stronger and live better.

(Some links may be affiliate links. As an Amazon Associate, Testify earns from qualifying purchases.)

If you found this helpful, you’ll love our weekly email. It’s got useful videos, articles, and training tips just like the one in this article. Sign up below, and of course, if you don’t love it, you can unsubscribe at any time.


At Testify, we offer small group training, private coaching (in-person or remotely via Zoom), online coaching, and form checks. Would you like to get quality coaching from a Starting Strength Coach?

STOP Making These MISTAKES With Your Lifting Gear | Part 1: Errors #1-7

You're making some mistakes with your lifting gear, and you don't even know it. In Part 1 of this series, Starting Strength Coach Phil Meggers covers 7 errors (and how to fix them) that lifters make with their equipment.


At Testify, we offer small group training, private coaching (in-person or remotely via Zoom), online coaching, and form checks. Click the button below to get quality coaching from a Starting Strength Coach and start getting stronger TODAY.

The Testify Republic - August 5, 2024

THIS WEEK'S SUBMISSION

From our video 4 Tactics to Triage Your Bench Press FAST | Get a BIGGER Bench (click the title to watch):

Alex
A quick question, how can you make sure you will place your elbows slightly in front of the bar at the bottom? Do you bend the bar?

Phil
Here are two cues that often work well:
1. Elbows forward
2. Lead with the elbows

However, if you're coaching yourself, it's important to video yourself to evaluate whether or not you're executing the cue properly. What the lift feels like and what's actually happening are often two different things, so remember to record yourself and then compare it to what's discussed in this video.


TESTIFY ONLINE COACHING

Want to get stronger working remotely with one of our Starting Strength Coaches? Click here to contact us and learn more.

Get Stronger. Live Better. Start today.


ARTICLES & VIDEOS

4 Tactics to Triage Your Bench Press FAST | Get a BIGGER Bench
We address four major technical aspects to focus on and evaluate when trying to improve your bench press. Click here to watch.


Your Most Important Piece of Training Gear - Part 1 (Lifting Gear Series)
What is your most important piece of gear, and why? This is the 6th article in our "Lifting Gear" series and is Part 1 of a mini-series as well. Click here to read.


Blast from the Past: Halting Deadlift for a BIGGER, Stronger Deadlift!
Want to improve your deadlift? The halting deadlift can help. We explain what a halting deadlift is, how to do it, and why you might want to utilize the halting deadlift in your training. Click here to watch.


Blast from the Past: The Deadlift: You're Doing This Wrong - Part 3
Your breathing is destroying your deadlift, and you probably don't even know it. In the 3rd article in our series on fixing the deadlift, Phil covers how to breathe correctly in the deadlift. Click here to read.


“GET STRONGER - LIVE BETTER” SHIRTS ARE AVAILABLE!

Why do you train? Because getting stronger makes everything else easier. Get stronger. Live better. “Testify” to this message and represent your favorite gym with this shirt in several color options.

Click here to head to the Testify Store.


WHAT'S COMING UP

Below are a few of our upcoming events, and you can find out what else is on the calendar by heading to our events page at www.testifysc.com/events.

Deadapalooza! The Annual Testify Deadlift Festival

  • August 23, 2024

  • Deadapalooza is a strength meet wherein the only contested lift is - you guessed it - the deadlift. There will be one bar (possibly multiple bars if numbers dictate), and the meet will be conducted in a "rising bar" format, so the weight on the bar only goes up! It's a ton of fun, so come on out!

  • Click here to register or for more information.

Minneapolis, MN: Starting Strength Squat & Deadlift Camp

  • August 31, 2024

  • Spend the day learning the theory and practice of the low bar back squat and the deadlift.

  • Participants will spend lots of time on the platform receiving coaching and instruction on the squat and deadlift in a small group setting. We will also have a lecture and discussion on programming and cover how to identify and correct common technical problems.

  • Click here to register or for more information.

Starting Strength Self-Sufficient Lifter Camp

  • September 28, 2024

  • Spend the day learning the Squat, Press, and Deadlift and how to self-evaluate your lifts while training in your garage or commercial gym without a coach.

  • Click here to register or for more information.


THIS WEEK’S CONDITIONING

Option 1
Sled
Outdoors:
10 rounds of:
Push sled 100 ft
Pull sled 100 ft (hand over hand)

Indoors:
20 rounds of:
Push sled 50 ft
Pull sled 50 ft (hand over hand)

Compare to 2024.06.03.

Option 2
Bike/row:
4 x 800m

Rest 3 minutes between each round. Score = slowest time.

Compare to 2024.05.13.

Option 3
Outdoors:
10 rounds:
25 yd yoke carry
Rest 1 minute

Indoors:
10 rounds:
30 yd yoke carry (15 yd down-back)
Rest 1 minute

Compare to 2024.04.15.

Option 4
10 x 50 ft farmer carry
Each carry is 25 ft down and 25 ft back and is for time. Rest 1 minute between carries.

Women: 97# per handle (80# of plates)
Men: 137# per handle (120# of plates)
(Note: Each handle weighs 17#.)

Compare to 2024.04.15.


As always, we hope this helps you get stronger and live better!

Your Most Important Piece of Training Gear - Part 1 (Lifting Gear Series)

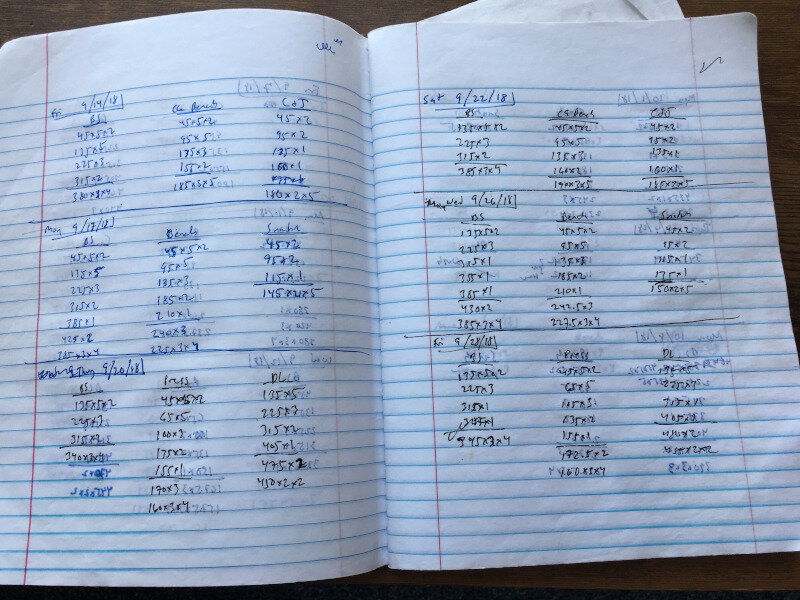
Today, we're going to talk about your most important piece of training equipment. It’s not your belt, shoes, or wrist wraps - it’s not even the barbell or the squat rack. Your belt, shoes, and wraps can be easily replaced, and people train on different squat racks and with different barbells all the time. The one item that cannot be replaced - the one thing that is specific to you - is your training log.

In Part 1 of this mini-series, we’re discussing why the training log is important and why you should keep one, and in Part 2, we’ll cover how to set one up and correctly use it.

Be sure to check out the included videos as they also cover some additional material not included in this article.

This is the sixth article in our “Lifting Gear” series. Click below to read the previous articles in the series:

Exercise vs Training
Your training log is important since it’s specific to you, but it’s important for a number of other reasons as well. For starters, the training log separates exercise from training.

There’s nothing wrong with exercising, and it is certainly much better than doing nothing at all. However, exercising is what you do when you want to get hot, you want to get sweaty, you want to get tired, and you want to feel like you’ve accomplished something. Training, on the other hand, is what you do when you actually want to accomplish something, and that’s what we’re focused on.

Your Training History
Your training log is also important because it contains your history. As a result, it of course contains your lifts, warm-ups, work sets, etc., but it holds more than that. It tells you how training went on a given day - you can write down notes about your training sessions, and I encourage you to do precisely this. Notes such as “Today was a great day,” “Today was terrible,” or “185 for work sets felt awfully heavy!” are all examples of what you might write in your log.

Remember - someday 185 lb will just be a warm-up weight, and on that day, it will be very satisfying to look back and remember when 185 lb was a challenging work weight.

Your Training Compass
Because you train, you have a program and a plan. You have goals, and because your training log contains your history - i.e., where you’ve been - it also functions as your compass and helps guide you in the direction you want to go.

The log works as a compass in two ways - first, before you leave the gym each day, plan your next session. You want to walk into the gym for your next workout knowing what you’re going to hit for your work sets, so write all of that down before leaving the gym.

Second, the log functions as a compass because you’re going to write down your goals: “I want to squat 315 lb,” “I’m going to get my first chin-up this year,” or “I want to bench 225 lb at my next meet” are all solid examples of goals to write in your training log. These help guide you, motivate you, and make the process much more gratifying when you achieve these milestones.

Your training log is important - it separates training from merely exercising, it contains your history, and it’s your compass as you go forward. Next, it’s time to learn how to keep a log, so in Part 2, we’ll cover precisely how to go about setting up and utilizing your training log. In the meantime, we hope this helps you get stronger and live better.

(Some links may be affiliate links. As an Amazon Associate, Testify earns from qualifying purchases.)

If you found this helpful, you’ll love our weekly email. It’s got useful videos, articles, and training tips just like the one in this article. Sign up below, and of course, if you don’t love it, you can unsubscribe at any time.


At Testify, we offer small group training, private coaching (in-person or remotely via Zoom), online coaching, and form checks. Would you like to get quality coaching from a Starting Strength Coach?