Deadlift Tip: Quit Bending Your Arms!

(A Blast from the Past article originally posted on 01/07/22)

Here’s a quick deadlift tip: Don’t Bend Your Arms.

Ever.

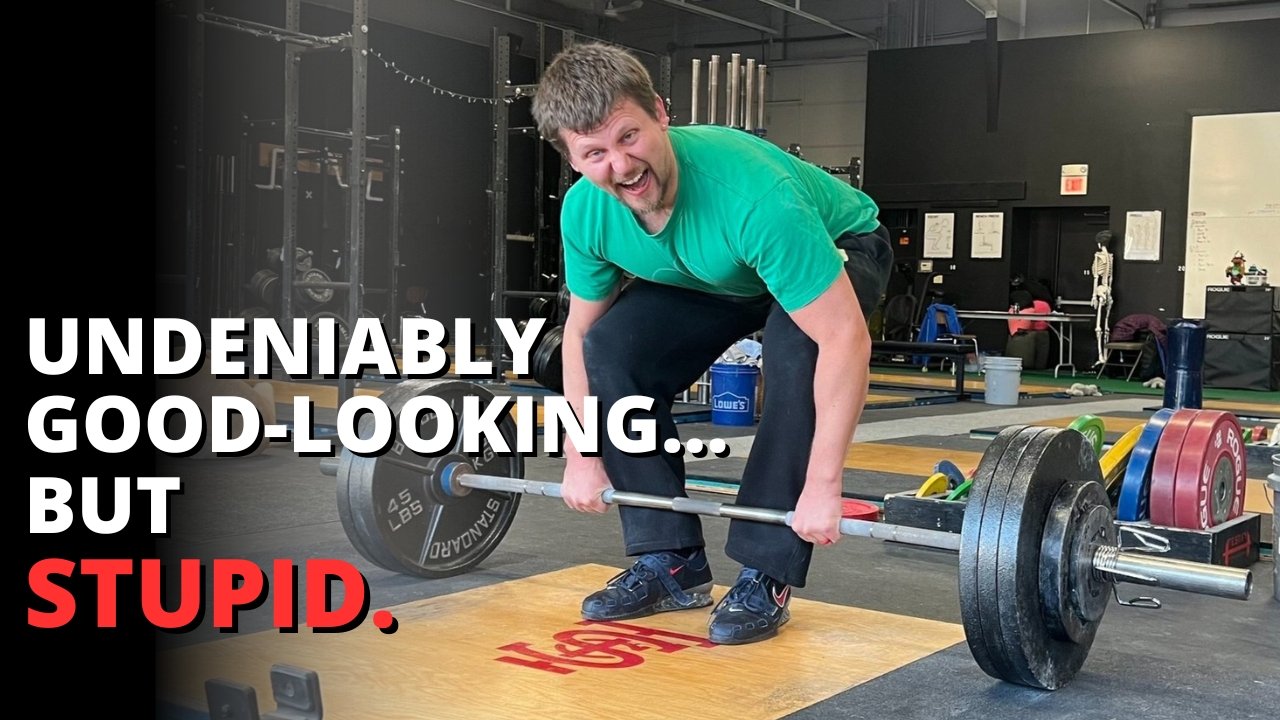
don’t be like this fool when setting up to pull.

This will seem rather obvious to many people - after all, who would voluntarily try to pull a heavy weight off the floor with bent arms? Nonetheless, this problem shows up in the setup for some lifters, and interestingly enough, it will occasionally rear its ugly head on the pull itself.

If you have this issue in your setup, remember that, when you bend your knees slightly to touch your shins to the bar, the knees go out (i.e., sideways) slightly and touch the inside of your elbows. Don’t shove the knees out so hard that you end up causing your elbows to bend. This is what we like to refer to as . . . ridiculous.

This . . . is much better.

Whether you’re setting up or pulling, remember - keep your arms straight. Bent arms are highly inefficient when pulling heavy weights off the floor . . . and they just look so silly. Don’t be silly.

We hope this helps you get stronger and live better!

(Some links may be affiliate links. As an Amazon Associate, Testify earns from qualifying purchases.)

If you found this helpful, you’ll love our weekly email. It’s got useful videos, articles, and training tips just like the one in this article. Sign up below, and of course, if you don’t love it, you can unsubscribe at any time.


At Testify, we offer small group training, private coaching (in-person or remotely via Zoom), online coaching, and form checks. Would you like to get quality coaching from a Starting Strength Coach?

Improve Your Deadlift by FIXING This Problem!

Does the bar move forward or swing away from you when you deadlift? Add pounds to your deadlift by solving this problem. Phil gives you a few tips to fix this issue.

(A Blast from the Past video originally published on 03/28/22)


At Testify, we offer small group training, private coaching (in-person or remotely via Zoom), online coaching, and form checks. Click the button below to get quality coaching from a Starting Strength Coach and start getting stronger TODAY.

No Deadlift Jack? THREE Tips for Loading Your Deadlift SUPER Easy

Struggling to load your deadlift? Deadlift jacks can be pricey, so here are three tips to make loading your deadlift super easy without any special equipment.


At Testify, we offer small group training, private coaching (in-person or remotely via Zoom), online coaching, and form checks. Click the button below to get quality coaching from a Starting Strength Coach and start getting stronger TODAY.

TWO Signs You're Accidentally KILLING Your Deadlift

Two deadlift mistakes: one simple cue to fix them both. Phil addresses two common deadlift errors and covers how to correct them with only one cue.


At Testify, we offer small group training, private coaching (in-person or remotely via Zoom), online coaching, and form checks. Click the button below to get quality coaching from a Starting Strength Coach and start getting stronger TODAY.

STOP Making This Deadlift Mistake With Your Legs!

Are you “kicking” the bar away from you with your shins when you deadlift? It’s killing your pulls, so knock it off. Let’s fix it real quick-like.

There are a number of reasons a deadlift can swing away from you, and we’re going to discuss one of them today: the error of accidentally pushing the bar away from you with your shins (i.e., “kicking” the bar with your shins) during the setup process. Two versions of this error are quite common, so let’s address them both, and this is explained and demonstrated in the included video as well.

Version #1: Bringing Your Shins to the Bar Too Aggressively
This error occurs during step 3 of the 5-step deadlift setup process. You can watch the included How to Start Lifting: Learn to Deadlift video for a more in-depth treatment of this setup process, but the quick version is as follows:

Step 1: Stance - narrow with shins 1” from the bar

Step 2: Bend at the hips to take your grip

Step 3: Bend your knees to touch your shins to the bar

Step 4: Squeeze your chest up to set your back

Step 5: Pull - drag the bar up your legs

If you bring your shins aggressively and quickly to the bar during step 3, you may inadvertently kick the bar away from you (i.e., it will roll forward a bit).

To solve this problem, simply use the cue “shins to the bar softly” or “shins lightly to the bar.” The idea is to bend your knees just enough to bring your shins in contact with the bar - and no more than that. Next, squeeze your chest up (step 4), and then pull (step 5).

Version #2: Dropping Your Hips When You Set Your Back
This error occurs during step 4 of the setup process - the “squeeze your chest up to set your back” step. If you set your back aggressively (and by the way, good for you if you do!), you might accidentally drop your hips, which causes your shins to move further forward, which causes the bar to get pushed forward.

It’s worth noting that this can be fixed after the fact; you simply raise your hips back up a bit and roll the bar back to its original location, but we’ve now added more variables and steps to our setup process, and it’s better not to make this mistake in the first place. What to do?

When squeezing your chest up to set your back in rigid extension, use the cue “chest up AND hips up.” Of course, you’re not actually trying to raise your hips - you’re just using the “hips up” part of the cue to make sure the hips stay in place and don’t move downward. We use this cue quite regularly, and it has worked wonders for a number of lifters.

As always, we hope this helps you get stronger and live better.

(Some links may be affiliate links. As an Amazon Associate, Testify earns from qualifying purchases.)

If you found this helpful, you’ll love our weekly email. It’s got useful videos, articles, and training tips just like the one in this article. Sign up below, and of course, if you don’t love it, you can unsubscribe at any time.


At Testify, we offer small group training, private coaching (in-person or remotely via Zoom), online coaching, and form checks. Would you like to get quality coaching from a Starting Strength Coach?

Antonio and the Deadlift

(A Blast from the Past article originally posted on 12/02/18)

Do you know about the Italian physician and anatomist Antonio Maria Valsalva (1666 - 1723)? Probably not, and that’s O.K., but every time you lift, you perform a maneuver - the Valsalva maneuver - that is named after him. To Valsalva is to hold your breath against a closed glottis, or perhaps more simply, to take a big breath and “bear down.”

You Valsalva instinctively when you are trying to push a stalled or stuck car, you Valsalva when you’re constipated and trying to poop, and fighter pilots Valsalva as part of their Anti-G Straining Maneuvers (AGSMs), which are performed to avoid passing out when subjected to high G-forces in the cockpit.

Now, let’s chat about the Valsalva maneuver and the deadlift.

You’ve been coached on the setup for the deadlift, so you’ve got the 5 steps down pat:

  • Stance - take a relatively narrow stance with your shins about 1” from the bar.

  • Grip - take a narrow grip on the bar (DO NOT MOVE THE BAR).

  • Shins - bend your knees to bring your shins into contact with the bar (DO NOT MOVE THE BAR).

  • Chest - squeeze your chest up to set your back in rigid extension (DO NOT MOVE THE BAR).

  • Pull - drag the bar up your legs.

jill correctly holds her valsalva at the top of her deadlift.

Most people will Valsalva right before (or during the process of) squeezing the chest up. Excellent. They will usually hold that Valsalva all the way up to the top of the lift - the lockout. Excellent again.

And right here - right at the top - this is where we tend to see a hiccup in the process. Some lifters (especially newer lifters) have a tendency to release their Valsalva at the top of the deadlift, i.e., they blow out their breath at the top. If you are one of these lifters - if you tend to release your breath at this point of the deadlift - there is only one thing to do.

Stop. That. Now.

james (left) and Loren (right) both know how important breath is when it comes to stability.

The Valsalva, the holding of your breath against a closed glottis and with tightly contracted abs - provides stability to the lift. Put simply, breath is stability, and stability is a wonderful thing to have when pulling heavy weights off the floor and setting them back down again.

So, if you tend to release your breath at the top of your deadlift, work on fixing it. Specifically, start by focusing on keeping your Valsalva while warming up the deadlift. The weight is lighter at this point, so you can spare some extra mental energy for this endeavor. Breath only when the bar is on the floor - not while loaded.

And be sure to thank Antonio the next time you complete a successful set of deadlifts.

(Some links may be affiliate links. As an Amazon Associate, Testify earns from qualifying purchases.)

If you found this helpful, you’ll love our weekly email. It’s got useful videos, articles, and training tips just like the one in this article. Sign up below, and of course, if you don’t love it, you can unsubscribe at any time.


At Testify, we offer small group training, private coaching (in-person or remotely via Zoom), online coaching, and form checks. Would you like to get quality coaching from a Starting Strength Coach?