Types of Barbells: Weightlifting vs Powerlifting vs Hybrid
/
Weightlifting bars, powerlifting bars, and dual purpose bars (i.e., hybrid bars) - what is the difference between these types of barbells, and specifically, what’s the deal with the rings (i.e., score marks or knurl marks) on each bar?
That Poor Soul
Some bars have one set of rings, and some bars have two sets of rings. Every time we go to (or host) a powerlifting meet, weightlifting meet, or strengthlifting meet, there is always some poor soul who shows up having trained on one type of bar - for example, a bar that has two sets of rings - and then he steps onto the competition platform and discovers he’s about to use a bar that only has one set of rings.
Now, he’s not sure which set of rings he was using in training, and as a result, he doesn’t know where to take his grip on the competition bar. This situation can also happen in training - either you’re forced to use a different bar than you usually do, or perhaps you’re traveling and are training at an unfamiliar gym.
Let’s prevent this problem.
The Solution
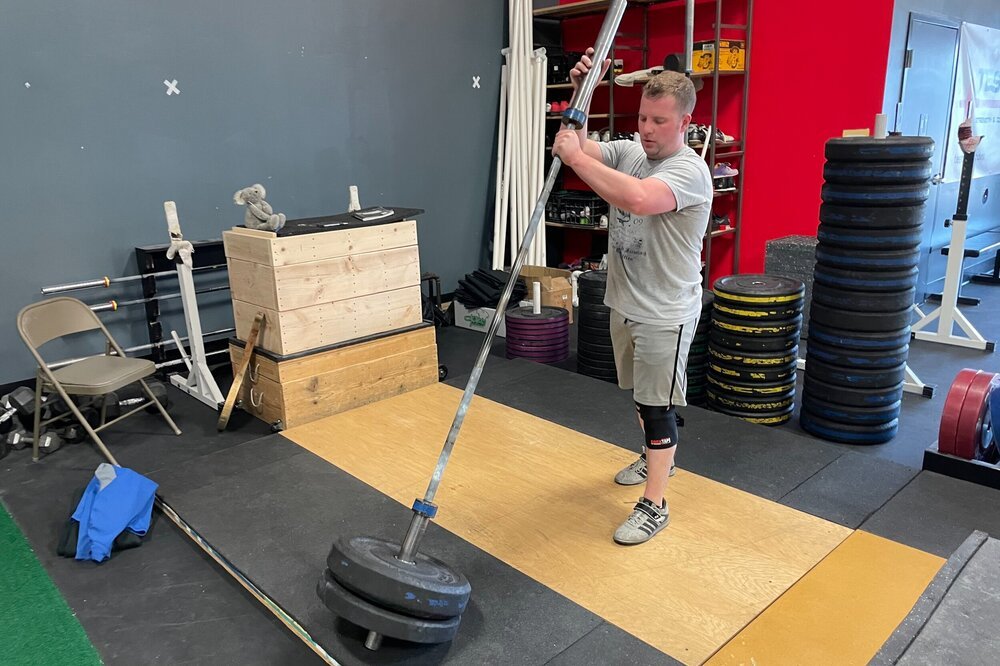
The solution is straightforward - familiarize yourself with the two types of rings, and you’ll be good to go. We use a hybrid bar as you see in Figure 1 for this purpose.

Figure 1: dual rings (hybrid bar)
The inner set of rings are 81 cm apart (approximately 32 in) and are commonly referred to as the “powerlifting rings” or simply the “power rings”. On a dedicated powerlifting barbell or “power bar,” this is the only set of rings you see (Figure 2), so if you go to a powerlifting meet, this is most likely what you’ll be using.

figure 2: power rings (power bar)
The outer set of rings are 91 cm apart (approximately 36 in) and are commonly referred to as the “weightlifting rings” or the “Olympic lifting rings.” If you go to a weightlifting meet, you’ll probably be lifting on a dedicated weightlifting bar (Figure 3), and that bar will only have the outer set of rings.

figure 3: Weightlifting rings (weightlifting bar)
But Why?
The rings are simply there as reference points for your grip so that your lifts can be more consistent and hopefully more successful as well. In the case of a power bar, the rings also serve as the markers for the maximum legal grip width for the bench press (i.e., in competition).
What To Do?
Know what bar you’re using. If you’re using a bar that has only one set of rings, get out a tape measure and measure the distance between the rings or - at the very least - measure it relative to some part of your body (arm length, etc.). This way, you know what bar you’re using, and if you have to use a different bar - whether training somewhere else or competing - your grip (and therefore your lifts) will still be consistent, which means you are more likely to hit your lifts successfully.
As always, we hope this helps you get stronger and live better.
-Phil
PS: Whenever you want even more Testify in your life, here are some free resources:
Book a free intro and strategy session with us HERE.
Pick up a free copy of Testify’s Squat Guide: 12 Tips to Improve Your Squat Now HERE.
Get our free weekly email - containing useful videos, articles, and training tips - HERE.
Follow Testify on Instagram HERE.
Subscribe to Testify’s YouTube channel HERE.
(Some links may be affiliate links. As an Amazon Associate, Testify earns from qualifying purchases.)
At Testify, we offer small group training, private coaching (in-person or remotely via Zoom), online coaching, and form checks. Interested in getting stronger, looking better, and having more energy?
How to Start Lifting: Learn to Deadlift
/In the fourth video of the "How to Start Lifting" series, Phil and the Testify gang help you learn how to deadlift and also discuss how to go about your first deadlift workout.
(This video is a Blast from the Past video originally published on 10/25/21.)
At Testify, we offer small group training, private coaching (in-person or remotely via Zoom), online coaching, and form checks. Click the button below to get quality coaching from a Starting Strength Coach and start getting stronger TODAY.
Tips and Tricks for the New Lifter - Part II
/
Evan demonstrates a handy trick for loading and unloading your deadlift.
(A Blast from the Past article originally posted on 04/16/21)
In Part I of this series, we discussed several tips and tricks that might help you as a new lifter, and now, in Part II, we’re back with a few more. With practice, using these tactics may seem obvious, and you might wonder why you didn’t think of them earlier, but when you’re starting out, these types of tips are often anything but obvious.
Easy Loading for Deadlifts
When you’re loading (or unloading) your deadlift with more than one 45 lb plate per side or more than one bumper plate per side, roll the plate (on the side you’re currently loading) up onto a 2.5 lb plate. This will raise the 45 lb plate or bumper plate off the ground just enough that it makes it easier to slide on the next plate (see the photo above).
Of course, using a deadlift jack is makes things even easier, and we have a video on how to make one (click here or scroll down to the end of this article), but in lieu of that, using a 2.5 lb plate works quite well.
Holding Valsalva for Multiple Reps
You can hold your Valsalva (i.e., your tightly held breath) for multiple reps on the bench press. Holding your Valsalva for 2-3 reps is pretty common on the bench press, and as long as you aren’t running out of oxygen, doing so works very well as you don’t have to get tight again before the next rep.
Two warnings, though: first, don’t take it as a personal challenge to see how many reps you can get on one breath - this may not end well - and second, holding your Valsalva for multiple reps doesn’t usually work very well for lifts other than the bench press.
Easy Unloading for Bumper Plates
If you’re finished snatching, cleaning, or deadlifting (even rowing), and you have multiple bumper plates on each side of the bar, here’s how to unload your bar: first, take the collars off both sides of the bar. Second, unload all of the plates from the left side of the bar. Third, raise the empty left side of the bar - walking it upward (the right side of the bar remains on the ground) until the bar is sitting vertically inside the stack of plates on the right side of the bar. Finally, simply lift the bar out of the stack, put the bar away, and then put the plates away.
Evan shows how to easily remove multiple bumper plates at once.
We hope these tips help you get stronger and live better, and perhaps we’ll be back with a Part III in the future.
-Phil
PS: Whenever you want even more Testify in your life, here are some free resources:
Book a free intro and strategy session with us HERE.
Pick up a free copy of Testify’s Squat Guide: 12 Tips to Improve Your Squat Now HERE.
Get our free weekly email - containing useful videos, articles, and training tips - HERE.
Follow Testify on Instagram HERE.
Subscribe to Testify’s YouTube channel HERE.
(Some links may be affiliate links. As an Amazon Associate, Testify earns from qualifying purchases.)
At Testify, we offer small group training, private coaching (in-person or remotely via Zoom), online coaching, and form checks. Interested in getting stronger, looking better, and having more energy?
50 Grams of Protein in 1 MINUTE | Fast Protein for Muscle Growth
/Need to get some more protein in your diet? Phil shows you how to do it real quick-like.
At Testify, we offer small group training, private coaching (in-person or remotely via Zoom), online coaching, and form checks. Click the button below to get quality coaching from a Starting Strength Coach and start getting stronger TODAY.
Testify Register - June 12, 2023
/THIS WEEK'S QUESTION
From our video The ONE Thing Fitness Magazines WON'T Tell You About the Squat (click the title to watch):
Anoop H.N.
Great video. What's the cue for the bar rolling forward towards neck due to the explosive hip drive? Lifting chest early kills the hip drive but staying leaned over will make the bar move towards neck when the hip drive is more than required? Is there any cue for ideal hip drive?
Phil
Thanks very much. If the bar is rolling forward, there are a couple of possible issues. One could be the bar's position on the back - if it's a bit too low, it tends to slide down during the set, and if it's a bit high, it tends to roll upward (the problem you mentioned). We have a video that covers nailing the bar position, so this may help:
Bar Position in the Squat
https://youtu.be/wVShiXRo9r8
Another issue is a general lack of tightness during the setup (i.e., before you unrack the bar). Be sure the chest is out, shoulders are back, and the bar is extremely secure before you stand the bar up. It should take work to get into the correct position. Here's a short video that covers this issue:
How to Squat: The Setup | STOP Doing This!
https://youtu.be/QZpqpwdP9Bc
Finally, there is the problem of exaggerating the hip drive. It's not as common as the first two issues, but it does happen. In this case, we might need to cue the person to "raise the chest" as they come up out of the hole or "drive the bar up" and not think about hip drive. This is not usually what we want, and it's never what we'd cue a new lifter, but in the case of someone who has this issue, they already know how to drive their hips and are actually doing it to the detriment of the rest of their body coming up, so we sometimes will use an overcue like this. It's usually accompanied by a "nobody else pay attention to what I'm telling this person" comment to the rest of the gym :-).
Hope this helps!
ARTICLES & VIDEOS
Why THIS is What You're Missing
You're not normal without this. Click here to watch.
How to Deadlift 600 POUNDS in 10 Minutes | Save Time at the Gym
You can save some serious time during your training sessions, and it's not complicated. Phil explains and demonstrates how to do it. Click here to watch.
How to Safely Bench Press Alone!
If you need to bench press alone, you need to do it safely, and it's very simple. We break it down. Click here to read.
Blast from the Past: How to Start Lifting: Learn to Squat
Phil and the Testify gang teach you how to squat and explain how to do your first squat workout (3rd video in the "How to Start Lifting" series). Click here to watch.
Blast from the Past: Conditioning with the Rower
The rower (or "erg") is a great conditioning tool. We cover a few options for utilizing the rower for effective conditioning. Click here to read.

NEW TESTIFY GEAR!
Sun's out, guns out, and we've got men's and women’s tank tops in multiple colors. Get yours today and represent your favorite gym!
Click here to head to the Testify Store.
WHAT'S COMING UP
Reminder: We will be closed for training on Saturday, June 17, as we are hosting the annual Testify Strongman Summer Showdown that day.
Below are a few of our upcoming events, and you can find out what else is on the calendar by heading to our events page at www.testifysc.com/events.
Testify Strongman Summer Showdown
June 17, 2023
Show up to lift, throw, carry, push, and pull big things, but most importantly, show up to have a great time with your fellow competitors and perhaps try something new!
Registration is closed, but come on out to cheer the athletes on!
Testify IronFest V
July 8, 2023
IronFest is a team-based strength meet wherein the contested lifts will be the squat, press, bench press, and deadlift. Competitors will form teams of 2 lifters/team and perform all 4 lifts; each lifter will perform one upper body lift and one lower body lift, and each lifter will receive 3 attempts for each lift.
Click here to register or for more information.
Deadapalooza! The Annual Testify Deadlift Festival
August 25, 2023
Deadapalooza is a strength meet wherein the only contested lift is - you guessed it - the deadlift. There will be one bar (possibly multiple bars if numbers dictate), and the meet will be conducted in a "rising bar" format, so the weight on the bar only goes up! It's a ton of fun, so come on out!
Click here to register or for more information.
THIS WEEK’S CONDITIONING
Option 1
”Prowler Base+1”
1. Load up a manageable weight.
2. Sprint 40m at 85% intensity.
3. Rest 30 sec.
4. Repeat 5-15 times.
Courtesy of “Death by Prowler” (on Starting Strength).
Compare to 2023.04.10.
Option 2
Bike/row:
4 x 800m
Rest 3 minutes between each round. Score = slowest time.
Compare to 2023.03.20.
Option 3
Outdoors:
10 rounds:
25 yd yoke carry
Rest 1 minute
Indoors:
10 rounds:
30 yd yoke carry (15 yd down-back)
Rest 1 minute
Compare to 2023.02.20.
Option 4
10 x 50 ft farmer carry
Each carry is 25 ft down and 25 ft back and is for time. Rest 1 minute between carries.
Women: 97# per handle (80# of plates)
Men: 137# per handle (120# of plates)
(Note: Each handle weighs 17#.)
Compare to 2023.02.20.