The Bench Press: You're Forgetting to Do This - Part 2

When benching, you know you’re supposed to retract your shoulder blades, push with your legs, and drive that bar up and back to its original starting position, but you’re still forgetting one thing . . .

Get your grip right.

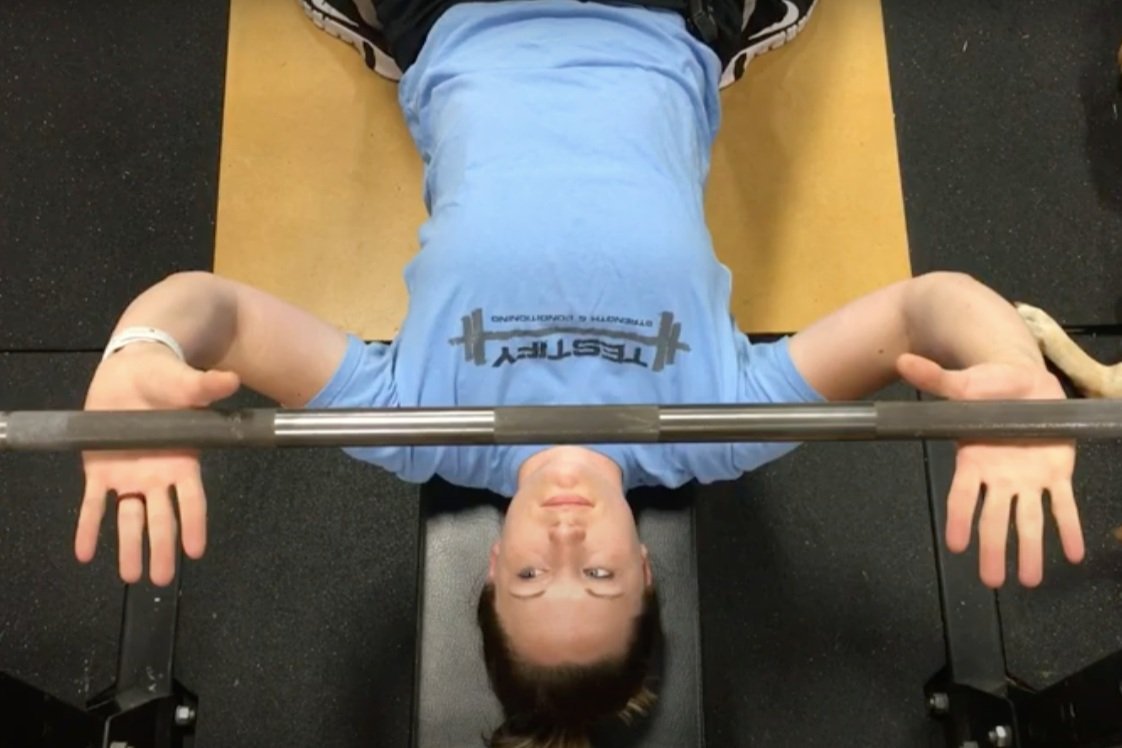
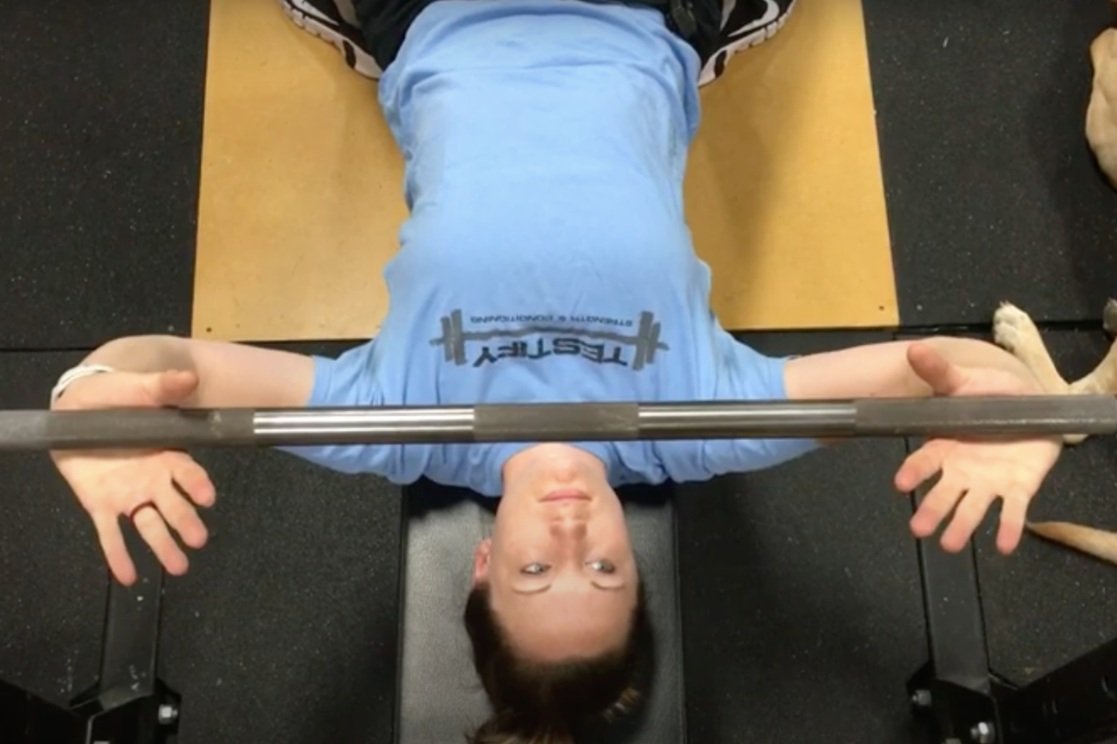
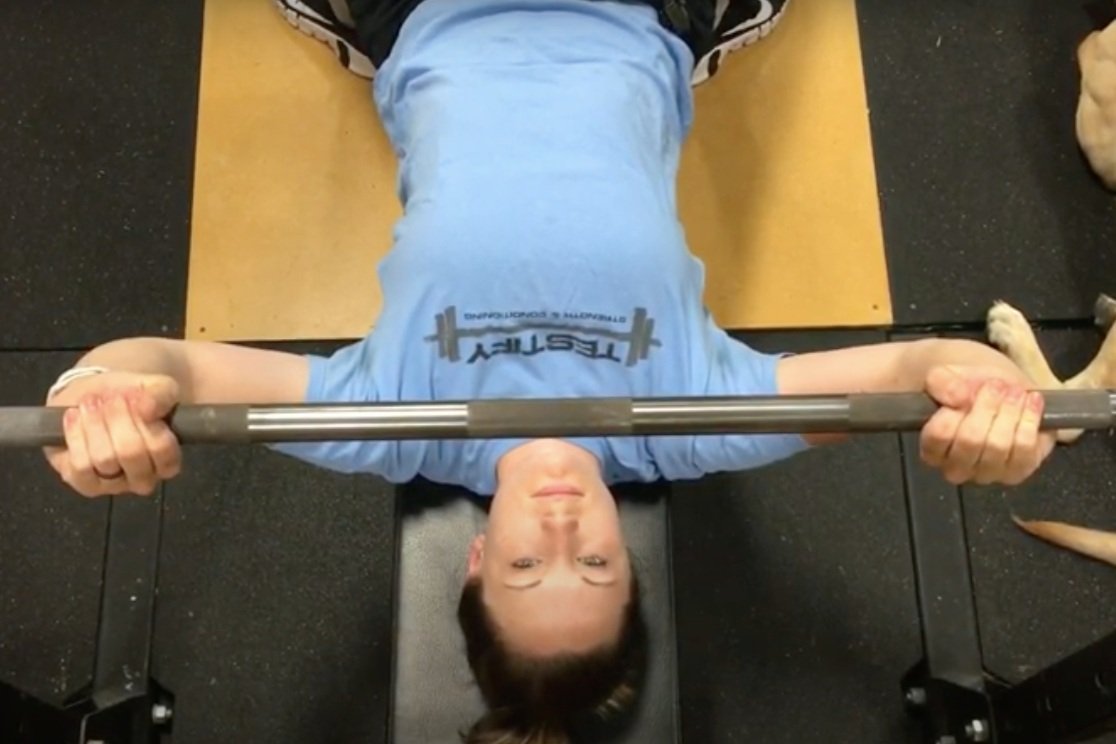
When taking your grip for the bench, you want the barbell to rest on the base or heel of the palm, i.e., directly over the bones of your forearm. This ensures that you have efficient force transfer between you and the bar, which is rather important when trying to move heavy weights. On the other hand, having the bar back toward your fingers causes your wrists to be in full extension (i.e., bent backwards), which is a flimsy and weak position for them to be in when trying to support a heavy load.

To achieve the correct grip, pronate your hands slightly by internally rotating your arms a bit and then squeezing the bar tightly with your fingers (scroll through the photos below for a demonstration).

If this doesn’t quite make sense, you can use the “diamond grip” approach described in this short article.

As always, we hope this helps you get stronger and live better.

(Some links may be affiliate links. As an Amazon Associate, Testify earns from qualifying purchases.)

If you found this helpful, you’ll love our weekly email. It’s got useful videos, articles, and training tips just like the one in this article. Sign up below, and of course, if you don’t love it, you can unsubscribe at any time.


At Testify, we offer small group training, private coaching (in-person or remotely via Zoom), online coaching, and form checks. Would you like to get quality coaching from a Starting Strength Coach?

click here to start today

Week 2022.05.02

Reminder: Please note that the gym will be closed for training this Saturday, 05/07/22, as we are hosting the annual Testify Barbell MAYhem weightlifting meet.

This Week’s Conditioning

Option 1
Sled Pyramid – 4, 5, or 6 tiers
Go up and down a 4, 5, or 6 tier “sled pyramid” – rest as needed. The distance for each round is 80 m indoors (a down-back on the 40m course) or 200 ft outdoors (2 down-backs on the 50 ft course). Rest as needed.

For example, Bob does the following (4 tiers):
Round 1: Empty sled
Round 2: 25#
Round 3: 50#
Round 4: 75#
Round 5: 50#
Round 6: 25#
Round 7: Empty sled

Compare to 2022.02.28.

Option 2
Bike/row:
5 min on
4 min off
4 min on
3 min off
3 min on
2 min off
2 min on
1 min off
1 min on

Record distance for each interval and add for total distance.

Compare to 2022.02.07.

Option 3
Outdoors:
8 rounds:
4 tire flips
50 yd sled push (25 yd down-back)
Rest 1 minute

Indoors:
8 rounds:
4 tire flips
100 ft sled push (50 ft down-back)
Rest 1 minute

Compare to 2022.01.10.

Option 4
5 rounds:
4 tire flips
8 sledgehammer strikes
6 pull-ups
10 push-ups

Pull-ups and push-ups can be modified – talk to the coaches for options.

Compare to 2022.01.10.


At Testify, we offer small group training, private coaching (in-person or remotely via Zoom), online coaching, and form checks. Would you like to get quality coaching from a Starting Strength Coach?

click here to start today

The Squat: You're Going to Do This Wrong

You’ve read the Blue Book, you’ve watched the videos, the bar is sitting in that nice, low bar position, and you’ve correctly performed the Valsalva maneuver - you’re ready to squat.

Don’t be like this fool.

If you’re new to squatting, though, you’re about to do something wrong . . .

You’re going to try and maintain a vertical back angle as you descend - in other words, you’re going to try and keep your torso as upright as possible.

Everyone does this at first, so don’t worry, you’re not a mutant, but we need to correct it, and we want to correct it right away. Simply tell yourself, “Point my chest at the floor” as you start your descent. In other words, reach back with your butt and lean over as you squat (check out the video below for a demonstration).

It’s easy to accidentally confuse “vertical back” with “straight back.” We want a straight, rigid back, but we don’t want a vertical back while squatting.

This . . . is much better.

Of course, it will be vertical at the beginning and the end of the movement (when we’re standing up), but your squat will be stronger and more efficient if your point your chest at the floor as you start your descent and then keep it pointed at the floor as you drive back up out of the bottom as well.

As always, we hope this helps you get stronger and live better.

(Some links may be affiliate links. As an Amazon Associate, Testify earns from qualifying purchases.)

This . . . is also much better.

If you found this helpful, you’ll love our weekly email. It’s got useful videos, articles, and training tips just like the one in this article. Sign up below, and of course, if you don’t love it, you can unsubscribe at any time.


At Testify, we offer small group training, private coaching (in-person or remotely via Zoom), online coaching, and form checks. Would you like to get quality coaching from a Starting Strength Coach?

click here to start today

Week 2022.04.25

This Week’s Conditioning

Option 1
Sled
Outdoors:
10 rounds of:
Push sled 100 ft
Pull sled 100 ft (hand over hand)

Indoors:
20 rounds of:
Push sled 50 ft
Pull sled 50 ft (hand over hand)

Compare to 2022.02.21.

Option 2
Bike/row:
4 x 3 minutes

Rest 3 minutes between each round. Score = lowest distance.

Compare to 2022.01.31.

Option 3
5-10 rounds:
50 ft yoke carry
50 ft yoke push
100 ft sandbag carry and S.O.B. (sandbag-over-bar)

Perform 1 round every 2-3 minutes.

Compare to 2022.01.03.

Option 4
Row/Tire 10 min ladder:
2 cal row
2 tire flips
4 cal row
4 tire flips
6 cal row
6 tire flips

Climb the ladder as high as possible in 10 minutes.

Compare to 2022.01.03.


At Testify, we offer small group training, private coaching (in-person or remotely via Zoom), online coaching, and form checks. Would you like to get quality coaching from a Starting Strength Coach?

click here to start today

The Bench Press: You're Forgetting to Do This - Part 1

You’re all set to bench - your grip is pronated, your shoulder blades are pinched back, and you’ve got your focal point nailed down, but you’re forgetting one thing . . .

Use. Your. Legs.

Don’t worry - Dave is NOT forgetting to do this.

When benching, drive up the bench with your legs. In other words, use your legs to drive your body in the direction of your head (i.e., “up the bench”). You should be driving in such a manner that - if the barbell wasn’t pinning your shoulders to the bench - you might actually start sliding up the bench.

Make sure you’re driving horizontally and not vertically - remember that the rep doesn’t count if your butt comes up off the bench. Drive with your legs throughout the entire rep - drive hard on the descent and drive even harder on the ascent.

Leg drive is easy to forget about - especially if you’re new to the bench press - but it’s important. Your legs give you lateral stability (the bench doesn’t help much here as it’s not very wide), they support your arch, and they help make everything between your feet and your shoulders that much more rigid, which makes for a more stable platform from which to bench.

So use your legs next time, and if you find that you keep forgetting, write “leg drive” down in your training log as a cue for yourself next time.

As always, we hope this helps you get stronger and live better.

(Some links may be affiliate links. As an Amazon Associate, Testify earns from qualifying purchases.)

If you found this helpful, you’ll love our weekly email. It’s got useful videos, articles, and training tips just like the one in this article. Sign up below, and of course, if you don’t love it, you can unsubscribe at any time.


At Testify, we offer small group training, private coaching (in-person or remotely via Zoom), online coaching, and form checks. Would you like to get quality coaching from a Starting Strength Coach?

click here to start today

Week 2022.04.18

This Week’s Conditioning

Option 1
Sled
Outdoors:
10-20 x 25 yds EMOM at a weight of your choice

Every minute, push the sled 25 yards, i.e., if pushing the sled takes 20 seconds, then you have 40 seconds to rest. Perform 10-20 rounds.

Indoors:
10-20 x 100 ft EMOM at a weight of your choice

Every minute, push the sled 100 feet, i.e., if pushing the sled takes 20 seconds, then you have 40 seconds to rest. Perform 10-20 rounds.

Compare to 2022.02.14.

Option 2
Bike/row:
4 x 800m

Rest 3 minutes between each round. Score = slowest time.

Compare to 2022.01.24.

Option 3
Outdoors:
5-10 rounds:
10 sledgehammer strikes (5R, 5L)
50 yd farmer carry (25 yd down-back)
Rest 1 minute

Indoors:
5-10 rounds:
10 sledgehammer strikes (5R, 5L)
100 ft farmer carry (50 ft down-back)

Rest 1 minute

Compare to 2021.12.27.

Option 4
5-8 rounds:
50 ft sled push
50 ft sled pull (hand over hand)
Row 1 minute
Rest 1 minute

This can also be done in a group of three where the sledder determines how long the other two people row and rest.

Compare to 2021.12.27.