Week 2020.12.14
/Reminder: Below are the hours for Christmas week (you can also find these on our Location & Hours page and on the whiteboard at the gym). Any days not listed retain their normal hours.
Thursday, 12/24/20: Regular morning hours; closed in the afternoon/evening
Friday, 12/25/20: Closed
Saturday, 12/26/20: Regular hours
New on the Testify YouTube channel!
This Week’s Conditioning
Option 1
Sled Pyramid – 4, 5, or 6 tiers
Go up and down a 4, 5, or 6 tier “sled pyramid” – rest as needed. The distance for each round is 80 m indoors (a down-back on the 40m course) or 200 ft outdoors (2 down-backs on the 50 ft course). Rest as needed.
For example, Bob does the following (4 tiers):
Round 1: Empty sled
Round 2: 25#
Round 3: 50#
Round 4: 75#
Round 5: 50#
Round 6: 25#
Round 7: Empty sled
Compare to 2020.10.05.
Option 2
Bike/row:
5 min on
4 min off
4 min on
3 min off
3 min on
2 min off
2 min on
1 min off
1 min on
Record distance for each interval and add for total distance.
Compare to 2020.09.21.
Option 3
5-10 rounds of:
30 sec ME tire flips
30 sec rest
Compare to 2020.08.24.
Option 4
10 x 50 ft farmer carry
Each carry is 25 ft down and 25 ft back and is for time. Rest 1 minute between carries.
Women: 97# per handle (80# of plates)
Men: 137# per handle (120# of plates)
(Note: Each handle weighs 17#.)
Compare to 2020.08.17.
Shin Angle and Your Deadlift
/
This deadlifter has a problem. Can you figure out what it is?
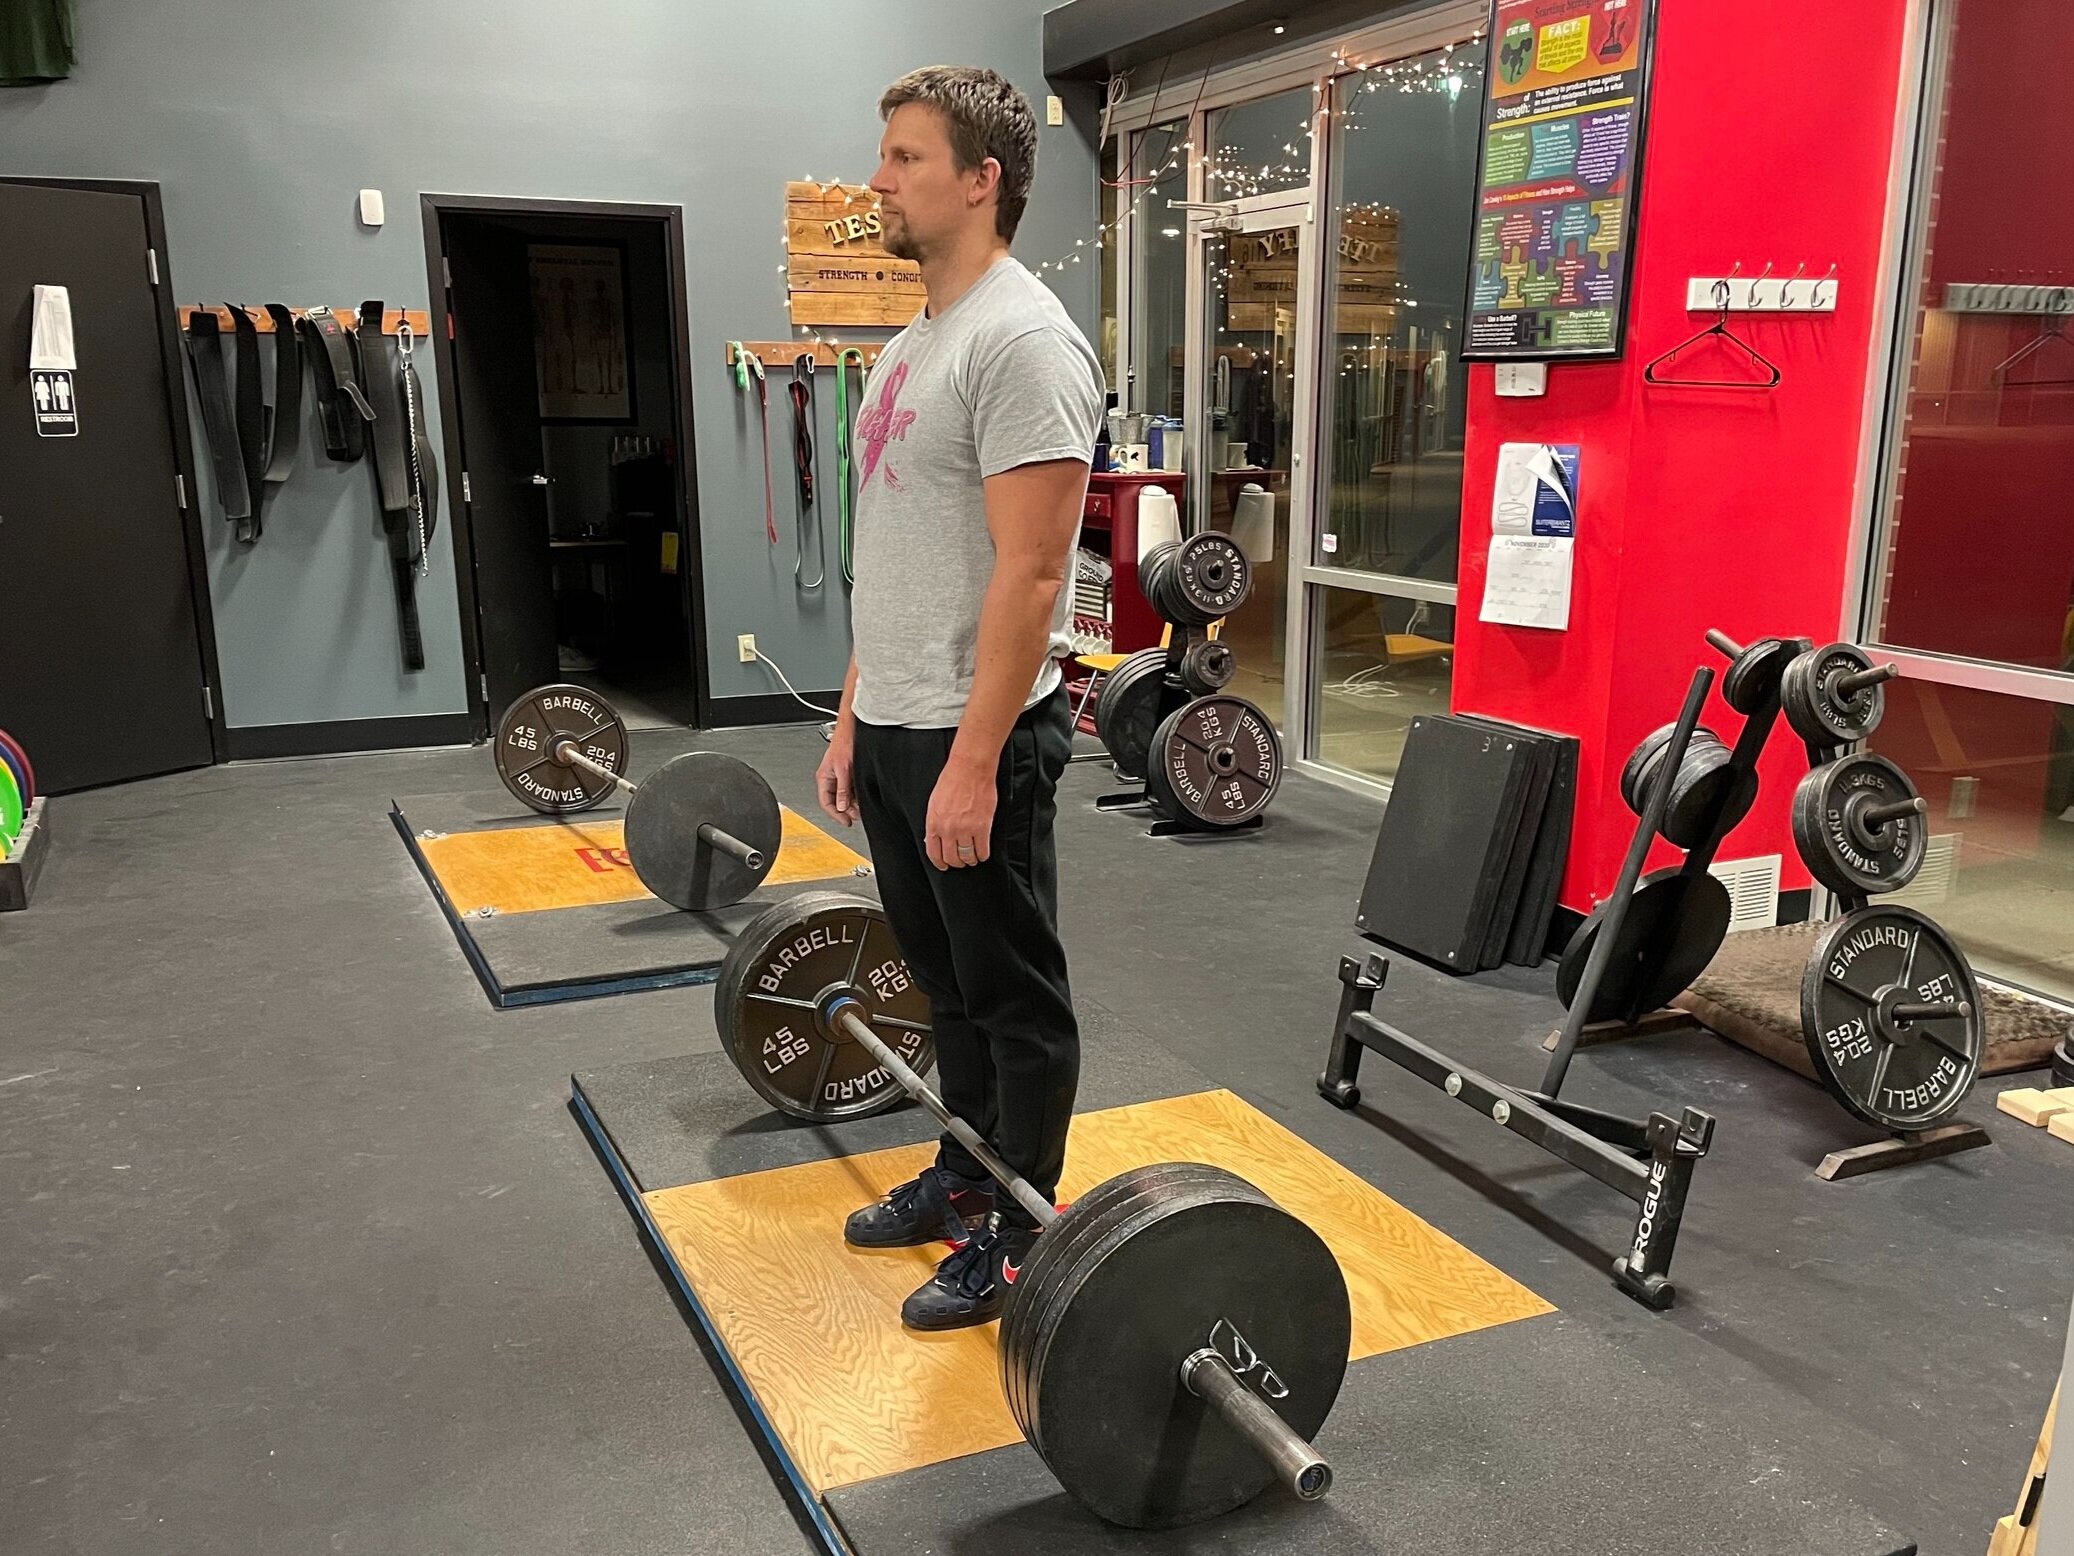
Incorrect stance - too close to the bar (shins actually touching the bar in this case)
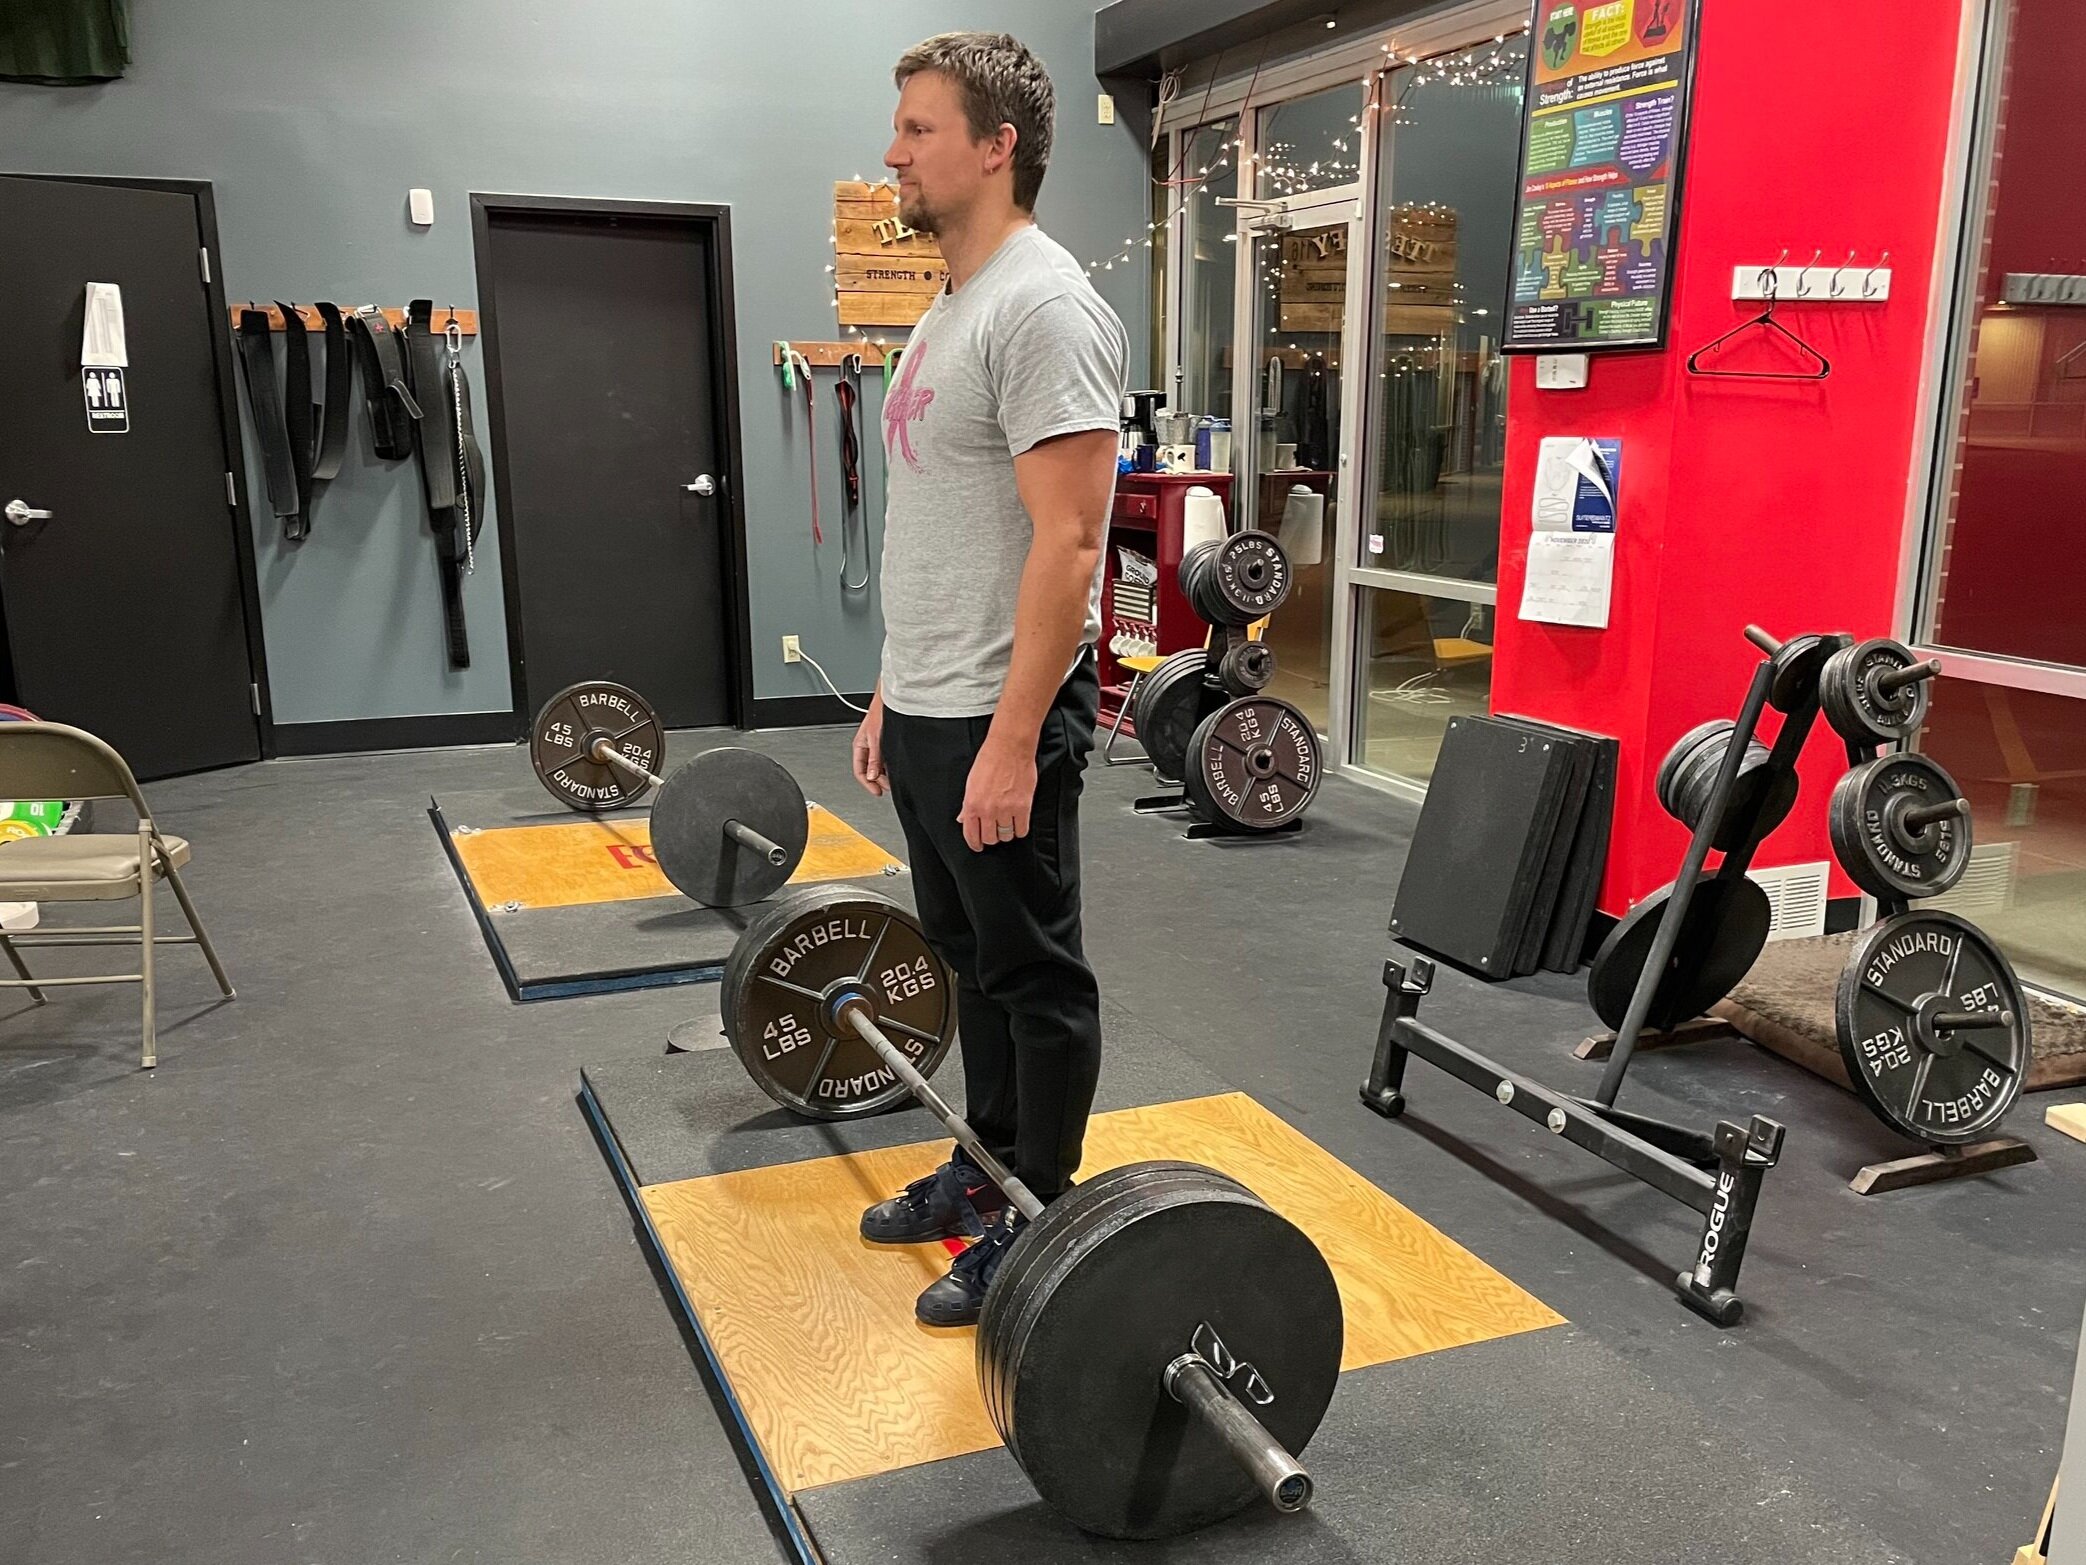
Correct stance with shins 1 inch from the bar.
In the setup for the deadlift, we sometimes see the problem of people setting up too close to the bar, and taking a look at your shin angle can help identify this problem. This problem is usually born of good intentions and is similar to the “shoving the knees too far out in the squat” problem (yes, that actually does happen with some people). We know we’re supposed to shove our knees out, and then we accidentally - and almost always unknowingly - overdo it. Likewise, in the deadlift, you know you’re supposed to set up close to the bar, and then you accidentally overdo it by setting up too close.
Remember, step #1 of the deadlift setup is “Set up with the bar over your midfoot - with your shins one inch from the bar.” It is NOT simply “Set up close to the bar.”
This is where looking at your shin angle can help. In the deadlift setup, at the start of the pull, everyone will have a small shin angle (measured from vertical) if the bar is over midfoot, i.e., the shin will be angled slightly forward, but the actual amount will vary slightly with anthropometry. With this variance in mind, there is no single shin angle that will be correct for everyone, but there is one angle that is wrong for everyone, and that’s zero degrees. In other words, if your shins are completely vertical as you’re about to pull the bar off the floor, the bar is in the wrong spot with respect to the middle of your foot.
Setting up too close to the bar creates the tell-tale warning sign of vertical shins.
If you notice that your shins are vertical as you’re about to pull (or if you record yourself and notice it on video), then one of three things has happened:
You set up too close to the bar for your first rep. Solution? Take your stance with your shins one inch from the bar - not with your shins arbitrarily close to the bar.
You set the bar down (after pulling the previous rep) too close to your shins. Solution? Set it down over the middle of your foot, not up against your shins.
You set the bar down forward of the midfoot (or even directly over the midfoot) and then rolled it back to your shins. Solution? If you set the bar down forward of the midfoot, simply roll it back slightly to its correct position over the middle of your foot, and then bend your knees to bring your shins to the bar. The bar is the marker for your shins, not the other way around.

Setting up with shins 1 inch from the bar permits a slight forward angle of the shins.
Pay attention to your shin angle the next time you deadlift, especially during your warmups when the weight isn’t so heavy and you can spare some mental bandwidth. If you notice this “vertical shin” problem, figure out which one of the three scenarios listed above you’re in, and correct accordingly. Your deadlift PR will thank you for it. Happy training.
Week 2020.12.07
/New on the Testify YouTube channel!
This Week’s Conditioning
Option 1
Sled
Outdoors:
10 rounds of:
Push sled 100 ft
Pull sled 100 ft (hand over hand)
Indoors:
20 rounds of:
Push sled 50 ft
Pull sled 50 ft (hand over hand)
Compare to 2020.10.12.
Option 2
Bike/row:
4 x 3 minutes
Rest 3 minutes between each round. Score = lowest distance.
Compare to 2020.09.28.
Option 3
Outdoors:
5-10 rounds:
10 sledgehammer strikes (5R, 5L)
50 yd farmer carry (25 yd down-back)
Rest 1 minute
Indoors:
5-10 rounds:
10 sledgehammer strikes (5R, 5L)
100 ft farmer carry (50 ft down-back)
Rest 1 minute
Compare to 2020.08.31.
Option 4
1. 5 yoke carries @ 30 yd (15 yd downback) – work up to heaviest carry
2. 5 rounds of 5 reps on the axle “clean and press away” – work up to heavy set of 5
Compare to 2020.08.24.
3 Cues to Set Your Back in the Deadlift
/
Setting the back in rigid extension in the deadlift can be problematic for some lifters, and this is understandable. You can’t see what’s going on back there and you might not know what extension really feels like. Your spinal erectors are fighting with your hamstrings for control of your back, and we want your spinal erectors to win this battle because a nice, rigid back is much more efficient at transferring force from your hips and legs to the bar. With this goal in mind, let’s examine a few cues that might help you out.
“Push your belly down between your thighs.”
The first cue we use when teaching the deadlift is “squeeze your chest up,” but after that, this is probably our next best cue, and I believe the credit for this one goes go Nick Delgadillo. The concept is pretty simple - shove your belly down in between your femurs, and if you do that, you’ll have a rigid, flat back.
“Wrinkles in your shirt”
Picture the back of your shirt with wrinkles in it - not smooth (which is what it would be if your back was rounded in flexion) but rather starting to bunch up as you try to arch your back. Granted, we don’t want your back to be arched - just straight - but trying to arch it will help get it straight for a lot of people who struggle with back extension. This one tends to be useful because, even if someone doesn’t have a solid grasp of back extension, they can picture what they’d have to do to put some wrinkles in their shirt.
“Show your shirt to the wall.”
Imagine someone standing about 10-20 feet in front of you. Now - without dropping your hips - try to show the writing on your shirt to that person. That person needs to be able to read what’s on your shirt. It’s a bit of an exaggeration, but a useful one nonetheless.
Try one or two of these cues out the next time you deadlift. If you don’t have a coach or an educated friend watching you, record yourself so you can check afterward whether or not you successfully set your back. Happy training.
Week 2020.11.30
/Reminder: Please note that the gym will be closed this Saturday, 12/05/20, as we are hosting the annual Testify Christmas Classic weightlifting meet.
New on the Testify YouTube channel!
This Week’s Conditioning
Option 1
Sled
Outdoors:
10-20 x 25 yds EMOM at a weight of your choice
Every minute, push the sled 25 yards, i.e., if pushing the sled takes 20 seconds, then you have 40 seconds to rest. Perform 10-20 rounds.
Indoors:
10-20 x 100 ft EMOM at a weight of your choice
Every minute, push the sled 100 feet, i.e., if pushing the sled takes 20 seconds, then you have 40 seconds to rest. Perform 10-20 rounds.
Compare to 2020.10.19.
Option 2
Bike/row:
4 x 800m
Rest 3 minutes between each round. Score = slowest time.
Compare to 2020.10.05.
Option 3
Outdoors:
10 rounds:
25 yd yoke carry
Rest 1 minute
Indoors:
10 rounds:
30 yd yoke carry (15 yd down-back)
Rest 1 minute
Compare to 2020.09.07.
Option 4
Sandbag-over-bars
Set yoke at #33 for women or #35 for men.
1. 1 minute AMRAP
2. 5 rounds of 2 reps every 2 minutes (speed!)
3. 1 minute AMRAP
Weights
Female under 40 years
140 lbs and under: 75 lbs
140.1 lbs – 185 lbs: 100 lbs
185.1 lbs and over: 150 lbs
Female 40 years and over
140 lbs and under: 50 lbs
185 lbs and under: 75 lbs
185.1 lbs and over: 100 lbs
Male under 40 years
185 lbs and under: 150 lbs
185.1 lbs – 235 lbs: 200 lbs
235.1 lbs and over: 250 lbs
Male 40 years and over
185 lbs and under: 100 lbs
185.1 lbs – 235 lbs: 150 lbs
235.1 lbs and over: 200 lbs
Compare to 2020.08.31.