3 Ways You're Ruining Your Squat

(A Blast from the Past article originally posted on 07/21/23)

Let’s cover a few mistakes that you might be making with your squat, and then let’s fix them fast.

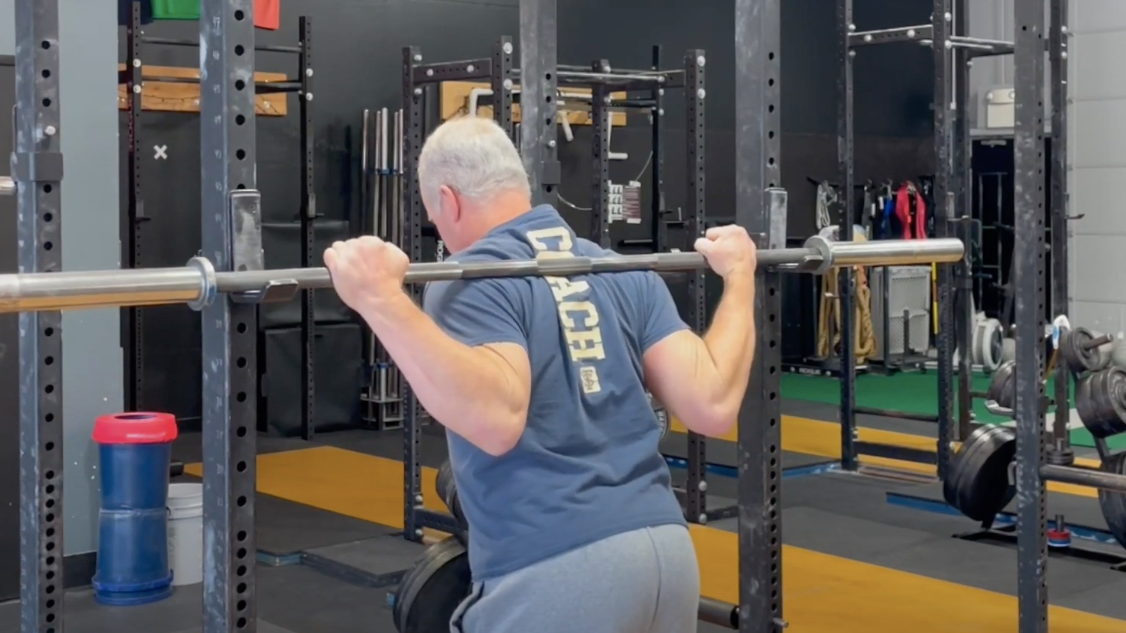
Mistake #1: Trying to Stay Upright
When you squat, don’t confuse a vertical back with a straight back. We want a straight back - it’s more efficient - but we’re not all that interested in a vertical back. Of course, your back will be vertical at the beginning and the end of the squat (i.e., when you’re standing up), but throughout the squat, it will (and should) move through a range of angles.

To fix this problem, as you start your squat, reach back with your hips and simultaneously point your chest at the floor as you descend (watch the included video for a demonstration). In other words, get leaned over as you descend - it will put you in a stronger, more efficient position at the bottom of the squat so that you can effectively drive your hips up out of the hole. Trying to stay upright (and trying to get upright too soon on the ascent) simply makes your squat harder and less efficient than it should be.

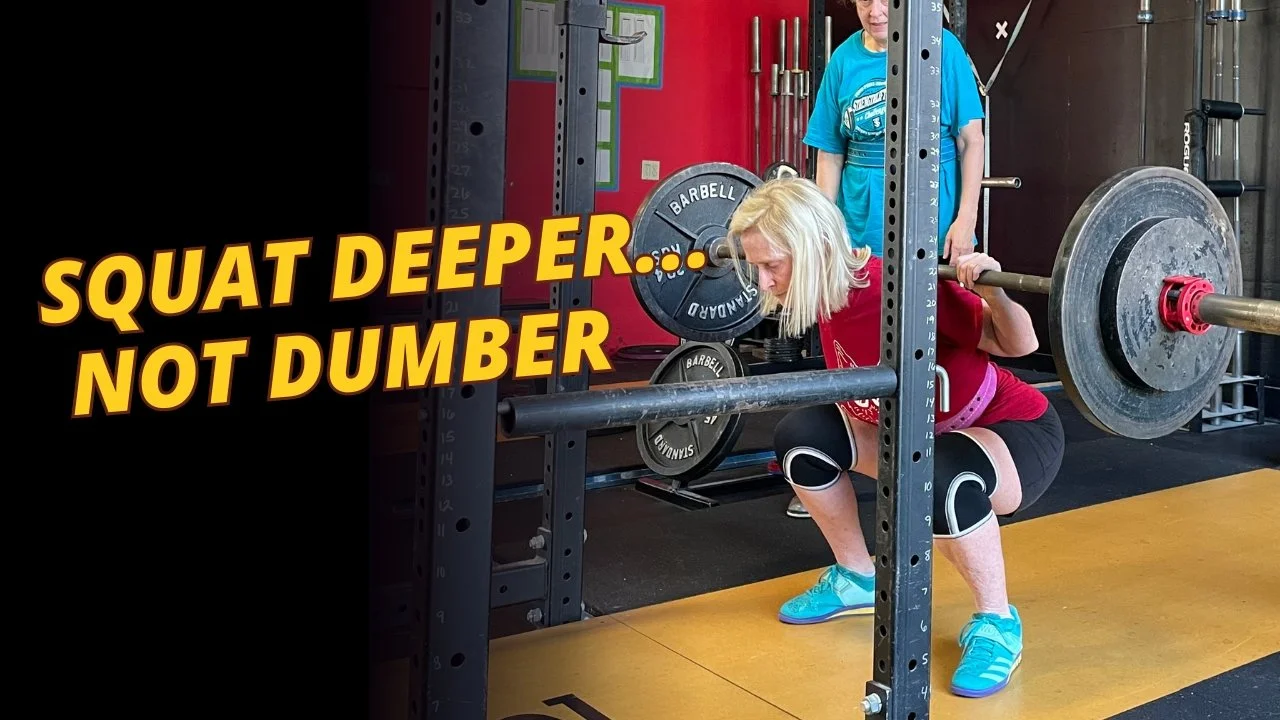
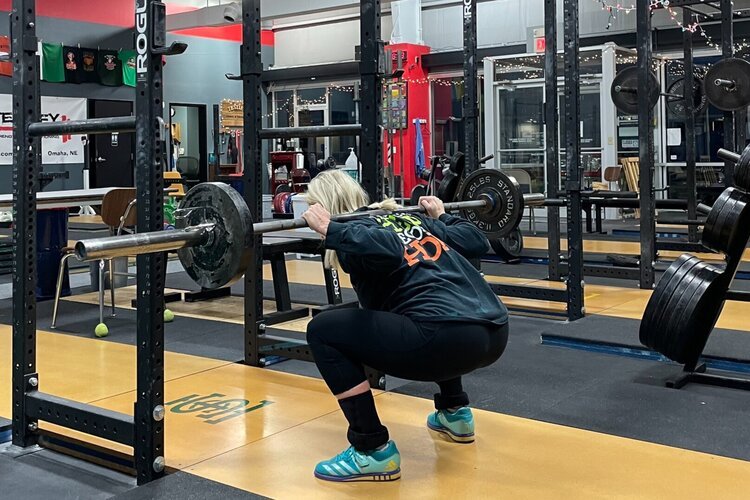
Mistake #2: Not Shoving Your Knees Out
When you squat, your knees travel forward - after all, that’s what knees generally do when they bend, but you are also going to shove them sideways, i.e., you’re going to shove your femurs apart from one another. We don’t want your knees to travel only forward; instead, your knees are going to travel both forward and out (i.e., forward and sideways).

To accomplish this, take a stance with your heels roughly shoulder-width apart, and then point your toes out at about a 30 degree angle. As you start to descend, point your knees in the direction of your toes so that your femurs are parallel to your feet (again, watch the included video for a demonstration).

When you shove your knees out, you allow your adductors (i.e., your groin muscles) to contribute to the lift, and this makes for a stronger squat. Shoving your knees apart also means that you get your femurs out of the way of your hips and torso, and this, in turn, makes it easier to achieve proper depth in the squat.

Mistake #3: Arching Your Back
You don’t want an arched back; in other words, you don’t want your spine in a position of overextension. Granted, you don’t want a rounded or flexed back, but we certainly don’t want an arched back either. An arched back is neither a comfortable nor a strong position in which to support a heavy load. You simply want your back to be straight and rigid as this is very efficient for transferring force from your hips and legs to the barbell. Watch the included video for a demonstration of what to do (and what not to do).

If you find yourself arching your back before or during the squat, remind yourself to clamp down hard by contracting your abs as tightly as you can. If this doesn’t work, you may need to use an overcue and tell yourself to “round your back” just a bit. However, remember that this is an overcue and be conservative with its use - you don’t actually want a rounded back, but you may find that this helps you successfully achieve a straight back.

As always, we hope this helps you get stronger and live better.

-Phil

PS: Whenever you want even more Testify in your life, here are some free resources:

  • Book a free intro and strategy session with us HERE.

  • Pick up a free copy of Testify’s Squat Guide: 12 Tips to Improve Your Squat Now HERE.

  • Get our free weekly email - containing useful videos, articles, and training tips - HERE.

  • Follow Testify on Instagram HERE.

  • Subscribe to Testify’s YouTube channel HERE.

(Some links may be affiliate links. As an Amazon Associate, Testify earns from qualifying purchases.)


At Testify, we offer small group training, private coaching (in-person or remotely via Zoom), online coaching, and form checks. Interested in getting stronger, looking better, and having more energy?

book a free intro

Don't Perform a SINGLE Squat at the Gym Until You Watch This

This one mistake hides in plain sight—and it might be holding your squat back more than you think. Starting Strength Coach Phil Meggers covers this foundational squat issue with 4 important tips.

Whenever you want even more Testify in your life, here are some free resources:

  • Book a free intro and strategy session with us HERE.

  • Pick up a free copy of Testify’s Squat Guide: 12 Tips to Improve Your Squat Now HERE.

  • Get our free weekly email - containing useful videos, articles, and training tips - HERE.

  • Follow Testify on Instagram HERE.

  • Subscribe to Testify’s YouTube channel HERE.


At Testify, we offer small group training, private coaching (in-person or remotely via Zoom), online coaching, and form checks. Interested in getting stronger, looking better, and having more energy?

book a free intro

You're (Probably) Destroying Your Squat . . . Before You Even Start.

It’s entirely possible that you’re ruining your squat before you even start the descent. If so, this problem needs to be fixed right away.

Are You Committed?
Today’s error is that of not getting correctly positioned before you unrack the barbell. In other words, how much effort are you putting into that process - how uncomfortable are you willing to get before you unrack the bar?

If you’d rather see this process (i.e., the mistake and the solution) in action, check out the video below.

When you stand the barbell up that two to three inches from the hooks of the rack, be sure to think of that movement as your first rep (no, you don’t get to count it), and as such, you need to get tight and correctly positioned before you do it.

Figure 1: don’t be like this fool.

What Not To Do
You certainly don’t want to get under the bar in a loose, relaxed, sloppy manner (Figure 1), then stand the bar up, walk a step or two back to take your stance, and then have to get tight under the bar - i.e., squeeze your chest up with shoulders back - when you’ve already got 100 lb, 200 lb, 300 lb, etc. on your back.

What You Should Do
Instead, be sure to position yourself and brace correctly before you stand the bar up from the hooks. Your chest is up, shoulders back, you’ve performed your Valsalva, and every muscle in your trunk that can be contracted tightly is contracted tightly so that you are rigidly braced (Figure 2).

Getting tight and properly positioned under the bar takes work and effort. If you feel relaxed and comfortable before your unrack the bar - it’s wrong.

Get uncomfortable.

figure 2: This is much better.

Your set starts before you think it does - it starts when you unrack it - so prepare yourself accordingly.

Be committed to the entire process and be sure to get tight before you unrack the bar. Your squat will thank you.

As always, we hope this helps you get stronger and live better.

-Phil

PS: Whenever you want even more Testify in your life, here are some free resources:

  • Book a free intro and strategy session with us HERE.

  • Pick up a free copy of Testify’s Squat Guide: 12 Tips to Improve Your Squat Now HERE.

  • Get our free weekly email - containing useful videos, articles, and training tips - HERE.

  • Follow Testify on Instagram HERE.

  • Subscribe to Testify’s YouTube channel HERE.

(Some links may be affiliate links. As an Amazon Associate, Testify earns from qualifying purchases.)


At Testify, we offer small group training, private coaching (in-person or remotely via Zoom), online coaching, and form checks. Interested in getting stronger, looking better, and having more energy?

book a free intro

99% of Lifters Don't Know These Training Tricks

Most lifters are leaving progress on the table without realizing it. Starting Strength Coach Phil Meggers covers 12 overlooked training tactics, techniques, and tricks that can change the way you approach the bar. Watch this before your next session — your future PRs will thank you.

Whenever you want even more Testify in your life, here are some free resources:

  • Book a free intro and strategy session with us HERE.

  • Pick up a free copy of Testify’s Squat Guide: 12 Tips to Improve Your Squat Now HERE.

  • Get our free weekly email - containing useful videos, articles, and training tips - HERE.

  • Follow Testify on Instagram HERE.

  • Subscribe to Testify’s YouTube channel HERE.


At Testify, we offer small group training, private coaching (in-person or remotely via Zoom), online coaching, and form checks. Interested in getting stronger, looking better, and having more energy?

book a free intro

Squatting Deeper - Don't Make These 2 Mistakes!

(A Blast from the Past article originally posted on 05/07/21)

When people are endeavoring to squat deeper - whether because their coach told them too or because they’ve recorded themselves on video and seen the disheartening proof of a “too-high” squat - we often see two mistakes:

  1. The lifter descends significantly faster than before without actually squatting deeper.

  2. The lifter leans over too much.

With regard to mistake #1, remember that going deeper doesn’t mean descending faster. In fact, 50% of the time, going down faster doesn’t change anything except the speed of the descent (yes, duh) and the other 50% of the time, the lifter actually cuts off his squat even higher when he tries to descend more quickly.

Julie makes mistake #2 as she leans over too much in an effort to achieve the proper depth. Note that the crease of her hips have not passed below the level of the top of her kneecap and are, in fact, well above height of the kneecap.

Julie makes mistake #2 as she leans over too much in an effort to achieve the proper depth. Note that the crease of her hips have not passed below the level of the top of her kneecap and are, in fact, well above height of the kneecap.

Mistake #2 - leaning over too much - comes from a misunderstanding of how depth is achieved. Depth is achieved when the crease of the hip passes just below the height of the top of the patella. In other words, you squat deeper by taking the hips lower - not by taking the barbell lower.

JULIE HITS THE CORRECT DEPTH ON HER SQUAT.

If the hips go lower, everything else above the hips goes lower as well - including the bar - but the reverse is not necessarily true. When starting your descent, leaning over (as you shove your knees out and reach back with your hips) is important, but once you’ve set your back angle by doing so, keep it constant - don’t lean over more than you already have.

If you struggle with either of these two mistakes, try the cues “stretch deep” or “reach deep” the next time you squat. With the “stretch deep” cue, you are reminding yourself that you will experience a stretch in the hips as you descend lower into the squat, and with the “reach deep” cue, you are reminding yourself that you reach downward with your hips - not the bar.

“Stretch deep” and “reach deep” - give these cues a try, and as always, we hope these tips help you get stronger and live better.

-Phil

PS: Whenever you want even more Testify in your life, here are some free resources:

  • Book a free intro and strategy session with us HERE.

  • Pick up a free copy of Testify’s Squat Guide: 12 Tips to Improve Your Squat Now HERE.

  • Get our free weekly email - containing useful videos, articles, and training tips - HERE.

  • Follow Testify on Instagram HERE.

  • Subscribe to Testify’s YouTube channel HERE.

(Some links may be affiliate links. As an Amazon Associate, Testify earns from qualifying purchases.)


At Testify, we offer small group training, private coaching (in-person or remotely via Zoom), online coaching, and form checks. Interested in getting stronger, looking better, and having more energy?

book a free intro

Is Your Squat Stuck? It's Not Why You Think.

Do you have an odd sticking point in your squat? Let’s fix it right now.

Odd sticking point? What do you mean?
On your descent, you reached back with your hips, you pointed your chest at the floor, and you shoved your knees apart. You’ve gotten a bounce out of the bottom of the squat, you’ve started your ascent, and you’re driving your hips upward as you do so.

You’ve maintained that nice, leaned over back angle, and then, when you’re past what is the typical sticking point of a heavy squat - around one third to one half of the way up - right when things should start getting a bit easier, suddenly, your squat is still extremely difficult. In fact, it might even get harder and actually slow down.

If you want to see a demonstration of this, watch the video below - specifically the squat that starts at the 0:43 mark.

What did I do wrong?
You maintained your back angle and drove your hips up out of the hole initially, but because the barbell feels awfully heavy and you’re worried about missing the rep, your brain reverts to “Oh-my-goodness-I-need-to-stand-up-right-now,” and you start raising your chest too soon.

This kills your hips drive, the bar speed dies, and the squat gets much harder than it should be at this point in the ascent.

The Fix
There are a couple of different cues to help you solve this problem:

  • Keep driving the hips.

  • Stay in your hips.

  • Stay leaned over.

  • Stay in your lean. (my personal favorite, and the idea is to stay in that leaned over position longer than you think you should)

Tyler does an excellent job staying in his hips, - staying leaned over - on his ascent.

When panic sets in - when you really want to raise your chest and try to get your torso vertical (which will make your squat miserably hard) - stay in that lean just a bit longer . . . and you’ll reach the top without making the squat any harder than it needs to be.

To see this “staying in your lean” executed well, go back to the video above and watch the squat at the 0:56 mark.

Stay in your hips, stay in your lean - and you’ll be just fine.

As always, we hope this helps you get stronger and live better.

-Phil

PS: Whenever you want even more Testify in your life, here are some free resources:

  • Book a free intro and strategy session with us HERE.

  • Pick up a free copy of Testify’s Squat Guide: 12 Tips to Improve Your Squat Now HERE.

  • Get our free weekly email - containing useful videos, articles, and training tips - HERE.

  • Follow Testify on Instagram HERE.

  • Subscribe to Testify’s YouTube channel HERE.

(Some links may be affiliate links. As an Amazon Associate, Testify earns from qualifying purchases.)


At Testify, we offer small group training, private coaching (in-person or remotely via Zoom), online coaching, and form checks. Interested in getting stronger, looking better, and having more energy?

book a free intro