How to Close Grip Bench Press for Maximum Strength!
/Want a bigger bench press? Of course you do. Phil helps you learn how to correctly perform the close grip bench press.
(A Blast from the Past video originally published on 04/04/22)
At Testify, we offer small group training, private coaching (in-person or remotely via Zoom), online coaching, and form checks. Click the button below to get quality coaching from a Starting Strength Coach and start getting stronger TODAY.
4 Tips for a Better Bench Press
/(A Blast from the Past article originally posted on 12/10/21)
Let’s briefly cover a few tips to help you achieve a better, stronger bench press.
Tip #1: Grip
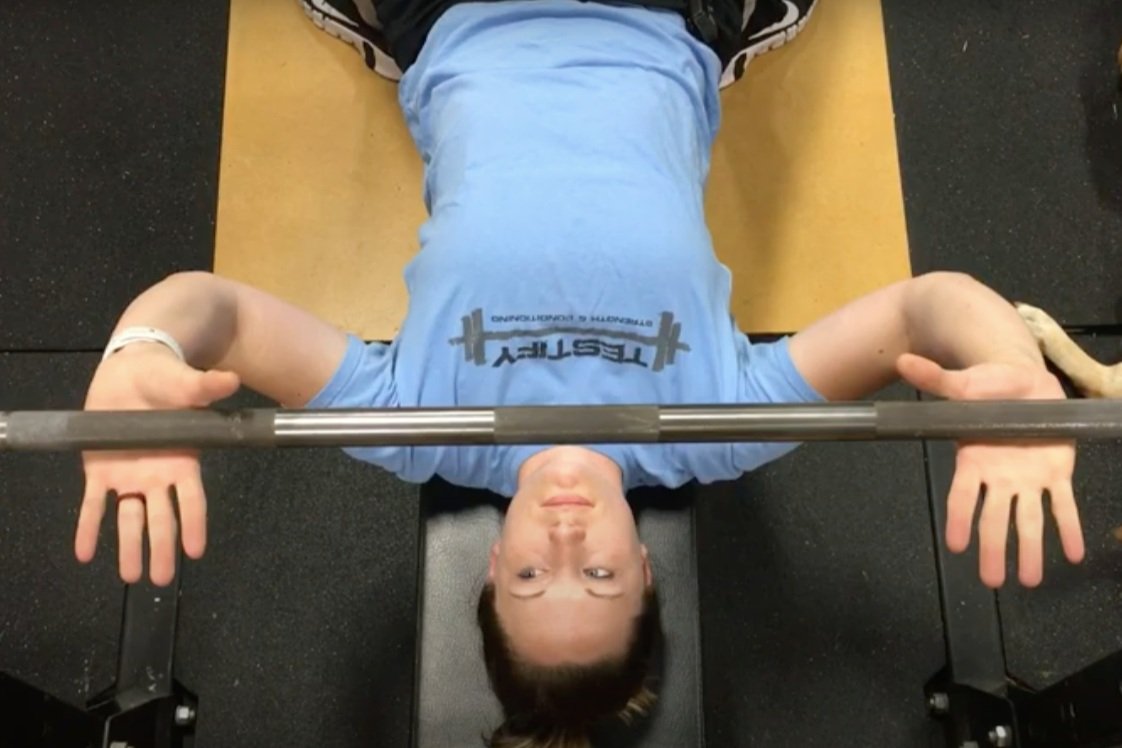
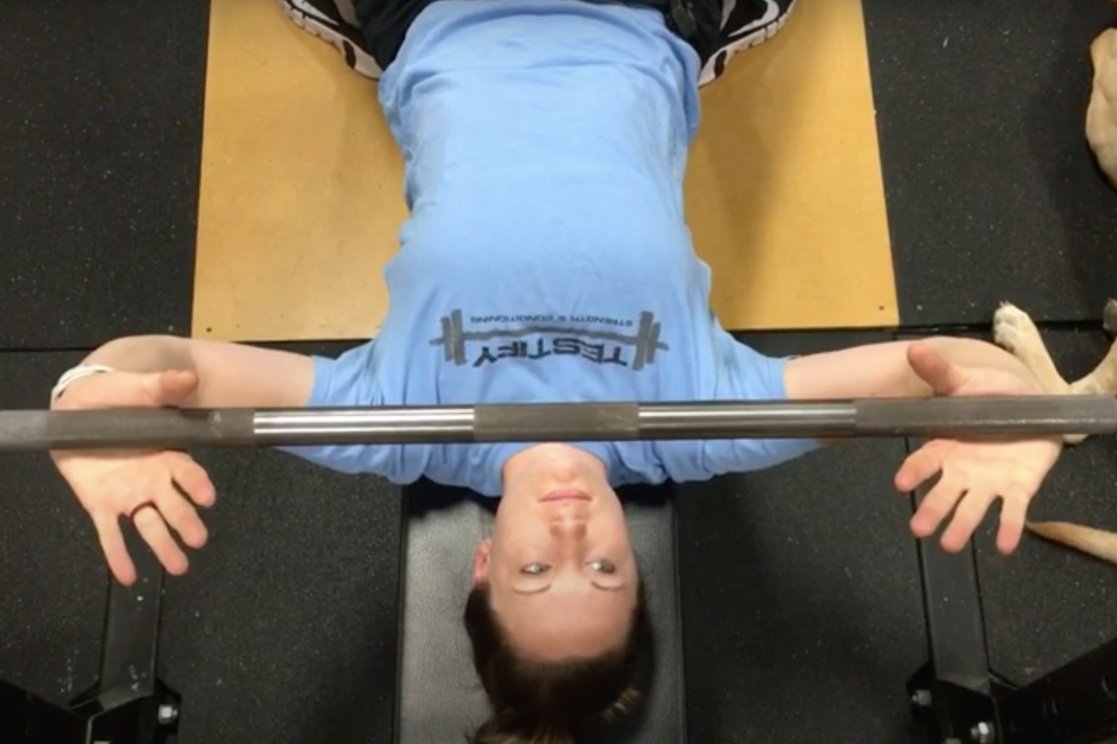
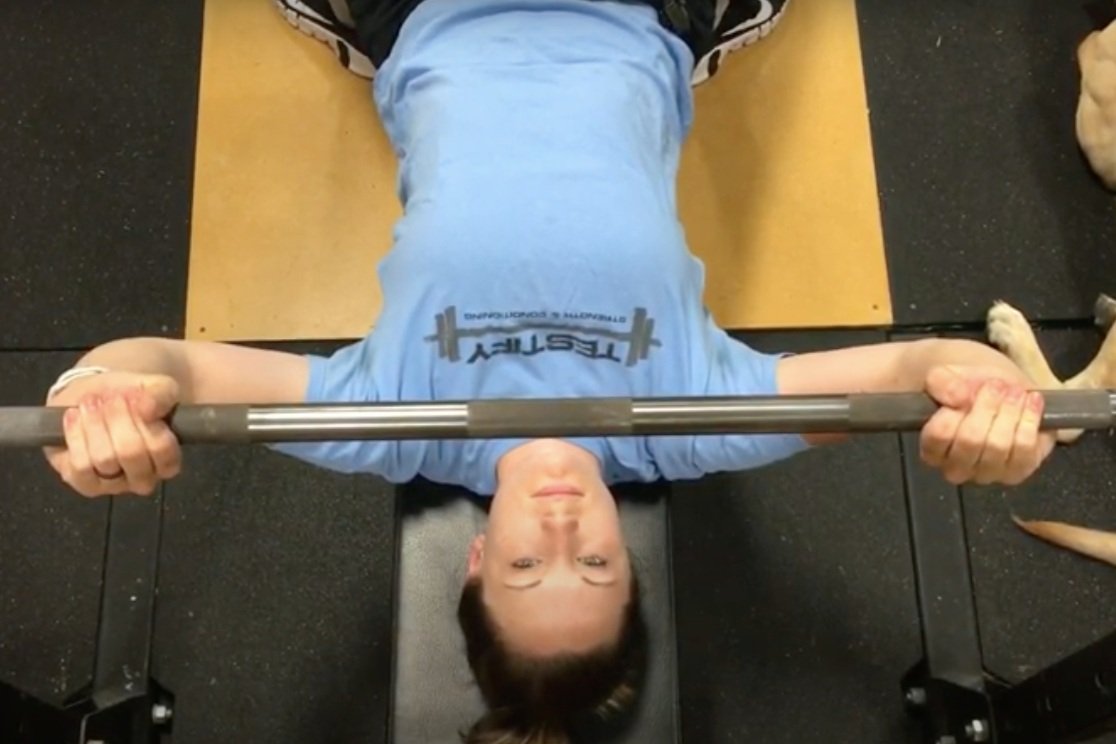
Take your grip so that the barbell rests on the base or heel of the palm, i.e., directly over the bones of the forearm. This is the best position for efficient force transfer between you and the bar.
To do this, simply pronate your hands slightly by internally rotating your arms a bit and then squeezing the bar tightly with your fingers. (scroll through the photos below for a demonstration)


Tip #2: Retract Your Shoulder Blades
For demonstrative purposes, imagine that you’re sitting upright (Figure 2), and there is a pen oriented vertically between your shoulder blades. You want to try and pull your shoulder blades back (i.e., retract your shoulder blades) so that the pen is pinched in place.
figure 2: at left, Becky demonstrates protracted shoulders (bad), and at right, becky demonstrates retracted shoulders (much better).
Now, simply perform that same motion (lying down, of course) when setting up for your bench press. Retract your shoulder blades before you unrack the bar, and then re-retract your shoulder blades after the unrack as well in case you lose a bit of shoulder positioning during the unracking process. Some people find the uprights of the rack useful to assist the process of setting the shoulders. Then, keep your shoulders retracted throughout your set (and re-retract them between reps if they get a bit out of position).
Tip #3: Leg Drive
Drive up the bench with your legs, i.e., use your legs to drive your body horizontally in the direction of your head (“up the bench”). The drive is horizontal, not vertical, so don’t lift your butt up off of the bench (the rep doesn’t count if you do that). Engage your legs before the start of each rep and drive up the bench throughout the entire movement (not just on the ascent).
figure 2: Becky stares at the ceiling
Tip #4: Focal Point
Find a point directly above you on the ceiling and stare at that point throughout the entire set (Figure 2). Before you start your first rep, you can see the bar in your periphery, and the bar needs to finish in that same spot each time. A stationary reference point makes for a more consistent and efficient bar path, so we watch the immovable ceiling and not the moving bar.
We hope these tips help you get stronger and live better!
(Some links may be affiliate links. As an Amazon Associate, Testify earns from qualifying purchases.)
If you found this helpful, you’ll love our weekly email. It’s got useful videos, articles, and training tips just like the one in this article. Sign up below, and of course, if you don’t love it, you can unsubscribe at any time.
At Testify, we offer small group training, private coaching (in-person or remotely via Zoom), online coaching, and form checks. Would you like to get quality coaching from a Starting Strength Coach?
Bench Press with Short Legs or Back Pain?
/(A Blast from the Past article originally posted on 11/26/21)
If you have shorter legs you may find it difficult or simply uncomfortable to keep your feet planted firmly (and flat) on the ground. Let’s fix this.
Having your feet planted flat and firmly to the floor is important because your feet provide lateral stability, i.e., your stance provides side-to-side stability during the bench press because the bench itself is rather narrow. Additionally, having your feet planted firmly on the ground allows you to use your legs to drive up the bench during the movement as well (which provides rigidity in your upper body and also reinforces your arch).
With all this in mind, if you have shorter legs - specifically shorter lower legs (i.e., your shins or shanks) - and if you find that your heels are coming up off the ground, then simply stack a bumper plate or two underneath each foot.
You can use wooden blocks or rubber mats instead of bumper plates, but whatever you use, your new “foot platform” needs to provide a non-slip surface that is high enough that you can keep your feet flat and firmly on that surface. A reasonable benchmark (get it?) is to create a platform high enough that your thighs are roughly parallel to the ground.
The use of such a platform can also be a good tactic if you experience some low back discomfort or pain when you lie down on the bench. This can occur with people with shorter legs due to the excessive arch needed to reach their feet down to the floor, and it can also occur with older people or with people who carry some extra weight.
Jen demonstrates the use of bumper plates to provide an elevated platform for her feet.
If lying down on the bench causes you some discomfort, try raising your feet up a bit by using a platform. If your use of the platform is due to discomfort (and not due to having short legs), you may find that you can reduce the height of your platform over time (e.g., remove a bumper plate from your stack), and you might even get to the point where your feet are flat on the ground again.
We hope this helps you get stronger and live better!
(Some links may be affiliate links. As an Amazon Associate, Testify earns from qualifying purchases.)
If you found this helpful, you’ll love our weekly email. It’s got useful videos, articles, and training tips just like the one in this article. Sign up below, and of course, if you don’t love it, you can unsubscribe at any time.
At Testify, we offer small group training, private coaching (in-person or remotely via Zoom), online coaching, and form checks. Would you like to get quality coaching from a Starting Strength Coach?
How to Unrack a Heavy Bench Press By Yourself
/Struggling with unracking your bench press when training alone? Take the strain off your shoulders (and avoid getting a barbell to the face!) with this method.
At Testify, we offer small group training, private coaching (in-person or remotely via Zoom), online coaching, and form checks. Click the button below to get quality coaching from a Starting Strength Coach and start getting stronger TODAY.
Use This Grip for a BIGGER Bench Press and Press!
/Want a bigger bench? A bigger press? Of course you do. Let’s get right to it.
figure 1: Compression grip (bench press configuration)
This article is the first in our short series on the correct grip for each lift - from pushing movements like a bench press or a press to pulling movements like a deadlift or a row, and we’ll also discuss the differences that come into play when you have an Olympic movement like a snatch or clean.
Today’s Topic: Pushing Movements
The grip we are covering today is the type of grip you would take for the bench press (Figure 1), the press, the incline bench press, the close grip bench press, etc. This grip is commonly referred to as a compression grip.
An important concept to remember is that - and this is true for both pushing and pulling movements - gravity alway wants objects to move downward.
This includes the barbell that’s in your hands, so when you’re pushing on the bar, you don’t want to put the bar in a position that permits the bar to accidentally reach a lower position (in your hands) than the position it’s already occupying. In other words, make sure that the bar is in the lowest, stable position you can achieve . . . right from the start.
figure 2: Do not put the bar up here.
What NOT To Do
For example, when you unrack the press, don’t support the barbell up high in the hand (Figure 2). If you do this with a heavy weight, it’s simply going to bend your wrist backward (thus lowering the bar). As a result, your flimsy, little, dainty, baby wrists are in a rather unstable position of extreme extension (Figure 3).
You’ve created an energy leak, and this is not a productive position from which to press or bench heavy weights. What to do?
figure 3: wrists in extreme extension - don’t be like this fool.
Figure 4
The Answer
Before unracking either the press or the bench, get the bar sitting over the base of the palms - not up by the base of your fingers, but at the base of your actual hand (Figure 4).
This position permits the bar to be stacked right over the bones of the forearms, which is excellent for force transfer.
From here, pronate your grip just enough that your thumbs can grip the bar (Figure 5). This positions the thumbs so that they can wrap around the bar in the opposite direction of the rest of your fingers.
Squeeze the bar tightly, and that’s it - this is your grip (Figure 6).
figure 5: pronate the grip slightly until the thumbs are below the bar.
The Result
This grip permits the bar to sit deep in the base of your palm - whether you’re benching or pressing. Your wrists are as straight as they can be, although they won’t be entirely straight - let’s call it a neutral position.
As a side not, wrist wraps can help achieve and maintain this position, but they shouldn’t be a crutch - learn to achieve the correct position without wraps, and then start using wraps as your work weights get heavier.
Figure 6: squeeze the bar tightly.
The wrists certainly are no longer bent back in extreme extension, and they also aren’t so straight that it feels like the bar is pushing down on the webbing of your thumb.
As previously mentioned, the bar is now positioned right over the bones of the forearm (Figure 7), which makes for efficient force transfer between your arms, hands, and the bar, and this makes for a stronger press or bench press.
figure 7: compression grip (press width)
Next up - the tension grip.
As always, we hope these tips help you get stronger and live better.
(Some links may be affiliate links. As an Amazon Associate, Testify earns from qualifying purchases.)


