The Bench Press: You're Forgetting to Do This - Part 4

In this article - our last in this series - we cover an aspect that is forgotten very frequently by new lifters (ahem . . . sometimes even experienced lifters) . . .

Retract your shoulders blades.

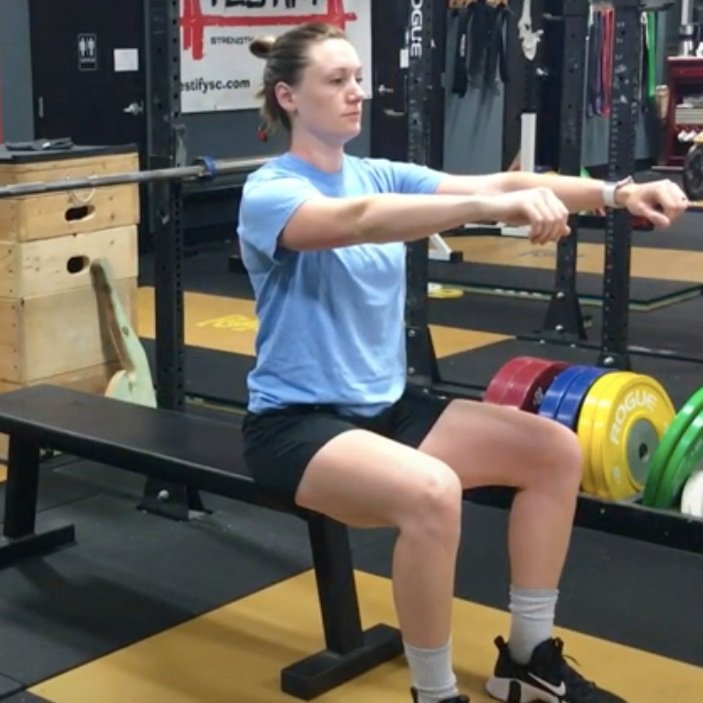
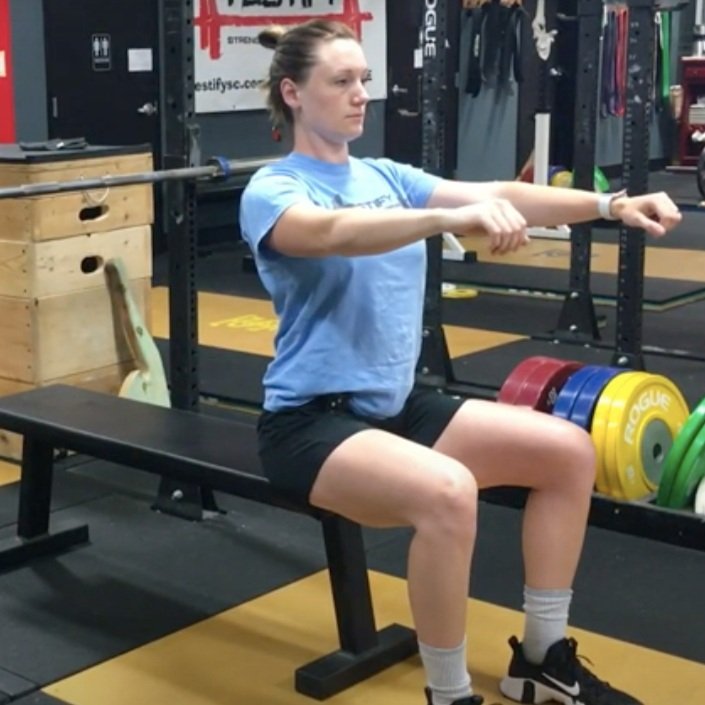
Which picture is correct? Hint: It’s not the one on the left.

Imagine you’re sitting upright and have a pen oriented vertically between your shoulder blades. Now, pull your shoulder blades back so that you’re pinching the pen in place (see photos below).

This is what you want to do when benching as well - only lying down. Retract the shoulder blades before you unrack the barbell, re-retract them after the unrack as well in case you lose some shoulder positioning during the process of unracking, and then keep them retracted throughout the set. Additionally, if needed, re-retract them between reps if they get out of position.

Retracting the shoulder blades creates more stability and puts us in a stronger, safer, and more efficient position from which to bench. Not having your shoulders retracted is the benching equivalent of squatting while standing on your toes - just plain dumb.

Retracting your shoulders also has the added bonus of shaving off just a bit of distance that the bar has to travel (just like squatting while flat-footed means you don’t squat as far as you would if you stupidly squatted while balanced up on your toes).

As always, we hope this helps you get stronger and live better.

(Some links may be affiliate links. As an Amazon Associate, Testify earns from qualifying purchases.)

If you found this helpful, you’ll love our weekly email. It’s got useful videos, articles, and training tips just like the one in this article. Sign up below, and of course, if you don’t love it, you can unsubscribe at any time.


At Testify, we offer small group training, private coaching (in-person or remotely via Zoom), online coaching, and form checks. Would you like to get quality coaching from a Starting Strength Coach?

The Bench Press: You're Forgetting to Do This - Part 3

You’re all set to bench - your grip is pronated, your shoulder blades are pinched back, and you’re driving with your legs, but you’re still forgetting one thing . . .

Jeremiah correctly fixes his gaze at a point on the ceiling.

Find your focal point.

After you’ve unracked the barbell but before starting the first rep, find a point directly above you on the ceiling and stare at that point. You now have created a “sight picture” as you can still see the barbell in your periphery even while staring at the ceiling. You’re going to recreate this picture at the end of each rep, so remind yourself that the bar needs to finish in this exact same position every single time.

Then, simply stare at that focal point during each rep and even between reps - there’s no need to introduce unnecessary variability into your benching by having to re-find the focal point before each rep, so just keep looking at it like you do in the squat (watch the included video).

Having a stationary reference point makes for a more consistent and efficient bar path, and it makes for better balance as well (we don’t watch the bar since it’s a moving reference point).

As always, we hope this helps you get stronger and live better.

(Some links may be affiliate links. As an Amazon Associate, Testify earns from qualifying purchases.)
If you found this helpful, you’ll love our weekly email. It’s got useful videos, articles, and training tips just like the one in this article. Sign up below, and of course, if you don’t love it, you can unsubscribe at any time.


At Testify, we offer small group training, private coaching (in-person or remotely via Zoom), online coaching, and form checks. Would you like to get quality coaching from a Starting Strength Coach?

The Bench Press: You're Forgetting to Do This - Part 2

When benching, you know you’re supposed to retract your shoulder blades, push with your legs, and drive that bar up and back to its original starting position, but you’re still forgetting one thing . . .

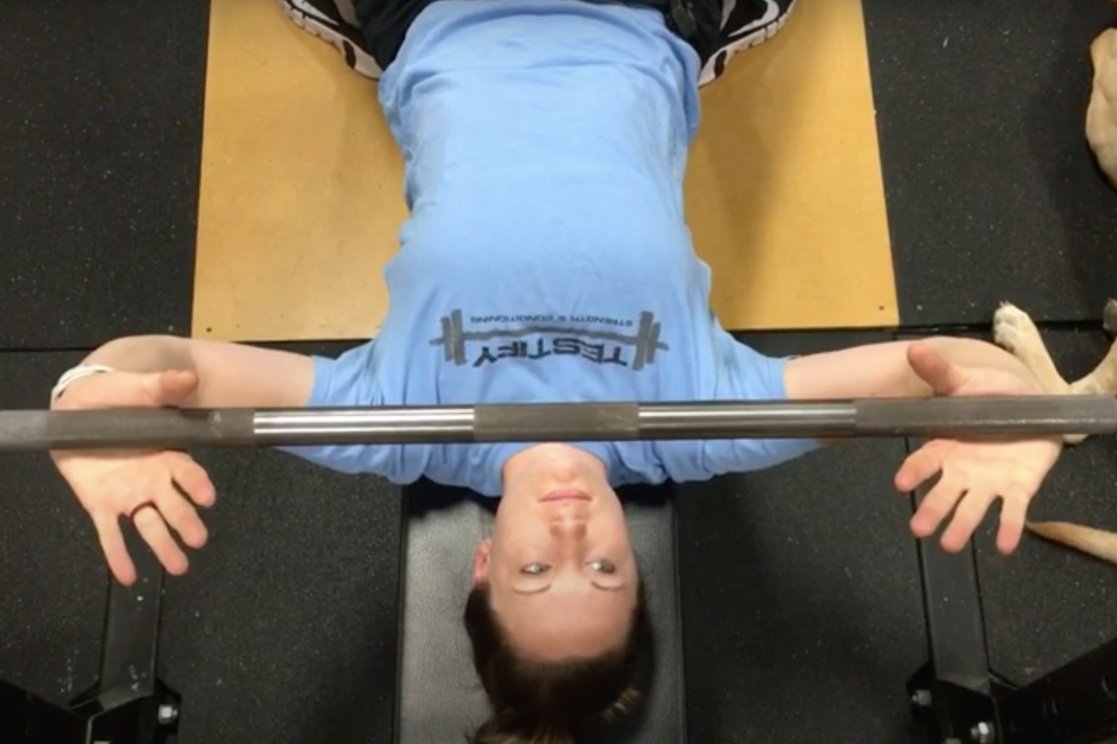
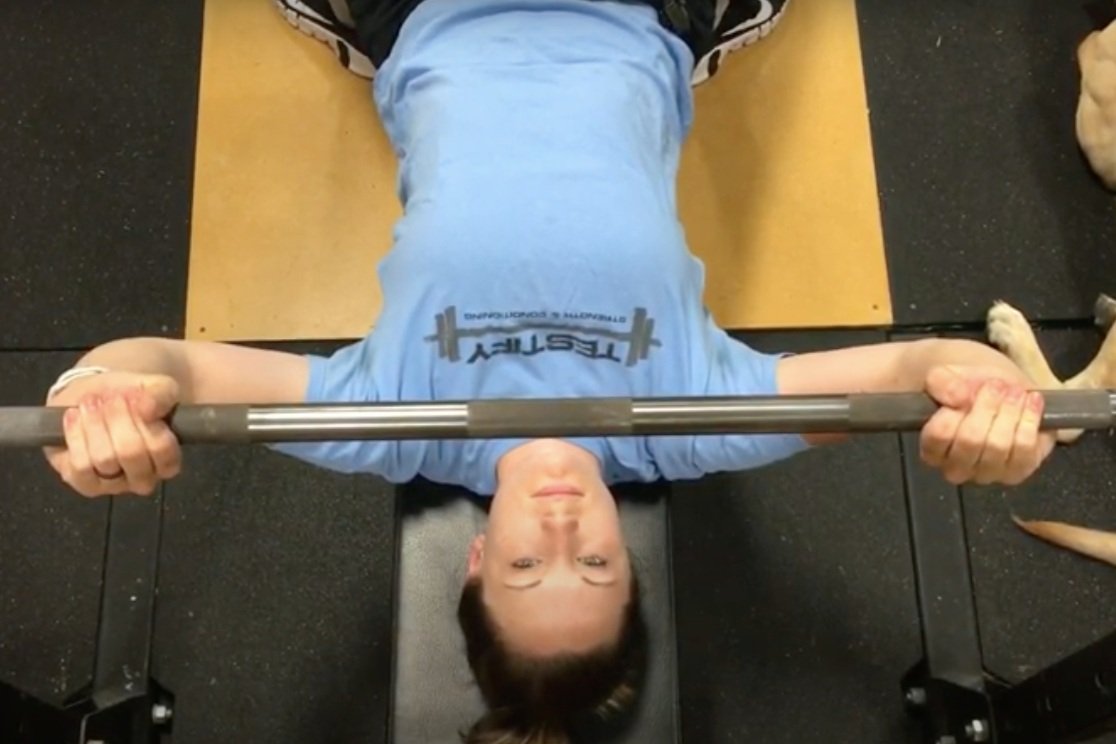
Get your grip right.

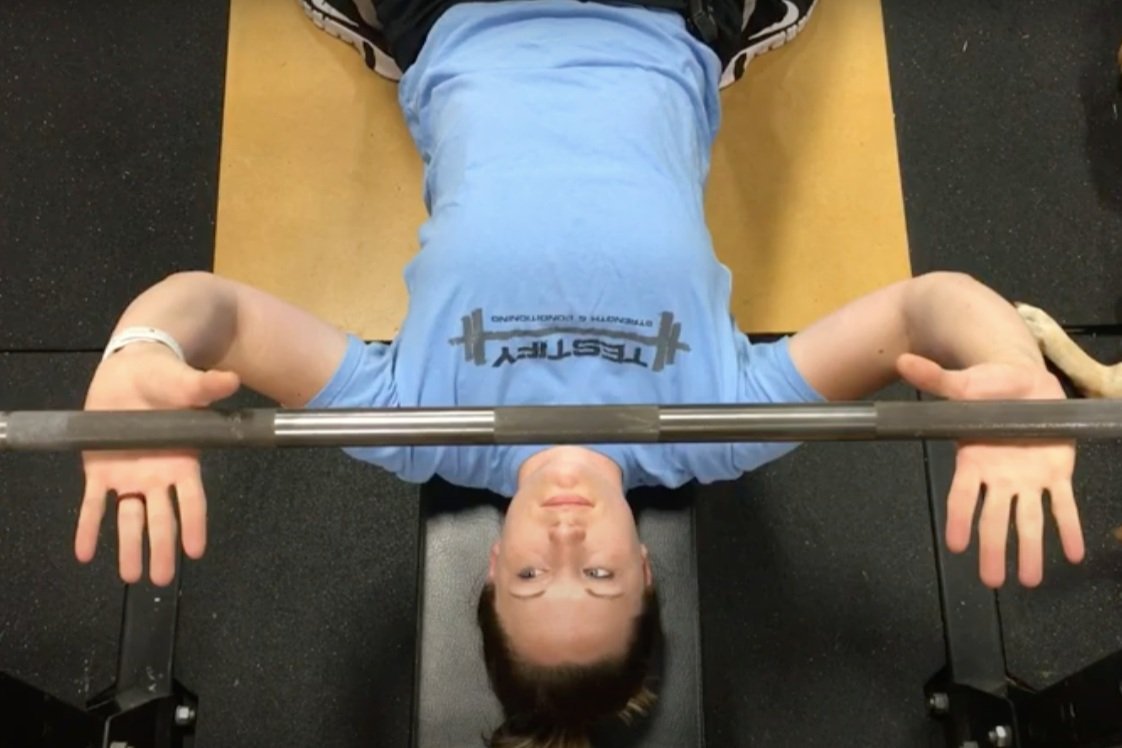
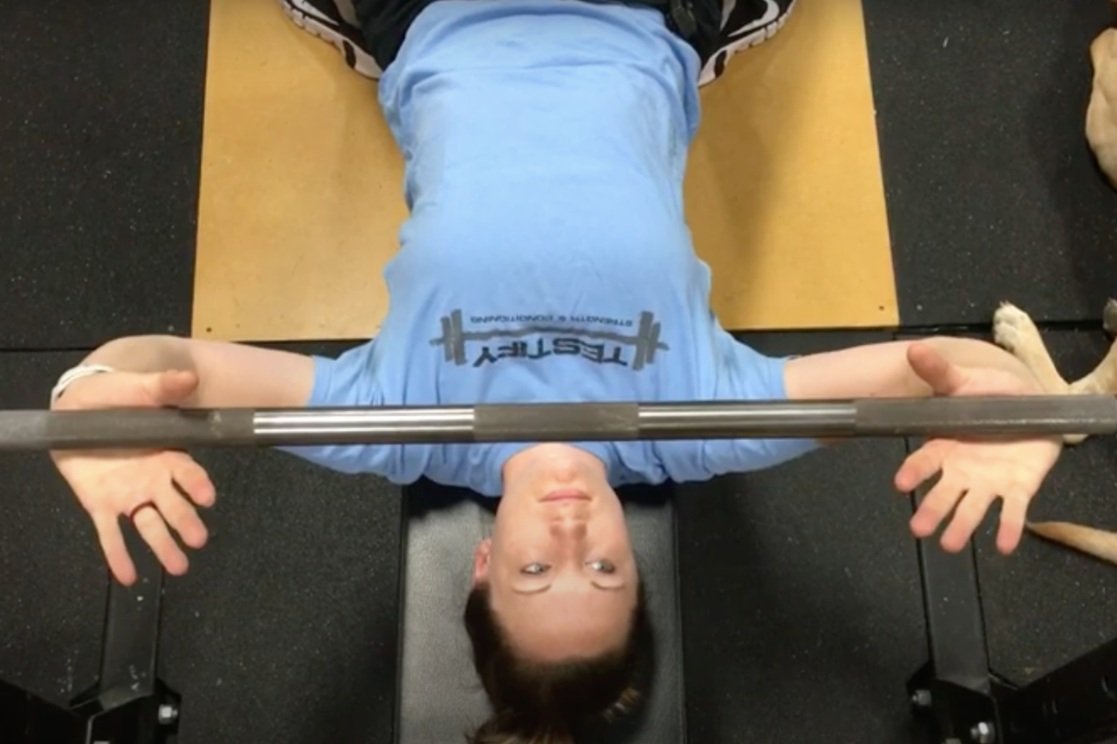
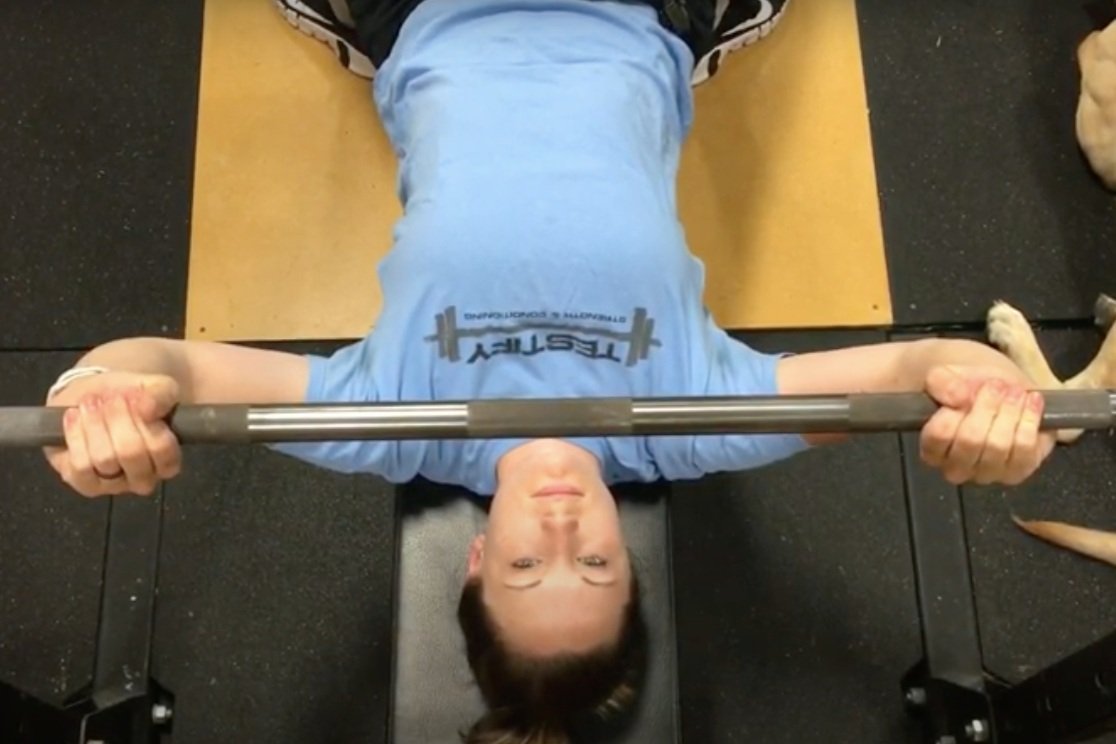
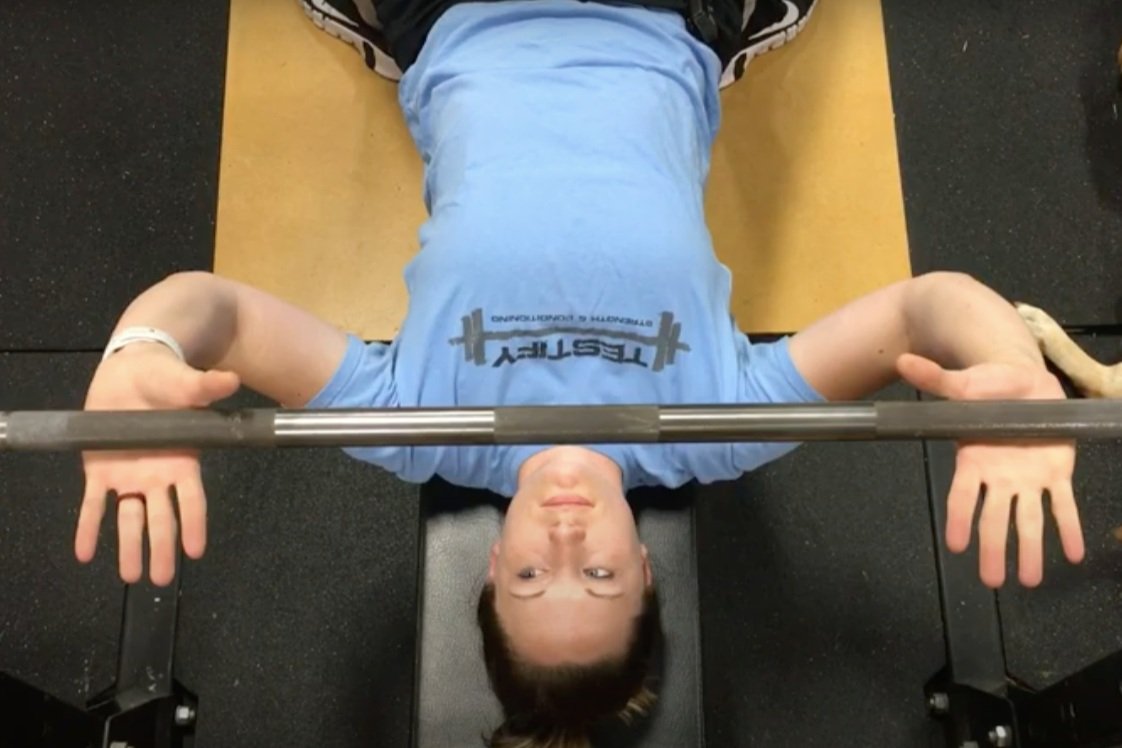
When taking your grip for the bench, you want the barbell to rest on the base or heel of the palm, i.e., directly over the bones of your forearm. This ensures that you have efficient force transfer between you and the bar, which is rather important when trying to move heavy weights. On the other hand, having the bar back toward your fingers causes your wrists to be in full extension (i.e., bent backwards), which is a flimsy and weak position for them to be in when trying to support a heavy load.

To achieve the correct grip, pronate your hands slightly by internally rotating your arms a bit and then squeezing the bar tightly with your fingers (scroll through the photos below for a demonstration).

If this doesn’t quite make sense, you can use the “diamond grip” approach described in this short article.

As always, we hope this helps you get stronger and live better.

(Some links may be affiliate links. As an Amazon Associate, Testify earns from qualifying purchases.)
If you found this helpful, you’ll love our weekly email. It’s got useful videos, articles, and training tips just like the one in this article. Sign up below, and of course, if you don’t love it, you can unsubscribe at any time.


At Testify, we offer small group training, private coaching (in-person or remotely via Zoom), online coaching, and form checks. Would you like to get quality coaching from a Starting Strength Coach?

The Bench Press: You're Forgetting to Do This - Part 1

You’re all set to bench - your grip is pronated, your shoulder blades are pinched back, and you’ve got your focal point nailed down, but you’re forgetting one thing . . .

Use. Your. Legs.

Don’t worry - Dave is NOT forgetting to do this.

When benching, drive up the bench with your legs. In other words, use your legs to drive your body in the direction of your head (i.e., “up the bench”). You should be driving in such a manner that - if the barbell wasn’t pinning your shoulders to the bench - you might actually start sliding up the bench.

Make sure you’re driving horizontally and not vertically - remember that the rep doesn’t count if your butt comes up off the bench. Drive with your legs throughout the entire rep - drive hard on the descent and drive even harder on the ascent.

Leg drive is easy to forget about - especially if you’re new to the bench press - but it’s important. Your legs give you lateral stability (the bench doesn’t help much here as it’s not very wide), they support your arch, and they help make everything between your feet and your shoulders that much more rigid, which makes for a more stable platform from which to bench.

So use your legs next time, and if you find that you keep forgetting, write “leg drive” down in your training log as a cue for yourself next time.

As always, we hope this helps you get stronger and live better.

(Some links may be affiliate links. As an Amazon Associate, Testify earns from qualifying purchases.)

If you found this helpful, you’ll love our weekly email. It’s got useful videos, articles, and training tips just like the one in this article. Sign up below, and of course, if you don’t love it, you can unsubscribe at any time.


At Testify, we offer small group training, private coaching (in-person or remotely via Zoom), online coaching, and form checks. Would you like to get quality coaching from a Starting Strength Coach?

Diamond Grip for the Press and Bench Press

When learning to press or bench press, getting the correct grip can be tricky at first. A very common error is to take a grip that carries the bar back in the fingers (Figure 1).

Figure 1: This is no good.

Let’s fix this.

When we press or bench press, we’d like the barbell to be supported directly over the bones of the forearms, and to do this, we pronate our grip so that the bar sits on the heel of the palm. This provides for excellent force transfer between our arms and hands and the bar, whereas holding the bar back in the fingers with wrists in full extension creates a very weak and flimsy position.

Pronating your grip (Figure 2) simply means that you’re going to rotate your thumbs down toward your feet, and after that, you squeeze the bar tightly with your fingers (“crush the bar” is a good cue).

Figure 2: This . . . is much better.

With this said, new lifters sometimes screw up the pronation step, either rotating their hands the wrong way or spinning their hands on top of the bar (in the press). If this is you, take the “diamond grip” approach as shown in Figure 3:

Figure 3: The Diamond Grip approach

Step 1
Place your palms on the bar - palms will face the wall (not the floor) with thumbs below the bar and in contact with each other.

Step 2
Rotate your hands so that your index fingers are now in contact with each other (above the bar). The gap between your hands will make a diamond if you’ve done this correctly.

Step 3
Slide your hands away from each other until you reach the correct grip width - narrow for the press (about shoulder width) and about a hand-width wider than that for the bench press.

Step 4
Squeeze the bar tightly with your fingers.

Make a diamond with your hands and then slide your hands outward - it’s that simple.

We hope this helps you get stronger and live better!

(Some links may be affiliate links. As an Amazon Associate, Testify earns from qualifying purchases.)

If you found this helpful, you’ll love our weekly email. It’s got useful videos, articles, and training tips just like the one in this article. Sign up below, and of course, if you don’t love it, you can unsubscribe at any time.


At Testify, we offer small group training, private coaching (in-person or remotely via Zoom), online coaching, and form checks. Would you like to get quality coaching from a Starting Strength Coach?

4 Tips for a Better Bench Press

Let’s briefly cover a few tips to help you achieve a better, stronger bench press.

Tip #1: Grip
Take your grip so that the barbell rests on the base or heel of the palm, i.e., directly over the bones of the forearm. This is the best position for efficient force transfer between you and the bar.

To do this, simply pronate your hands slightly by internally rotating your arms a bit and then squeezing the bar tightly with your fingers. (scroll through the photos below for a demonstration)

Tip #2: Retract Your Shoulder Blades
For demonstrative purposes, imagine that you’re sitting upright (Figure 2), and there is a pen oriented vertically between your shoulder blades. You want to try and pull your shoulder blades back (i.e., retract your shoulder blades) so that the pen is pinched in place.

figure 2: at left, Becky demonstrates protracted shoulders (bad), and at right, becky demonstrates retracted shoulders (much better).

Now, simply perform that same motion (lying down, of course) when setting up for your bench press. Retract your shoulder blades before you unrack the bar, and then re-retract your shoulder blades after the unrack as well in case you lose a bit of shoulder positioning during the unracking process. Some people find the uprights of the rack useful to assist the process of setting the shoulders. Then, keep your shoulders retracted throughout your set (and re-retract them between reps if they get a bit out of position).

Tip #3: Leg Drive
Drive up the bench with your legs, i.e., use your legs to drive your body horizontally in the direction of your head (“up the bench”). The drive is horizontal, not vertical, so don’t lift your butt up off of the bench (the rep doesn’t count if you do that). Engage your legs before the start of each rep and drive up the bench throughout the entire movement (not just on the ascent).

figure 2: Becky stares at the ceiling

Tip #4: Focal Point
Find a point directly above you on the ceiling and stare at that point throughout the entire set (Figure 2). Before you start your first rep, you can see the bar in your periphery, and the bar needs to finish in that same spot each time. A stationary reference point makes for a more consistent and efficient bar path, so we watch the immovable ceiling and not the moving bar.

We hope these tips help you get stronger and live better!

(Some links may be affiliate links. As an Amazon Associate, Testify earns from qualifying purchases.)

If you found this helpful, you’ll love our weekly email. It’s got useful videos, articles, and training tips just like the one in this article. Sign up below, and of course, if you don’t love it, you can unsubscribe at any time.


At Testify, we offer small group training, private coaching (in-person or remotely via Zoom), online coaching, and form checks. Would you like to get quality coaching from a Starting Strength Coach?