Struggling to Improve Your Press? These 10 Tips Actually Help.
/
Here are 10 quick tips to help you press more efficiently . . . today.
1. Narrow Grip
As a ballpark estimation, most guys will have their index finger right on the edge of the knurling (i.e., almost touching the smooth part of the bar), and most gals will have their index fingers on the smooth part of the bar with the rest of their fingers on the knurling.
Don’t take a wide grip - this isn’t the bench press. Simply reach out in front of you like you’re Frankenstein’s monster, and you are well on your way toward the correct grip width.
2. Bar Position in the Hands
When you take your grip, you’re setting up to push the barbell, so you shouldn’t have your wrists bent backward in full extension as if you’re trying to break your wrists.
In fact, if you simply reach out with one hand and lean on the bar in a casual, “just putting out the vibe” manner (Figure 1), you’ll probably do a good job of pushing on the bar with the base of your palm, which is what you want.
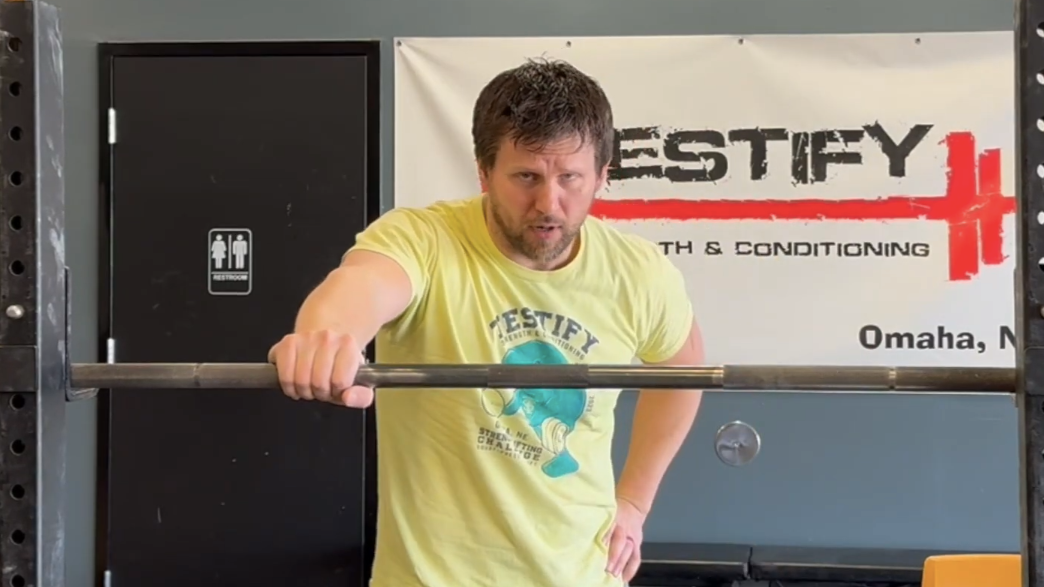
Figure 1: good bar position in the hand. good vibe too. i call it “knurled steel.”
Toward this end, pronate your hands slightly when you take your grip and be sure that you’re setting up with the bar in the base of the palm (i.e., not up by the pads at the base of your fingers). Squeeze the bar tightly, and all of this will help ensure that your wrists are relatively neutral and not bent backward in full extension (Figure 2).
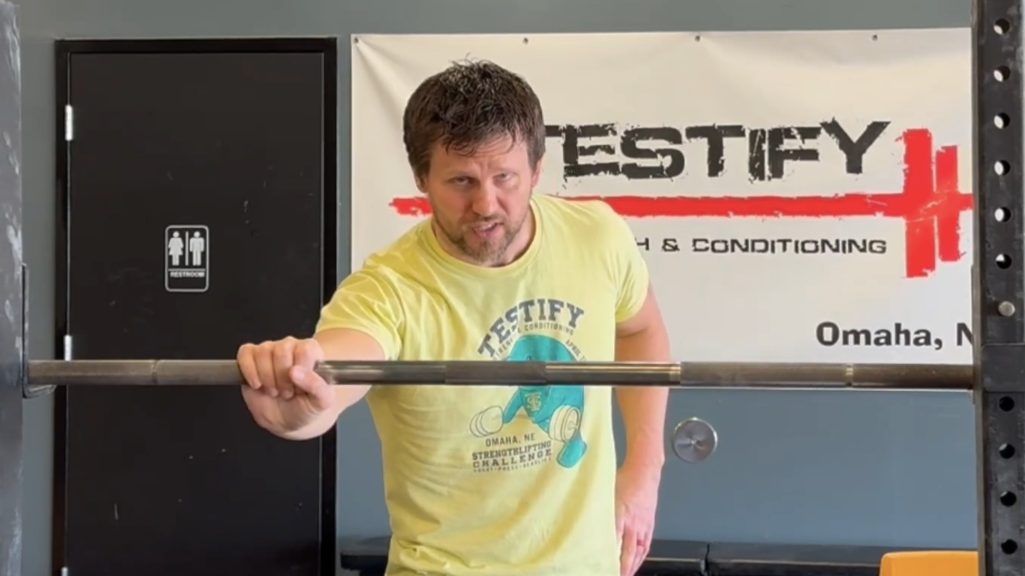
figure 2: terrible bar position in the hand. hideous wrist extension. awkward vibe.
3. Dip Down
After you take your grip, but before you unrack the bar, get very close to the bar (chest touching the bar is a good approach), and then dip down by bending your knees. Dip down far enough so that you can rotate your elbows slightly in front of the bar without having to bend your wrists.
Treat your wrists like they are in a cast - do not let them change shape or bend backward at all as you rotate your elbows into position. Dipping down far enough is key to this process.
Once your elbows are in position, unrack the bar by standing up, i.e., you unrack the bar with your legs - not your arms.
4. Stay Close
This isn’t a marathon - stay close to the rack after you unrack the bar.
The process is: “stand the bar up, half step, half step.” In other words, unrack the bar with your legs, take a small step back with your right foot, then take a small step back with your left foot. At this point, you’re ready to press.
5. Wide Stance
A common error is a stance that is too narrow. To fix this, unrack the bar with your feet at roughly squat width (or slightly wider), and then maintain that width as you take your two half steps backward from the rack.
6. Elbows
Viewed from the front, you should have vertical forearms. Viewed from the side, your elbows should be slightly in front of the bar.
You achieve this position before you ever unrack the bar (back in tip #3), so make sure you maintain this position during the unracking process.
Never let your elbows drift backward out of position.
7. Eyes Forward
Pick a spot on the wall in front of you at about eye-height. Stare at that spot before you unrack the bar, during the unracking process, during and between each rep, and until the bar is back in the hooks.
Don’t close your eyes, and don’t let your gaze wander. Stare at your focal point.
8. Tight Knees
If you bend your knees, the lift becomes a push press, so your rep doesn’t count.
With that in mind, flex your quads hard before you reach forward with your hips. We don’t usually cue muscles, but we do cue them when we’re trying to prevent movement, and that’s exactly the case here. We want to prevent knee flexion.
Tight knees. Flex the quads. Keep the knees stiff.
9. Aim
Give yourself something to aim for when pressing.
Aim for your nose, or cue yourself to press up and slightly backward.
10. Throw the Bar
Think of the press as a throw.
When you reach forward with your hips, that’s analogous to winding up to throw a baseball - cocking your arm back and getting ready to stride forward.
Then, as your hips slam back into position - as you aggressively stand up - that’s the violent aspect of the throw.
The press is a throw that uses the hips to get the movement started.
As always, we hope this helps you get stronger and live better.
-Phil
PS: Whenever you want even more Testify in your life, here are some free resources:
Book a free intro and strategy session with us HERE.
Pick up a free copy of Testify’s Squat Guide: 12 Tips to Improve Your Squat Now HERE.
Get our free weekly email - containing useful videos, articles, and training tips - HERE.
Follow Testify on Instagram HERE.
Subscribe to Testify’s YouTube channel HERE.
(Some links may be affiliate links. As an Amazon Associate, Testify earns from qualifying purchases.)