Simple and Cheap DIY Chalk Stand

When you chalk up for your next set, it’s nice to have a chalk stand. It’s not absolutely necessary, of course, as you can just use a bag of chalk or - better yet - a chalk bucket sitting on the ground. Although those options work, a chalk stand makes much less of a mess than a bag of chalk, and as the stand is raised, you don’t have to reach all the way down to the floor level as you do with a bucket of chalk, which can be a bit of pain if you already have your belt tightened.

With all this in mind, here’s how you can make a simple and cheap chalk stand (feel free to watch the video above if you’d rather not read the steps below):

Step 1
Go to your nearest hardware store and purchase the following items (you may already have some of these items at home). If you’d rather not make the trip, you can click the items below and order from Amazon.

Step 2
Set one bucket on the ground - upside down.

Step 3
Set the other bucket on top of the first bucket - right side up. The closed ends of the two buckets should now be touching.

Step 4
Tape the two buckets together by wrapping duct tape around the buckets several times. Tape the “seam” between the buckets as well as above and below the seam. Five or six times around the buckets should do nicely.

Step 5
Spray paint the buckets. This step is optional and is for aesthetic purposes only - it covers up any logos or printing on the buckets. It’s nice to have the paint match the buckets (or as closely as possible) for two reasons:

  • This is supposed to be a quick process, so don’t worry too much about whether you’ve painted the entire apparatus or not. If the logos are covered and the paint closely matches the bucket, it will look just fine.

  • Eventually, the paint will chip or wear in places, and if the bucket is close to the same color as the paint, this won’t be a big deal.

Step 6
Place the lid on the ground - upside down - with a brick, 10 lb plate, or some other relatively heavy object on top of the lid, and then set your new chalk stand on top of the lid and press down so that the lid is attached to the stand. You’ve now weighted the base of your chalk stand and made it much less likely to tip over and spill.

IMG_6318.JPG

Step 7
Put a chalk-topper over the top of the stand. This is optional, but if other people use your chalk stand, you’ll find this greatly helps keep the chalk dust inside the stand. Our chalk toppers are from www.junkbrands.com.
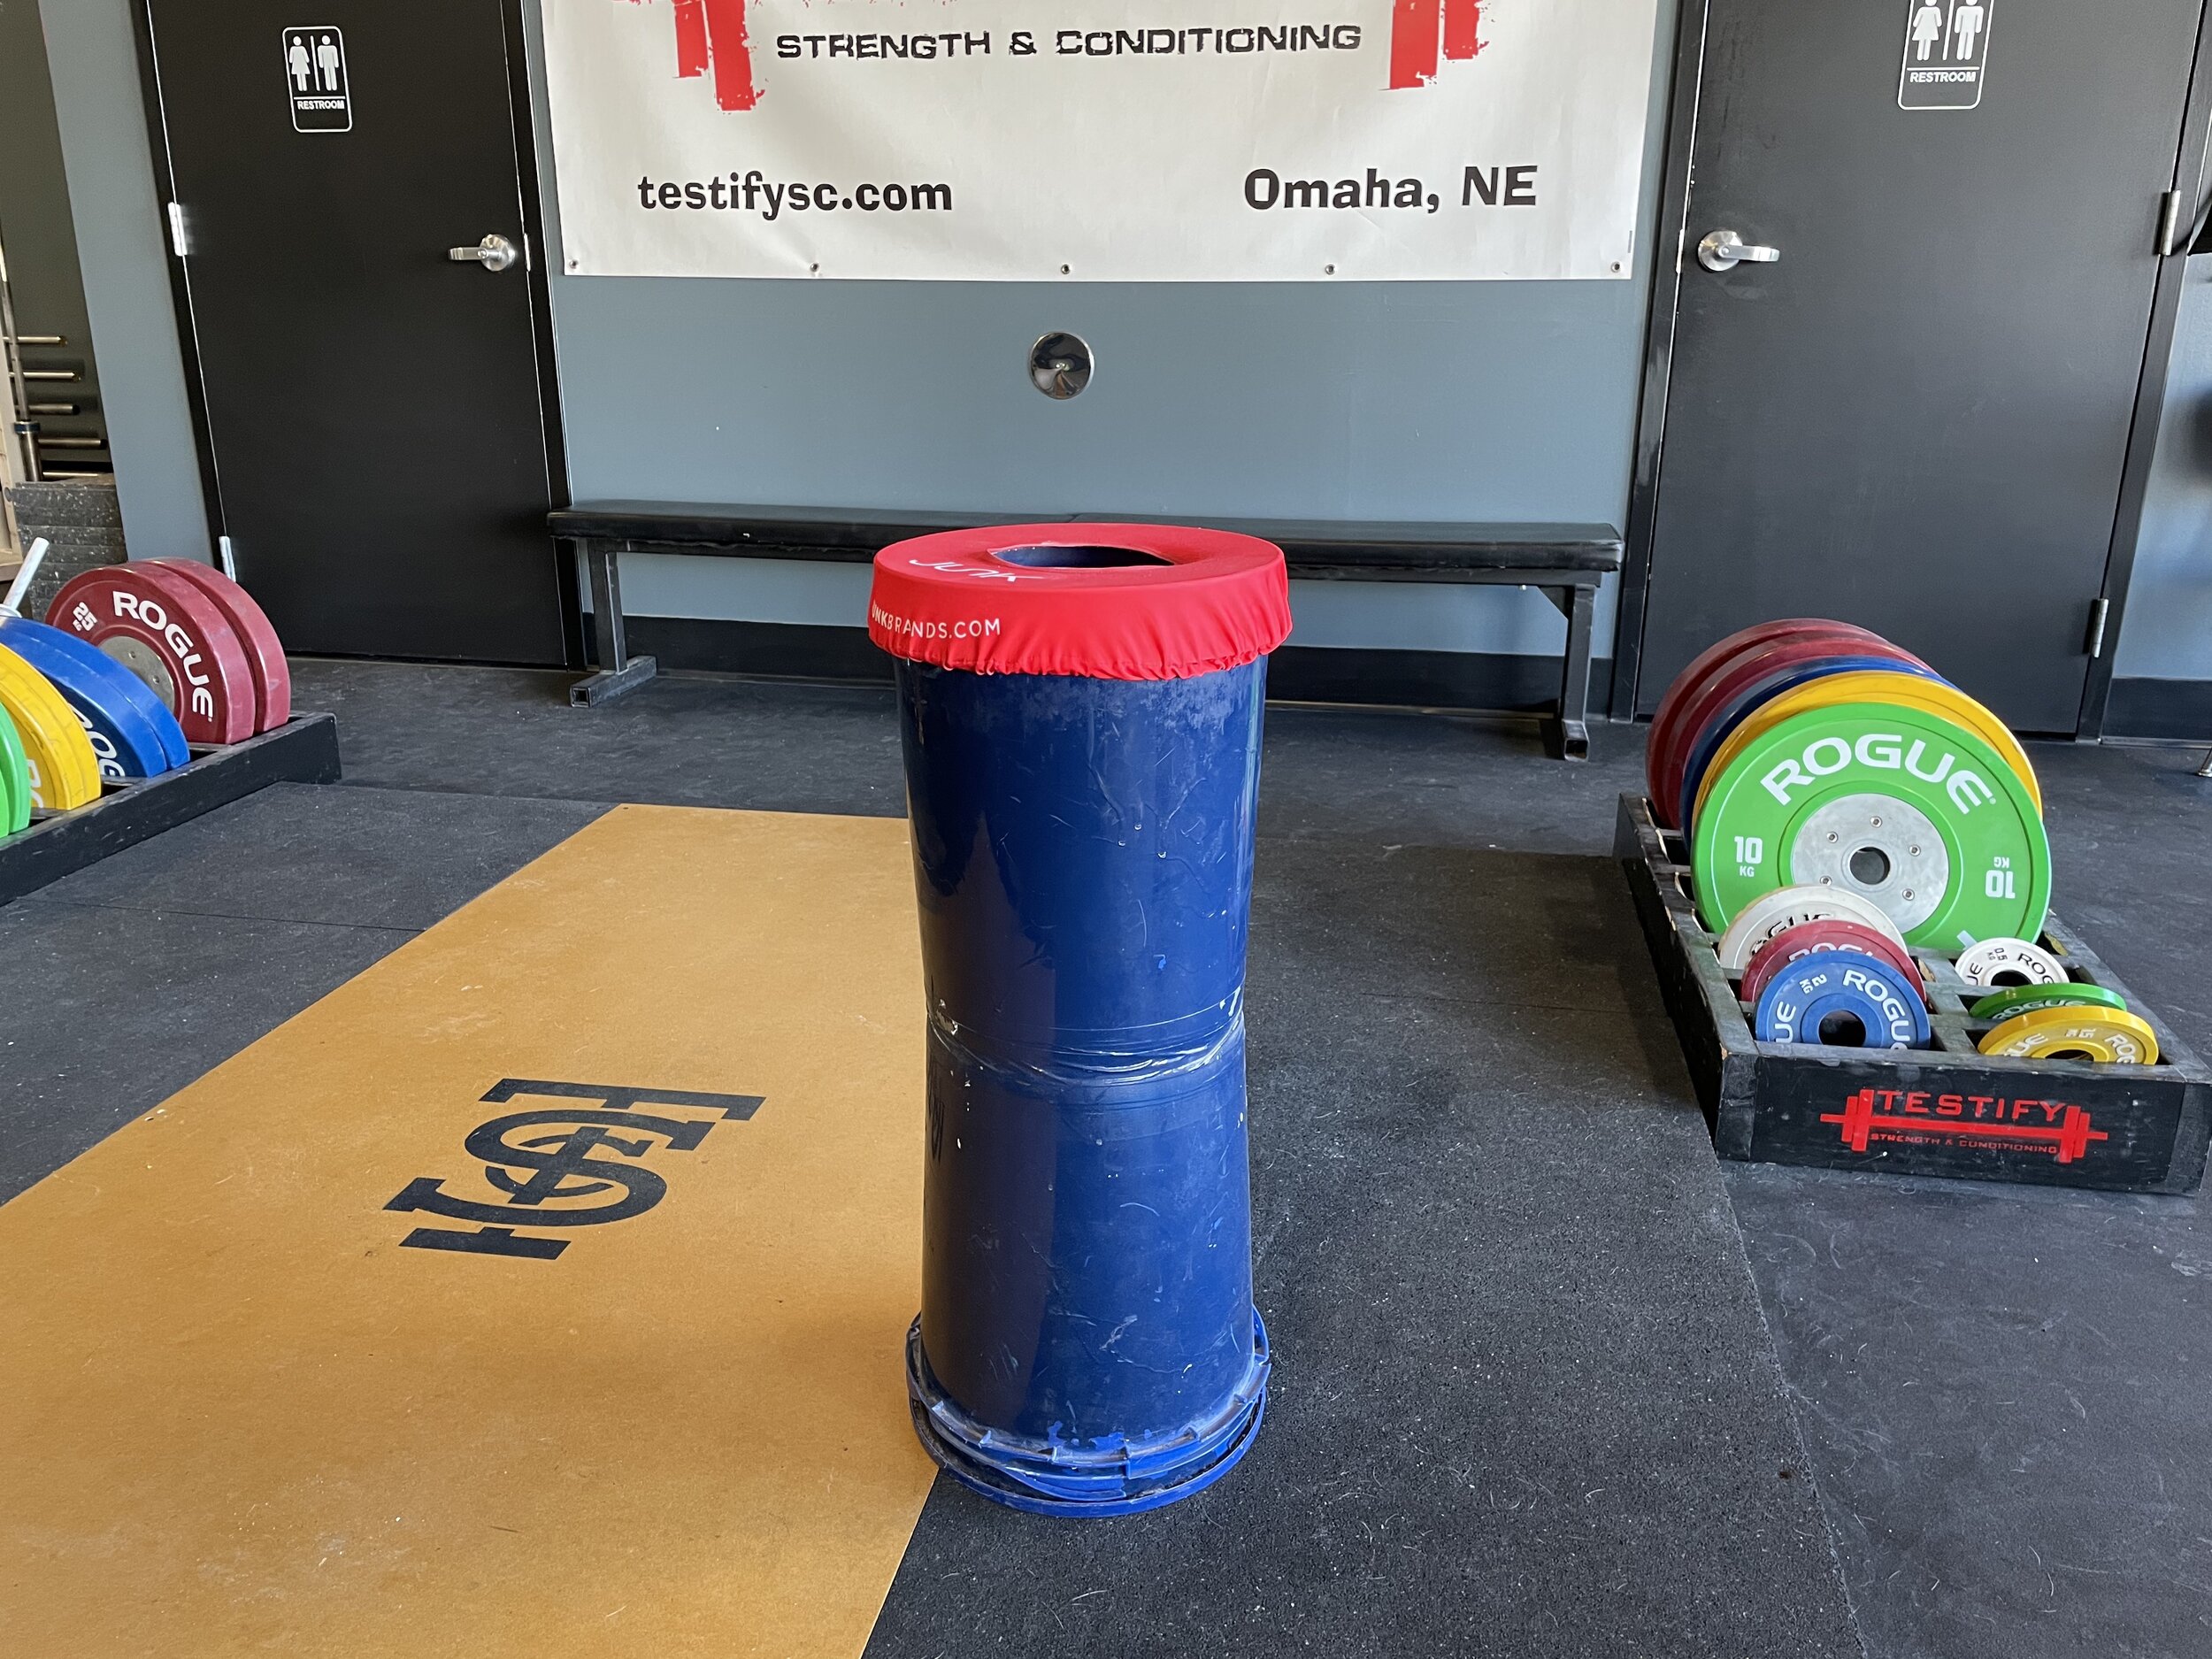
IMG_6316.JPG

Step 8
Place some chalk in the top bucket, and you’re good to go!

As always, we hope this helps you get stronger and live better.

-Phil

PS: Whenever you want even more Testify in your life, here are some free resources:

  • Book a free intro and strategy session with us HERE.

  • Pick up a free copy of Testify’s Squat Guide: 12 Tips to Improve Your Squat Now HERE.

  • Get our free weekly email - containing useful videos, articles, and training tips - HERE.

  • Follow Testify on Instagram HERE.

  • Subscribe to Testify’s YouTube channel HERE.

(Some links may be affiliate links. As an Amazon Associate, Testify earns from qualifying purchases.)


At Testify, we offer small group training, private coaching (in-person or remotely via Zoom), online coaching, and form checks. Interested in getting stronger, looking better, and having more energy?

book a free intro

Week 2021.02.22

This Week’s Conditioning

Option 1
Sled
Outdoors:
10 rounds of:
Push sled 100 ft
Pull sled 100 ft (hand over hand)

Indoors:
20 rounds of:
Push sled 50 ft
Pull sled 50 ft (hand over hand)

Compare to 2020.12.21.

Option 2
Bike/row:
4 x 800m

Rest 3 minutes between each round. Score = slowest time.

Compare to 2020.11.30.

Option 3
1st: 5 x 50 ft seated sled pull. Add weight each round. Rest as needed.
2nd: 5 x 100 ft duck walk. Add weight each round. Rest as needed.

Compare to 2020.11.02.

Option 4
Row 10 x 100m
Rest 1 min between sprints. Your score is your slowest time.

Compare to 2020.10.26.

Why Do You Put the Bar There When You Squat?

Listen up, folks - we’re going to discuss something you’ve probably never thought about before - why we put the barbell in the low bar position when we squat. Specifically, we’re going to discuss an anatomical rationale for placing the bar in The Position, so for today, we’ll be skipping the mechanical discussions about moment arms, hip drive, etc. (but as I was a physics teacher in a past life, we can geek out on that some other time if you like).

If you take a person who has never squatted before, maybe even a person who has squatted before, and you say, “Hey, go over there and squat that bar down and up” - which is unfortunately a fairly common approach to coaching - pretty much everyone in the world will go over to the rack, get under the bar, and they will then place the bar in what is called the high bar position (only they don’t know it’s called that), and they’ll stand upright with the bar sitting up high on the shelf provided by your traps.

They will do this because it’s easy and it’s obvious. It’s easy because it doesn’t require much - if any - flexibility (although it actually can be tough for some people), and it’s obvious because it’s the first potential shelf that the bar runs into as you slide under the bar.

However, remember that this position - the position of standing upright - is the easiest position in the entire squat. You know this because you can stand there supporting a lot more weight than you can actually squat. As this is the easiest position to assume, we might be wise not to let this position dictate the location of the bar.

Instead, we’re going to slide just a bit further forward - further under the bar, if you will - until the bar slides past the traps and is now supported on the shelf provided by your delts. We choose this location for the bar - not because it’s the easiest position to achieve when standing up (because it is not) - but rather because it’s the most secure location for the bar when you’re actually squatting.

Picture yourself at the bottom of your squat - you’ve got a nice, leaned-over torso, and now, with the bar sitting in The Position, any downward motion of the bar (i.e., rolling or sliding down your back) is blocked by your delts, and any upward motion is blocked by your traps. The bar is pinned between these two muscle groups in a very secure manner, and a bar that doesn’t want to move up or down your back is a very good thing when squatting heavy weights.

Now that you’ve got something to think about as you rest between work sets, it’s time to get to squatting.

As always, we hope this helps you get stronger and live better.

-Phil

PS: Whenever you want even more Testify in your life, here are some free resources:

  • Book a free intro and strategy session with us HERE.

  • Pick up a free copy of Testify’s Squat Guide: 12 Tips to Improve Your Squat Now HERE.

  • Get our free weekly email - containing useful videos, articles, and training tips - HERE.

  • Follow Testify on Instagram HERE.

  • Subscribe to Testify’s YouTube channel HERE.

(Some links may be affiliate links. As an Amazon Associate, Testify earns from qualifying purchases.)


At Testify, we offer small group training, private coaching (in-person or remotely via Zoom), online coaching, and form checks. Interested in getting stronger, looking better, and having more energy?

book a free intro

Week 2021.02.15

This Week’s Conditioning

Option 1
Sled Pyramid – 4, 5, or 6 tiers
Go up and down a 4, 5, or 6 tier “sled pyramid” – rest as needed. The distance for each round is 80 m indoors (a down-back on the 40m course) or 200 ft outdoors (2 down-backs on the 50 ft course). Rest as needed.

For example, Bob does the following (4 tiers):
Round 1: Empty sled
Round 2: 25#
Round 3: 50#
Round 4: 75#
Round 5: 50#
Round 6: 25#
Round 7: Empty sled

Compare to 2020.12.14.

Option 2
Bike/row:
4 x 3 minutes

Rest 3 minutes between each round. Score = lowest distance.

Compare to 2020.11.23.

Option 3
1. Work up to a heavy single on the axle clean-and-press (i.e., ground to overhead).
2. 5 x 100 ft Zercher carry (50 ft down-back). Add weight each round. Rest as needed.

Compare to 2020.10.26.

Option 4
Outdoors
4 rounds:
50 yd farmer carry
80 m sled drag
Rest 2 min

Indoors
4 rounds:
100 ft farmer carry
100 ft sled drag
Rest 2 min

Compare to 2020.10.19.

The Time to Compete is Now

IMG_5976.jpg

You’ve been training the barbell lifts for a while now - maybe it’s a few weeks, maybe it’s a few months - and you hear about this meet coming up a few months from now. You’ve thought about entering it - just toyed with the idea, really - but you’re not going to pull the trigger. No way. When your squat/deadlift/snatch/etc. gets to That Weight, though - yeah, then you’re going to sign up. You promise. When that happens, you’ll do it.

Knock that crap off. Knock it off right now. If we had kindergartners play soccer the way we adults often think about lifting competitions, those poor kids would never play a game until they reached puberty. Maybe not even then. Fortunately, we often make better decisions for others than we make for ourselves, so instead, the kids get about two to three weeks of practice, and then it’s game time.

The time to compete is Now. Not later. If you decide to wait until you lift That Weight, you’ll be waiting forever - because once you lift That Weight, you’ll decide that it really wasn’t that impressive . . . but you’ll definitely sign up once you hit That Next Goal. Right. This never ending line of thought means you’ll never sign up for a meet, and if you never do that, you’ll miss out on so much fun. When our members sign up for and compete in their first meet, the first thing I always hear afterward is something like, “That was so much fun! I’m really glad I did this!”

IMG_6764.jpg

Your first meet is just that - your first meet. If kindergartners can play a soccer game after three weeks of practice, you can do a lifting meet after a few months of training. You won’t be setting world records, and no one else will be either. Sign up and go have fun - that’s what meets are for, after all. After your first meet, you’ll have some numbers to look at and try to beat should you decide to do another one. The most important thing about your first meet is that there actually is one, so we’ll see you there, right?

Week 2021.02.08

This Week’s Conditioning

Option 1
Sled
Outdoors:
10 rounds of:
Push sled 100 ft
Pull sled 100 ft (hand over hand)

Indoors:
20 rounds of:
Push sled 50 ft
Pull sled 50 ft (hand over hand)

Compare to 2020.12.07.

Option 2
Bike/row:
5 min on
4 min off
4 min on
3 min off
3 min on
2 min off
2 min on
1 min off
1 min on

Record distance for each interval and add for total distance.

Compare to 2020.11.16.

Option 3
Outdoors:
8 rounds:
4 tire flips
50 yd sled push (25 yd down-back)
Rest 1 minute

Indoors:
8 rounds:
4 tire flips
100 ft sled push (50 ft down-back)
Rest 1 minute

Compare to 2020.10.19.

Option 4
Outdoors:
5 rounds:
15 cal row
50 yd sled push, 100#/50#

Indoors:
5 rounds:
15 cal row
100 ft sled push, 250#/125#

Push sled slow for recovery. Score is slowest row.

Compare to 2020.10.12.