How to Squat Heavy ALONE! | How to Fail a Squat Safely
/
When lifting weights, it's generally a good idea to not end up dead or - for that matter - even injured. With this in mind, let's quickly cover how to avoid getting yourself trapped under a heavy squat that you just failed.
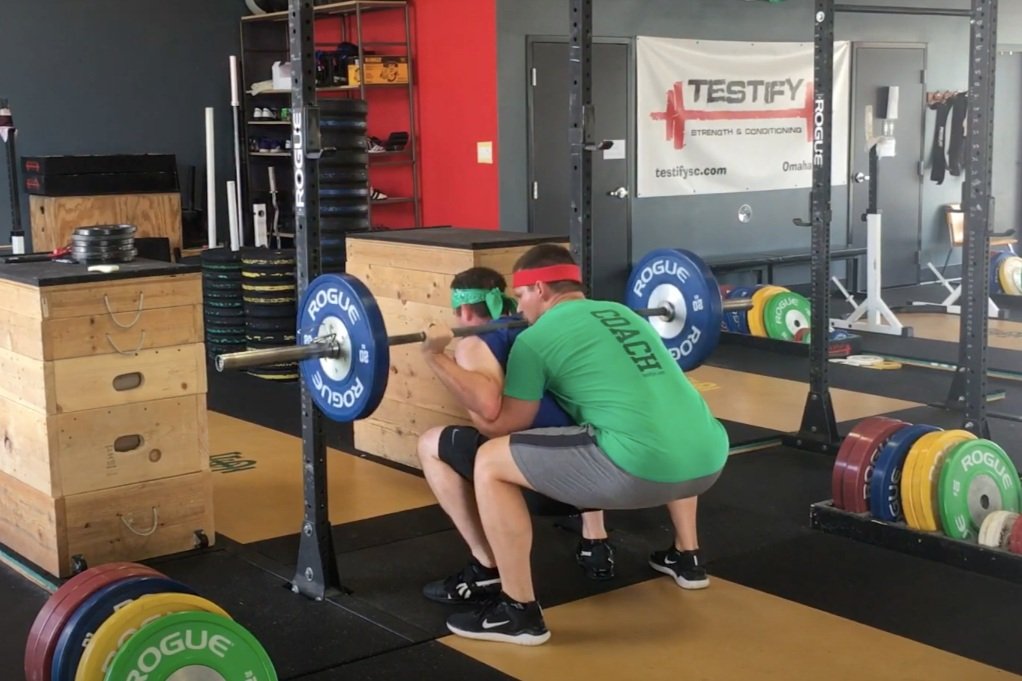
Figure 1: For so many reasons, this is stupid. don’t spot like this.
Spotters are fantastic (when possible)
Ideally, when training, you don't want to fail a rep. You try to avoid it whenever possible, but sometimes these things happen, and in the squat, the best solution is to have spotters that you trust. Specifically, get two spotters, i.e., one on each side.
Forget the whole “spotter-behind-you” thing (Figure 1). It’s stupid, the back spotter is in a terribly mechanically disadvantaged position, and it’s a good way to get both you and your spotter injured. It can, however, make for viral “YouTube-fail” videos.
The video included in this article covers how to spot the squat as well as how to squat alone, so I’d recommend watching that.
The great thing about having spotters is this: the moment you start to fail, i.e, the moment you start to go back down, the spotters immediately take the bar. You don’t have to go all the way down to the pins.

figure 2: This is much better.
If you start to fail a rep, you only descend an inch or two, and your spotters step in and support the bar (Figure 2). At this point, you and your spotters - because you stay under the bar and never abandon your spotters - lift the barbell up and put it back in the rack.
What if you train alone?
Spotters are indeed great; however, if you often train alone (and I understand that as I usually do also), you need to be able to set the safeties (AKA “pins” or “crash bars”) correctly. Whether you’re using pin/pipe safeties, spotter arms, or even strap safeties, the concept and process are both quite simple:
Set the pins low enough that they don’t cause a problem but high enough that they save you from a problem.
The process is as follows:
Figure 3: Parker helps check for adequate clearance.
Step 1: Make sure the pins are low enough
As you’re warming up with the empty bar, look to the side at the bottom of the rep (don’t do this on a regular basis, but doing this a few times with the empty bar is fine). Make sure that, when you’re at the correct depth, you’ve still got a couple inches of clearance between the bar and the pins (Figure 3). You want a couple of inches (and not just a tiny sliver of space) because you need to be able to accidentally go a bit too deep on your squat and not immediately run into the safeties. Going an inch too deep on a squat happens every now and then, and running into the safeties makes the ascent much harder, so give yourself a little room.

figure 4: Parker helps me perform a practice fail.
Step 2: Practice failing a rep
Next, either with the empty bar or with a very light weight on the bar, do a “practice fail” (Figure 4). To do this, perform a couple of normal reps, and then on the third or perhaps fourth rep, go down, start coming back up an inch or two, pretend it’s too heavy, then simply relax your upper back, squat back down, and set the bar on the pins.
At this point, you’ll perform the COS (Crawl of Shame), and crawl out - either forward or backward - from underneath the barbell.
Don’t envision this - actually practice it. You need to know you are still safe in the even of a missed rep.
WARNING: STUPIDITY
I do NOT recommend ever dumping the bar backward off your back and onto the floor. I don’t recommend it with a high bar squat, and I certainly do not recommend it with the squat we teach, which is commonly referred to as a low bar squat. It’s a silly practice, requires a decent amount of nimbleness - which you may or may not possess when grinding out a challenging, exhausting rep - and lastly, it encourages you to quit on a rep that you very well might have been able to get if you had spotters or safeties that you trusted.
You’re welcome to dump it off your back if you like - it’s your life - but be forewarned that it’s stupid. At the very least, don’t do it in my gym.
Wrapping it up
Back to sanity . . . be sure to practice a failed rep, and then adjust the safeties accordingly if they are too low. Again, the safeties need to be low enough that they don't cause a problem but high enough that they save you from a problem.
Don't wait until it gets heavy to find out whether you've set them correctly.
As always, we hope this helps you get stronger and live better.
(Some links may be affiliate links. As an Amazon Associate, Testify earns from qualifying purchases.)