4 Tips for a Better Bench Press

Let’s briefly cover a few tips to help you achieve a better, stronger bench press.
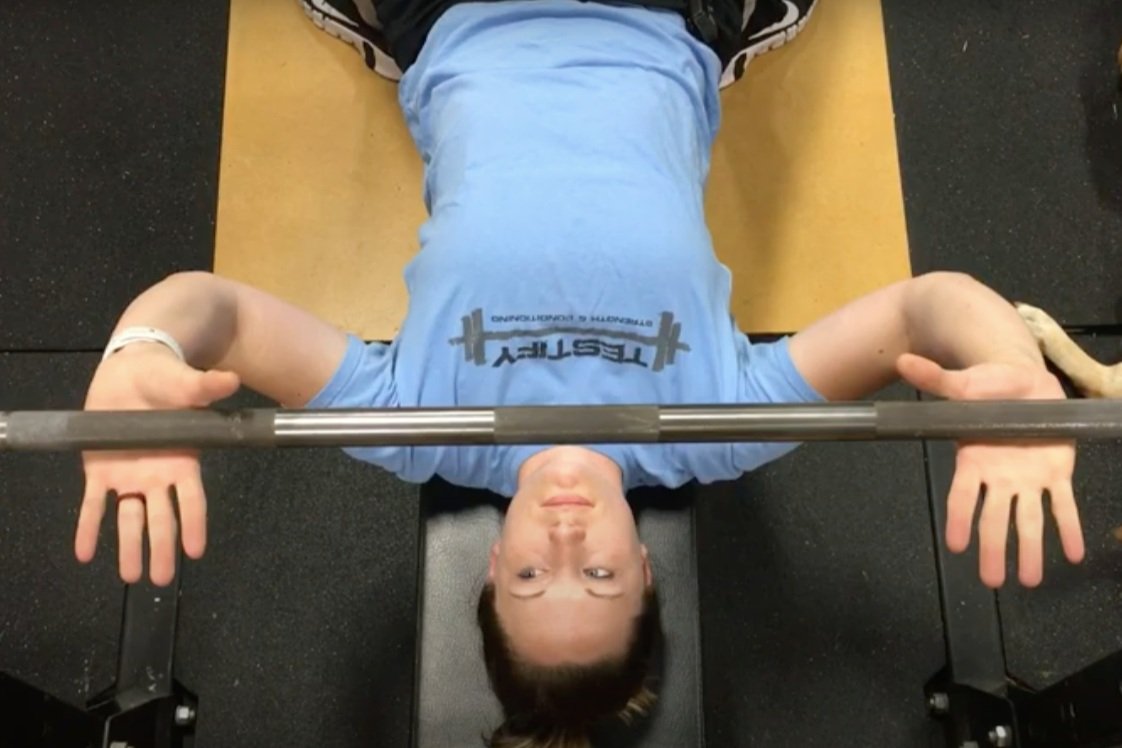
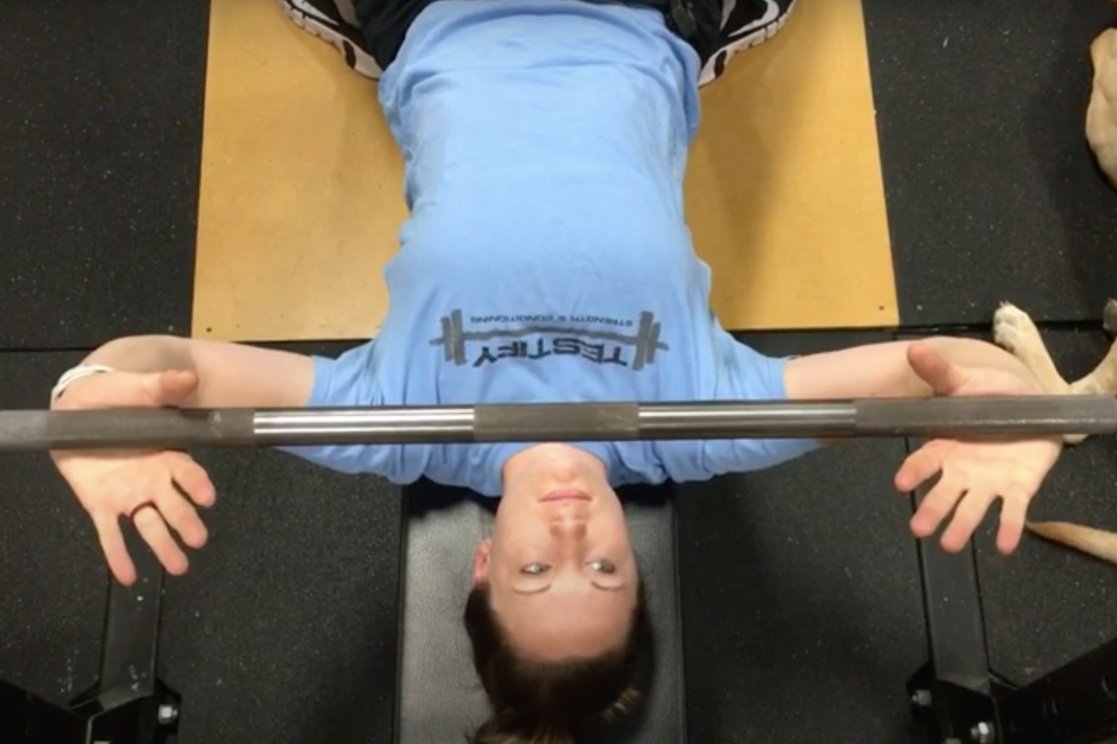
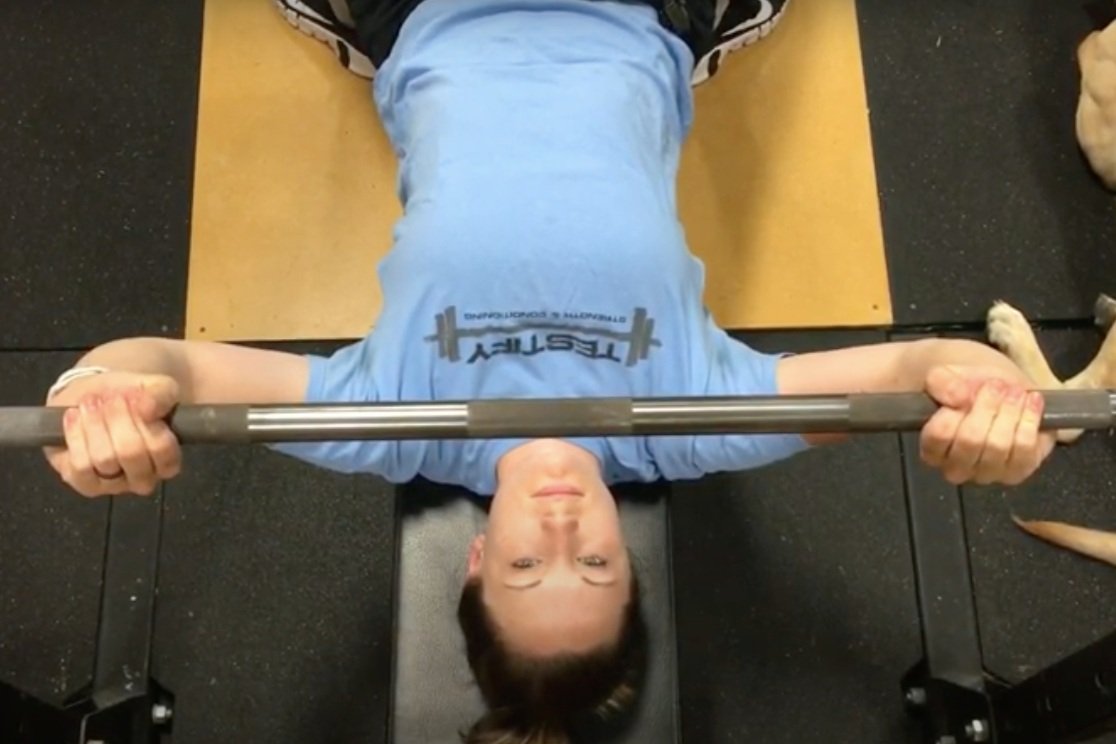
Tip #1: Grip
Take your grip so that the barbell rests on the base or heel of the palm, i.e., directly over the bones of the forearm. This is the best position for efficient force transfer between you and the bar.

To do this, simply pronate your hands slightly by internally rotating your arms a bit and then squeezing the bar tightly with your fingers. (scroll through the photos below for a demonstration)

Tip #2: Retract Your Shoulder Blades
For demonstrative purposes, imagine that you’re sitting upright (Figure 2), and there is a pen oriented vertically between your shoulder blades. You want to try and pull your shoulder blades back (i.e., retract your shoulder blades) so that the pen is pinched in place.

figure 2: at left, Becky demonstrates protracted shoulders (bad), and at right, becky demonstrates retracted shoulders (much better).

Now, simply perform that same motion (lying down, of course) when setting up for your bench press. Retract your shoulder blades before you unrack the bar, and then re-retract your shoulder blades after the unrack as well in case you lose a bit of shoulder positioning during the unracking process. Some people find the uprights of the rack useful to assist the process of setting the shoulders. Then, keep your shoulders retracted throughout your set (and re-retract them between reps if they get a bit out of position).

Tip #3: Leg Drive
Drive up the bench with your legs, i.e., use your legs to drive your body horizontally in the direction of your head (“up the bench”). The drive is horizontal, not vertical, so don’t lift your butt up off of the bench (the rep doesn’t count if you do that). Engage your legs before the start of each rep and drive up the bench throughout the entire movement (not just on the ascent).

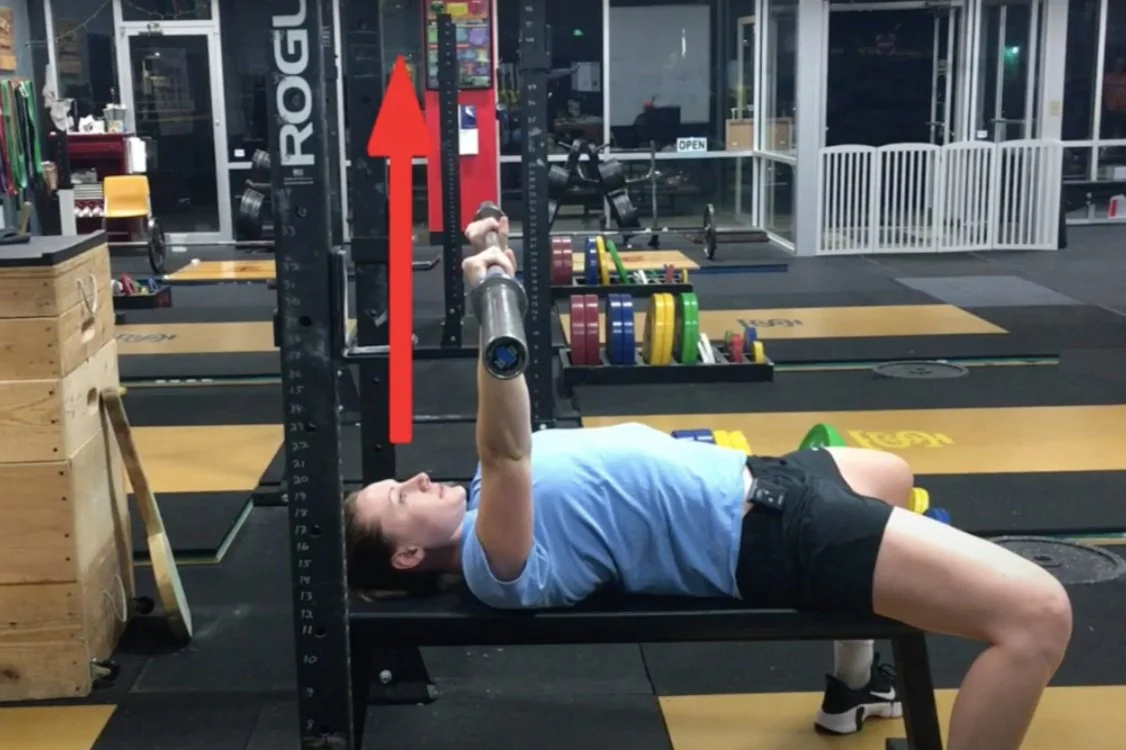
figure 2: Becky stares at the ceiling

Tip #4: Focal Point
Find a point directly above you on the ceiling and stare at that point throughout the entire set (Figure 2). Before you start your first rep, you can see the bar in your periphery, and the bar needs to finish in that same spot each time. A stationary reference point makes for a more consistent and efficient bar path, so we watch the immovable ceiling and not the moving bar.

We hope these tips help you get stronger and live better!

(Some links may be affiliate links. As an Amazon Associate, Testify earns from qualifying purchases.)

If you found this helpful, you’ll love our weekly email. It’s got useful videos, articles, and training tips just like the one in this article. Sign up below, and of course, if you don’t love it, you can unsubscribe at any time.


At Testify, we offer small group training, private coaching (in-person or remotely via Zoom), online coaching, and form checks. Would you like to get quality coaching from a Starting Strength Coach?

click here to start today

Week 2021.12.06

The annual Testify Christmas Classic was a great success this weekend, and we are immensely thankful to everyone who helped out! Loaders, referees, table officials, those who helped setup and tear down - we could not have hosted this meet without you all!

In addition, thank you to everyone who came out afterward (or stuck around!) for the annual Christmas party! We have the best members at Testify, and it was wonderful getting to hang out with you!

This Week’s Conditioning

Option 1
Sled
Outdoors:
10 rounds of:
Push sled 100 ft
Pull sled 100 ft (hand over hand)

Indoors:
20 rounds of:
Push sled 50 ft
Pull sled 50 ft (hand over hand)

Compare to 2021.10.04.

Option 2
Bike/row:
8 x 30 sec on/2:00 off

Score = least distance covered in any 30 second interval

Compare to 2021.09.13.

Option 3
8 rounds:
Outdoors:
4 tire flips
50 yd sled push (25 yd down-back)
Rest 1 minute

Indoors:
4 tire flips
100 ft sled push (50 ft down-back)
Rest 1 minute

Compare to 2021.08.16.

Option 4
Sandbag-over-bars
Set yoke at #33 for women or #35 for men.
1. 1 minute AMRAP
2. 5 rounds of 2 reps every 2 minutes (speed!)
3. 1 minute AMRAP

Weights
Female under 40 years
140 lbs and under: 75 lbs
140.1 lbs – 185 lbs: 100 lbs
185.1 lbs and over: 150 lbs

Female 40 years and over
140 lbs and under: 50 lbs
185 lbs and under: 75 lbs
185.1 lbs and over: 100 lbs

Male under 40 years
185 lbs and under: 150 lbs
185.1 lbs – 235 lbs: 200 lbs
235.1 lbs and over: 250 lbs

Male 40 years and over
185 lbs and under: 100 lbs
185.1 lbs – 235 lbs: 150 lbs
235.1 lbs and over: 200 lbs

Compare to 2021.08.16.

Fix Your Early Arm Bend on Your Cleans and Snatches!

Bent arms on a clean or snatch are a problem, so we’re going to try to solve this.

Figure 1: Becky reaches the top of the clean with straight arms, which is what we want.

In Figure 1, Becky demonstrates a clean with straight arms - which is what we want at this point in the lift.

In Figure 2, Becky demonstrates what we don’t want to see, which is a clean with an early arm pull (or “early arm bend”). In other words, we see her bend her arms before they are supposed to bend (for a real time view of this, watch the included video below).

Figure 2: Becky demonstrates an early arm pull (notice the bent elbows), which we don’t want.

The problem with bent arms is that they are deformable, i.e., they can change shape. If you’re Babe Ruth, and you want to hit a baseball, you want to do so with a bat - a rigid, non-deformable object. You don’t want to hit a baseball with a pool noodle because, no matter how strong or fast you are, you can’t effectively transfer that power into the baseball through a squishy pool noodle.

Likewise, during a clean (or snatch) you are trying to take all the power generated in your legs and hips and transfer it through your (hopefully) rigid spine and then down through your long, straight arms into the barbell. If your back isn’t rigid or if the arms aren’t straight, then those structures are deformable, which means they can absorb some of the power you’re trying to transmit to the bar. We don’t want this, so let’s cover some cues to solve this problem.

Cue #1: Long arms (or “straight arms”)
The first cue we’re going to use is the simplest approach. Just cue yourself “long arms” or “straight arms” (or even “straight elbows”). If this works, don’t make it any more complicated. The goal was long, straight arms, so we cued exactly that.

Cue #2: Flex your triceps (or “tight triceps”)
The job of the triceps is to extend (i.e., straighten) the elbow, so if you cue yourself to flex your triceps or tighten your triceps, then your elbows will be nice and straight, which is exactly what we’re looking for.

Cue #3: Shrug
If the first two cues don’t work, try cueing yourself to shrug at the top of the pull (i.e., the top part of the clean where your knees and hips are straight and you’re up on your toes - the top of the “jump”). A shrug is inherent to the movement anyway, but reminding yourself to aggressively shrug at the top of the clean will often solve a bent arm situation (very few people shrug with bent arms).

Cue #4: Leave it on the floor
This one requires some explanation before you actually try it out. The idea here is that you are endeavoring to have such long arms, straight arms that - even though you’re moving upward as you pull the bar off the floor - you are simultaneously trying to leave the bar on the floor. You’re trying to actively stretch your arms out so that, even while standing up, you’re trying to keep the bar down on the floor. It’s obviously an exaggerated mental picture - kind of a “go, go, Gadget-arms!” type of situation - but the cue itself shortens up to “leave it on the floor,” and it tends to work quite well.

We hope these cues help, and as always, we hope this helps you get stronger and live better!

(Some links may be affiliate links. As an Amazon Associate, Testify earns from qualifying purchases.)

If you found this helpful, you’ll love our weekly email. It’s got useful videos, articles, and training tips just like the one in this article. Sign up below, and of course, if you don’t love it, you can unsubscribe at any time.


At Testify, we offer small group training, private coaching (in-person or remotely via Zoom), online coaching, and form checks. Would you like to get quality coaching from a Starting Strength Coach?

click here to start today

Week 2021.11.29

Reminder: Please note that the gym will be closed for training this Saturday (12/04/21) as we are hosting the annual Testify Christmas Classic weightlifting meet.

2nd Reminder: The annual Testify Christmas Party is this Saturday after the meet (roughly 4:30 p.m.-ish). Please bring a dish to share as well as a drink. Click here for the food sign-up sheet (for bringing a main dish vs a side vs a dessert).

This Week’s Conditioning

Option 1
Sled Pyramid – 4, 5, or 6 tiers
Go up and down a 4, 5, or 6 tier “sled pyramid” – rest as needed. The distance for each round is 80 m indoors (a down-back on the 40m course) or 200 ft outdoors (2 down-backs on the 50 ft course). Rest as needed.

For example, Bob does the following (4 tiers):
Round 1: Empty sled
Round 2: 25#
Round 3: 50#
Round 4: 75#
Round 5: 50#
Round 6: 25#
Round 7: Empty sled

Compare to 2021.09.27.

Option 2
Bike/row:
4 x 800m

Rest 3 minutes between each round. Score = slowest time.

Compare to 2021.09.06.

Option 3
Outdoors:
10 rounds:
25 yd yoke carry
Rest 1 minute

Indoors:
10 rounds:
30 yd yoke carry (15 yd down-back)
Rest 1 minute

Compare to 2021.08.09.

Option 4
10 x 50 ft farmer carry
Each carry is 25 ft down and 25 ft back and is for time. Rest 1 minute between carries.

Women: 97# per handle (80# of plates)
Men: 137# per handle (120# of plates)
(Note: Each handle weighs 17#.)

Compare to 2021.08.09.

Bench Press with Short Legs or Back Pain?

If you have shorter legs you may find it difficult or simply uncomfortable to keep your feet planted firmly (and flat) on the ground. Let’s fix this.

Having your feet planted flat and firmly to the floor is important because your feet provide lateral stability, i.e., your stance provides side-to-side stability during the bench press because the bench itself is rather narrow. Additionally, having your feet planted firmly on the ground allows you to use your legs to drive up the bench during the movement as well (which provides rigidity in your upper body and also reinforces your arch).

With all this in mind, if you have shorter legs - specifically shorter lower legs (i.e., your shins or shanks) - and if you find that your heels are coming up off the ground, then simply stack a bumper plate or two underneath each foot.

You can use wooden blocks or rubber mats instead of bumper plates, but whatever you use, your new “foot platform” needs to provide a non-slip surface that is high enough that you can keep your feet flat and firmly on that surface. A reasonable benchmark (get it?) is to create a platform high enough that your thighs are roughly parallel to the ground.

The use of such a platform can also be a good tactic if you experience some low back discomfort or pain when you lie down on the bench. This can occur with people with shorter legs due to the excessive arch needed to reach their feet down to the floor, and it can also occur with older people or with people who carry some extra weight.

Jen demonstrates the use of bumper plates to provide an elevated platform for her feet.

If lying down on the bench causes you some discomfort, try raising your feet up a bit by using a platform. If your use of the platform is due to discomfort (and not due to having short legs), you may find that you can reduce the height of your platform over time (e.g., remove a bumper plate from your stack), and you might even get to the point where your feet are flat on the ground again.

We hope this helps you get stronger and live better!

(Some links may be affiliate links. As an Amazon Associate, Testify earns from qualifying purchases.)

If you found this helpful, you’ll love our weekly email. It’s got useful videos, articles, and training tips just like the one in this article. Sign up below, and of course, if you don’t love it, you can unsubscribe at any time.


At Testify, we offer small group training, private coaching (in-person or remotely via Zoom), online coaching, and form checks. Would you like to get quality coaching from a Starting Strength Coach?

click here to start today