EASY Way to Open Your Barbell Packaging | How to Unbox Your New Barbell

Historically speaking, unpackaging a brand new barbell has been a fairly horrific experience. The method covered in this article, however, is going to change your life (better yet, watch the included video for a demonstration).

If you’ve bought a new barbell, you already know what I’m talking about, and if you haven’t bought one but are going to purchase one soon, you’re about to experience this cardboard-and-metal terror.

A new barbell comes in a thick cardboard tube, and it has a metal end cap or insert at each end of the tube. Each manufacturer does things a bit differently, but typically, the end cap will be anchored in place very securely with staples or some other fastener.

On one hand, this is good - you want your barbell safe and unscathed while traveling to you. On the other hand, it’s a pain to open the tube as a result of this packaging. The manufacturer’s recommendation is usually to grab a utility knife, cut along one of the seams in the cardboard tube, and then twist to open the packaging (picture yourself opening a tube of Pillsbury dough, and you’ll get the idea well enough).

Don’t do this. I write - unfortunately - from personal experience, and this is a terrible way to open the packaging.

You can see the torn section where I had started the process with the old “screwdriver-and-pliers” method before looking for a better option.

Many people settle on using a flathead screwdriver to pry the staples open and out a bit, whereupon they use a needle nose pliers (or something similar) to finish pulling out the staples. This method works reasonably well, but it takes a while, which is annoying.

The last time I opened a barbell, I had used this screwdriver-and-pliers method on the first of several staples when I thought I’d take a look on the web and see if anyone had come up with a better method . . . and indeed someone had. This method comes courtesy of Colin Burke and his video, and here’s how to do it:

Step 1
Grab a nail punch and a hammer. A flat head screwdriver will probably work if you don’t have a nail punch.

Note: This is the part where I should tell you not to use a flat head screwdriver for this task as you might damage the screwdriver. With that said, if I didn’t have a nail punch, I would certainly have used a flat head screwdriver.

step 2: Use a hammer and nail punch to tap the staples through.

Step 2
Set the tip of the nail punch on top of a staple and then use the hammer to tap that staple several times until the staple has broken through the cardboard (at which point it is no longer anchoring the end cap to the cardboard tube). Repeat this process with all of the staples.

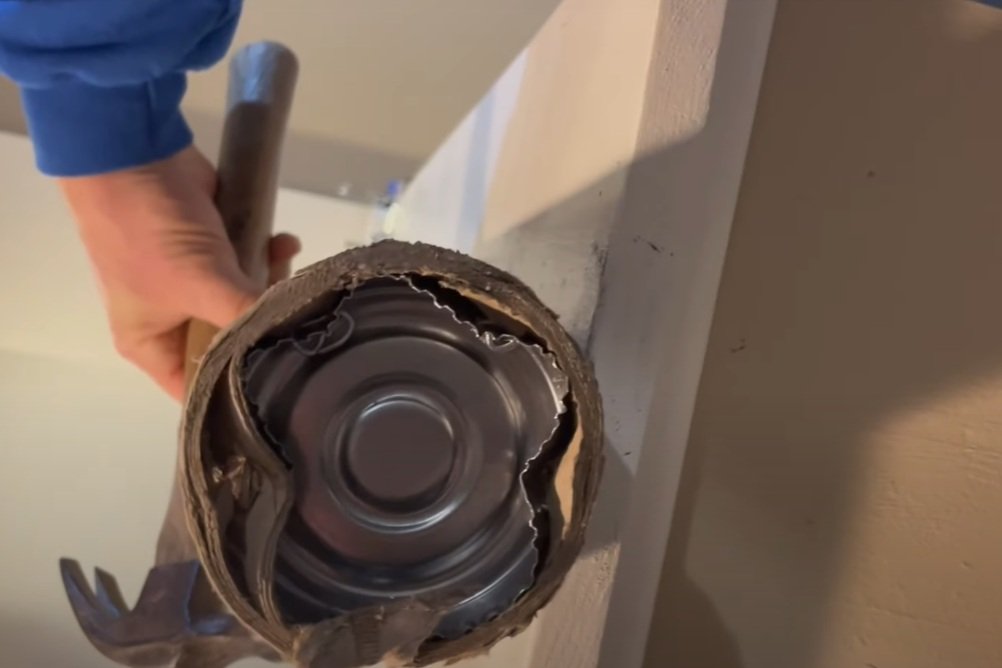
After step 2, all staples have been pounded through.

Step 3
Once the staples have all been pounded through, the end cap is still wedged into place but is no longer attached to the tube, so use a pliers (needle nose pliers or otherwise) and simply pull the end cap out.

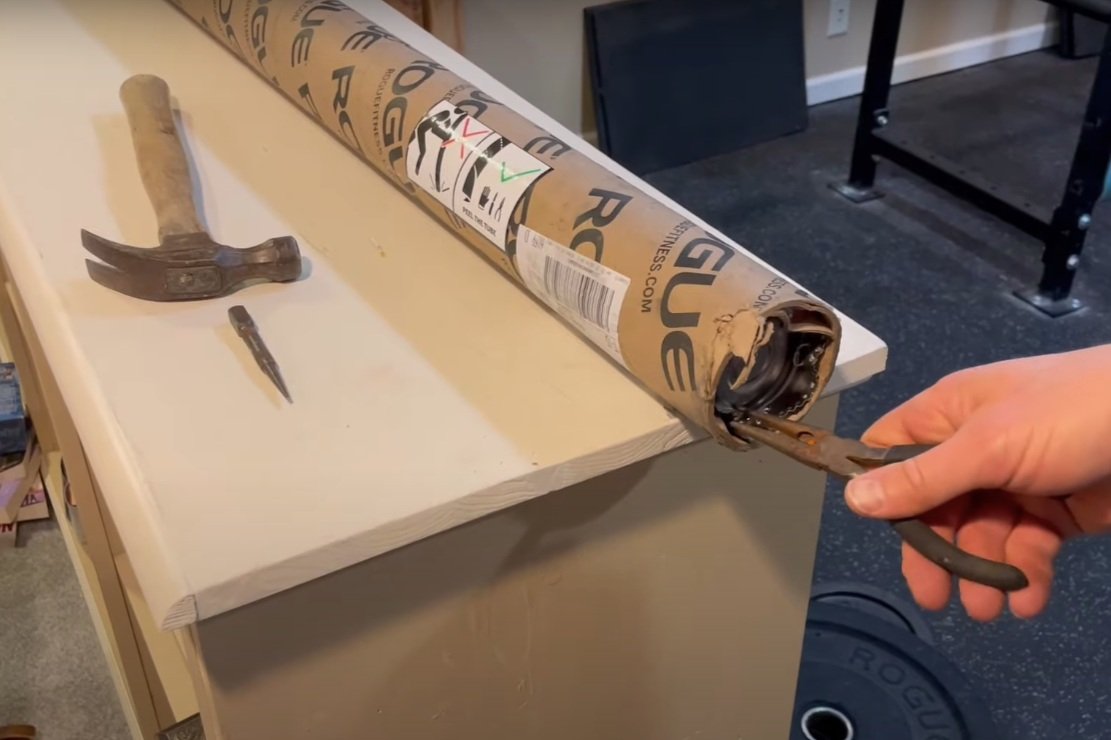
step 3: Use pliers to pull out the end cap

Step 4
Set the open end of the cylinder on the floor, lift up the other end, and pull the tube up and back until the barbell is completely out of the packaging (don’t let the bar drop to the floor).

Step 4: allowing barbell to slide out of tube

This process requires only a few tools, it’s quick, and most importantly - it’s easy. After unpackaging a barbell with this method, you’ll never go back to the cut-and-twist and screwdriver-and-pliers methods again.

As always, we hope this helps you get stronger and live better.

(Some links may be affiliate links. As an Amazon Associate, Testify earns from qualifying purchases.)

If you found this helpful, you’ll love our weekly email. It’s got useful videos, articles, and training tips just like the one in this article. Sign up below, and of course, if you don’t love it, you can unsubscribe at any time.


At Testify, we offer small group training, private coaching (in-person or remotely via Zoom), online coaching, and form checks. Would you like to get quality coaching from a Starting Strength Coach?

EASY Way to Put on Tight & Stiff Knee Sleeves (TWO TIPS)

What's the easiest way to put on knee sleeves - especially sleeves that are tight and stiff as with brands like SBD, Stoic, and Pioneer? Starting Strength Coach Phil Meggers gives you tactics to help you save your energy for . . . you know - actually training.


At Testify, we offer small group training, private coaching (in-person or remotely via Zoom), online coaching, and form checks. Click the button below to get quality coaching from a Starting Strength Coach and start getting stronger TODAY.

12 Pieces of Lifting Gear to THROW AWAY (and What to Replace Them With)

What pieces of weight lifting equipment would gym owner and Starting Strength Coach Phil Meggers throw away and what would he replace them with?


At Testify, we offer small group training, private coaching (in-person or remotely via Zoom), online coaching, and form checks. Click the button below to get quality coaching from a Starting Strength Coach and start getting stronger TODAY.

Lifting Gear: What to Wear and What NOT to Wear!

The topic of what to wear when training seems rather straightforward at first - you just put on a shirt, put on some shoes, probably put on some shorts as well, and you're good to go, right?

Not so fast. There’s a host of potential bad decisions to be made here, so let’s briefly (get it?) address a few considerations to help you train more effectively.

This is the first article in our “Lifting Gear” series, so be sure to check back in the coming weeks for future articles in the series.

Shirts
Whether you choose a t-shirt, a long-sleeved shirt, or a sweatshirt, they’re all fine, but the big takeaway here is cotton. Cotton is your best friend when it comes to training, and specifically, you don’t want a technical shirt, which is the type of shirt made from moisture-wicking material.

Tech shirts are great for running, playing basketball, etc., but they are terrible for lifting because the material itself tends to be rather slick. You want excellent friction between you and the barbell when squatting and cleaning, and you again want significant friction between you and the bench when bench pressing, and a tech shirt is simply awful in this regard. Wear cotton.

Additionally, if you’re squatting, benching, cleaning, or jerking (perhaps pressing as well), don’t wear a tank top. Humans are sweaty and oily when they train, and you don’t want your sweaty, oily, and therefore slick shoulders in contact with the bar or the bench when you train. Friction is important, so don’t wear a tank top. Unless you’re performing curls - tank tops are then, of course, mandatory.

Pants
Sweatpants, shorts, leggings - all of these are acceptable. You do, of course, want to make sure they allow you to move freely and don’t bind up on you, so if you’re wearing shorts, don’t wear shorts so long that they come to or below your knees. Shorts of this length tend to bind up at the knees when squatting (and should be reserved for 14-year-old male basketball players anyway), so they’re a bad choice.

the power diaper - Eat your heart out, people.

With that said, if your shorts are long, you can either roll them up a bit at the waistband or hike them up like I do and embrace the “power diaper” look (Figure 1). Granted, my shorts aren’t actually that long - I simply prefer the power diaper.

Socks
For the most part, any pair of athletic socks will do when training. The length of the sock doesn’t matter . . . unless you’re deadlifting, snatching, or cleaning. When pulling from the floor, you want to keep the bar as close as possible, but you also don’t want to nick your shins with the bar. Shins bleed easily, so I recommend wearing long socks if you’re not already wearing sweatpants or leggings.

By “long socks,” I mean over-the-calf-just-below-the-knee long socks. Don’t skimp here - once you’ve caught your shin with the bar, bled, and developed a scab, it’s extremely easy to break that scab open again during subsequent training sessions, and as a result, you won’t be as efficient at keeping the bar close to you (it might be a subconscious effect, but it’s a real effect, nonetheless).

Shoes
Wear lifting shoes. The most important feature of a lifting shoe is the rigid, nondeformable sole, which is extremely useful and efficient for force transfer. Regular shoes are great for walking and running but terrible for lifting - they are squishy and akin to lifting while standing on pillows. We have several videos that cover lifting shoes in depth, and I’d recommend watching one of those for more information.

Also, don’t lift in Chuck Taylors. A Chuck Taylor is not a lifting shoe. A Chuck Taylor is the shoe for someone who started thinking about lifting shoes but never completed the thought. Don’t lift in your squishy Chucks - you’re better than that.

As always, we hope this helps you get stronger and live better.

(Some links may be affiliate links. As an Amazon Associate, Testify earns from qualifying purchases.)

If you found this helpful, you’ll love our weekly email. It’s got useful videos, articles, and training tips just like the one in this article. Sign up below, and of course, if you don’t love it, you can unsubscribe at any time.


At Testify, we offer small group training, private coaching (in-person or remotely via Zoom), online coaching, and form checks. Would you like to get quality coaching from a Starting Strength Coach?

Don't be a Noob: Loading the Bar

(A Blast from the Past article originally posted on 01/06/19)

You have probably noticed (hopefully!) that whenever we load metal plates on a barbell, we always load them so that the numbers printed on the plates face inward (Figure 1), i.e., the numbers of the plates on one end of the bar can “see” the numbers of the plates on the other end of the bar.

figure 1: ted demonstrates the proper method of plate loading on his 405 lb squat.

You may also have wondered to yourself, “Self, why do we always load the plates this way?”

We briefly allude to the primary rationale for this method of loading on everyone’s first day at Testify, but in case you’ve forgotten, let’s chat.

Each metal plate has a lip - a ledge - that makes grasping the plate easier. Loading a plate with the lip facing inward (i.e., away from you) allows your fingers to grasp the plate in a very secure manner. This secure grip is important since the most common injury in a weight room is not a back injury, it’s not a knee injury, and it’s not a wrist injury - it’s a broken toe (or other bone in the foot) caused by dropping a plate on one’s foot.

Every plate is easier to grasp with the numbers facing inward rather than outward, and this is especially true for the 25 lb and 45 lb plates, which - dropped from even a few inches up in the air - are superbly unforgiving to one’s tarsals, metatarsals, and phalanges (mind you, dropping the smaller plates can have some nasty effects as well). With this in mind, we always load the plates with the numbers facing inward.

What about the bumper plates, you say? Bumper plates have a lip on both sides (albeit a rather small one), so load them as you please. There’s no rules!

(Some links may be affiliate links. As an Amazon Associate, Testify earns from qualifying purchases.)

If you found this helpful, you’ll love our weekly email. It’s got useful videos, articles, and training tips just like the one in this article. Sign up below, and of course, if you don’t love it, you can unsubscribe at any time.


At Testify, we offer small group training, private coaching (in-person or remotely via Zoom), online coaching, and form checks. Would you like to get quality coaching from a Starting Strength Coach?

The Best Barbell Collars? (They're Not What You Think)

You've got a lot of options for barbell collars out there, but how about one that's simple, cheap, effective, and easy to use? Look no further.

(A Blast from the Past video originally published on 04/23/22)


At Testify, we offer small group training, private coaching (in-person or remotely via Zoom), online coaching, and form checks. Click the button below to get quality coaching from a Starting Strength Coach and start getting stronger TODAY.